
Popular categories
Looking for a yarn?


Comments / Questions (200)
![]() Guinevere Phaneuf wrote:
Guinevere Phaneuf wrote:
On the pattern it say for the back piece too decrease 22 stitches evenly over the stitches in diagram A.1 A.2 And A.3 but this wouldn't be the back piece it would be the front
04.01.2020 - 17:02DROPS Design answered:
Dear Mrs Phaneuf, on back piece you cast off all stitches while decreasing stitches to keep correct width. On front piece, you will first slip middle stitches on a thread for neck, the work both shoulders separately before casting off sts (while decreasing to keep correct width). Happy knitting!
06.01.2020 - 08:02
![]() Nicola Moncur wrote:
Nicola Moncur wrote:
I dont understand the bind off for the end of the sleeve AT THE SAME TIME as 8 of these 19 ( does this mean the last of the 19 ) what does 2 and 2 before bind off, 3 stitches 1 time 2 stitches 1 time mean
03.01.2020 - 19:28DROPS Design answered:
Hello Nicola! It means you decrease 8 sts by knitting 19 sts 2 tog. Then you continue binding off rest of the sts as it says in the pattern. Happy knitting!
03.01.2020 - 23:53
![]() Oudinet Michelle wrote:
Oudinet Michelle wrote:
Bonjour, en ce qui concerne les diagrammes le A2 a 2 rangs de plus que les A1 et A3 . Comment fait on pour les rangs qui on moins de rangs . C'est a dire pour les rangs 19 et 20 du A1 que fait on pour les A1 et A2 doit on reprendre au 1er rang ? Merci bien
21.12.2019 - 12:10DROPS Design answered:
Bonjour Mme Oudinet, quand vous avez terminé A.3 en hauteur, reprenez au 1er rang, et continuez A.2 comme avant; autrement dit, quand vous les 2 derniers rangs du 1er A.2 en hauteur, vous tricotez les 2 premiers rangs du 2ème A.3. Répétez les diagrammes ainsi en hauteur, pour qu'ils s'alignent eux mêmes les uns au-dessus des autres. Bon tricot!
02.01.2020 - 09:30
![]() Nicola Moncur wrote:
Nicola Moncur wrote:
Which size pattern do I knit fpr a 38 - 39 inch chest is it M or L ?
18.12.2019 - 16:42DROPS Design answered:
Hello Nicola! Measurements on the diagram are given for finished jumper. If you don't want a very fitted jumper, make size L. Happy knitting!
18.12.2019 - 18:59
![]() Marie Line wrote:
Marie Line wrote:
Je ne comprends pas la fin du dos : rabattre en diminuant en même temps 20 mailles a intervalles réguliers au dessus.....et que fait on des autres mailles et comment termine t\'on ? Merci de votre réponse
15.11.2019 - 06:37DROPS Design answered:
Bonjour Marie-Line, pour que la largeur du dos soit juste et pas trop large (à cause des torsades), on doit rabattre les mailles en diminuant 20 m dans les torsades comme on le montre dans cette vidéo. Bon tricot!
15.11.2019 - 08:59
![]() Crebassa wrote:
Crebassa wrote:
Pull Siberia: Je ne comprends pas la fin de l explication des manches: Rabattre 19 mailles en même temps tricoter 8 mailles et les rabatte puis encore 3 mailles et 2 mailles ensuite il doit rester 16 mailles je ne comprends pas comment on arrive à ce nombre!!! Merci
10.11.2019 - 20:10DROPS Design answered:
Bonjour Mme Crebassa, vous rabattez les 19 premières mailles en diminuant 8 m en même temps - voir vidéo = il reste 22 m. Puis vous rabattez 1 x 3 m et 1 x 2 m = 22-3-2= 17 m; tricotez 3 rangs sans diminuer et rabattez 1 m au début du rang suivant = il reste 16 m. Bon tricot!
11.11.2019 - 11:31
![]() Gitte Andreaden wrote:
Gitte Andreaden wrote:
Ærme Glatstrik over de første 6 masker, strik A.4 over de næste 42 masker, strik første maske i A.4, 6 masker glatstrik Betyder det at man skal tage 6 masker ud 1 gang i den første maske i mønsteret? Eller hver gang man starter på mønsteret?
03.11.2019 - 20:41DROPS Design answered:
Hej Gitte, Nej! Du har 55 masker, strikker 6 masker glatstrik på hver side af mærket midt under ærmet, og du tager 1 maske ud på hver side af mærket, de nye masker strikkes i glatstrik. Den ekstra maske (=43m i A.4) som strikkes i A.4 er kun for at mønsteret skal blive ens i begge sider :)
05.11.2019 - 09:58
![]() Anne Louise Grønnemose wrote:
Anne Louise Grønnemose wrote:
I forstykket er der to steder hvor er kun er 6 og ikke 7 størrelser (10-10-10-12-12-12 og 30-30-30-36-36-36). Siden jeg strikker str L plejer jeg at tage den midterste størrelse, men jeg ved ikke hvad jeg skal gå efter her..?
27.09.2019 - 12:04DROPS Design answered:
Hej Anne Louise, det er den største størrelse som mangler. Vi har lagt en rettelse ud. Tak for info :)
27.09.2019 - 14:52
![]() Desharbes Veronique wrote:
Desharbes Veronique wrote:
Pour ce modèle, les diagrammes indiquent que les rangs endroit où les rangs endroit et rangs envers, merci de me donner la réponse Cordialement. Mme Desharbes
22.09.2019 - 19:29DROPS Design answered:
Bonjour Mme Desharbes, les diagrammes montrent tous les rangs: ceux sur l'endroit aussi bien que ceux sur l'envers, mais vus sur l'endroit - cf notre FAQ. Bon tricot!
23.09.2019 - 09:34
![]() Petronelle wrote:
Petronelle wrote:
Hej, jeg er i gang med at strikke ærmerne til blusen, men jeg kan ikke få mønsteret til at stemme. Skal jeg strikke 1. rapport i A.4 på 1. omgang, 2. rapport på 2. omgang osv.? Derudover, skal udtagningerne strikkes i glatstrik, eller får man flere masker, som skal strikkes efter A.4?
11.08.2019 - 13:57DROPS Design answered:
Hej Petronelle, du strikker ærmet rundt på strømpepinde/rundpind strikker A.4 over de midterste masker på ærmet, alle andre masker strikkes i glatstrik også de nye du tager ud midt under ærmet. Første omgang i A.4 strikkes maskerne skiftevis ret og vrang, næste omgang strikkes ret (glatstrik), 3.omgang skiftevis ret og vrang igen og så videre. God fornøjelse!
03.10.2019 - 14:02
|
||||||||||||||||||||||
Siberia#siberiasweater |
||||||||||||||||||||||
 |
 |
|||||||||||||||||||||
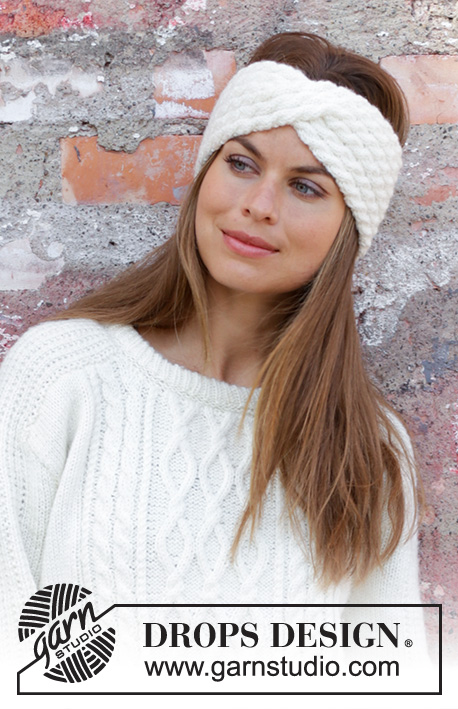
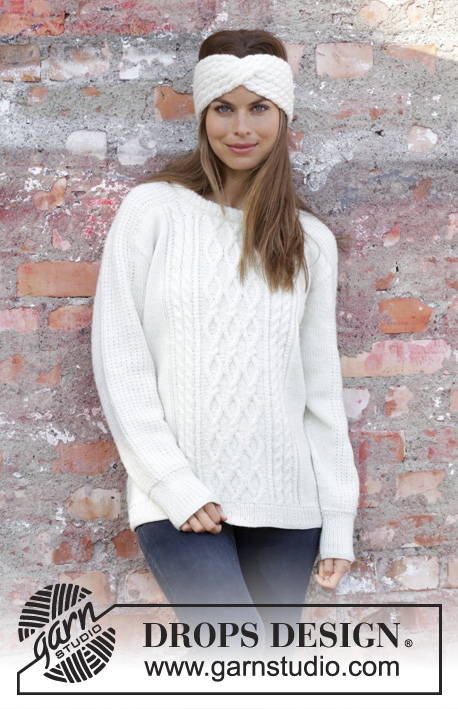
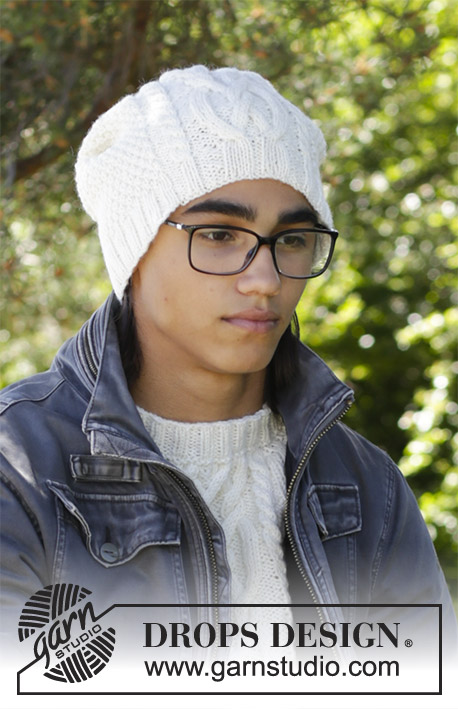
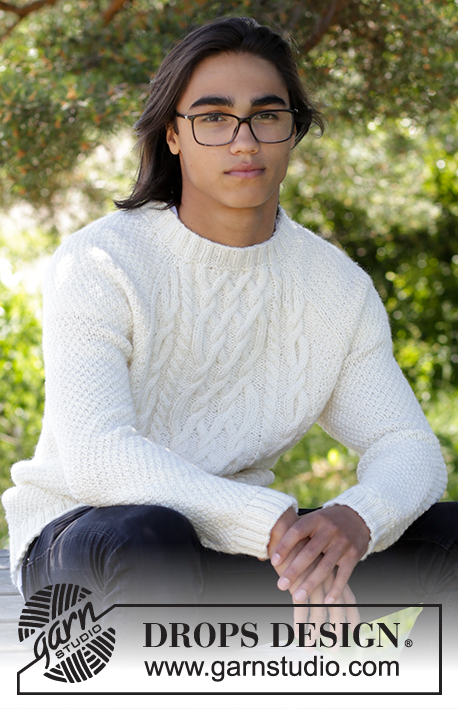
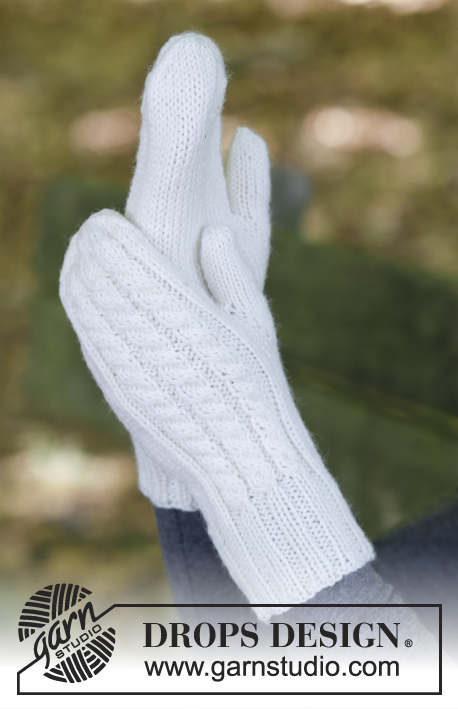
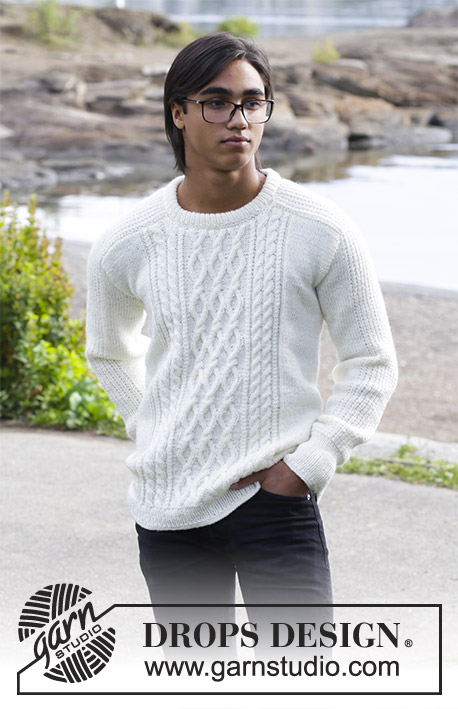
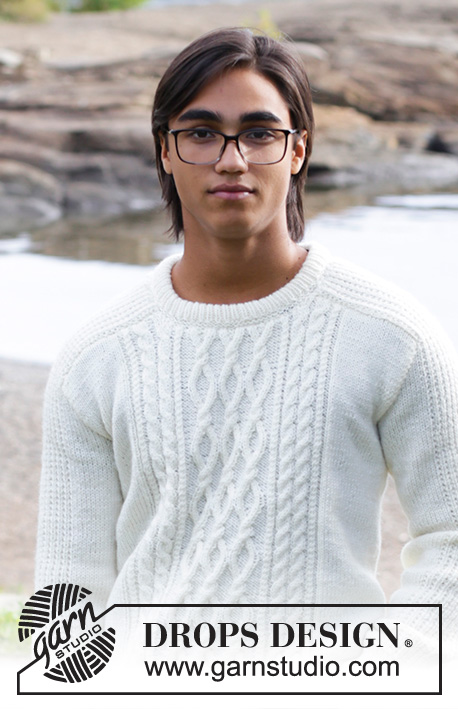
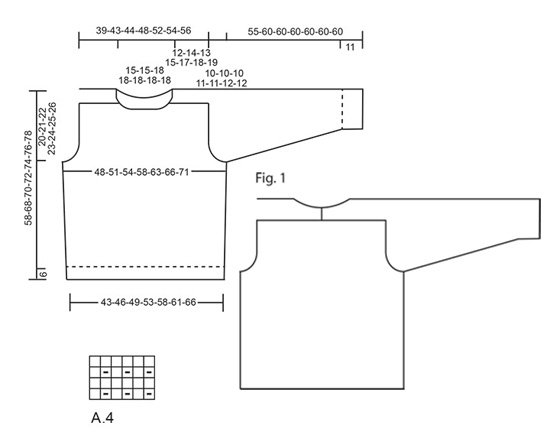
Men’s knitted jumper with cables. Sizes 13/14 years – XXXL. The piece is worked in DROPS Merino Extra Fine.
DROPS 185-2 |
||||||||||||||||||||||
|
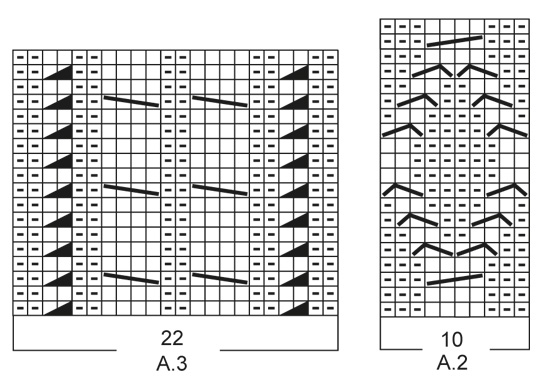
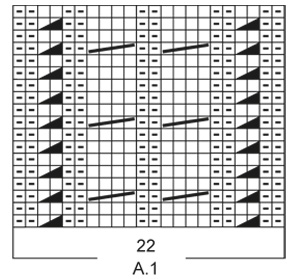
INFORMATION FOR THE PATTERN: RIDGE/GARTER STITCH (worked in the round): 1 ridge = 2 rounds. Knit 1 round and purl 1 round. PATTERN: See diagrams A.1 to A.4. The diagrams show all the rows in the pattern seen from the right side. INCREASE/DECREASE TIP (evenly spaced): To work out how to increase/decrease evenly, count the total number of stitches on the needle (e.g. 218 stitches) and divide by the number of increases/decreases to be made (e.g. 10) = 21.8. In this example, increase alternately after approx. every 21st and 22nd stitch by making 1 yarn over. On the next round, work the yarn overs twisted to avoid holes. If you are decreasing (in this example) knit together alternately approx. every 20th and 21st stitch and every 21st and 22nd stitch. INCREASE TIP (for sides in body and sleeves): Start 1 stitch before the marker, make 1 yarn over, knit 2 (the marker sits in the middle of these two stitches), make 1 yarn over. On the next round knit the yarn overs twisted to avoid holes. The new stitches are subsequently worked in stocking stitch. CASTING OFF TIP: Decrease 1 stitch at the same time as casting off as follows: Knit 2 stitches together, knit 1 stitch, pass over (cast off) (= 1 extra stitch decreased). ---------------------------------------------------------- JUMPER – SHORT OVERVIEW OF THE PIECE: The sleeve is worked upwards, continued onto the shoulder and along the neck, top back. The neck-stitches at the top of the sleeve are decreased towards the front piece and a small section of the sleeve is continued along the top of the back piece and later sewn together mid-back, so the neck is higher at the back than at the front – see Fig.1. ---------------------------------------------------------- JUMPER: The piece is worked in the round with circular needle as far as the armholes, then the front and back pieces are worked back and forth separately. The sleeves are worked in the round with double pointed needles as far as the armholes, then the sleeves are worked back and forth. To finish, the sleeves are sewn into the armhole and shoulders on front and back pieces. BODY: Cast on 218-230-246-264-280-298-314 stitches with circular needle size 3.5 mm and Merino Extra Fine. Work 2 RIDGES – see description above! Then work rib (knit 1 /purl 1). When the piece measures 5 cm work 1 ridge, AT THE SAME TIME as you increase 10-10-10-12-12-14-14 stitches evenly on the first round – read INCREASE/DECREASE TIP= 228-240-256-276-292-312-328 stitches. Insert 2 markers in the piece, one at the beginning of the round and one after 114-120-128-138-146-156-164 stitches (= in each side). Change to circular needle size 4 mm and work PATTERN as follows – see description above: * Work 20-23-27-27-31-31-35 stitches stocking stitch, A.1 (= 22 stitches), A.2 (= 10 stitches) over the next 30-30-30-40-40-50-50 stitches (= 3-3-3-4-4-5-5 repeats in width), A.3 (= 22 stitches), 20-23-27-27-31-31-35 stitches stocking stitch, the marker sits here *, work from *-* 1 more time. REMEMBER THE KNITTING TENSION! Continue the pattern and repeat the charts in height. When the piece measures 9 cm increase 1 stitch on both sides of the markers in each side – read INCREASE TIP (= 4 stitches increased). Increase in this way every 6-8-8-9-9-9-10 cm a total of 5 times = 248-260-276-296-312-332-348 stitches. When the piece measures 38-47-48-49-50-51-52 cm cast off 6 stitches for the armhole in each side (cast off 3 stitches on both side of the markers in each side) and continue each piece separately. BACK PIECE: = 118-124-132-142-150-160-168 stitches. The piece is worked back and forth with circular needle. Continue with pattern, stocking stitch and 1 edge stitch in garter stitch in each side, AT THE SAME TIME continue to cast off for armhole at the beginning of each row in each side as follows: 2 stitches 3-3-4-4-4-4-5 times and 1 stitch 1-0-1-1-2-2-2 times = 104-112-114-124-130-140-144 stitches. When the piece measures 49-59-61-63-65-67-69 cm cast off, AT THE SAME TIME as you decrease 20-20-20-22-18-24-24 stitches evenly over the stitches in diagrams A.1, A.2 and A.3 – read CASTING OFF TIP. FRONT PIECE: = 118-124-132-142-150-160-168 stitches. Continue with pattern, stocking stitch and 1 edge stitch in garter stitch, AT THE SAME TIME as cast off for armhole as for back piece = 104-112-114-124-130-140-144 stitches. When the piece measures 46-56-58-60-62-64-66 cm decrease 10-10-10-12-12-12-12 stitches evenly over the middle 40-40-40-48-48-48-48 stitches before these stitches are placed on a thread for the neck (= 30-30-30-36-36-36-36 stitches on thread). The shoulders are now finished separately. On the next row from the neck cast off 2 stitches = 30-34-35-36-39-44-46 stitches. When the piece measures 49-59-61-63-65-67-69 cm (adjust to match the back piece) cast off, AT THE SAME TIME as you decrease 5-5-4-5-3-6-6 stitches evenly over the 15-15-15-16-16-21-21 stitches towards the neck – remember CASTING OFF TIP. Work the other shoulder in the same way. RIGHT SLEEVE: The piece is worked in the round with double pointed needles. Cast on 56-58-60-62-64-66-68 stitches with double pointed needles size 3.5 mm and Merino Extra Fine. Work 2 ridges. Then work rib (= knit 1 /purl 1) until the piece measures 10 cm. Work 1 ridge, AT THE SAME TIME as you decrease 5 stitches evenly on row = 51-53-55-57-59-61-63 stitches. Insert 1 marker at the beginning of the round. Change to double pointed needles size 4 mm and work pattern on the next round as follows: Stocking stitch over the first 4-5-6-7-8-9-10 stitches, work A.4 over the next 42 stitches, work the first stitch in A.4, 4-5-6-7-8-9-10 stitches stocking stitch. Continue this pattern upwards. AT THE SAME TIME when the piece measures 13-12-13-12-12-14-13 cm increase 1 stitch on each side of the marker – remember INCREASE TIP! Increase in this way every 2-2½-2-2-2-1½-1½ cm a total of 14-15-16-17-18-19-20 times = 79-83-87-91-95-99-103 stitches. When the piece measures 45-50-50-49-49-48-48 cm cast off 6 stitches mid under the sleeve (cast off 3 stitches on each side of the marker). Then work back and forth on the needle AT THE SAME TIME as you cast off for sleeve cap at the beginning of each row in each side as follows: 2 stitches 2-4-6-7-9-10-12 times and 1 stitch 12-10-8-8-6-6-4 times = 41 stitches left in all sizes. The piece measures 55-60-60-60-60-60-60 cm. NOW YOU MEASURE THE PIECE FROM HERE! Continue with pattern over the remaining stitches until the piece measures 12-14-13-15-17-18-19 cm. Then you cast off at the beginning of each row from the right side as follows: 19 stitches 1 time AT THE SAME TIME as 8 of these 19 stitches are knitted together 2 and 2 before they are cast off, 3 stitches 1 time, 2 stitches 1 time. Work 3 rows without decreases. Cast off 1 stitch on the next row = 16 stitches left in all sizes. Continue working until the piece measures 19-21-22-24-26-27-28 cm. The whole sleeve measures approx. 74-81-82-84-86-87-88 cm. LEFT SLEEVE: Worked as for right sleeve, but decreases at top are worked in opposite side, i.e. at the beginning of every row from the wrong side. ASSEMBLY: Sew the sleeves together mid back inside the cast off edge of each sleeve. Sew the sleeves to front and back piece on body in the outermost stitch as follows: Sew from the armhole and up along shoulder on back piece to mid back. Repeat on the other side. Sew in that same way from armhole and up along shoulder to the neck on the front piece. Repeat on the other side. NECKLINE: Knit up 94-94-108-108-108-108-108 stitches around the neck (including the stitches from the thread) with short circular needle size 3.5 mm and Merino Extra Fine. Work 2 ridges, AT THE SAME TIME as you increase on the last round 22-22-26-26-26-26-26 stitches evenly = 116-116-134-134-134-134-134 stitches. Then work rib (= knit 1 /purl 1). When the rib measures 8 cm work 1 ridge. Cast off. Fold the neck double and fasten on the inside, ridge to ridge. |
||||||||||||||||||||||
Diagram explanations |
||||||||||||||||||||||
|
||||||||||||||||||||||
 |
||||||||||||||||||||||
 |
||||||||||||||||||||||
 |
||||||||||||||||||||||
Have you finished this pattern?Tag your pictures with #dropspattern #siberiasweater or submit them to the #dropsfan gallery. Do you need help with this pattern?You'll find 30 tutorial videos, a Comments/Questions area and more by visiting the pattern on garnstudio.com. © 1982-2026 DROPS Design A/S. We reserve all rights. This document, including all its sub-sections, has copyrights. Read more about what you can do with our patterns at the bottom of each pattern on our site. |
||||||||||||||||||||||


With over 40 years in knitting and crochet design, DROPS Design offers one of the most extensive collections of free patterns on the internet - translated to 17 languages. As of today we count 324 catalogues and 12290 patterns translated into English (UK/cm). 12290
We work hard to bring you the best knitting and crochet have to offer, inspiration and advice as well as great quality yarns at incredible prices! Would you like to use our patterns for other than personal use? You can read what you are allowed to do in the Copyright text at the bottom of all our patterns. Happy crafting!
Post a comment to pattern DROPS 185-2
We would love to hear what you have to say about this pattern!
If you want to leave a question, please make sure you select the correct category in the form below, to speed up the answering process. Required fields are marked *.