
Popular categories
Looking for a yarn?


Comments / Questions (200)
![]() Giulia wrote:
Giulia wrote:
Nella manica ad un certo punto dice di "Lavorare 1 costa a legaccio e, ALLO STESSO TEMPO, diminuire 5 maglie a intervalli regolari = 51-53-55-57-59-61-63 maglie. Inserire 1 segno all’inizio del giro. Passare ai ferri a doppia punta n° 4 e sul giro successivo, lavorare il motivo come segue: Maglia rasata sulle prime 4.. maglie" la maglia rasata sarà quindi a rovescio come il secondo giro della costa a legaccio?
23.11.2020 - 10:38DROPS Design answered:
Buonasera Giulia, questo modello è lavorato in tondo: la maglia rasata si lavora a diritto su tutti i giri. Buon lavoro!
23.11.2020 - 22:00
![]() Malin Aune wrote:
Malin Aune wrote:
Hei! jeg holder på med avfellingen til bakstykket, og det er litt ulike ting som forvirrer meg. på bildet av genserens deler, som ligger ovenfor mønsteret, ser det ut til at det felles rett av, men oppskriften forvirrer meg, med tanke på at man skal felle masker samtidig som man feller av. Skal altså da maskene strikkes sammen to og to, jevnt fordelt, også felles av? Det hadde vært fint om det var et bildet av den ferdige genseren bakfra også. Det er en fin genser og en super utfordring!
03.11.2020 - 19:49
![]() Anne Whelan wrote:
Anne Whelan wrote:
Thank you!
01.11.2020 - 15:00
![]() Anne Whelan wrote:
Anne Whelan wrote:
Orry but this doesn't answer my question. I decreased on both ends of the RS and both ends of the WS. But the piece does not measure as it should. It is too short. Should I only decrease at the beginning of the RS and the beginning of the WS? NOT the beginning and end of both sides? Thanks for your help. Anne Whelan
29.10.2020 - 10:54DROPS Design answered:
Dear Mrs Whelan, you should cast off at the beginning of every row, both from RS and from WS, ie in 4th size you cast off 2 sts on each side a total of 7 times, this means you will cast off 2 stitches at the beginning of next 14 rows. (you won't decrease nor cast off at the end of the rows) Hope this will help. Happy knitting!
29.10.2020 - 13:53
![]() Anne Whelan wrote:
Anne Whelan wrote:
At 49cm after casting off 6 stitches across the marker I cast off as I understood until 41 stitches remained but the piece only measured approximately 53cm. My understanding of the decrease for the cap sleeve is obviously incorrect. Could you clarify for me please?
26.10.2020 - 20:06DROPS Design answered:
Dear Mrs Whelan, make sure you cast off the same number of stitches on each side for your size - you have to cast off at the beg of each row on each side = from RS as well as from WS. Happy knitting!
27.10.2020 - 13:03
![]() Maureen Leon wrote:
Maureen Leon wrote:
No entiendo cómo se remata AL MISMO TIEMPO que se disminuye? Podrían explicar paso a paso por favor? Gracias!
19.10.2020 - 21:27DROPS Design answered:
Hola Maureen. Tienes las explicaciones sobre cómo hacer al mismo tiempo la disminución y el cierre de los puntos en el TIP PARA EL REMATE, que tienes en el apartado INFORMACIÓN PARA REALIZAR EL PATRÓN.
02.11.2020 - 19:35
![]() Meron wrote:
Meron wrote:
Can you please give measurements according to your sizing. I can't seem to find the chest measurements for small, medium etc sizing of this pattern thanks in advance
13.08.2020 - 04:32DROPS Design answered:
Hi Meron, You will find a diagram, with all the measurements, at the bottom of the page. Happy knitting!
13.08.2020 - 07:11
![]() Pat wrote:
Pat wrote:
Can you tell me is the pattern also on the back of the jumper or only on the front?
07.08.2020 - 04:07DROPS Design answered:
Hi Pat, The pattern is on both the front and the back. Happy knitting!
07.08.2020 - 08:02
![]() Jenny wrote:
Jenny wrote:
I have managed to finish the sleeve caps but am struggling to set the sleeves with the saddle into the body of the jersey. How do I sew in the corners where the right angles of the body meet the saddle? This part does not lie flat and puckers, almost as though the corner is too big and needs to be curved to fit in? Apart from this problem the jersey looks pretty, this problem makes it look less than perfect. Many thanks, Jenny
30.07.2020 - 13:55DROPS Design answered:
Dear Jenny, the sleeves should fit the armholes/straight edges on front/back piece - try to pin it carefully before sewing could help. Happy finishing!
30.07.2020 - 15:42
![]() Jenny Walsh wrote:
Jenny Walsh wrote:
How do you interpret the binding off off the sleeve top (from 19 stitches)? I do not understand the instructions.
29.07.2020 - 10:27DROPS Design answered:
Dear Jenny, You knit the fist stitch, then, you knit together the 2 following stitches and pass the fist stitch over the 2 stitches that were knitted together and you keep doing this until you have bind off all 19 stitches. Hope this will help. Happy Knitting!
29.07.2020 - 10:47
|
||||||||||||||||||||||
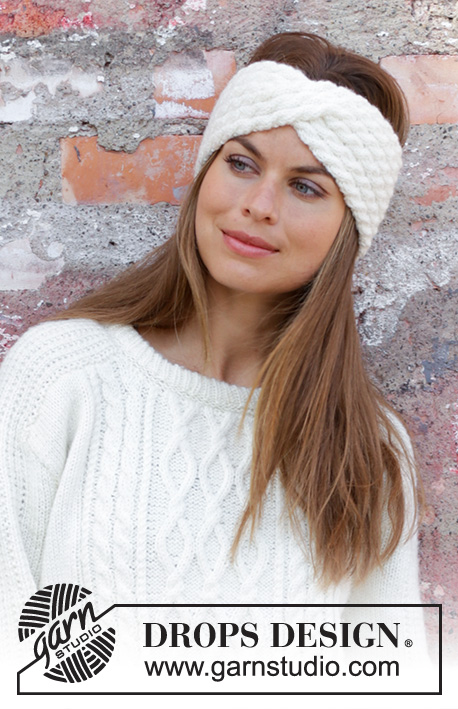
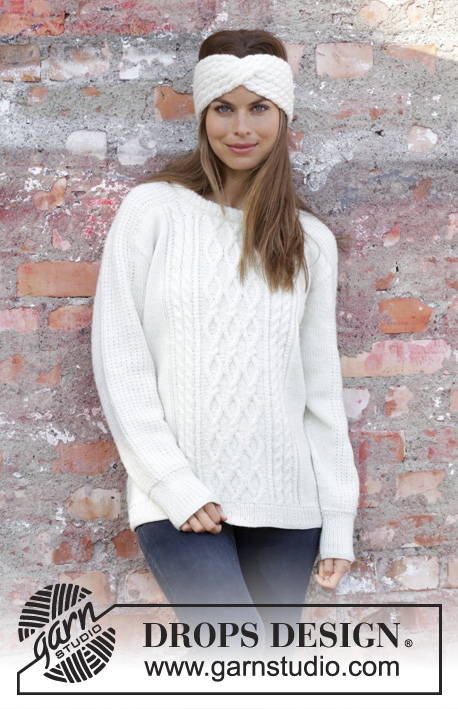
Siberia#siberiasweater |
||||||||||||||||||||||
 |
 |
|||||||||||||||||||||
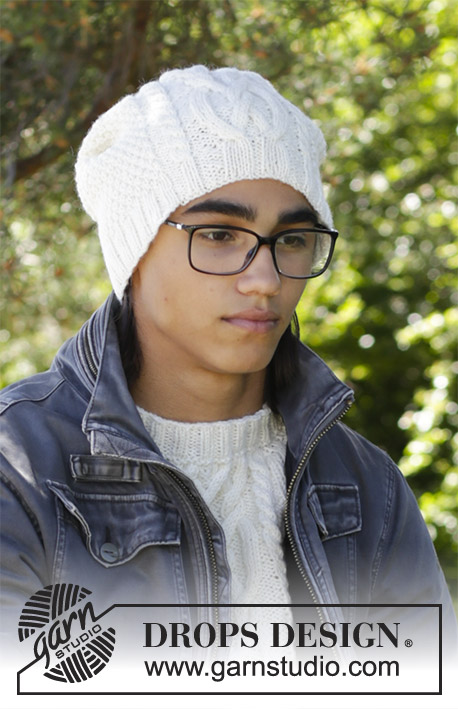
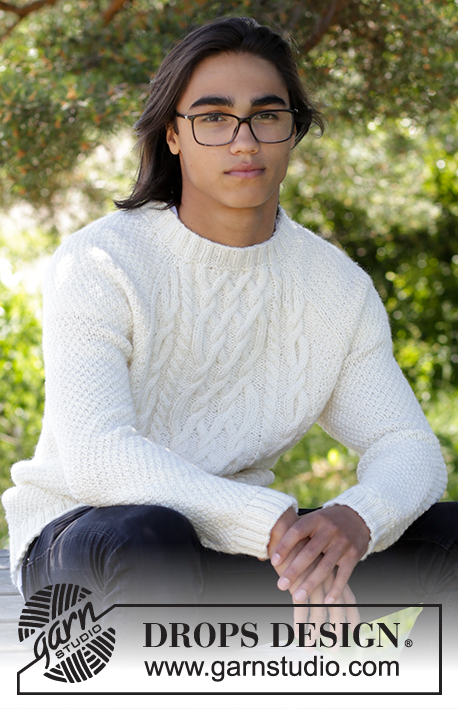
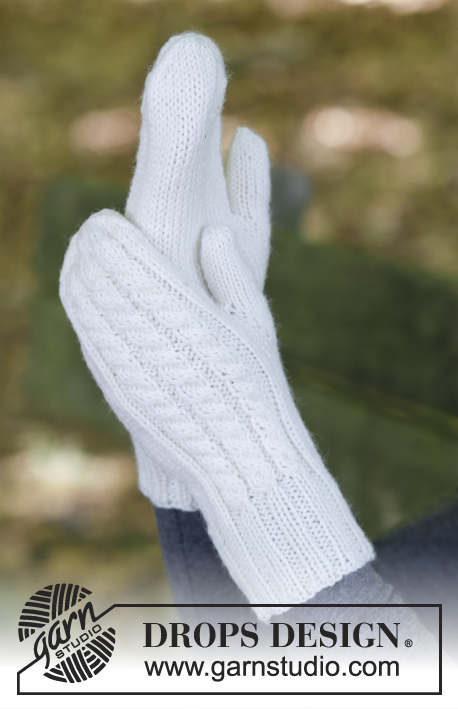
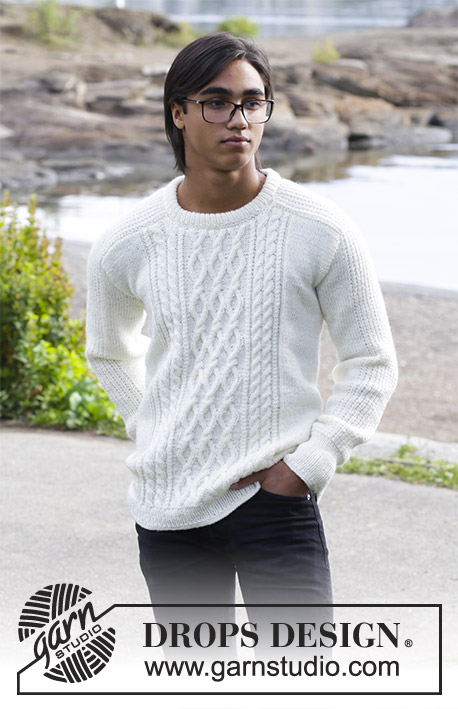
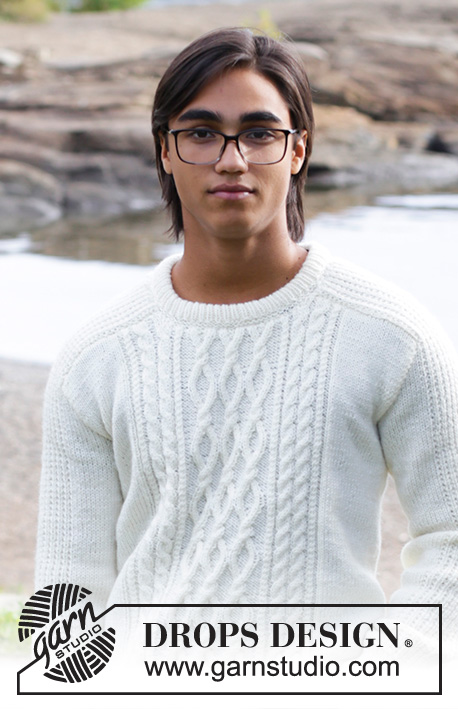
Men’s knitted jumper with cables. Sizes 13/14 years – XXXL. The piece is worked in DROPS Merino Extra Fine.
DROPS 185-2 |
||||||||||||||||||||||
|
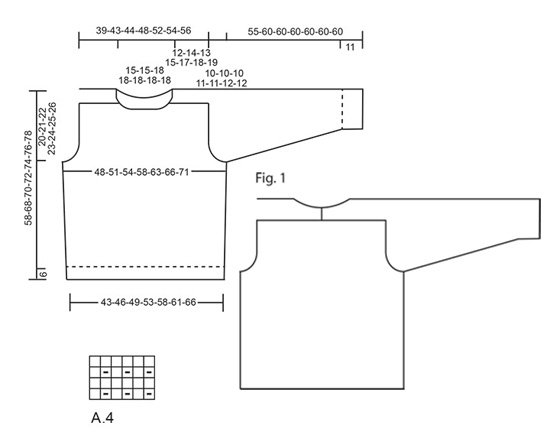
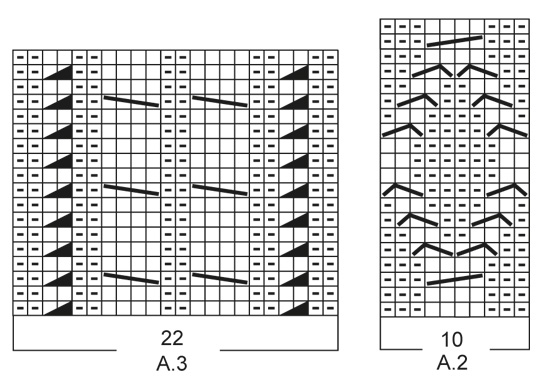
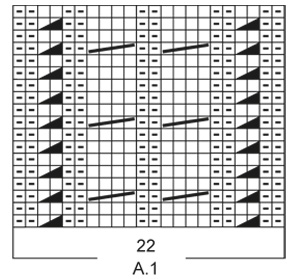
INFORMATION FOR THE PATTERN: RIDGE/GARTER STITCH (worked in the round): 1 ridge = 2 rounds. Knit 1 round and purl 1 round. PATTERN: See diagrams A.1 to A.4. The diagrams show all the rows in the pattern seen from the right side. INCREASE/DECREASE TIP (evenly spaced): To work out how to increase/decrease evenly, count the total number of stitches on the needle (e.g. 218 stitches) and divide by the number of increases/decreases to be made (e.g. 10) = 21.8. In this example, increase alternately after approx. every 21st and 22nd stitch by making 1 yarn over. On the next round, work the yarn overs twisted to avoid holes. If you are decreasing (in this example) knit together alternately approx. every 20th and 21st stitch and every 21st and 22nd stitch. INCREASE TIP (for sides in body and sleeves): Start 1 stitch before the marker, make 1 yarn over, knit 2 (the marker sits in the middle of these two stitches), make 1 yarn over. On the next round knit the yarn overs twisted to avoid holes. The new stitches are subsequently worked in stocking stitch. CASTING OFF TIP: Decrease 1 stitch at the same time as casting off as follows: Knit 2 stitches together, knit 1 stitch, pass over (cast off) (= 1 extra stitch decreased). ---------------------------------------------------------- JUMPER – SHORT OVERVIEW OF THE PIECE: The sleeve is worked upwards, continued onto the shoulder and along the neck, top back. The neck-stitches at the top of the sleeve are decreased towards the front piece and a small section of the sleeve is continued along the top of the back piece and later sewn together mid-back, so the neck is higher at the back than at the front – see Fig.1. ---------------------------------------------------------- JUMPER: The piece is worked in the round with circular needle as far as the armholes, then the front and back pieces are worked back and forth separately. The sleeves are worked in the round with double pointed needles as far as the armholes, then the sleeves are worked back and forth. To finish, the sleeves are sewn into the armhole and shoulders on front and back pieces. BODY: Cast on 218-230-246-264-280-298-314 stitches with circular needle size 3.5 mm and Merino Extra Fine. Work 2 RIDGES – see description above! Then work rib (knit 1 /purl 1). When the piece measures 5 cm work 1 ridge, AT THE SAME TIME as you increase 10-10-10-12-12-14-14 stitches evenly on the first round – read INCREASE/DECREASE TIP= 228-240-256-276-292-312-328 stitches. Insert 2 markers in the piece, one at the beginning of the round and one after 114-120-128-138-146-156-164 stitches (= in each side). Change to circular needle size 4 mm and work PATTERN as follows – see description above: * Work 20-23-27-27-31-31-35 stitches stocking stitch, A.1 (= 22 stitches), A.2 (= 10 stitches) over the next 30-30-30-40-40-50-50 stitches (= 3-3-3-4-4-5-5 repeats in width), A.3 (= 22 stitches), 20-23-27-27-31-31-35 stitches stocking stitch, the marker sits here *, work from *-* 1 more time. REMEMBER THE KNITTING TENSION! Continue the pattern and repeat the charts in height. When the piece measures 9 cm increase 1 stitch on both sides of the markers in each side – read INCREASE TIP (= 4 stitches increased). Increase in this way every 6-8-8-9-9-9-10 cm a total of 5 times = 248-260-276-296-312-332-348 stitches. When the piece measures 38-47-48-49-50-51-52 cm cast off 6 stitches for the armhole in each side (cast off 3 stitches on both side of the markers in each side) and continue each piece separately. BACK PIECE: = 118-124-132-142-150-160-168 stitches. The piece is worked back and forth with circular needle. Continue with pattern, stocking stitch and 1 edge stitch in garter stitch in each side, AT THE SAME TIME continue to cast off for armhole at the beginning of each row in each side as follows: 2 stitches 3-3-4-4-4-4-5 times and 1 stitch 1-0-1-1-2-2-2 times = 104-112-114-124-130-140-144 stitches. When the piece measures 49-59-61-63-65-67-69 cm cast off, AT THE SAME TIME as you decrease 20-20-20-22-18-24-24 stitches evenly over the stitches in diagrams A.1, A.2 and A.3 – read CASTING OFF TIP. FRONT PIECE: = 118-124-132-142-150-160-168 stitches. Continue with pattern, stocking stitch and 1 edge stitch in garter stitch, AT THE SAME TIME as cast off for armhole as for back piece = 104-112-114-124-130-140-144 stitches. When the piece measures 46-56-58-60-62-64-66 cm decrease 10-10-10-12-12-12-12 stitches evenly over the middle 40-40-40-48-48-48-48 stitches before these stitches are placed on a thread for the neck (= 30-30-30-36-36-36-36 stitches on thread). The shoulders are now finished separately. On the next row from the neck cast off 2 stitches = 30-34-35-36-39-44-46 stitches. When the piece measures 49-59-61-63-65-67-69 cm (adjust to match the back piece) cast off, AT THE SAME TIME as you decrease 5-5-4-5-3-6-6 stitches evenly over the 15-15-15-16-16-21-21 stitches towards the neck – remember CASTING OFF TIP. Work the other shoulder in the same way. RIGHT SLEEVE: The piece is worked in the round with double pointed needles. Cast on 56-58-60-62-64-66-68 stitches with double pointed needles size 3.5 mm and Merino Extra Fine. Work 2 ridges. Then work rib (= knit 1 /purl 1) until the piece measures 10 cm. Work 1 ridge, AT THE SAME TIME as you decrease 5 stitches evenly on row = 51-53-55-57-59-61-63 stitches. Insert 1 marker at the beginning of the round. Change to double pointed needles size 4 mm and work pattern on the next round as follows: Stocking stitch over the first 4-5-6-7-8-9-10 stitches, work A.4 over the next 42 stitches, work the first stitch in A.4, 4-5-6-7-8-9-10 stitches stocking stitch. Continue this pattern upwards. AT THE SAME TIME when the piece measures 13-12-13-12-12-14-13 cm increase 1 stitch on each side of the marker – remember INCREASE TIP! Increase in this way every 2-2½-2-2-2-1½-1½ cm a total of 14-15-16-17-18-19-20 times = 79-83-87-91-95-99-103 stitches. When the piece measures 45-50-50-49-49-48-48 cm cast off 6 stitches mid under the sleeve (cast off 3 stitches on each side of the marker). Then work back and forth on the needle AT THE SAME TIME as you cast off for sleeve cap at the beginning of each row in each side as follows: 2 stitches 2-4-6-7-9-10-12 times and 1 stitch 12-10-8-8-6-6-4 times = 41 stitches left in all sizes. The piece measures 55-60-60-60-60-60-60 cm. NOW YOU MEASURE THE PIECE FROM HERE! Continue with pattern over the remaining stitches until the piece measures 12-14-13-15-17-18-19 cm. Then you cast off at the beginning of each row from the right side as follows: 19 stitches 1 time AT THE SAME TIME as 8 of these 19 stitches are knitted together 2 and 2 before they are cast off, 3 stitches 1 time, 2 stitches 1 time. Work 3 rows without decreases. Cast off 1 stitch on the next row = 16 stitches left in all sizes. Continue working until the piece measures 19-21-22-24-26-27-28 cm. The whole sleeve measures approx. 74-81-82-84-86-87-88 cm. LEFT SLEEVE: Worked as for right sleeve, but decreases at top are worked in opposite side, i.e. at the beginning of every row from the wrong side. ASSEMBLY: Sew the sleeves together mid back inside the cast off edge of each sleeve. Sew the sleeves to front and back piece on body in the outermost stitch as follows: Sew from the armhole and up along shoulder on back piece to mid back. Repeat on the other side. Sew in that same way from armhole and up along shoulder to the neck on the front piece. Repeat on the other side. NECKLINE: Knit up 94-94-108-108-108-108-108 stitches around the neck (including the stitches from the thread) with short circular needle size 3.5 mm and Merino Extra Fine. Work 2 ridges, AT THE SAME TIME as you increase on the last round 22-22-26-26-26-26-26 stitches evenly = 116-116-134-134-134-134-134 stitches. Then work rib (= knit 1 /purl 1). When the rib measures 8 cm work 1 ridge. Cast off. Fold the neck double and fasten on the inside, ridge to ridge. |
||||||||||||||||||||||
Diagram explanations |
||||||||||||||||||||||
|
||||||||||||||||||||||
 |
||||||||||||||||||||||
 |
||||||||||||||||||||||
 |
||||||||||||||||||||||
Have you finished this pattern?Tag your pictures with #dropspattern #siberiasweater or submit them to the #dropsfan gallery. Do you need help with this pattern?You'll find 30 tutorial videos, a Comments/Questions area and more by visiting the pattern on garnstudio.com. © 1982-2026 DROPS Design A/S. We reserve all rights. This document, including all its sub-sections, has copyrights. Read more about what you can do with our patterns at the bottom of each pattern on our site. |
||||||||||||||||||||||


With over 40 years in knitting and crochet design, DROPS Design offers one of the most extensive collections of free patterns on the internet - translated to 17 languages. As of today we count 324 catalogues and 12290 patterns translated into English (UK/cm). 12290
We work hard to bring you the best knitting and crochet have to offer, inspiration and advice as well as great quality yarns at incredible prices! Would you like to use our patterns for other than personal use? You can read what you are allowed to do in the Copyright text at the bottom of all our patterns. Happy crafting!
Post a comment to pattern DROPS 185-2
We would love to hear what you have to say about this pattern!
If you want to leave a question, please make sure you select the correct category in the form below, to speed up the answering process. Required fields are marked *.