
Popular categories
Looking for a yarn?


Comments / Questions (47)
![]() Goedele wrote:
Goedele wrote:
Ik wil deze trui graag opnieuw breien, maar nu is de kleur 6736 niet meer te verkrijgen. Welke kleur past het best bij de andere kleuren: 9044 donkere druif of 9023 paarse mist
04.12.2025 - 21:28DROPS Design answered:
Dag Goedele,
Voor vragen over kleurnummers en verfbaden kun je het beste terecht bij je verkooppunt. Zij kunnen je wellicht verder helpen om het juiste kleurbad en/of kleurnummer te vinden.
05.12.2025 - 19:39
![]() Andrea wrote:
Andrea wrote:
Bei mir klappt sich der Saum ( krause Rippen) nach oben. Was kann ich tun? Vielen Dank im Voraus Andrea
01.12.2025 - 10:56DROPS Design answered:
Liebe Andrea, Sie können den Pullover mit Stecknadeln auf einer geeigneten Unterlage spannen, anfeuchten (z.B. mit einer Sprühflasche für Blumen) und trocknen lassen, danach entfernen Sie die Stecknadeln, dann sollte sich der Rand nicht mehr rollen. Viel Spaß!
01.12.2025 - 15:58
![]() Vera wrote:
Vera wrote:
Ich stricke gerade die Mütze von Modell z-794 blueberry fizz. Wie komme ich auf 156 Maschen nach 5 Runden? Ich habe 128 Maschen angeschlagen, 2 Maschen zugenommen = 130. Dann 13 Rapporte a 10 Maschen. Ab der 3. Reihe sind es 11 Maschen. Komme aber trotzdem nicht auf 156
20.11.2025 - 15:37DROPS Design answered:
Liebe Vera, A.2 beginnt mit 10 Maschen aber man wird 2 Maschen zunehmen (bei der 2. Runde + bei der 5. Runde) so mit 130 Maschen hatten Sie 13 Rapporte x 12 Maschen je= 156 Maschen. Viel Spaß beim Stricken!
20.11.2025 - 17:01
![]() Françoise Roget wrote:
Françoise Roget wrote:
Bonjour, Le pull se termine par des côtes en point mousse. Pourriez vous me dire comment l'on tricote le point mousse quand on tricote en rond? Merci de votre aide, Cordialement
14.10.2025 - 17:48DROPS Design answered:
Bonjour Mme Roget, volontiers: vous allez alterner 1 tour en mailles endroit et 1 tour en mailles envers (pour obtenir ainsi 1 côte mousse, l'équivalent de 2 rangs endroit quand on tricote en allers et retours). Retrouvez cette technique en vidéo ici. Bon tricot!
15.10.2025 - 09:08
![]() Françoise Roget wrote:
Françoise Roget wrote:
Merci beaucoup de votre aide. J ai passé l étape "empiècement/dos,devant" grâce à vous.
04.10.2025 - 15:10
![]() Françoise wrote:
Françoise wrote:
Bonjour Blueberry Fizz Désolée mais je ne comprends pas: - pourquoi commence t on la suite de l empiecement au milieu des. 10 mailles ajoutées alors que l' on a le fil de la fin de l empiècement au milieu du dos? Quelque chose m échappe. Pouvez-vous me dire quoi. Merci de votre aide Cordialement (Mes excuses si ce message vous est déjà arrivé)
03.10.2025 - 10:26
![]() Françoise wrote:
Françoise wrote:
Bonjour Blueberry Fizz Désolée mais je ne comprends pas: - pourquoi commence t on la suite de l empiecement au milieu des. 10 mailles ajoutées alors que l' on a le fil de la fin de l empiècement au milieu du dos? Quelque chose m échappe. Pouvez-vous me dire quoi. Merci de votre aide Cordialement
03.10.2025 - 09:57DROPS Design answered:
Bonjour Françoise, c'était un choix de la styliste de commencer le bas du pull sur le côté et plus au milieu dos, vous pouvez couper le fil comme dans les explications puis glisser les mailles de la fin du dos jusqu'au milieu de la 1ère manche et commencer les tours ici ou bien continuer à partir du milieu dos, sans couper le fil, pensez juste à bien mettre vos fils marqueurs sous chacune des manches pour faire les augmentations au bon endroit. Bon tricot!
03.10.2025 - 16:39
![]() Françoise wrote:
Françoise wrote:
Rebonjour,y Re: Blueberry Fizz " Désolée mais c est la 1ere fois que je tricote du haut vers le bas et même si j ai beaucoup tricoté dans ma vie, ce n est pas évident du tout. Bref, après l empiecement, est ce que vous pouvez me confirmer que l' on récupère les mailles du dernier rang de l empiecement sauf celles mises de côté pour les manches? Pourquoi commencer par le milieu des 10 mailles ajoutées d un côté si l' on continue à tricoter en rond? Merci
02.10.2025 - 18:02DROPS Design answered:
Bonjour Françoise, à la fin de l'empiècement, on met les mailles des manches en attente et on monte pour les remplacer des mailles pour les côtés du pull; on tricote ensuite en rond; vous pouvez aussi ne pas couper le fil et continuer à partir du milieu dos si vous préférez, dans ce modèle, ce sera possible. Retrouvez, en photo, les étapes de la division de l'empiècement dans cette leçon, à partir de la photo 9. Bon tricot!
03.10.2025 - 07:58
![]() Françoise Roget wrote:
Françoise Roget wrote:
Merci de votre réponse me donnant les références coloris du modèle Blueberry Fizz en rouge. Je ne l avais pas vue. C est très aimable, Cordialement
02.10.2025 - 17:24
![]() Françoise Roget wrote:
Françoise Roget wrote:
Bonjour Concerne : Blueberry Fizz - fin des explications "empiecement" > " couper le fil" Je souhaiterais savoir de quel fil il s agit? Merci d avance Cordialement
02.10.2025 - 17:12DROPS Design answered:
Bonjour Mme Roget, coupez le fil avec lequel vous avez terminé votre dernier tour; une fois que vous avez divisé l'ouvrage pour le dos/le devant et les manches, les tours vont commencer au milieu des mailles montées sous une des manches, il vous faudra glisser les mailles du demi-dos + la moitié des mailles montées sous la 1ère manche (sans les tricoter) avant de continuer. Bon tricot!
02.10.2025 - 17:22
|
||||||||||||||||||||||||||||||||||
Blueberry Fizz#blueberryfizzsweater |
||||||||||||||||||||||||||||||||||
 |
 |
|||||||||||||||||||||||||||||||||
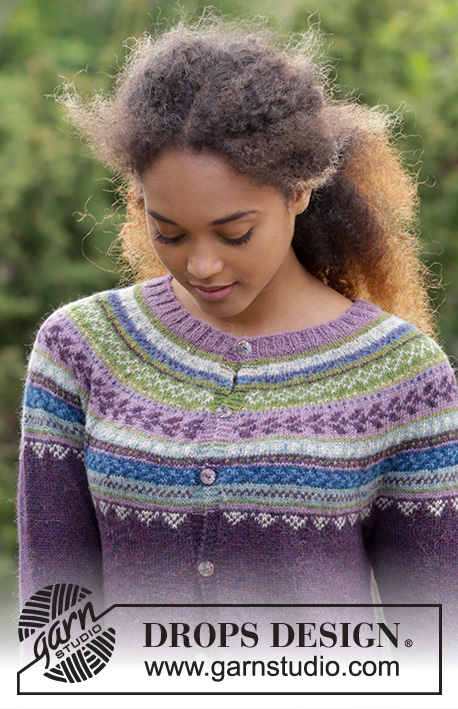
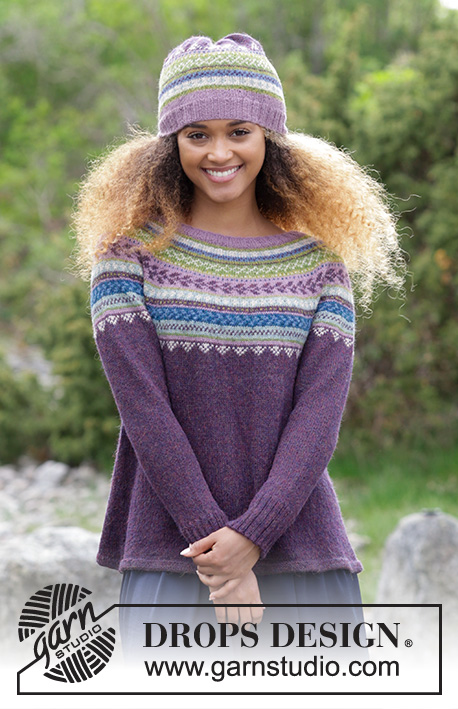
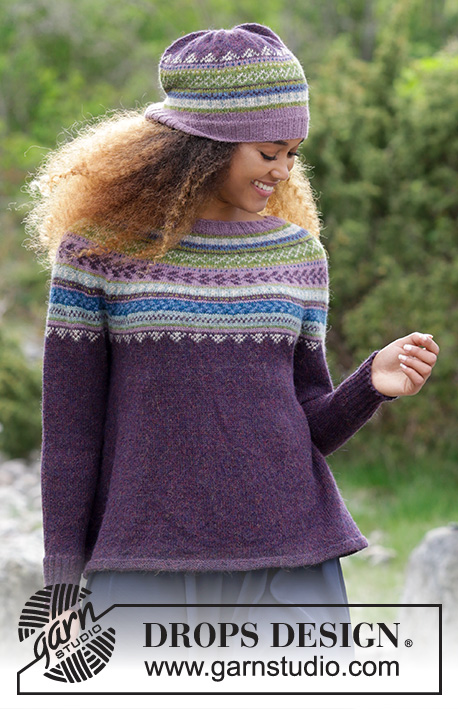
The set consists of knitted jumper with round yoke, multi-coloured Norwegian pattern and A-shape, worked top down. Sizes S - XXXL. Hat with multi-coloured Norwegian pattern. The set is worked in DROPS Alpaca.
DROPS 180-7 |
||||||||||||||||||||||||||||||||||
|
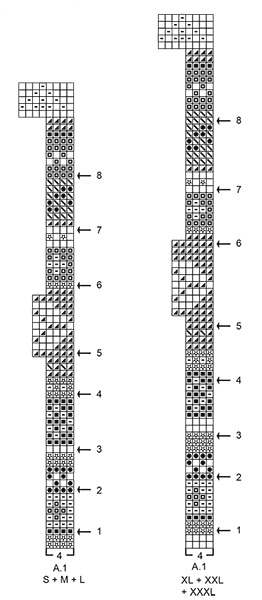
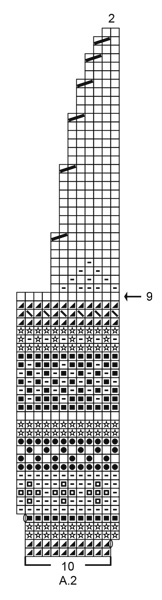
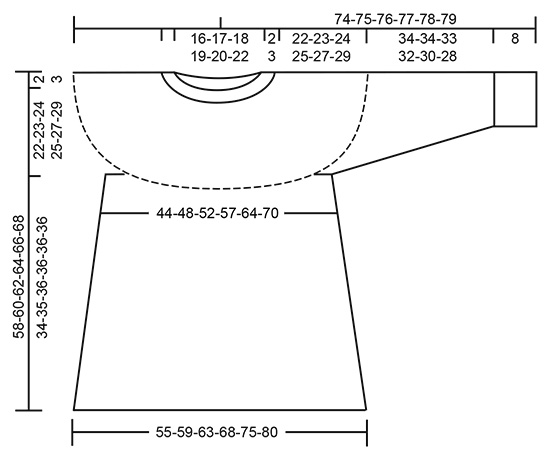
INFORMATION FOR THE PATTERN: RIDGE/GARTER STITCH (worked in the round): 1 ridge = 2 rounds. Knit 1 round and purl 1 round. DECREASE/INCREASE TIP: To work out how to decrease/increase evenly, count the total number of stitches on needle (e.g. 120 stitches) and divide by the number of decreases/increases to be made (e.g. 16) = 7.5. In this example, decrease by alternately knitting together every 6th and 7th stitch and every 7th and 8th stitch. If you are increasing, make 1 yarn over alternately after approx. every 7th and 8th stitch, on the next round work the yarn overs twisted into the pattern so that there are no holes. ELEVATION (for back of neck in jumper): Insert 1 marker at the beginning of the round = mid back. Start from the right side with old pink and knit 8-8-8-9-9-10 stitches past the marker, turn, tighten the strand and purl 16-16-16-18-18-20 stitches. Turn, tighten the strand and knit 24-24-24-27-27-30 stitches, turn, tighten the strand and purl 32-32-32-36-36-40 stitches. Continue back and forth in this way by working 8-8-8-9-9-10 more stitches each time you turn (remember to tighten the strand when you turn) until you have worked back and forth over a total of 64-64-64-72-72-80 stitches and the last row is from the wrong side. Turn, tighten the strand and knit to mid back. PATTERN: Jumper: See diagram A.1. Choose diagram for your size. Hat: See diagram A.2. The whole pattern is worked in stocking stitch. KNITTING TIP: To avoid the knitting tension becoming tighter when you work pattern, it is important that the strands at the back of the piece are not tight. You can increase a needle size when working pattern if this is a problem. INCREASE TIP (for sides of body): Start 1 stitch before the marker thread, make 1 yarn over, knit 2 (the marker thread sits in the middle of these 2 stitches), make 1 yarn over (= 2 stitches increased). On the next round knit the yarn overs twisted to prevent holes. DECREASE TIP (for mid under sleeve): Start 3 stitches before marker thread, knit 2 together, knit 2 (the marker thread sits in the middle of these 2 stitches), slip 1 stitch as if to knit, knit 1, pass the slipped stitch over the knitted stitch (= 2 stitches decreased). ---------------------------------------------------------- JUMPER: The piece is worked in the round with circular needle, top down. The sleeves are worked in the round with short circular needle, top down, change to double pointed needles when necessary. NECKLINE: Cast on 120-124-128-136-140-148 stitches with circular needle size 2.5 mm and old pink. Knit 1 round. Then work rib (= knit 2 / purl 2). When the rib measures 2-2-2-3-3-3 cm knit 1 round where you decrease 16 stitches in all sizes evenly on the round – read DECREASE/INCREASE TIP = 104-108-112-120-124-132 stitches. Continue by working the yoke as described below. YOKE: Read KNITTING TIP! Change to circular needle size 3 mm. Knit 1 round. For a better fit, you can now work an ELEVATION in the back of the neck – see description above. When the elevation has been completed, work A.1 in the round (= 26-27-28-30-31-33 repeats of 4 stitches). Continue the pattern in this way and at the same time increase on each round marked with an arrow in A.1 as described below – remember DECREASE/INCREASE TIP and REMEMBER THE KNITTING TENSION! Arrow-1: Increase 36-40-44-48-52-56 stitches evenly on round = 140-148-156-168-176-188 stitches. Arrow-2: Increase 36-38-40-44-48-50 stitches evenly on round = 176-186-196-212-224-238 stitches. Arrow-3: Increase 28-34-36-40-48-50 stitches evenly on round = 204-220-232-252-272-288 stitches. Arrow-4: Increase 28-34-40-40-44-48 stitches evenly on round = 232-254-272-292-316-336 stitches. Arrow-5: Increase 26-34-34-38-44-48 stitches evenly on round = 258-288-306-330-360-384 stitches. Arrow-6: Increase 26-32-34-38-40-40 stitches evenly on round = 284-320-340-368-400-424 stitches. Arrow-7: Increase 24-28-32-36-40-40 stitches evenly on round = 308-348-372-404-440-464 stitches. Arrow-8: Increase 20-20-28-28-32-32 stitches evenly on round = 328-368-400-432-472-496 stitches. When A.1 has been completed in height, the piece measures approx. 24-24-24-28-28-28 cm from the cast-on edge mid front. Continue with stocking stitch and navy/purple until the piece measures 24-25-26-28-30-32 cm from the cast-on edge mid front (if the knitting tension is right in height, this measurement is reached in S and XL when A.1 has been completed). The next round is worked as follows: Knit 49-54-58-64-71-77 stitches (= ½ back piece), place the next 67-77-85-89-95-95 stitches on a thread for sleeve, cast on 8-8-10-10-12-14 new stitches on the needle (= in side under the sleeve), knit the next 97-107-115-127-141-153 stitches (= front piece), place the next 67-77-85-89-95-95 stitches on a thread for sleeve, cast on 8-8-10-10-12-14 new stitches on the needle (= in side under the sleeve) and knit the remaining 48-53-57-63-70-76 stitches (= ½ back piece). Cut the strand. Body and sleeves are now finished separately. THE PIECE IS NOW MEASURED FROM HERE! BODY: = 210-230-250-274-306-334 stitches. Insert 1 marker thread in the middle of the 8-8-10-10-12-14 stitches cast on under the sleeve in each side. Start the round by one of the marker threads and work stocking stitch in the round with navy/purple. When the piece measures 1-1-2-2-2-2 cm from the separation, increase 2 stitches in each side – read INCREASE TIP (= 4 stitches increased). Increase in this way every 8th round (approx. every 2½ cm) to finished length (if the knitting tension is right in height, increase 13 times in each side). When the piece measures 32-33-34-34-34-34 cm from the separation, there are approx. 262-282-302-326-358-386 stitches on the needle. Work 4 ridges in the round over all stitches. Then cast off with knit, but to avoid the cast-off edge being tight you can make 1 yarn over after approx. every 8th stitch at the same time as you cast off (the yarn overs are cast off as normal stitches). The jumper measures approx. 58-60-62-64-66-68 cm from the shoulder down. SLEEVE: Place the 67-77-85-89-95-95 stitches from the thread in one side of the piece on short circular needle size 3 mm, in addition knit up 1 stitch in each of the 8-8-10-10-12-14 stitches cast on under the sleeve with navy/purple = 75-85-95-99-107-109 stitches. Insert 1 marker thread in the middle of the 8-8-10-10-12-14 stitches under the sleeve. Start the round here and work stocking stitch in the round. When the sleeve measures 2-2-2-2-3-3 cm from the separation, decrease 2 stitches mid under the sleeve – read DECREASE TIP. Decrease in this way every 2½-2-1½-1½-1-1 cm a total of 12-16-19-20-23-23 times = 51-53-57-59-61-63 stitches. Continue working until the sleeve measures 34-34-33-32-30-28 cm from the separation (shorter measurements in larger sizes because of longer yoke). Knit 1 round where you increase 17-19-19-21-19-21 stitches evenly on round = 68-72-76-80-80-84 stitches. Change to double pointed needles size 2.5 mm and work rib in the round (= knit 2 /purl 2). When the rib measures 8 cm (or desired length) cast off with knit over knit and purl over purl, but to avoid the cast-off edge being tight, you can make 1 yarn over after every 4th stitch AT THE SAME TIME as you cast off (yarn overs cast off as normal stitches). The sleeve measures approx. 42-42-41-40-38-36 cm from the separation. Work the other sleeve in the same way. ---------------------------------------------------------- HAT: The piece is worked in the round with short circular needle, bottom up. Change to double pointed needles when necessary. Cast on 128-136 stitches with circular needle size 2.5 and old pink. Knit 1 round. Then work rib (= knit 2 /purl 2). When the rib measures 4 cm change to circular needle size 3 mm. Work 2-4 rounds stocking stitch – AT THE SAME TIME on the first round, increase 2-4 stitches evenly on round = 130-140 stitches. Continue by working A.2 (= 13-14 repeats of 10 stitches). REMEMBER THE KNITTING TENSION! When you have worked 5 rounds in A.2 there are 156-168 stitches on the needle. On the round marked with arrow-9 in A.2 decrease 12-16 stitches evenly on round – read DECREASE/INCREASE TIP = 144-152 stitches. Continue A.2 (= 18-19 repeats of 8 stitches). When A.2 has been completed there are 36-38 stitches on the needle. Knit 1 round with navy/purple where all the stitches are knitted together 2 and 2 = 18-19 stitches. Cut the strand, pull it through the remaining stitches, tighten and fasten well. The hat measures approx. 24-25 cm top down. |
||||||||||||||||||||||||||||||||||
Diagram explanations |
||||||||||||||||||||||||||||||||||
|
||||||||||||||||||||||||||||||||||
 |
||||||||||||||||||||||||||||||||||
 |
||||||||||||||||||||||||||||||||||
 |
||||||||||||||||||||||||||||||||||
Have you finished this pattern?Tag your pictures with #dropspattern #blueberryfizzsweater or submit them to the #dropsfan gallery. Do you need help with this pattern?You'll find 32 tutorial videos, a Comments/Questions area and more by visiting the pattern on garnstudio.com. © 1982-2026 DROPS Design A/S. We reserve all rights. This document, including all its sub-sections, has copyrights. Read more about what you can do with our patterns at the bottom of each pattern on our site. |
||||||||||||||||||||||||||||||||||


With over 40 years in knitting and crochet design, DROPS Design offers one of the most extensive collections of free patterns on the internet - translated to 17 languages. As of today we count 324 catalogues and 12290 patterns translated into English (UK/cm). 12290
We work hard to bring you the best knitting and crochet have to offer, inspiration and advice as well as great quality yarns at incredible prices! Would you like to use our patterns for other than personal use? You can read what you are allowed to do in the Copyright text at the bottom of all our patterns. Happy crafting!
Post a comment to pattern DROPS 180-7
We would love to hear what you have to say about this pattern!
If you want to leave a question, please make sure you select the correct category in the form below, to speed up the answering process. Required fields are marked *.