
Popular categories
Looking for a yarn?


Comments / Questions (88)
![]() Lilo wrote:
Lilo wrote:
Hallo, ich stricke die Hose und habe gerade die verkürzten Reihen für Erhöhung gestrickt und bin jetzt auf der linken Seite. Muss ich nochmal wenden oder stricke ich jetzt die Hose auf der linken Seite fertig?
21.03.2020 - 12:58DROPS Design answered:
Liebe Lilo, ja genau, stricken Sie noch eine Rückreihe bis zur hinteren Mitte und dann stricken Sie mit den grösseren Nadeln ab der hinteren Mitte in der Runde. Viel Spaß beim stricken!
23.03.2020 - 09:23
![]() Aiva wrote:
Aiva wrote:
Bonjour, J'ai quelques difficultés avec le diagramme A1 pour le bonnet taille naissance. Si j'interprète les instructions correctement, le chapeau correspond à une diminution de 2 mailles (donc passage de 3 à 1 maille résiduelle). Je ne vois pas bien comment je peux revenir à 3 mailles pour reproduire le motif à l'aide d'un seul jeté. Pourriez-vous m'expliquer où est mon erreur? Merci pour votre retour, Bien cordialement, Aiva
24.02.2020 - 19:29DROPS Design answered:
Bonjour Aiva, le symbole que vous appelez le chapeau ne correspond pas à une diminution de 2 mailles mais d'une seule maille, vous glissez 1 m, vous tricotez 2 m end et vous passez la m glissée par-dessus la m tricotée = il reste 2 mailles et au rang suivant, vous faite 1 jeté entre ces 2 mailles. Cette vidéo montre une variation de ce type de petite torsade. Bon tricot!
25.02.2020 - 09:21
![]() Abeer wrote:
Abeer wrote:
Thank you for the pattern
28.10.2019 - 12:30
![]() Malan Hentze wrote:
Malan Hentze wrote:
Hej. Jeg strikker huen og er i tvivl om jeg skal måle længde efter midten hvor mønsteret er eller ude i siderne..........der er 2 cm forskel således at når siderne måler 14 cm, måler mønsteret i midten 16 cm.
20.10.2019 - 14:51DROPS Design answered:
Hei Malan. Mål i rillene (siden). God Fornøyelse!
21.10.2019 - 13:00
![]() Majbrit wrote:
Majbrit wrote:
Jeg er igang med bukserne, men kan ikke få A.3 diagrammet til at passe, 4. Række vises der 2 ret, men i række 3 er de 3 ret blevet til en( en løs af, to sammen den løs over) = 1 maske på pinden Eller hvad gør jeg forkert?
04.10.2019 - 20:21DROPS Design answered:
Hei Majbrit På 3. rekke strikker du slik: Ta 1 maske løs av pinnen som om den skulle strikkes rett, 2 masker rett, løft den løse masken over. Du har da 2 masker, ikke 1 maske som du skriver (de 2 masken skal ikke strikkes sammen, men hver for seg). Ta gjerne en titt på våre hjelpevideoer til denne buksen, kanskje de vil hjelpe deg om du fortsatt har problemer. God Fornøyelse!
07.10.2019 - 09:21
![]() Beata wrote:
Beata wrote:
Dziekuje bardzo. Zrobilam te czapeczke na okraglo na drutach z zylka. Ominelam zszywanie z tylu czapeczki.
12.09.2019 - 08:14
![]() Beata wrote:
Beata wrote:
Dzien dobry. Prosze o pomoc. Robie czapke rozmiar 3/4 lata. Schemat A1. Pytanie ...czy mam robic 4 rzedy I nastepnie rzad w ktorym robic trzeba 8 razy 2 oczka razem. ? Po ktorej stronie robotki trzeba robic narzut ? Jesli po prawej to wzor widoczny jest inny niz na zdjeciu. Dziekuje.
06.09.2019 - 13:01DROPS Design answered:
Witaj Beatko, schemat A.1 jest przerabiany na 4 rzędach na wysokość. Rzędy nieparzyste schematu (1 i 3) są przerabiane na prawej stronie robótki. Masz przerobić 2 rzędy wg schematu A.1 (a boki czapeczki ściegiem francuskim), następnie rząd 3 (na prawej stronie robótki), gdzie będą 8 razy zamykane 2 o. razem na prawo i tam też (między tymi zamykanymi oczkami) będą narzuty. W rzędzie 4 (na lewej stronie robótki) będą również 2 narzuty, ale na bokach schematu, przy fałszywych warkoczykach. Powodzenia!
09.09.2019 - 07:46
![]() Delphine wrote:
Delphine wrote:
Bonjour, Je ne comprends pas comment je dois plier le bonnet pour le coudre ?
31.08.2019 - 09:48DROPS Design answered:
Bonjour Delphine, vous faites d'abord la couture en hauteur (à partir des mailles rabattues jusqu'au rang de montage = côtés de l'ouvrage), puis vous pliez le bonnet pour que cette couture (= dos) se trouve au milieu de A.1 (cf dernière photo)ainsi, A.1 est au milieu du devant du bonnet. Vous assemblez ensuite les mailles du rang de montage entre elles. Bon assemblage!
02.09.2019 - 09:21
![]() Beata wrote:
Beata wrote:
Dziekuje serdecznie. Tak, zamieszcze zdjecia.
29.08.2019 - 18:24
![]() Beata wrote:
Beata wrote:
Spodenki rozmiar 4 lata. Na schemacie spodenek rozmiar w pasie jest 28 -30cm. Pas jest zrobiony sciagaczem. Czy 30 cm to jest wielkosc kiedy sciagacz/ pas jest rozciagniety czy sciagniety ? Prosze o pomoc. Dziekuje.
27.08.2019 - 15:55DROPS Design answered:
Witaj Beato! Rozmiar w pasie jest mierzony, jak ściągacz jest lekko naciągnięty (obwód jest mniej więcej równy obwodowi w biodrach, tak jak na schematycznym rysunku). Miłej pracy! Koniecznie zamieść zdjęcie gotowej pracy na naszej grupie DROPS Workshop ma facebooku. Pozdrawiamy!
27.08.2019 - 17:27
|
||||||||||||||||||||||
Hello Kitten#hellokittenset |
||||||||||||||||||||||
 |
 |
|||||||||||||||||||||
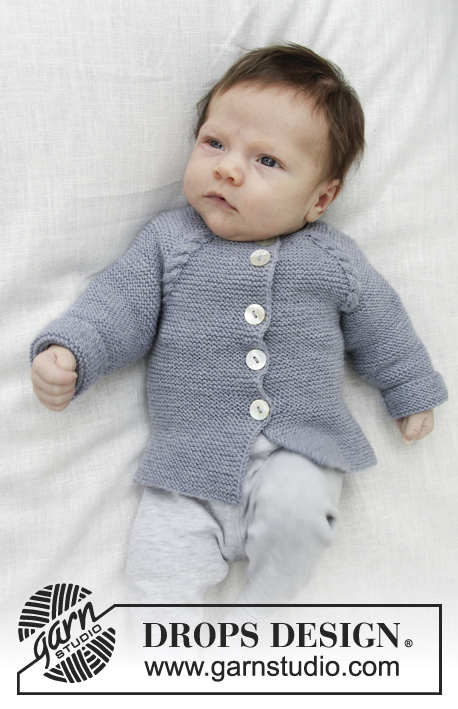
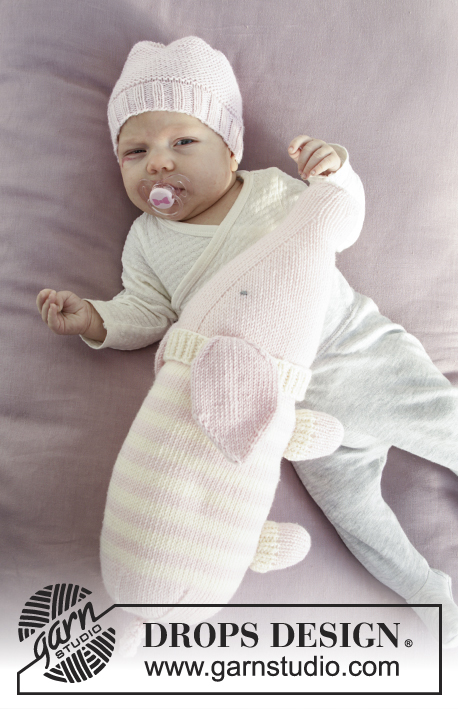
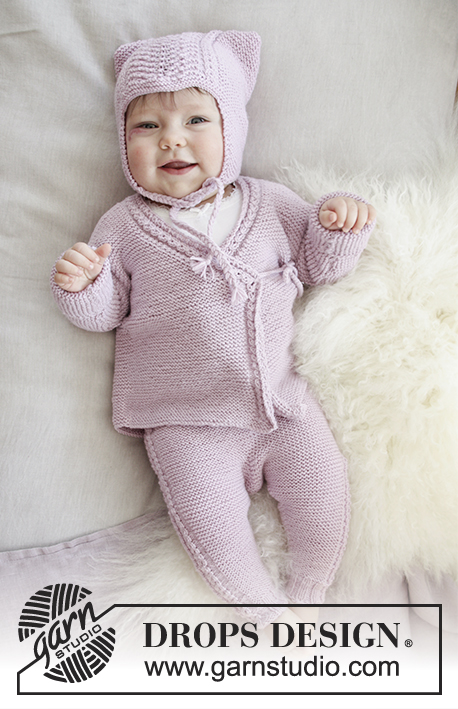
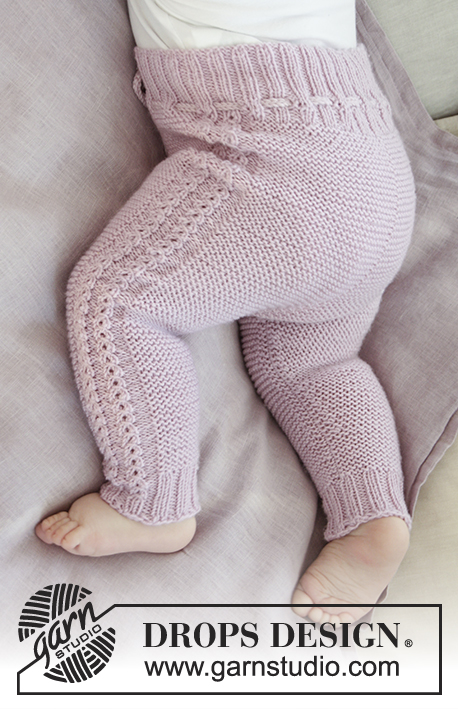
The set consists of: Hat for baby with garter stitch, wave pattern and earflaps. Wrap-around jacket and trousers with garter stitch and lace pattern. Sizes premature – 4 years. The set is knitted in DROPS BabyMerino.
DROPS Baby 29-9 |
||||||||||||||||||||||
|
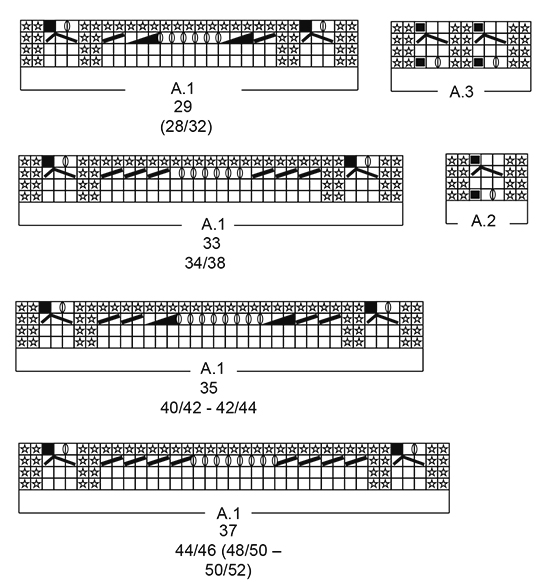
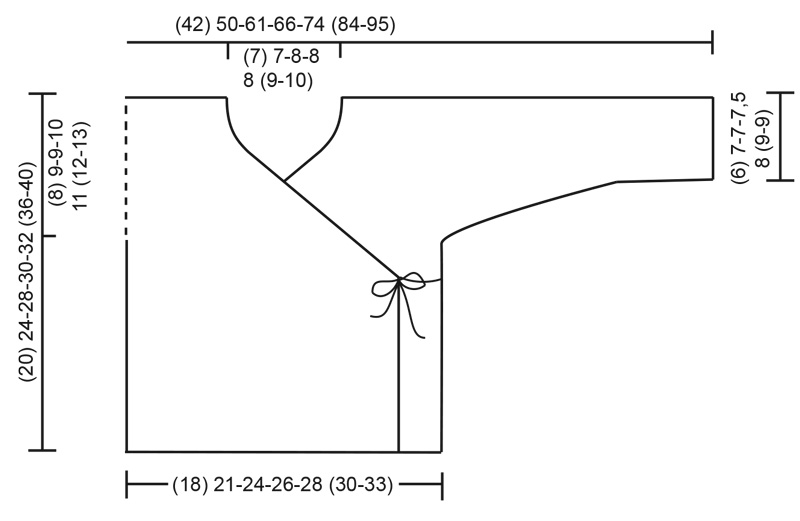
INFORMATION FOR THE PATTERN: RIDGE/GARTER STITCH (back and forth): 1 ridge = knit 2 rows. PATTERN: Hat: See diagram A.1. Jacket: See diagram A.2. Trousers: See diagram A.3. The diagrams show all the rows in the patterns seen from the right side. Choose the diagram for your size. DECREASE TIP-1 (for hat): All decreases are made from the right side! Decrease as follows: Work 1 edge stitch in garter stitch, slip 1 stitch as if to knit, knit 1, pass the slipped stitch over (= 1 stitch decreased), work garter stitch until there are 3 stitches left, knit 2 stitches together (= 1 stitch decreased), 1 edge stitch in garter stitch. DECREASE TIP-2 (for jacket): All decreases are made from the right side! Decrease as follows after the 1 edge stitch and A.2 (for the right front piece): Slip 1 stitch as if to knit, knit 1, pass the slipped stitch over (= 1 stitch decreased). Decrease as follows before the 1 edge stitch and A.2 (for the left front piece): Knit 2 together (= 1 stitch decreased). DECREASE TIP-3 (for the trousers): Work until there are 3 stitches left before the marker, then knit 2 stitches together (= 1 stitch decreased), work 2 stitches (the marker sits between these 2 stitches) and then knit 2 stitches twisted together (= 1 stitch decreased). INCREASE TIP (for the trousers): Increase 2 stitches by making 1 yarn over on each side of 2 stitches, on the next round, the yarn overs are knitted twisted to prevent holes. ---------------------------------------------------------- HAT: The hat is worked back and forth, top down. Cast on (79) 89-99-103-107 (115-121) stitches with circular needle size 3 mm and Baby Merino. Work GARTER STITCH – see description above, until the piece measures 3 cm. Then work as follows: (25) 28-32-34-35 (39-42) stitches in garter stitch, A.1 over (29) 33-35-35-37 (37-37) stitches and work (25) 28-32-34-35(39-42) stitches in garter stitch. REMEMBER THE KNITTING TENSION! Work in this way until the piece measures (14) 14-15-16-16 (18-19) cm. Work 2 ridges. On the next row from the right side, cast off for the earflaps as follows: Cast off the first (5) 8-10-10-9(11-12) stitches, knit the next (20) 20-22-24-26 (28-30) stitches (= first earflap) and place these stitches on a thread, cast off the next (29) 33-35-35-37 (37-37) stitches, knit over the next (20) 20-22-24-26 (28-30) stitches (= 2nd earflap) and place these stitches on a thread, cast off the last (5) 8-10-10-9 (11-12) stitches. Cut the strand. EARFLAPS: = (20) 20-22-24-26 (28-30) stitches. Place the stitches from one of the threads back on the needle, work garter stitch and decrease 1 stitch inside 1 edge stitch in each side of the piece – READ DECREASE TIP-1, as follows: Decrease 1 stitch in each side of the piece every 4th row a total of (6) 6-5-5-6 (6-7) times and 1 stitch in each side of the piece every 2nd row a total of (2) 2-4-5-5 (6-6) times = 4 stitches. The earflap measure approx. (6) 6-6-6-7 (8-8) cm. Cast off and fasten the strand. Repeat on the other earflap. ASSEMBLY: Sew the sides together, sewing edge to edge in the outermost stitch. Fold the hat so that this seam is mid back and then sew the cast-on edge together the same way. TIE CORD: Cut 6 strands of approx. 60 cm and thread them halfway through the tip of the earflap, in other words, there will be 12 strands to plait. Plait 1 plait. Tie 1 knot at the bottom. Do the same in the other earflap. --------------------------------------------------------- JACKET: The piece is worked back and forth on circular needle. Start with one of the front pieces, cast on stitches for the sleeve and work up to the shoulder. Work the other front piece, work the 2 front pieces together and work down the back piece. RIGHT FRONT PIECE: LOOSELY cast on (34) 37-44-48-52 (55-62) stitches with circular needle size 3 mm and Baby Merino and work 3 RIDGES – see description above (first row = right side). Work as follows from the right side: Work 1 edge stitch in garter stitch, A.2 over 6 stitches and work garter stitch to end of row. Continue pattern in this way until the piece measures (9) 12-16-16-17 (20-23) cm – adjust so that the next row is worked from the right side. Work 1 short row (starting from the right side) as follows: Work 1 edge stitch in garter stitch, A.2, turn the piece, tighten the strand and work back from the wrong side as before. Turn the piece. READ THE WHOLE OF THE FOLLOWING SECTION BEFORE CONTINUING! YOU CAST OFF FOR THE NECK AT THE SAME TIME AS YOU CAST ON STITCHES FOR THE SHOULDER/SLEEVE. DECREASE FOR NECK: Decrease 1 stitch for the neck inside 1 edge stitch and A.2 at the beginning of the row – READ DECREASE TIP-2. Decrease in this way every 2nd row a total of (18) 18-22-24-26 (28-32) times, then decrease every 4th row a total of 2 times. SHOULDER/SLEEVE: When the piece measures (12) 15-19-20-21 (24-27) cm cast on new stitches at the end of each row from the right side (= towards the side) for the sleeve as follows: Cast on (3) 4-6-6-6 (6-6) stitches a total of (4) 4-4-5-6 (7-8) times and (16) 19-19-18-19 (23-26) stitches a total of 1 time. After all increases and decreases there are (42) 52-63-70-79 (90-102) stitches on the row for the shoulder/sleeve. Continue with garter stitch and A.2 until the piece measures (20) 24-28-30-32 (36-40) cm – adjust so that you finish with the 4th row in A.2, now continue by working garter stitch over all stitches. Insert 1 marker = mid top of shoulder. Cast on 2 new stitches at the end of the row towards the neck (= from the wrong side) a total of 2 times = (46) 56-67-74-83 (94-106) stitches (last row = wrong side). Place all the stitches on a thread. LEFT FRONT PIECE: LOOSELY cast on (34) 37-44-48-52 (55-62) stitches with circular needle size 3 mm and Baby Merino and work 3 ridges (first row = right side). Continue as follows from the right side: Work garter stitch until there are 7 stitches left on the needle, A.2 over 6 stitches and 1 edge stitch in garter stitch. Continue the pattern in this way until the piece measures (9) 12-16-16-17 (20-23) cm – adjust so that the next row is worked from the wrong side. Work 1 short row (starting from the wrong side) as follows: Work 1 edge stitch in garter stitch, A.2, turn the piece, tighten the strand and work back from the right side. Turn the piece and work back from the wrong side. REMEMBER THE KNITTING TENSION! READ THE WHOLE OF THE NEXT SECTION BEFORE CONTINUING! YOU DECREASE FOR THE NECK AT THE SAME TIME AS YOU CAST ON STITCHES FOR THE SHOULDER/SLEEVE. DECREASE FOR THE NECK: Decrease 1 stitch for the neck before A.2 and 1 edge stitch at the end of the row. Decrease in this way every 2nd row a total of (18) 18-22-24-26 (28-32) times, then decrease every 4th row a total of 2 times. SHOULDER/SLEEVE: When the piece measures (12) 15-19-20-21 (24-27) cm cast on new stitches at the end of each row from the wrong side (= towards the side) for the sleeve as follows: Cast on (3) 4-6-6-6 (6-6) stitches a total of (4) 4-4-5-6 (7-8) times and (16) 19-19-18-19 (23-26) stitches a total of 1 time. After all increases and decreases there are (42) 52-63-70-79 (90-102) stitches on the row for shoulder/sleeve. Continue with garter stitch and A.2 until the piece measures (20) 24-28-30-32 (36-40) cm – adjust so that you finish with the 4th row in A.2, now continue by working garter stitch over all stitches. Insert 1 marker = mid top of shoulder. Cast on 2 new stitches at the end of the row towards the neck (= from the right side) a total of 2 times = (46) 56-67-74-83 (94-106) stitches. Knit 1 row from the wrong side. BACK PIECE: Knit over the left front piece from the right side (= (46) 56-67-74-83 (94-106) stitches), cast on (8) 8-10-10-12 (14-16) new stitches (= back of neck) and knit the right front piece on to the circular needle (= knit from the right side) = (100) 120-144-158-178 (202-228) stitches. THE PIECE IS NOW MEASURED FROM THE MARKERS ON THE SHOULDERS. Continue with garter stitch back and forth on the needle. When the piece measures (6) 7-7-7½-8 (9-9) cm cast off sleeve stitches as follows: Cast off at the beginning of each row in each side of the piece as follows: (16) 19-19-18-19 (23-26) stitches 1 time and (3) 4-6-6-6 (6-6) stitches a total of (4) 4-4-5-6 (7-8) times = (44) 50-58-62-68 (72-80) stitches. Continue working until the piece measures approx. (20) 24-28-30-32 (36-40) cm – fold the piece double at the markers on the shoulders and make sure that the front and back pieces are the same length – the loosely cast off. ASSEMBLY: Sew side and sleeve seams edge to edge in the outermost loop of the outermost stitch. CROCHET EDGE: Crochet with hook size 2.5 mm around the whole opening of the jacket as follows (from the right side): Work 1 double crochet in the first stitch, * 1 chain stitch, skip approx. 2 stitches/rows, 1 double crochet in the next stitch *, repeat from *-* around the whole jacket, but in each of the corners (where the decreases for the neck start on the front pieces) work the tie cord as follows: 1 double crochet in the tip, work chain stitches for approx. 20-25 cm, turn and work back with 1 slip stitch in each chain stitch, work 1 double crochet in the tip of the front piece again. The round is finished with 1 slip stitch in the first double crochet. Make 2 loose tie cords: Work chains for approx 20-25 cm, turn and work back with 1 slip stitch in each chain stitch. Cut the strand and make 1 more tie cord the same way. Fasten 1 tie cord on the inside on right side and 1 tie cord on the outside on the left side. Make sure to place the ties at the same height as the tie on the outside. --------------------------------------------------------- TROUSERS: The piece is worked in the round, top down. The round starts mid back. Cast on (88) 96-104-120-128 (136-144) stitches with circular needle size 2.5 mm and Baby Merino. Insert 1 marker at the beginning of the round (= mid back) and 1 marker after (44) 48-52-60-64 (68-72) stitches (= mid front). Work rib as follows from mid back: knit 1, * purl 2, knit 2 *, repeat from *-* and finish with purl 2 and knit 1. When the rib section measures 4 cm work a row of holes for the tie cord as follows: * knit 1, 1 yarn over, purl 2 together, knit 2, 1 yarn over, purl 2 together, knit 1 *, repeat from *-* the whole round. Work 1 round of rib with knit 2 / purl 2. Work an elevation at the back of the rib section as follows: Work (7) 7-9-9-9 (9-9) stitches, turn, tighten the strand, work (14) 14-18-18-18 (18-18) stitches back, turn, tighten the strand, work (20) 20-26-26-26 (26-26) stitches, turn, tighten the strand, work (26) 26-34-34-34 (34-34) stitches back. Continue in this way by working (6) 6-8-8-8 (8-8) more stitches each time you turn until you have worked a total of (50) 50-66-66-82 (82-82) stitches. Turn. Change to circular needle size 3 mm. Work as follows from mid back: Work (17) 19-21-25-27 (29-31) stitches in GARTER STITCH – see description above, A.3 (= 10 stitches), work (34) 38-42-50-54 (58-62) stitches in garter stitch, A.3 over 10 stitches, work (17) 19-21-25-27 (29-31) stitches in garter stitch. REMEMBER THE KNITTING TENSION! When the piece measures (12) 14-15-18-17 (18-19) cm from cast-on edge mid front, increase 1 stitch on each side of the 2 middle stitches at the front and back – READ INCREASE TIP (= 4 stitches increased). Increase in this way every 2nd round a total of (8) 8-8-8-12 (12-12) times = (120) 128-136-152-176 (184-192) stitches. After last increase, piece measures approx. (15) 17-18-21-22 (23-24) cm from cast-on edge mid front. On the next round of knit, cast off stitches for the gusset as follows: Start mid back and cast of the first (4) 4-4-4-5 (5-5) stitches, work garter stitch until there are (4) 4-4-4-5 (5-5)stitches left before the marker in front and cast off (8) 8-8-8-10 (10-10) stitches, work garter stitch until there are (4) 4-4-4-5 (5-5)) stitches left on the round, cast off the last (4) 4-4-4-5 (5-5) stitches. Cut the yarn. Place the stitches for one of the legs on a thread and finish each leg separately. LEG: The piece is worked in the round with double pointed needles. = (52) 56-60-68-78 (82-86) stitches. Divide the stitches on to double pointed needles size 3 mm and insert 1 marker at the beginning of the round (= inside leg). Continue with garter stitch and A.3 in the side as before for 1 cm – adjust so that the next round is 1 round of knit. Decrease 1 stitch on each side of the marker – READ DECREASE TIP-3, as follows: Size premature – 0/1 month and 1/3 months: On every 4th round. Size 6/9 months and 12/18 months: On every 6th round. Size 2 years: On every 8th round. Size ¾ years: On every 10th round. Decrease like this a total of (10) 12-12-14-15 (15-15) = (32) 32-36-40-48 (52-56) stitches. Work until the piece measures (24) 28-32-38-42 (48-55) cm from cast-on edge on mid front, now continue with A.3 as before but the garter stitches are worked in rib with knit 2/purl 2 until the piece measures approx. (26) 30-34-40-44 (50-57) cm from the cast-on edge on mid front – adjust so that the last round is the 4th round in A.3. Work rib over all stitches until the piece measures (27) 31-35-41-45 (51-58) cm from cast-on edge. Cast off with knit over knit and purl over purl. Place the stitches from the other leg back on double pointed needles size 3 mm and work as for the first leg. ASSEMBLY: Sew the (8) 8-8-8-10 (10-10) stitches cast off between the legs, to each other – front piece and back piece together. TIE CORD: Crochet a tie cord on the waist with hook size 2.5 mm as follows: Work chain stitches for approx. 110 cm, turn and work back with 1 slip stitch in each chain stitch, cut and fasten the strand. Tread the tie cord through the holes made in the rib and tie it at the front. |
||||||||||||||||||||||
Diagram explanations |
||||||||||||||||||||||
|
||||||||||||||||||||||
 |
||||||||||||||||||||||
 |
||||||||||||||||||||||
 |
||||||||||||||||||||||
 |
||||||||||||||||||||||
Have you finished this pattern?Tag your pictures with #dropspattern #hellokittenset or submit them to the #dropsfan gallery. Do you need help with this pattern?You'll find 40 tutorial videos, a Comments/Questions area and more by visiting the pattern on garnstudio.com. © 1982-2026 DROPS Design A/S. We reserve all rights. This document, including all its sub-sections, has copyrights. Read more about what you can do with our patterns at the bottom of each pattern on our site. |
||||||||||||||||||||||


With over 40 years in knitting and crochet design, DROPS Design offers one of the most extensive collections of free patterns on the internet - translated to 17 languages. As of today we count 324 catalogues and 12290 patterns translated into English (UK/cm). 12290
We work hard to bring you the best knitting and crochet have to offer, inspiration and advice as well as great quality yarns at incredible prices! Would you like to use our patterns for other than personal use? You can read what you are allowed to do in the Copyright text at the bottom of all our patterns. Happy crafting!
Post a comment to pattern DROPS Baby 29-9
We would love to hear what you have to say about this pattern!
If you want to leave a question, please make sure you select the correct category in the form below, to speed up the answering process. Required fields are marked *.