
Popular categories
Looking for a yarn?


Comments / Questions (88)
![]() Irina wrote:
Irina wrote:
Habe die Hose in Grösse 1-3 Monate 104 Maschen gestrickt .Hat alles gut geklappt. Jetzt versuche ich schon das 2.mal die Hose mit 96 Maschen zu stricken. Habe alles nach Anleitung gemacht. Jetzt muss ich die Reihe ab hintere Mitte 19 Maschen stricken und dann das Diagramm A3. Leider ist da ein Fehler in der Anleitung. Nach 19 Maschen muss das Diagramm mit 2 linke Maschen anfangen..Bei mir sind aber 2 rechte Maschen. Gruß Irina.
15.01.2021 - 22:16
![]() Irina wrote:
Irina wrote:
Da wir ja in Runden stricken werden alle 4 Reihen (das A3 Muster) von rechts nach links gelesen?
30.12.2020 - 08:43DROPS Design answered:
Liebe Irina. Ja , naturlich. Das ist korrekt. Viele Spass zum Stricken!
03.01.2021 - 16:41
![]() Irina wrote:
Irina wrote:
Moin, ich stricke die Hose in Grösse 1-3 Monate. Habe die Erhöhung gestrickt. Ist die letzte Reihe(50 Maschen) eine Rückreihe.?Dann wende ich und stricke eine Hinreihe .Ab denn Markierer stricke ich 19 Maschen und dann muss ich mit den 10 Maschen A3 anfangen . Aber ich habe da immer zuerst 2 rechte Maschen. Wo ist mein Fehler?
30.12.2020 - 08:38DROPS Design answered:
Liebe Irina, es stimmt so, aber in der Größe 0/1 Monat, die Grösse 1/3 Monate ist etwas unterschiedlich (= 3. Grösse) = 104 Maschen anschlagen, die verkürzten Reihen beginnen mit 9 linke Maschen und enden mit 66 Maschen (= Rückreihe), wenden und bis hintere Mitte stricken - und dann 21 M (= Mitte Rückenteil), A.3 ... . Viel Spaß beim stricken!
04.01.2021 - 12:57
![]() Encarna wrote:
Encarna wrote:
He tenido un Jersey con esa lana BABY DROPS BABY y le a salido un montón de bola o pelusa como le queramos llamar, pero a otro dia de estrenarlo
18.11.2020 - 10:50
![]() Astrid Kamin wrote:
Astrid Kamin wrote:
Hallo, komme nicht weiter ab dem Rückenteil. ich werd weich , habe gelesen gestrickt wieder und wieder neu gelesen. Ich komme einfach nicht weiter. Maschen des linken Vorderteil in der Hin-Reihe rechts stricken , neue Maschen aufnehmen und die Maschen des rechten Vorderteils in der Hin-Reihe rechts auf die Nadel stricken???? Wäre schön dazu ein Video zusehen. Freue mich auf eine Antwort, liebe Grüße Astrid
01.11.2020 - 13:53DROPS Design answered:
Liebe Frau Kamin, das Rückenteil wird jetzt von oben nach unten gestrickt, dh Von der Vorderseite = Hinreihe: stricken Sie die Maschen vom linken Schulter/Vorderteil, jetzt schlagen Sie neuen Maschen für den Halsausschnitt (zwischen beiden Vorderteile) und stricken Sie die stillgelegten Maschen von rechten Schulter/Vorderteil - dieses Video zeigt, wie man Maschen am Ende einer Reihe anschlägt - hier nehmen Sie diese Maschen am Ende einer Hinreihe (nach li. Vorderteil) und stricken jetzt danach die Maschen von re. Vorderteil. Viel Spaß beim stricken!
02.11.2020 - 09:50
![]() Yrsa Østergaard wrote:
Yrsa Østergaard wrote:
Hvordan kan jeg strikke retstrikning( med riller) når jeg strikker rundt blir’ det da glatstrikning ???
28.09.2020 - 20:57DROPS Design answered:
Hej Yrsa. Retstrik strikkes rundt således: Strik 1 omgang ret og 1 omgang vrang osv. Mvh DROPS Design
29.09.2020 - 09:03
![]() Marie Königsson wrote:
Marie Königsson wrote:
Vad menas med \"ingen maska,hoppa över denna ruta\" i mönsterdiagram A.3
27.08.2020 - 14:48
![]() Lucia wrote:
Lucia wrote:
Este patrón me gusta pero la técnica de punto nolose como podría hacer este mismo patrón en ganchillo
18.07.2020 - 22:14DROPS Design answered:
Hola Lucia. No hacemos patrones personalizados. Lamentablemente no hay en este momento una chaqueta a ganchillo de este tipo en nuestra colección.
20.07.2020 - 20:48
![]() Lia wrote:
Lia wrote:
Hi any baby patterns available in English?
11.04.2020 - 16:13DROPS Design answered:
Dear Lia. Here you have a list of all the baby patterns available in English. https://www.garnstudio.com/search.php?action=browse&c=3&lang=en Happy knitting!
12.04.2020 - 19:20
![]() Lilo wrote:
Lilo wrote:
Hallo, ich bin jetzt bei den Abnahmen für den Zwickel angekommen. Der Arbeitsfaden ist jetzt hinten, wird dieser abgeschnitten oder stricke ich damit das erste Bein? Also schließe ich die Runde für das erste Bein und stricke mit dem Arbeitsfaden weiter. Ich hoffe, ich habe mich verständlich ausgedrückt ;-)
31.03.2020 - 12:14DROPS Design answered:
Liebe Lilo, wenn Sie also die Maschen für den Zwickel abketten, beginnen Sie am an der hinteren Mitte und enden Sie an der hinteren Mitte, dh der Faden wird am Ende dieser Reihe abgeschnitten. Viel Spaß beim stricken!
31.03.2020 - 12:50
|
||||||||||||||||||||||
Hello Kitten#hellokittenset |
||||||||||||||||||||||
 |
 |
|||||||||||||||||||||
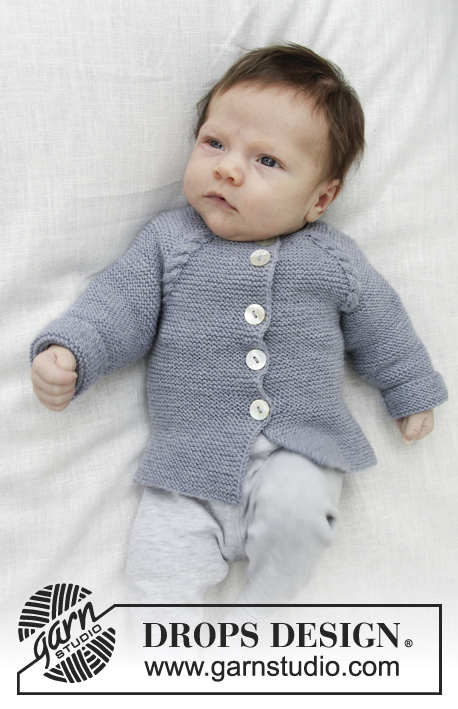
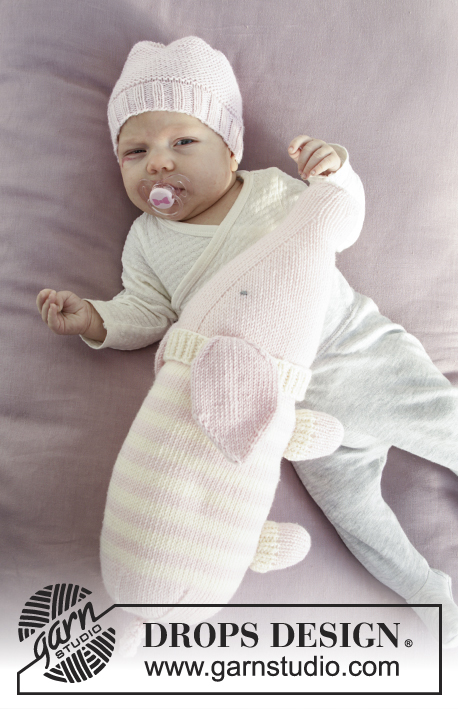
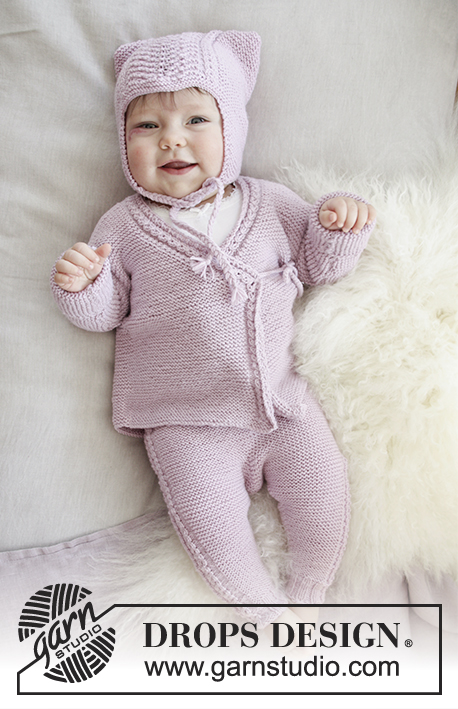
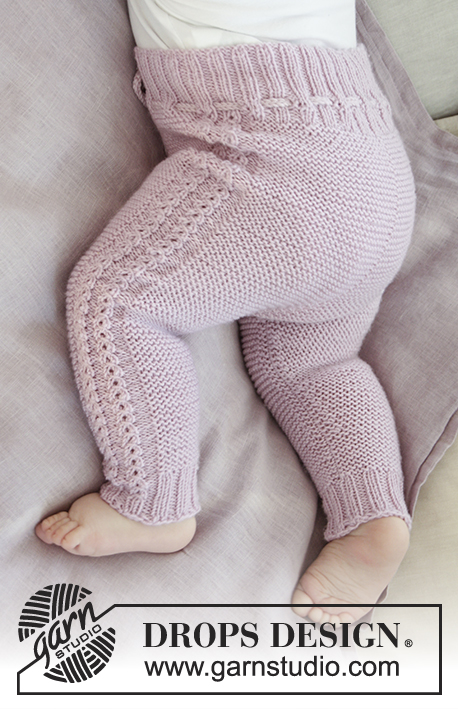
The set consists of: Hat for baby with garter stitch, wave pattern and earflaps. Wrap-around jacket and trousers with garter stitch and lace pattern. Sizes premature – 4 years. The set is knitted in DROPS BabyMerino.
DROPS Baby 29-9 |
||||||||||||||||||||||
|
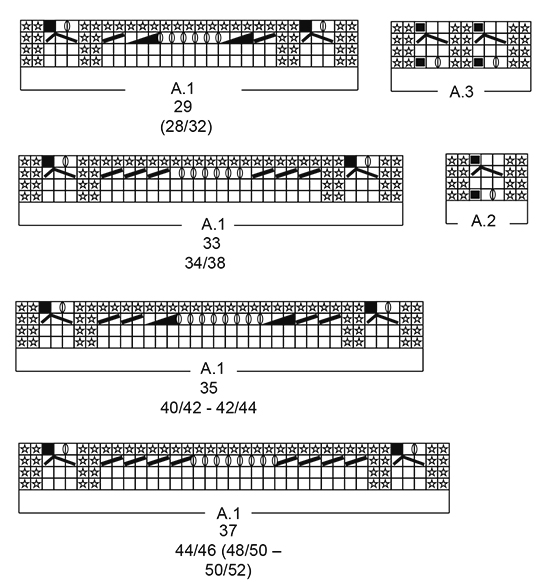
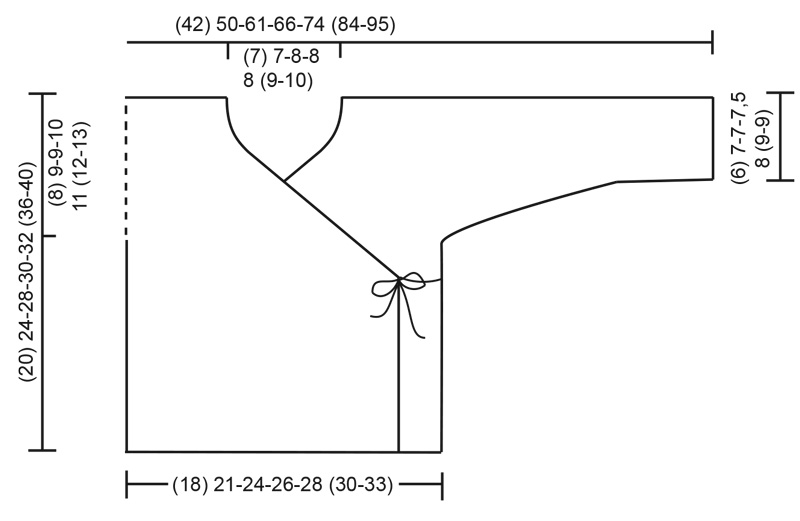
INFORMATION FOR THE PATTERN: RIDGE/GARTER STITCH (back and forth): 1 ridge = knit 2 rows. PATTERN: Hat: See diagram A.1. Jacket: See diagram A.2. Trousers: See diagram A.3. The diagrams show all the rows in the patterns seen from the right side. Choose the diagram for your size. DECREASE TIP-1 (for hat): All decreases are made from the right side! Decrease as follows: Work 1 edge stitch in garter stitch, slip 1 stitch as if to knit, knit 1, pass the slipped stitch over (= 1 stitch decreased), work garter stitch until there are 3 stitches left, knit 2 stitches together (= 1 stitch decreased), 1 edge stitch in garter stitch. DECREASE TIP-2 (for jacket): All decreases are made from the right side! Decrease as follows after the 1 edge stitch and A.2 (for the right front piece): Slip 1 stitch as if to knit, knit 1, pass the slipped stitch over (= 1 stitch decreased). Decrease as follows before the 1 edge stitch and A.2 (for the left front piece): Knit 2 together (= 1 stitch decreased). DECREASE TIP-3 (for the trousers): Work until there are 3 stitches left before the marker, then knit 2 stitches together (= 1 stitch decreased), work 2 stitches (the marker sits between these 2 stitches) and then knit 2 stitches twisted together (= 1 stitch decreased). INCREASE TIP (for the trousers): Increase 2 stitches by making 1 yarn over on each side of 2 stitches, on the next round, the yarn overs are knitted twisted to prevent holes. ---------------------------------------------------------- HAT: The hat is worked back and forth, top down. Cast on (79) 89-99-103-107 (115-121) stitches with circular needle size 3 mm and Baby Merino. Work GARTER STITCH – see description above, until the piece measures 3 cm. Then work as follows: (25) 28-32-34-35 (39-42) stitches in garter stitch, A.1 over (29) 33-35-35-37 (37-37) stitches and work (25) 28-32-34-35(39-42) stitches in garter stitch. REMEMBER THE KNITTING TENSION! Work in this way until the piece measures (14) 14-15-16-16 (18-19) cm. Work 2 ridges. On the next row from the right side, cast off for the earflaps as follows: Cast off the first (5) 8-10-10-9(11-12) stitches, knit the next (20) 20-22-24-26 (28-30) stitches (= first earflap) and place these stitches on a thread, cast off the next (29) 33-35-35-37 (37-37) stitches, knit over the next (20) 20-22-24-26 (28-30) stitches (= 2nd earflap) and place these stitches on a thread, cast off the last (5) 8-10-10-9 (11-12) stitches. Cut the strand. EARFLAPS: = (20) 20-22-24-26 (28-30) stitches. Place the stitches from one of the threads back on the needle, work garter stitch and decrease 1 stitch inside 1 edge stitch in each side of the piece – READ DECREASE TIP-1, as follows: Decrease 1 stitch in each side of the piece every 4th row a total of (6) 6-5-5-6 (6-7) times and 1 stitch in each side of the piece every 2nd row a total of (2) 2-4-5-5 (6-6) times = 4 stitches. The earflap measure approx. (6) 6-6-6-7 (8-8) cm. Cast off and fasten the strand. Repeat on the other earflap. ASSEMBLY: Sew the sides together, sewing edge to edge in the outermost stitch. Fold the hat so that this seam is mid back and then sew the cast-on edge together the same way. TIE CORD: Cut 6 strands of approx. 60 cm and thread them halfway through the tip of the earflap, in other words, there will be 12 strands to plait. Plait 1 plait. Tie 1 knot at the bottom. Do the same in the other earflap. --------------------------------------------------------- JACKET: The piece is worked back and forth on circular needle. Start with one of the front pieces, cast on stitches for the sleeve and work up to the shoulder. Work the other front piece, work the 2 front pieces together and work down the back piece. RIGHT FRONT PIECE: LOOSELY cast on (34) 37-44-48-52 (55-62) stitches with circular needle size 3 mm and Baby Merino and work 3 RIDGES – see description above (first row = right side). Work as follows from the right side: Work 1 edge stitch in garter stitch, A.2 over 6 stitches and work garter stitch to end of row. Continue pattern in this way until the piece measures (9) 12-16-16-17 (20-23) cm – adjust so that the next row is worked from the right side. Work 1 short row (starting from the right side) as follows: Work 1 edge stitch in garter stitch, A.2, turn the piece, tighten the strand and work back from the wrong side as before. Turn the piece. READ THE WHOLE OF THE FOLLOWING SECTION BEFORE CONTINUING! YOU CAST OFF FOR THE NECK AT THE SAME TIME AS YOU CAST ON STITCHES FOR THE SHOULDER/SLEEVE. DECREASE FOR NECK: Decrease 1 stitch for the neck inside 1 edge stitch and A.2 at the beginning of the row – READ DECREASE TIP-2. Decrease in this way every 2nd row a total of (18) 18-22-24-26 (28-32) times, then decrease every 4th row a total of 2 times. SHOULDER/SLEEVE: When the piece measures (12) 15-19-20-21 (24-27) cm cast on new stitches at the end of each row from the right side (= towards the side) for the sleeve as follows: Cast on (3) 4-6-6-6 (6-6) stitches a total of (4) 4-4-5-6 (7-8) times and (16) 19-19-18-19 (23-26) stitches a total of 1 time. After all increases and decreases there are (42) 52-63-70-79 (90-102) stitches on the row for the shoulder/sleeve. Continue with garter stitch and A.2 until the piece measures (20) 24-28-30-32 (36-40) cm – adjust so that you finish with the 4th row in A.2, now continue by working garter stitch over all stitches. Insert 1 marker = mid top of shoulder. Cast on 2 new stitches at the end of the row towards the neck (= from the wrong side) a total of 2 times = (46) 56-67-74-83 (94-106) stitches (last row = wrong side). Place all the stitches on a thread. LEFT FRONT PIECE: LOOSELY cast on (34) 37-44-48-52 (55-62) stitches with circular needle size 3 mm and Baby Merino and work 3 ridges (first row = right side). Continue as follows from the right side: Work garter stitch until there are 7 stitches left on the needle, A.2 over 6 stitches and 1 edge stitch in garter stitch. Continue the pattern in this way until the piece measures (9) 12-16-16-17 (20-23) cm – adjust so that the next row is worked from the wrong side. Work 1 short row (starting from the wrong side) as follows: Work 1 edge stitch in garter stitch, A.2, turn the piece, tighten the strand and work back from the right side. Turn the piece and work back from the wrong side. REMEMBER THE KNITTING TENSION! READ THE WHOLE OF THE NEXT SECTION BEFORE CONTINUING! YOU DECREASE FOR THE NECK AT THE SAME TIME AS YOU CAST ON STITCHES FOR THE SHOULDER/SLEEVE. DECREASE FOR THE NECK: Decrease 1 stitch for the neck before A.2 and 1 edge stitch at the end of the row. Decrease in this way every 2nd row a total of (18) 18-22-24-26 (28-32) times, then decrease every 4th row a total of 2 times. SHOULDER/SLEEVE: When the piece measures (12) 15-19-20-21 (24-27) cm cast on new stitches at the end of each row from the wrong side (= towards the side) for the sleeve as follows: Cast on (3) 4-6-6-6 (6-6) stitches a total of (4) 4-4-5-6 (7-8) times and (16) 19-19-18-19 (23-26) stitches a total of 1 time. After all increases and decreases there are (42) 52-63-70-79 (90-102) stitches on the row for shoulder/sleeve. Continue with garter stitch and A.2 until the piece measures (20) 24-28-30-32 (36-40) cm – adjust so that you finish with the 4th row in A.2, now continue by working garter stitch over all stitches. Insert 1 marker = mid top of shoulder. Cast on 2 new stitches at the end of the row towards the neck (= from the right side) a total of 2 times = (46) 56-67-74-83 (94-106) stitches. Knit 1 row from the wrong side. BACK PIECE: Knit over the left front piece from the right side (= (46) 56-67-74-83 (94-106) stitches), cast on (8) 8-10-10-12 (14-16) new stitches (= back of neck) and knit the right front piece on to the circular needle (= knit from the right side) = (100) 120-144-158-178 (202-228) stitches. THE PIECE IS NOW MEASURED FROM THE MARKERS ON THE SHOULDERS. Continue with garter stitch back and forth on the needle. When the piece measures (6) 7-7-7½-8 (9-9) cm cast off sleeve stitches as follows: Cast off at the beginning of each row in each side of the piece as follows: (16) 19-19-18-19 (23-26) stitches 1 time and (3) 4-6-6-6 (6-6) stitches a total of (4) 4-4-5-6 (7-8) times = (44) 50-58-62-68 (72-80) stitches. Continue working until the piece measures approx. (20) 24-28-30-32 (36-40) cm – fold the piece double at the markers on the shoulders and make sure that the front and back pieces are the same length – the loosely cast off. ASSEMBLY: Sew side and sleeve seams edge to edge in the outermost loop of the outermost stitch. CROCHET EDGE: Crochet with hook size 2.5 mm around the whole opening of the jacket as follows (from the right side): Work 1 double crochet in the first stitch, * 1 chain stitch, skip approx. 2 stitches/rows, 1 double crochet in the next stitch *, repeat from *-* around the whole jacket, but in each of the corners (where the decreases for the neck start on the front pieces) work the tie cord as follows: 1 double crochet in the tip, work chain stitches for approx. 20-25 cm, turn and work back with 1 slip stitch in each chain stitch, work 1 double crochet in the tip of the front piece again. The round is finished with 1 slip stitch in the first double crochet. Make 2 loose tie cords: Work chains for approx 20-25 cm, turn and work back with 1 slip stitch in each chain stitch. Cut the strand and make 1 more tie cord the same way. Fasten 1 tie cord on the inside on right side and 1 tie cord on the outside on the left side. Make sure to place the ties at the same height as the tie on the outside. --------------------------------------------------------- TROUSERS: The piece is worked in the round, top down. The round starts mid back. Cast on (88) 96-104-120-128 (136-144) stitches with circular needle size 2.5 mm and Baby Merino. Insert 1 marker at the beginning of the round (= mid back) and 1 marker after (44) 48-52-60-64 (68-72) stitches (= mid front). Work rib as follows from mid back: knit 1, * purl 2, knit 2 *, repeat from *-* and finish with purl 2 and knit 1. When the rib section measures 4 cm work a row of holes for the tie cord as follows: * knit 1, 1 yarn over, purl 2 together, knit 2, 1 yarn over, purl 2 together, knit 1 *, repeat from *-* the whole round. Work 1 round of rib with knit 2 / purl 2. Work an elevation at the back of the rib section as follows: Work (7) 7-9-9-9 (9-9) stitches, turn, tighten the strand, work (14) 14-18-18-18 (18-18) stitches back, turn, tighten the strand, work (20) 20-26-26-26 (26-26) stitches, turn, tighten the strand, work (26) 26-34-34-34 (34-34) stitches back. Continue in this way by working (6) 6-8-8-8 (8-8) more stitches each time you turn until you have worked a total of (50) 50-66-66-82 (82-82) stitches. Turn. Change to circular needle size 3 mm. Work as follows from mid back: Work (17) 19-21-25-27 (29-31) stitches in GARTER STITCH – see description above, A.3 (= 10 stitches), work (34) 38-42-50-54 (58-62) stitches in garter stitch, A.3 over 10 stitches, work (17) 19-21-25-27 (29-31) stitches in garter stitch. REMEMBER THE KNITTING TENSION! When the piece measures (12) 14-15-18-17 (18-19) cm from cast-on edge mid front, increase 1 stitch on each side of the 2 middle stitches at the front and back – READ INCREASE TIP (= 4 stitches increased). Increase in this way every 2nd round a total of (8) 8-8-8-12 (12-12) times = (120) 128-136-152-176 (184-192) stitches. After last increase, piece measures approx. (15) 17-18-21-22 (23-24) cm from cast-on edge mid front. On the next round of knit, cast off stitches for the gusset as follows: Start mid back and cast of the first (4) 4-4-4-5 (5-5) stitches, work garter stitch until there are (4) 4-4-4-5 (5-5)stitches left before the marker in front and cast off (8) 8-8-8-10 (10-10) stitches, work garter stitch until there are (4) 4-4-4-5 (5-5)) stitches left on the round, cast off the last (4) 4-4-4-5 (5-5) stitches. Cut the yarn. Place the stitches for one of the legs on a thread and finish each leg separately. LEG: The piece is worked in the round with double pointed needles. = (52) 56-60-68-78 (82-86) stitches. Divide the stitches on to double pointed needles size 3 mm and insert 1 marker at the beginning of the round (= inside leg). Continue with garter stitch and A.3 in the side as before for 1 cm – adjust so that the next round is 1 round of knit. Decrease 1 stitch on each side of the marker – READ DECREASE TIP-3, as follows: Size premature – 0/1 month and 1/3 months: On every 4th round. Size 6/9 months and 12/18 months: On every 6th round. Size 2 years: On every 8th round. Size ¾ years: On every 10th round. Decrease like this a total of (10) 12-12-14-15 (15-15) = (32) 32-36-40-48 (52-56) stitches. Work until the piece measures (24) 28-32-38-42 (48-55) cm from cast-on edge on mid front, now continue with A.3 as before but the garter stitches are worked in rib with knit 2/purl 2 until the piece measures approx. (26) 30-34-40-44 (50-57) cm from the cast-on edge on mid front – adjust so that the last round is the 4th round in A.3. Work rib over all stitches until the piece measures (27) 31-35-41-45 (51-58) cm from cast-on edge. Cast off with knit over knit and purl over purl. Place the stitches from the other leg back on double pointed needles size 3 mm and work as for the first leg. ASSEMBLY: Sew the (8) 8-8-8-10 (10-10) stitches cast off between the legs, to each other – front piece and back piece together. TIE CORD: Crochet a tie cord on the waist with hook size 2.5 mm as follows: Work chain stitches for approx. 110 cm, turn and work back with 1 slip stitch in each chain stitch, cut and fasten the strand. Tread the tie cord through the holes made in the rib and tie it at the front. |
||||||||||||||||||||||
Diagram explanations |
||||||||||||||||||||||
|
||||||||||||||||||||||
 |
||||||||||||||||||||||
 |
||||||||||||||||||||||
 |
||||||||||||||||||||||
 |
||||||||||||||||||||||
Have you finished this pattern?Tag your pictures with #dropspattern #hellokittenset or submit them to the #dropsfan gallery. Do you need help with this pattern?You'll find 40 tutorial videos, a Comments/Questions area and more by visiting the pattern on garnstudio.com. © 1982-2026 DROPS Design A/S. We reserve all rights. This document, including all its sub-sections, has copyrights. Read more about what you can do with our patterns at the bottom of each pattern on our site. |
||||||||||||||||||||||


With over 40 years in knitting and crochet design, DROPS Design offers one of the most extensive collections of free patterns on the internet - translated to 17 languages. As of today we count 324 catalogues and 12290 patterns translated into English (UK/cm). 12290
We work hard to bring you the best knitting and crochet have to offer, inspiration and advice as well as great quality yarns at incredible prices! Would you like to use our patterns for other than personal use? You can read what you are allowed to do in the Copyright text at the bottom of all our patterns. Happy crafting!
Post a comment to pattern DROPS Baby 29-9
We would love to hear what you have to say about this pattern!
If you want to leave a question, please make sure you select the correct category in the form below, to speed up the answering process. Required fields are marked *.