
Popular categories
Looking for a yarn?


Comments / Questions (28)
![]() Cunin Christine wrote:
Cunin Christine wrote:
Bonjour, Je fais ce pull en taille XL avec même laine et aiguilles et il me manque entre 3 et 4 pelotes de la couleur chêne clair alors que j\'ai commandé ce qui est indiqué ... c\'est la première fois que ça m\'arrive! Va falloir l\'indiquer!
28.03.2026 - 10:46DROPS Design answered:
Bonjour Mme Cunin, tricotez-vous bien avec la même tension que pour votre échantillon? Autrement dit aussi bien en largeur qu'en hauteur?
08.04.2026 - 15:04
![]() Christine Cunin wrote:
Christine Cunin wrote:
Bonjour, Je vais faire le pull 171-5 et je me demande où placer le raccord entre les bandes jacquard car forcément ça se raccorde mal quand on a fait un tour!? Placer le raccord sur le côté, ou au milieu dos comme ça semble être le cas ici? En fait c'est le problème de tous les jacquards en rond! Merci de me dire ce qui sera le mieux!
13.02.2026 - 14:32DROPS Design answered:
Bonjour Mme Cunin, dans ce modèle, les tours de l'empiècement commencent au milieu dos. Bon tricot!
13.02.2026 - 16:45
![]() Tina wrote:
Tina wrote:
Jeg strikker str. L. Er i gang med A1 og har taget ud ved pil2 og har 196 masker. Kan det passe? Ifølge A1 er en rapport 12 masker så det går ikke op?
05.01.2026 - 17:12DROPS Design answered:
Hei Tina. Du strikker A.1 16 ganger og har 4 masker igjen på omgange, da strikker du de 4 første maskene av A.1. Du får da en hel "firkant" med (diagrammet viser 3 "firkanter" mellom 2. og . pil), slik at mønstret stemmer. mvh DROPS Design
26.01.2026 - 09:02
![]() Vibeke wrote:
Vibeke wrote:
Kan man strikke denne bluse med Drops Paris? Skal man så ændre på størrelsen? Mvh Vibeke
05.06.2025 - 21:43DROPS Design answered:
Hei Vibeke. DROPS Karisma og DROPS Paris har forskjellige tykkelse, så strikkes det etter oppskriften med Paris, vil ikke oppskriften stemme. Se heller på garnkvaliteter i garngruppe B, om du ønsker å strikke denne oppskriften. mvh DROPS Design
10.06.2025 - 13:06
![]() Ritva-Leena wrote:
Ritva-Leena wrote:
How do I get these instructions in English or Finnish?
07.10.2024 - 11:39DROPS Design answered:
Dear Ritva-Leena, click on the scroll down menu next to the printer icon to edit language into either English or Finnish. Happy knitting!
07.10.2024 - 15:47
![]() Christine Russell wrote:
Christine Russell wrote:
DROPS Candy Lane pattern number 171-5. Having completed the neckband and done the increase row, the pattern says to Insert 1 marker mid back. Where is that? Thank you for your help-sorry, I have never knitted a top down sweater.
25.01.2024 - 15:18DROPS Design answered:
Dear Mrs Russel, the rounds start on mid back, ie insert the marker at the beginning of the round. Happy knitting!
26.01.2024 - 07:22
![]() Christine Russell wrote:
Christine Russell wrote:
DROPS Pattern number 171-5 Candy Lane. So sorry- I have another problem. I have tried several different methods of casting on the neckband. I am following the L size, so 82 stitches and I cannot get the neckband anywhere big enough to put over my head. Can you help please? I am obviously misunderstanding as the neckline in the photograph looks very relaxed. Thank you in advance.
25.01.2024 - 14:22DROPS Design answered:
Dear Mrs Russel, what about your tension? Do you have 21 sts = 10 cm in width with needle size 4 mm? Then you should get the correct width, but should you need larger neckline, just adjust to the desired circumference then adjust the number of ridges afterwards to start yoke with 108 sts as you need in L. Happy knitting!
26.01.2024 - 07:21
![]() Maria Cristina wrote:
Maria Cristina wrote:
Sto lavorando la manica e raffrontando le istruzioni con la vs. foto del modello, non riporta quando dice che , lavorando lo schema A2, arrivati alla freccia con il pallino, bisogna cambiare schema e lavorare l’ A3. Se facessi così il modello non seguirebbe lo stesso disegno del corpo e nella foto la manica ha lo stesso disegno del corpo. È un errore o bisogna seguire le istruzioni? Grazie
01.10.2023 - 17:07DROPS Design answered:
Buonasera Maria Cristina, nella manica, dopo le diminuzioni, è riportato: "Quando è stato lavorato il motivo fino alla freccia con il pallino indicata in A.2, lavorare il motivo in tondo seguendo il diagramma A.3 nello stesso modo". Se non avessimo risposto alla sua domanda, la preghiamo di riscriverci spiegandoci meglio il dubbio. Buon lavoro!
01.10.2023 - 18:50
![]() DAGMAR wrote:
DAGMAR wrote:
I AM KNITTING SIZE MEDIUM AND HAVE 104 STITCHES, BUT THE A1 PATTERN REPEATS ARE 12 STITCHES, WHAT AM I MISSING?
01.11.2021 - 14:37DROPS Design answered:
Hi Dagmar, Sometimes the stitch count is not divisible with full/whole repeats of the diagram in width. Here for example A.1 covers 12 stitches and is to be repeated over 104 stitches. In this case you will work 8 full repeats of A.1 (= 96 stitches), and then work the first 8 stitches in the diagram over the remaining stitches. Please also see the lesson DROPS HERE. Happy knitting!
01.11.2021 - 21:53
![]() Eva wrote:
Eva wrote:
Den rätstickade nederkanten på tröjan viker sig uppåt. Vad kan det bero på?
20.01.2021 - 18:00DROPS Design answered:
Hej Eva, du kan stryka eller pressa försiktigt med en lätt fuktad trasa från avigsidan vid låg temperatur :)
27.01.2021 - 14:27
|
||||||||||||||||||||||||||||||||||
Candy Lane#candylanesweater |
||||||||||||||||||||||||||||||||||
 |
 |
|||||||||||||||||||||||||||||||||
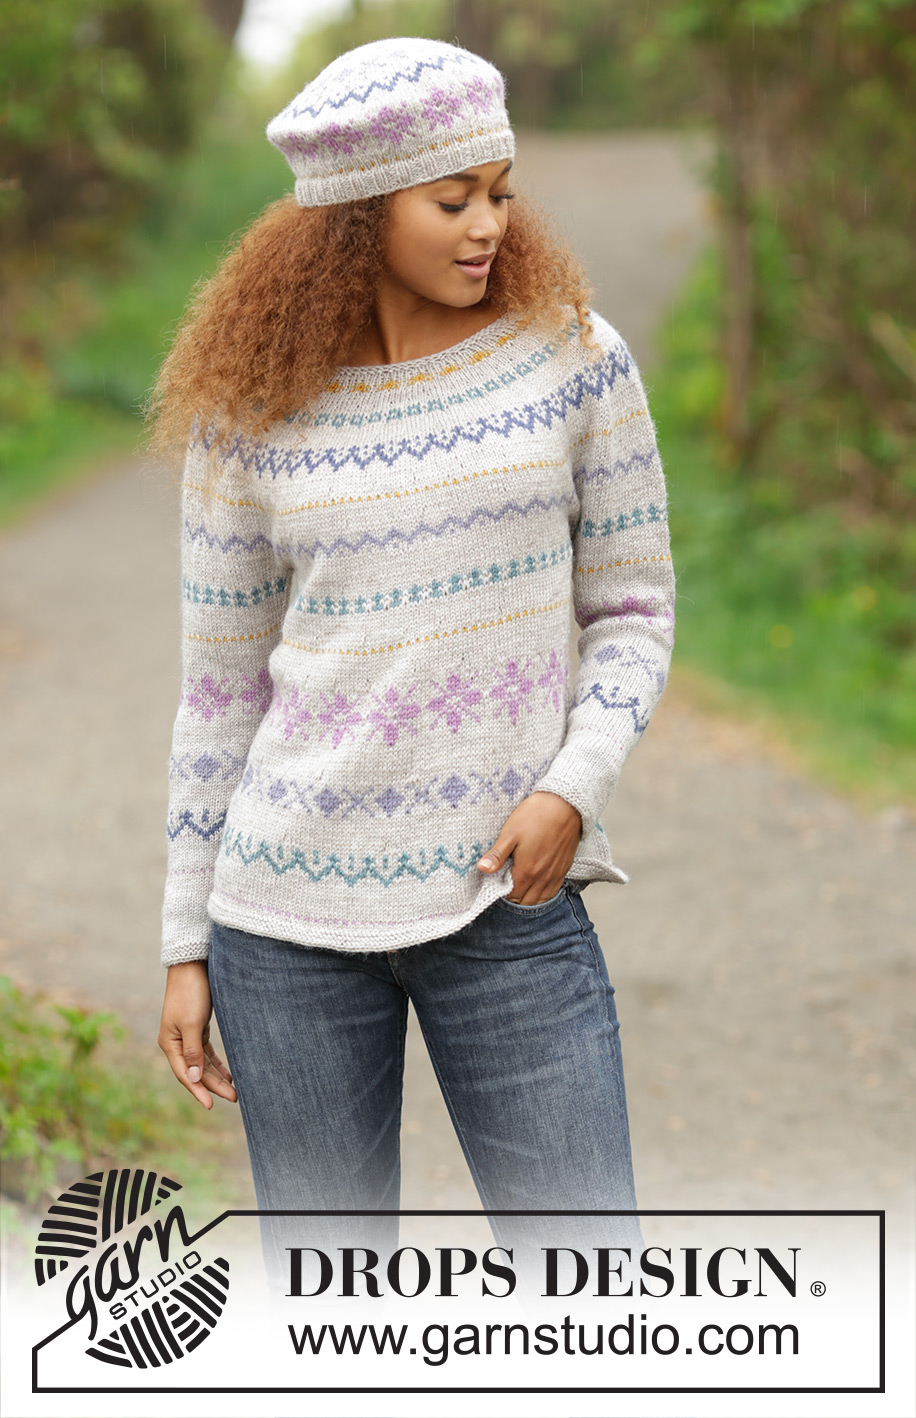
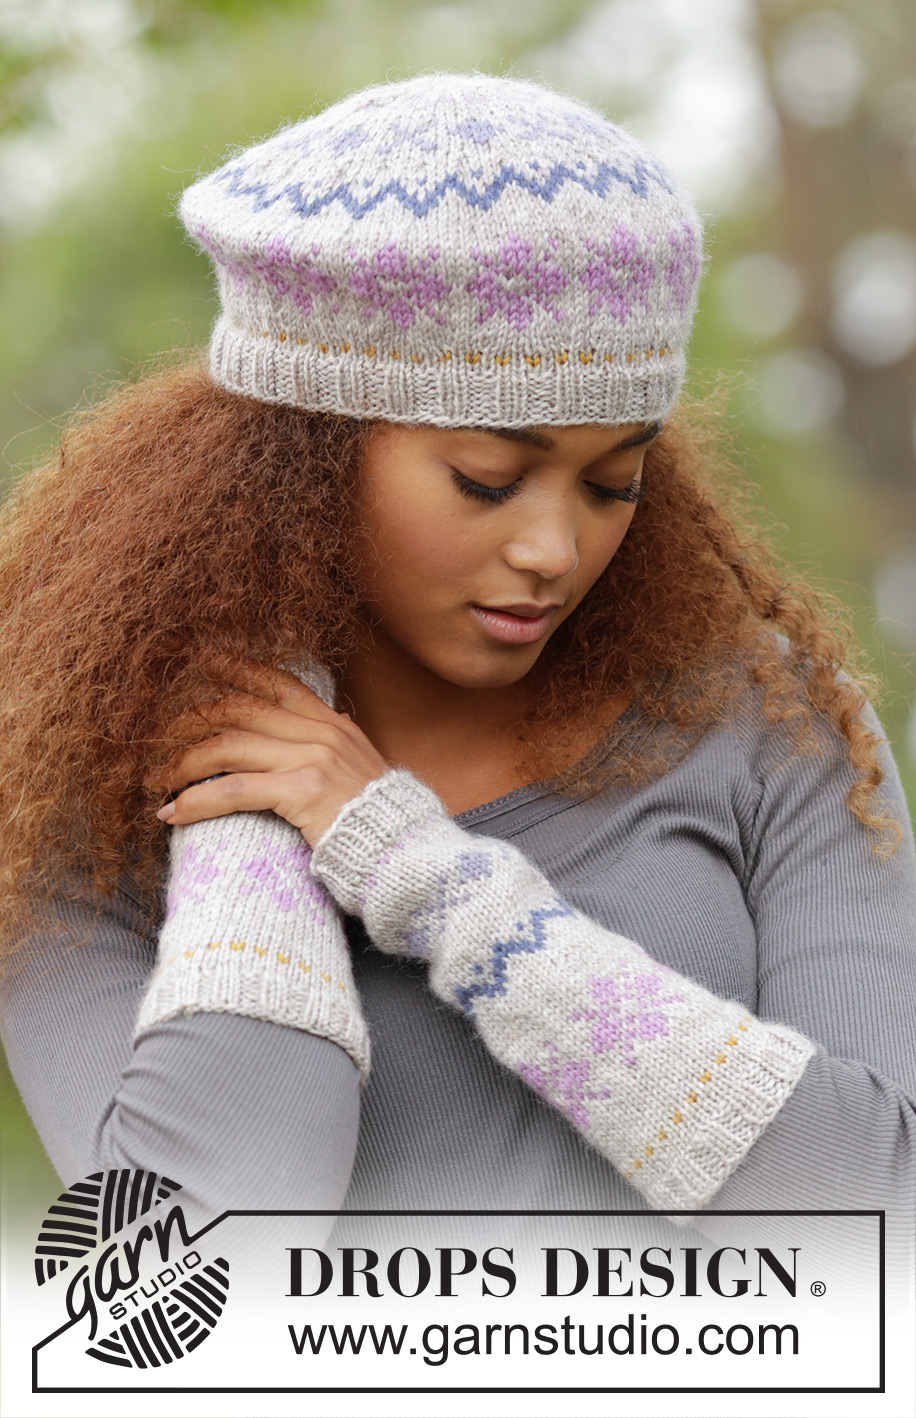
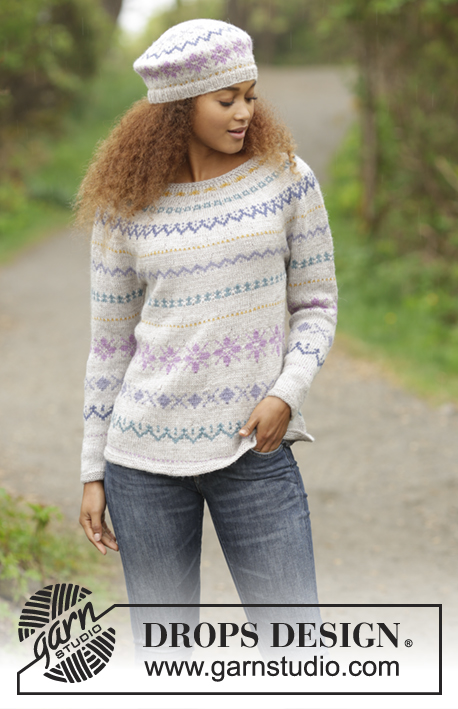
Set consists of: Knitted DROPS jumper with round yoke and pattern border, worked top down in ”Karisma”. Beret and wrist warmers with pattern border in “Karisma”. Size: S - XXXL.
DROPS 171-5 |
||||||||||||||||||||||||||||||||||
|
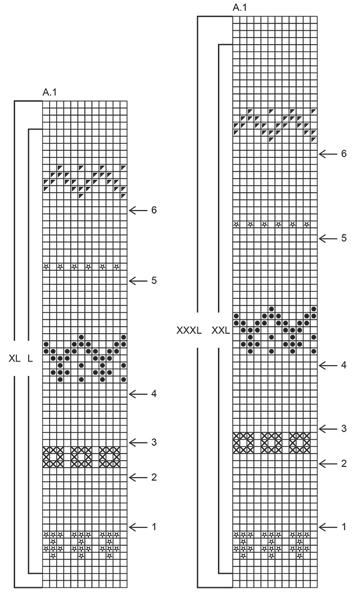
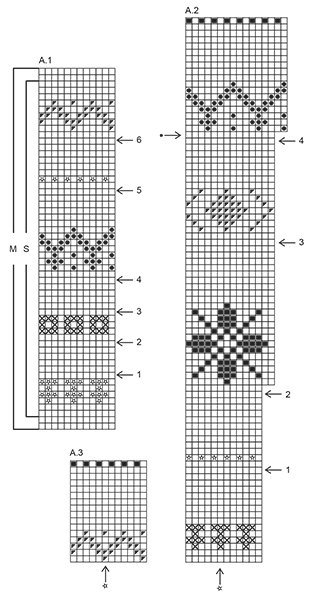
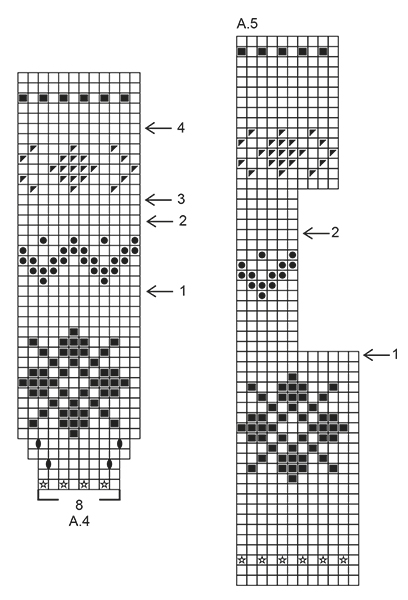
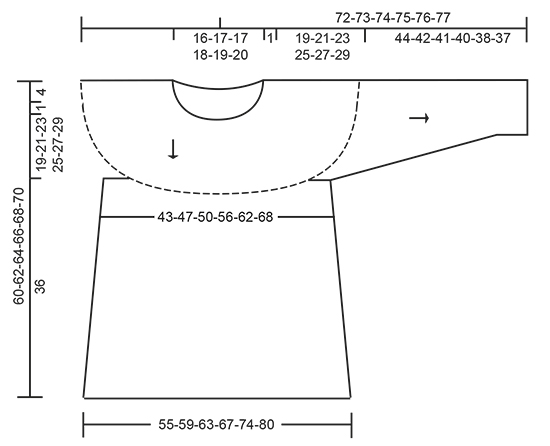
JUMPER: GARTER ST (worked in the round): 1 ridge = 2 rounds. * K 1 round and P 1 round *, repeat from *-*. PATTERN: See diagrams A.1 to A.3. Choose diagram for correct size (applies to A.1). Work entire pattern in stocking st. INCREASE TIP (applies to round yoke): To calculate how often inc should be done, use the total no of sts on row (e.g. 76 sts) and divide by no of inc to be done (e.g. 24) = 3.16. I.e. in this example inc after approx. every third st. Inc 1 st by making 1 YO, on next round work YO twisted to avoid holes. KNITTING TIP: If the knitting tension is wrong vertically and the garment is worked to tight, it will be too short and the armhole will be too small - this can be adjusted by working 1 extra round evenly in the sections with one colour. NOTE: If the garment is too loose, it will be too long and the armhole too big, this can be adjusted by working 1 round less in the sections in one colour. DECREASE TIP (applies to mid under sleeve): Beg 3 sts before marker and K 2 tog, K 2 (marker is between these 2 sts), slip 1 st as if to K, K 1, psso (dec sts + the 2 middle sts under sleeve are worked in light oak the entire sleeve). ---------------------------------------------------------- JUMPER: Worked in the round on circular needle from top down. YOKE: Cast on 76-80-82-86-88-92 sts on circular needle size 3 mm with light oak. Work 2 ridges in GARTER ST - see explanation above. Switch to circular needle size 4 mm and K 1 round while inc 24-24-26-30-32-32 sts evenly - READ INCREASE TIP = 100-104-108-116-120-124 sts. For better shape work an elevation in the back of neck with light oak as follows: Insert 1 marker mid back. K 13-13-14-15-16-17 sts past marker, turn, tighten yarn and P 26-26-28-30-32-34 sts back. Turn, tighten yarn and K 39-39-42-45-48-51 sts, turn, tighten yarn and P 52-52-56-60-64-68 sts back. Turn, tighten yarn and K 65-65-70-75-80-85 sts, turn, tighten yarn and P 78-78-84-90-96-102 sts back. Turn and K until mid back. Then work pattern in the round according to diagram A.1 (choose diagram for correct size) and inc evenly on every round marked with arrow in diagram as explained below - READ INCREASE TIP, KNITTING TIP and REMEMBER THE KNITTING TENSION. Arrow-1 Inc 40-42-44-50-56-62 sts = 140-146-152-166-176-186 sts. Arrow-2 Inc 40-42-44-50-56-62 sts = 180-188-196-216-232-248 sts. Arrow-3 Inc 30-36-38-44-48-52 sts = 210-224-234-260-280-300 sts. Arrow-4 Inc 30-34-36-40-44-48 sts = 240-258-270-300-324-348 sts. Arrow-5 Inc 26-30-34-38-38-38 sts = 266-288-304-338-362-386 sts. Arrow-6 Inc 16-24-32-34-34-34 sts = 282-312-336-372-396-420 sts. When A.1 has been worked, piece measures approx. 20-22-24-26-28-30 cm mid front (incl edge in garter st in neck). Work next round as follows with light oak: Work 41-45-48-54-59-64 sts in stocking st (= ½ back piece), slip the next 59-67-73-79-81-83 sts on 1 stitch holder (= sleeve), cast on 8-8-10-10-12-14 new sts (= in the side), work 82-89-95-107-117-127 sts in stocking st (= front piece), slip the next 59-67-73-79-81-83 sts on 1 stitch holder (= sleeve), cast on 8-8-10-10-12-14 sts (= in the side), work the remaining 41-44-47-53-58-63 sts in stocking st (= ½ back piece). Finish body and sleeves separately. BODY: = 180-194-210-234-258-282 sts. Insert 1 marker, NOW MEASURE PIECE FROM HERE! On first round inc 0-2-2-2-2-2 sts evenly AT THE SAME TIME work pattern in the round according to diagram A.2 = 180-196-212-236-260-284 sts. Continue pattern and inc evenly every round marked with arrow in diagram as explained below - REMEMBER INCREASE TIP. Arrow-1 Inc 12-10-10-6-6-6 sts = 192-206-222-242-266-290 sts. Arrow-2 Inc 18-18-16-10-14-18 sts = 210-224-238-252-280-308 sts. Arrow-3 Inc 14-14-14-14-14-14 sts = 224-238-252-266-294-322 sts. Arrow-4 Inc 8-10-12-14-18-14 sts = 232-248-264-280-312-336 sts. When diagram A.2 has been worked, continue in stocking st with light oak until finished measurements. When piece measures 34 cm from marker (jumper measures approx. 58-60-62-64-66-68 cm from shoulder), switch to circular needle size 3 mm. Work 3 ridges in garter st, switch back to needle size 4 mm and LOOSELY cast off with K. Jumper measures approx. 60-62-64-66-68-70 cm from shoulder. SLEEVE: READ ENTIRE SLEEVE BEFORE WORKING (inc round in A.2 does not apply to sleeve)! Worked in the round on a short circular needle, switch to double pointed needles when needed. Slip the 59-67-73-79-81-83 sts from stitch holder in one side of piece on a short circular needle size 4 mm and pick in addition 1 st in each of the 8-8-10-10-12-14 sts cast on under sleeve on body = 67-75-83-89-93-97 sts. Insert 1 marker at beg of round (= mid under sleeve) and 1 marker in the middle st on round (= mid on top of sleeve). Work pattern in the round according to diagram A.2 but on every pattern border count the beg of pattern out from mid st in pattern (see arrow in diagram – mid st in pattern should fit st with marker on top of sleeve). NOTE: The pattern will not fit mid under sleeve - work as much pattern as possible but always work the 4 middle sts mid under sleeve in light oak. AT THE SAME TIME when piece measures 2 cm, dec 2 sts mid under sleeve - READ DECREASE TIP. Dec a total of 13-16-19-21-22-23 times: in Size S: On every 8th round, in size M: On every 6th round, in size L: On every 5th round, in size XL: On every 4th round, in size XXL + XXXL: Alternately on every 3rd and 4th round = 41-43-45-47-49-51 sts. When it has been worked up to arrow with dot marked in A.2, work pattern in the round according to diagram A.3 the same way. After A.3 work in stocking st with light oak until sleeve measures 42-40-39-38-36-35 cm from division under sleeve (or desired length). Switch to double pointed needles size 3 mm and work 3 ridges in GARTER ST in the round - see explanation above. Switch back to double pointed needles size 4 mm and LOOSELY cast off with K. Sleeve measures approx. 44-42-41-40-38-37 cm from division under sleeve. Work the other sleeve the same way. ---------------------------------------------------------- BERET: PATTERN: See diagram A.4. Work entire pattern in stocking st. SHAPING TIP: To get a marked and tight shape on the beret moisten it and stretch it out on a plate approx. 24 cm in diameter. Leave hat to dry and take it carefully off the plate. This is done every time the hat is washed. ---------------------------------------------------------- BERET: Worked in the round on circular needle, switch to double pointed needles when needed. Cast on 104-112 sts on circular needle size 3 mm with light oak. K 1 round. Then work rib = K 2/P 2 for 3-4 cm. Switch to circular needle size 4 mm and K 1 round with light oak. Then work pattern according to diagram A.4 (= 13-14 repetitions on round). REMEMBER THE KNITTING TENSION After inc in diagram there are 156-168 sts on needle. On round marked with arrow-1 in diagram, dec 24 sts evenly (in size S/M K alternately every 5th and 6th st tog and every 6th and 7th st tog and in size M/L K every 6th and 7th st tog) = 132-144 sts. Continue pattern. On round marked with arrow-2 in diagram, dec 22-24 sts evenly (K every 5th and 6th st tog) = 110-120 sts. Continue pattern. On round marked with arrow-3 in diagram, dec 26-24 sts evenly (in size S/M K every 3rd and 4th st tog and in size M/L K every 4th and 5th st tog) = 84-96 sts. Continue pattern. On round marked with arrow-4 in diagram, dec 20-28 sts evenly (in size S/M K every 3rd and 4th st tog and in size M/L K alternately every 2nd and 3rd and every 3rd and 4th st tog) = 64-68 sts. Continue pattern. When A.4 has been worked 1 time vertically, continue with light oak as follows: * K 1 round, then K 1 round while dec 16-17 sts evenly (K every 3rd and 4th st tog) *, repeat from *-* 3 times in total (NOTE: For every round with dec work 1 st less before 2 sts are K tog ) = 16-17 sts. K 1 round. K the remaining sts tog 2 by 2 = 8-9 sts remain on needle. Cut the yarn and pull it through the remaining sts, tighten tog and fasten. The hat measures approx. 21-22 cm vertically - READ SHAPING TIP. ---------------------------------------------------------- WRIST WARMERS: PATTERN: See diagram A.5. Work entire pattern in stocking st. ---------------------------------------------------------- WRIST WARMERS: Worked in the round on double pointed needles, top down. Cast on 56 sts on double pointed needles size 3 mm with light oak. Work rib in the round = K 2/P 2 for 2.5 cm. K 1 round while dec 8 sts evenly (K every 6th and 7th st tog) = 48 sts. Switch to double pointed needles size 4 mm and work pattern in the round according to diagram A.5. REMEMBER THE KNITTING TENSION On round marked with arrow -1 in diagram, dec 6 sts evenly (K every 7th and 8th st tog) = 42 sts. On round marked with arrow -2 in diagram, dec 2 sts evenly (K every 20th and 21st st tog) = 40 sts. When A.5 has been worked 1 time vertically, piece measures approx. 22 cm. K 1 round with light oak while inc 4 sts evenly (inc 1 st after every 10th st) = 44 sts. Switch to double pointed needles size 3 mm and work rib in the round = K 2/P 2 for 2.5 cm. Then loosely cast off sts with K over K and P over P. Knit another wrist warmer the same way. |
||||||||||||||||||||||||||||||||||
Diagram explanations |
||||||||||||||||||||||||||||||||||
|
||||||||||||||||||||||||||||||||||
 |
||||||||||||||||||||||||||||||||||
 |
||||||||||||||||||||||||||||||||||
 |
||||||||||||||||||||||||||||||||||
 |
||||||||||||||||||||||||||||||||||
Have you finished this pattern?Tag your pictures with #dropspattern #candylanesweater or submit them to the #dropsfan gallery. Do you need help with this pattern?You'll find 35 tutorial videos, a Comments/Questions area and more by visiting the pattern on garnstudio.com. © 1982-2026 DROPS Design A/S. We reserve all rights. This document, including all its sub-sections, has copyrights. Read more about what you can do with our patterns at the bottom of each pattern on our site. |
||||||||||||||||||||||||||||||||||


With over 40 years in knitting and crochet design, DROPS Design offers one of the most extensive collections of free patterns on the internet - translated to 17 languages. As of today we count 324 catalogues and 12290 patterns translated into English (UK/cm). 12290
We work hard to bring you the best knitting and crochet have to offer, inspiration and advice as well as great quality yarns at incredible prices! Would you like to use our patterns for other than personal use? You can read what you are allowed to do in the Copyright text at the bottom of all our patterns. Happy crafting!
Post a comment to pattern DROPS 171-5
We would love to hear what you have to say about this pattern!
If you want to leave a question, please make sure you select the correct category in the form below, to speed up the answering process. Required fields are marked *.