
Popular categories
Looking for a yarn?


Comments / Questions (110)
![]() Nicole Carrier wrote:
Nicole Carrier wrote:
Bonjour! Je viens de terminer mes rangs raccourcis. Les augmentations: avec un jeté et tricoter normalement au rang suivant, donc ça va former un trou? Ou on tricote une maille torse au rang suivant?
03.04.2023 - 12:45DROPS Design answered:
Bonjour Nicole, pour savoir comment tricotez les jetes dans les diagrammes A.5-A.8, consultez-vous la legende (le jete peut etre tricote torse /ovale noir; ou il est tricote normalement / on va avoir un trou a cet endroit). Bon tricot!
04.04.2023 - 08:05
![]() Nicole Carrier wrote:
Nicole Carrier wrote:
Je fais la taille médium et je voudrais être sûre de bien comprendre l'étape des rangs raccourcis sur A3 à A5. 2 rangs raccourcis à 26 m des bouts et ensuite 4 rangs raccourcis à 6 m des bouts donc 6 rangs raccourcis? Merci! Ce patron représente un bon défi mais il est magnifique.
27.03.2023 - 15:36DROPS Design answered:
Bonjour Mme Carrier, vous tricotez les mailles comme avant sur l'endroit en laissant les 26 dernières mailles non tricotées, puis vous tournez et tricotez les mailles sur l'envers comme avant jusqu'à ce qu'il reste 26 mailles, tournez. Tricotez maintenant comme avant mais tricotez 6 mailles en moins à la fin des 4 rangs suivant (vous avez en attente: 26 m + 2 x 6 m de chaque côté). Bon tricot!
27.03.2023 - 15:47
![]() Linda Olofsson wrote:
Linda Olofsson wrote:
Ska till att sticka diagram 5-8 i Belle, och förstår deras plats vid markörernas plats samt hur ett förkortat varv görs. Men på vilka varv ska jag förkorta varven och senare "öka jämnt"? Får inte grepp om när jag börjar, och hur jag fortsätter. Det står "samtidigt" men också "när x varv är stickade", och att upprepa 0 ggr till... ...hittar inte riktigt var jag börjar och slutar.
12.11.2022 - 15:27DROPS Design answered:
Hej Linda, hvilken størrelse strikker du?
16.11.2022 - 14:02
![]() Sharlene Currin wrote:
Sharlene Currin wrote:
Hi. I have finished the short rows and the pattern says you must continue to do A5 to A8 but the diagram for A5 to A8 only has 8 rows which have now been completed. How do I continue?
15.10.2022 - 06:22DROPS Design answered:
Dear Sharlene, continue repeating these 8 rows as many times as necessary. Happy knitting!
17.10.2022 - 00:28
![]() Thibaud Marjolaine wrote:
Thibaud Marjolaine wrote:
Bonjour, j'ai beau recompter je ne comprends pas.. je tricote en L. On dit qu'il faut tricoter 2 fois A5-A8 + 8 rangs. Mais quand je recompte : j'ai 10 rangs de rangs raccourcis + 2 rangs ou je tricote tout + 4 rangs ou je rabats. Ça me fait 16 rangs, il doit donc me rester 6 rangs de A5 à A8 hors vous indiquez qu'il en reste 8. Ou est ce que je fait l'erreur ? D'avance merci pour votre réponse ! Le modèle est superbe en tout cas et très agréable à réaliser !
19.05.2022 - 22:38DROPS Design answered:
Bonjour Mme Thibaud, effectivement, il va vous en rester 6, continuez simplement comme indiqué et rabattez les mailes des emmanchures ensuite, tout doit retomber juste. Bonne continuation!
20.05.2022 - 12:41
![]() Ingrid Mertens wrote:
Ingrid Mertens wrote:
Ik had voor dit patroon in maat xxxl 450 gr wol nodig. Moest 1 bol nabestellen…..
11.05.2022 - 09:03
![]() Karen Milano wrote:
Karen Milano wrote:
I don't understand the short rows at all!! I knitted through one set but if I start a second set. In the chart, the number of stitches is wrong. Can you please explain this better?
28.04.2022 - 18:43DROPS Design answered:
Dear Mrs Milano, when working the short rows you continue working the stitches from diagrams as before, they won't be affected by the short rows, ie work A.5-A.6 and A.7-A.8 as before from RS and from WS and depending on your size, on the first row (3rd + 5th size), on the 3rd row (1st + 4th size) or on the 7th row of diagrams, start working short rows. Happy knitting!
29.04.2022 - 08:09
![]() Astrid Nijland wrote:
Astrid Nijland wrote:
Ik heb nog een vraag over deel A1 op een gegeven moment moet ik 3x maal een omslag maken en dan 4 steken breien. Maar ik heb maar 3 steken dan over. Verder klopt het hele patroon.
20.02.2022 - 11:51DROPS Design answered:
Dag Astrid,
Dan heb je wellicht toch ergens een foutje gemaakt. Twee naalden daar voor zit er voor en na het samenbreien een omslag, heb je die misschien over het hoofd gezien?
21.02.2022 - 11:31
![]() Astrid Nijland wrote:
Astrid Nijland wrote:
Bij patroon A1 ga ik van toer5 (9 steken) goede kant. Naar toer 6 teruggaan toer naar (11steken). Volgens mij klopt dit niet. Ik moet dan toch ook 9 steken hebben.
15.02.2022 - 11:03DROPS Design answered:
Dag Astrid,
In toer 5 van A.1 heb je 7 steken en je meerdert 4 steken (1 steek aan beide kanten van de beide 2 averechte steken ) zodat je 11 steken hebt als je aan toer 6 begint van A.1
17.02.2022 - 10:38
![]() Wong wrote:
Wong wrote:
Hi, this is my first time knitting on drops design. I am knitting size XXXL. I don't understand "Repeat A.5 to A.8 over the 6 sts on each side of each marker 2-3-2-3-4-5 times in total". Is it doing at the WS - 2nd row of A.5 to A.8 ? How to repeat 5 times (each side (left & right) of each marker only total 4 times)?
19.10.2021 - 10:36DROPS Design answered:
Dear Mrs Wong, work as explained with A.5, A.6, A.7, A.8 and stocking stitch, and when A.5-.A.8 have been worked one time in height, repeat them 4 more times. Markers should remain on the same place as before, and between A.5/A.6 and between A.7/A.8. Happy knitting!
20.10.2021 - 07:23
|
|||||||||||||||||||||||||||||||
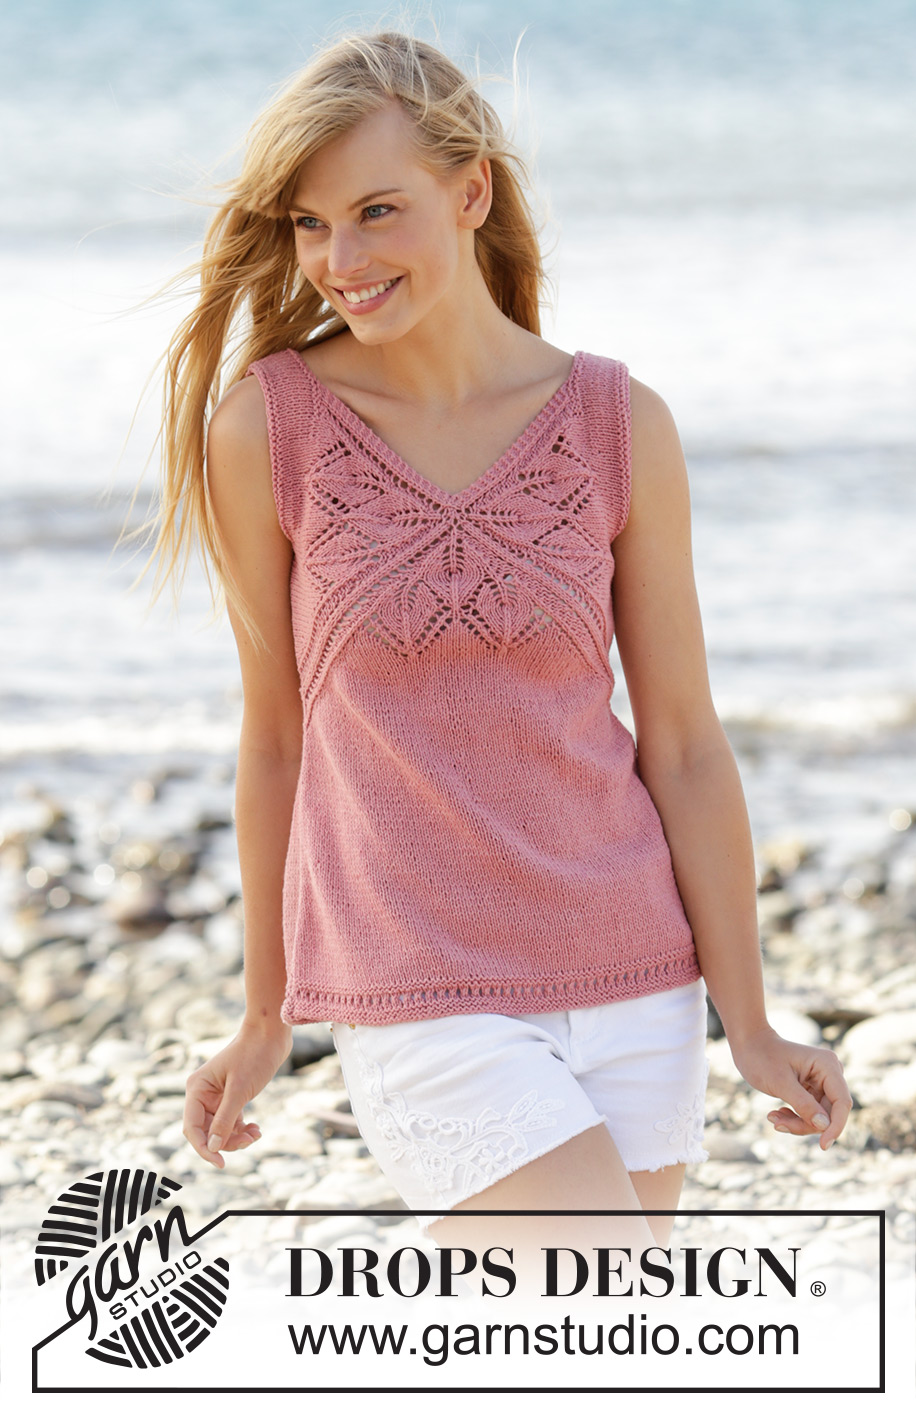
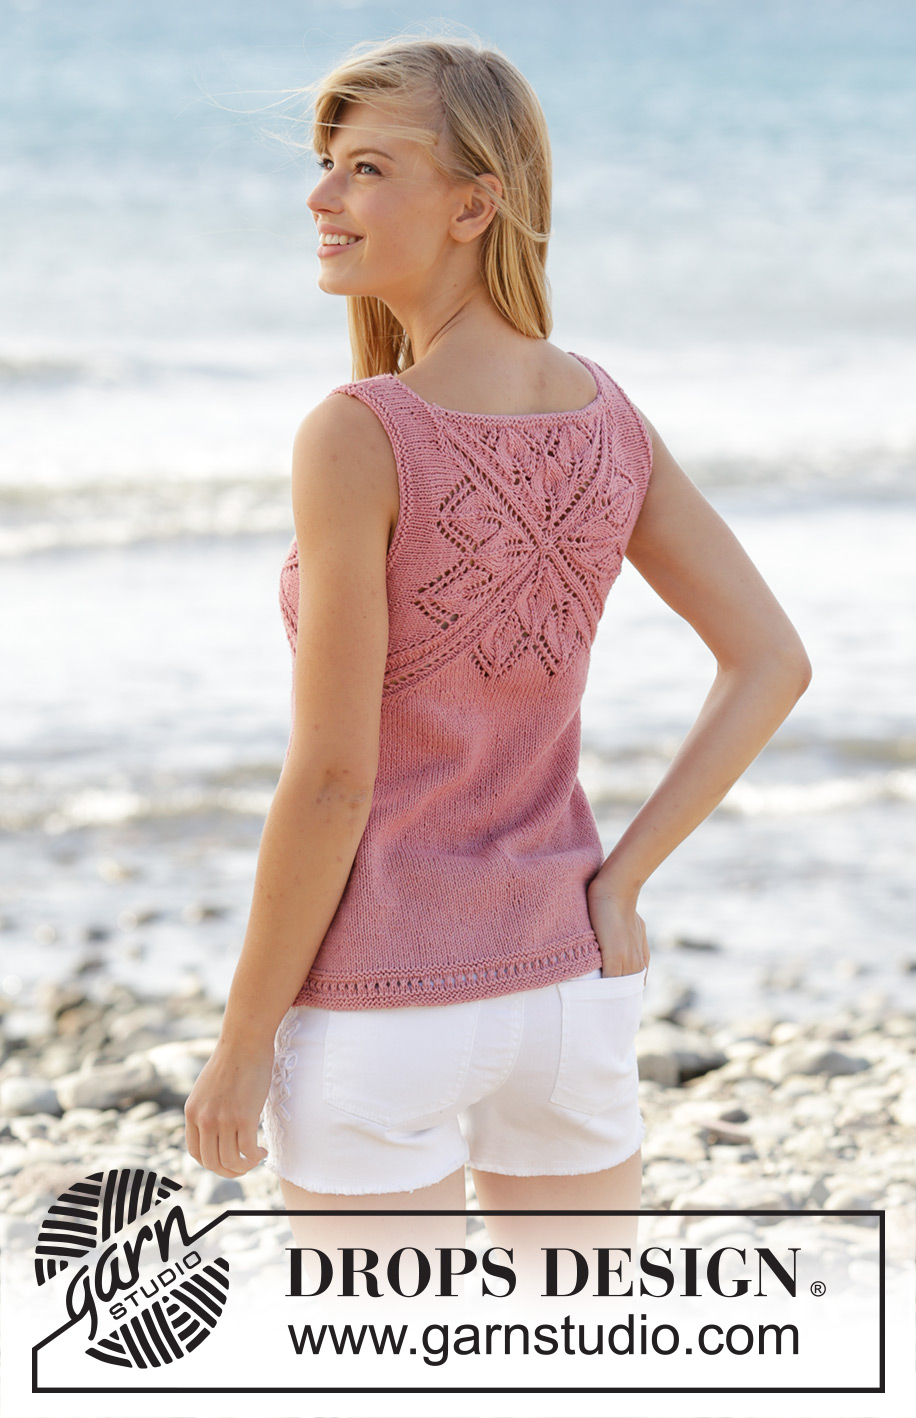
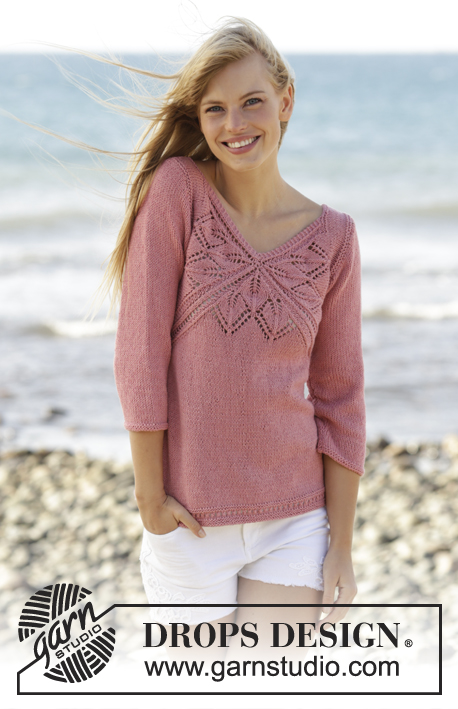
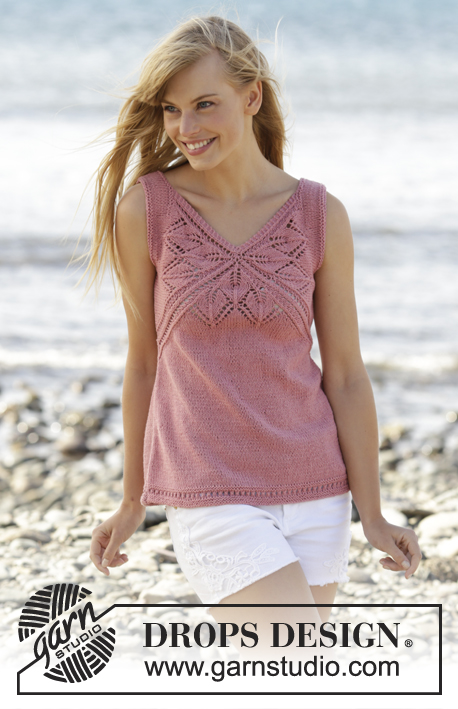
Butterfly Heart Top#butterflyhearttop |
|||||||||||||||||||||||||||||||
 |
 |
||||||||||||||||||||||||||||||
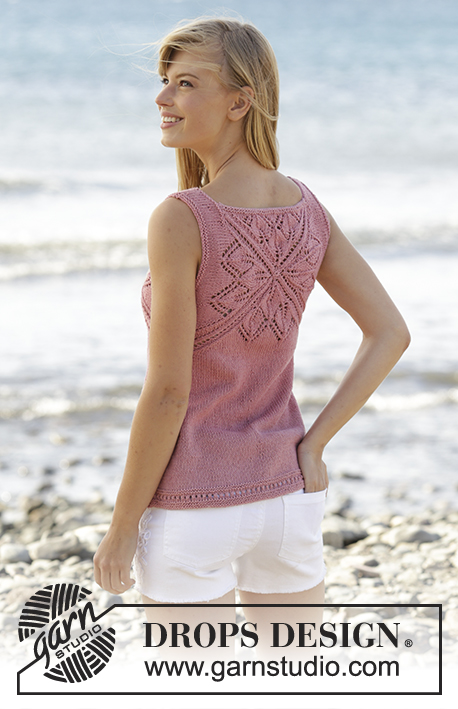
Knitted DROPS top with lace pattern and V-neck in ”Belle”. Worked top down. Size: S - XXXL.
DROPS 170-4 |
|||||||||||||||||||||||||||||||
|
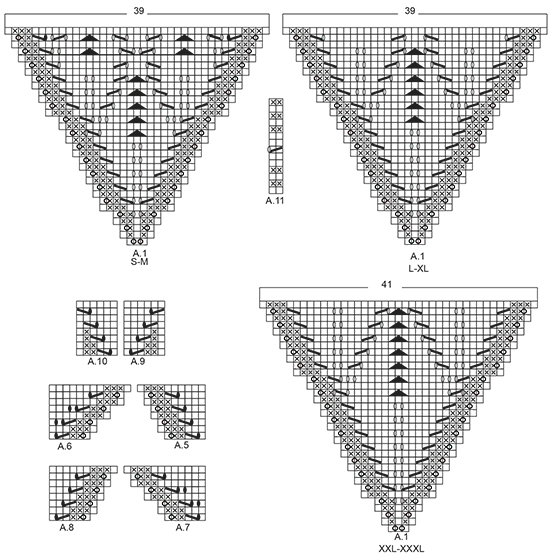
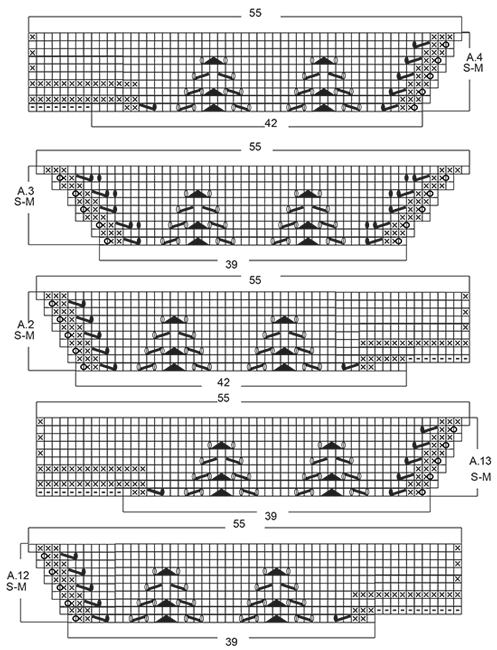
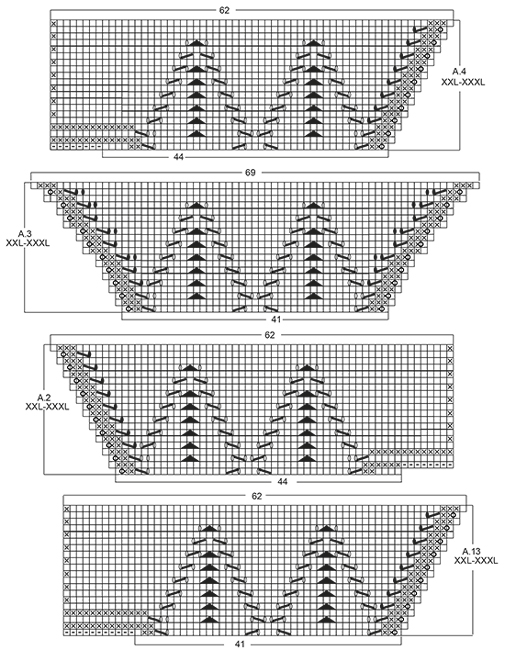
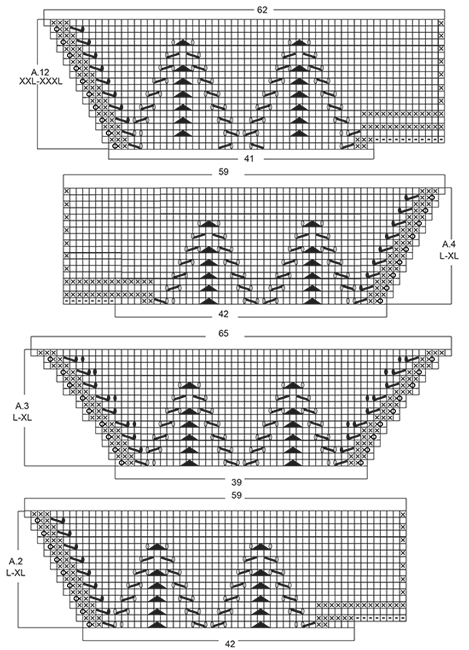
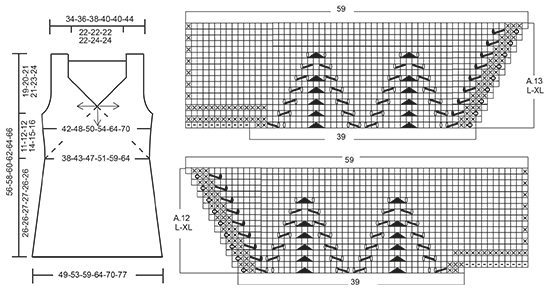
GARTER ST (back and forth): K all rows. 1 ridge = 2 rows K. PATTERN: See diagrams A.1 to A.13. The diagrams show all rows in pattern seen from RS. See diagram for correct size. SHORT ROWS: When turning in short rows, slip first st as if to K. Tighten thread and make sure to avoid big holes. INCREASE TIP: All inc are done from RS. Inc 1 st by making 1 YO, on next row P YO twisted to avoid holes. ---------------------------------------------------------- TOP: Work from the middle of V-neck and out in 3 triangles on front piece and 4 triangles on back piece, then work downwards. FRONT PIECE: Work back and forth from neck and down. Cast on 8 sts on circular needle size 4 mm with Belle. K 1 row. On next row inc as follows: * K 1, 1 YO *, repeat from *-* until 1 st remains and finish with K 1 = 15 sts on needle. Work next row as follows (from RS): Work YOs from previous row twisted, they should not make holes. Work 3 sts in GARTER ST - see explanation above, A.1, insert 1st marker, A.1, insert 2nd marker, A.1 (= repeat A.1 3 times in total on row), finish with 3 sts in garter st. REMEMBER THE KNITTING TENSION When A.1 has been worked 1 time vertically, there are 123-123-123-123-129-129 sts on needle. Piece measures approx. 11-11-11-11-12-12 cm from cast-on edge. Work next row as follows from RS: Work A.2 over the first 42-42-42-42-44-44 sts, A.3 over the next 39-39-39-39-41-41 sts and A.4 over the last 42-42-42-42-44-44 sts, after A.4 cast on 8 sts at the end of row for shoulder (see diagram). Work A.4 to A.2 on next row, after A.2 cast on 8 sts at the end of row for shoulder (see diagram). When A.2 to A.4 have been worked 1 time vertically, there are 165-165-183-183-193-193 sts on needle. Piece measures approx. 15-15-17-17-19-19 cm from cast-on edge. READ ALL OF THE FOLLOWING SECTION BEFORE CONTINUING! WORK PATTERN AS BEFORE WHILE AT THE SAME TIME WORKING SHORT ROWS IN EACH SIDE OF PIECE. PATTERN: Work next row as follows from RS: Work 1 st in garter st, 48-48-52-52-55-55 sts in stocking st, work A.5 over the next 6 sts, (marker), A.6 over the next 6 sts, 43-43-53-53-57-57 sts in stocking st, A.7 over the next 6 sts, (marker), A.8 over the next 6 sts, 48-48-52-52-55-55 sts in stocking st, finish with 1 st in garter st. Repeat A.5 to A.8 over the 6 sts on each side of each marker 2-3-2-3-4-5 times in total, then repeat the first 0-0-6-4-4-4 rows of A.5 to A.8 1 more times. SHORT ROWS: AT THE SAME TIME when 2-6-0-2-0-6 rows of A.5 to A.8 have been worked, work SHORT ROWS - see explanation above - in each side of piece as follows: Work until 26-26-24-23-18-18 sts remain on row (work A.5 to A.8 as before), turn and work until 26-26-24-23-18-18 sts remain, turn piece. Then work short rows in the different sizes as follows: SIZE M: Work 6 sts less for every turn 2 times in each side of piece. SIZE L-XL: Work 6 sts less for every turn 1-2 times in each side of piece, then work 4 sts less on every turn 3-2 times in each side of piece. SIZE XXL-XXXL: Work 6 sts less for every turn 1-1 time in each side of piece, then work 4 sts less for every turn 4-4 times in each side of piece, then work 2 sts less on every turn 4-5 times in each side of piece. ALL SIZES: When the short rows have been worked, work last row from WS, so that next row beg from shoulder. Then work over all sts from RS as follows: Work in garter st over the first 42-44-46-48-50-52 sts AT THE SAME TIME inc 0-2-4-4-6-6 sts evenly, work as before (i.e. A.5 to A.8 and stocking st) until 42-44-46-48-50-52 sts remain, work in garter st over the last sts AT THE SAME TIME inc 0-2-4-4-6-6 sts evenly (= 42-46-50-52-56-58 sts in garter st in each side of piece). Work 3 rows in garter st over the outermost 42-46-50-52-56-58 sts in garter st in each side of piece, pattern and stocking st over the remaining sts. On next row from WS work as follows: Cast off with K over the first 40-44-48-50-54-56 sts for armhole, work 2 sts in garter st, work in stocking st and pattern as before until 42-46-50-52-56-58 sts remain, 2 sts in garter st, cast off with K over the last 40-44-48-50-54-56 sts for armhole. Cut the yarn. 8-8-8-12-12-12 rows of A.5 to A.8 remain. Beg next row from RS. Continue to work in garter st over the first and last 2 sts in each side of piece. When A.5 to A.8 have been worked, there are 23-25-26-27-32-34 sts before 1st marker, 79-91-99-107-123-135 sts between 1st and 2nd marker and 23-25-26-27-32-34 sts after 2nd marker = 125-141-151-161-187-203 sts in total on row. Piece measures approx. 21-24-25-27-32-35 cm on the widest measured from cast-on edge. Insert 1 marker in piece, NOW MEASURE PIECE FROM HERE. On next row from RS loosely cast off the first 22-24-25-26-31-33 sts with K, work 1 edge st in garter st, (marker), work A.9 over the first 6 sts after marker, stocking st over the next 67-79-87-95-111-123 sts, A.10 over the last 6 sts before second marker, (marker), 1 edge st in garter st, loosely cast off the last 22-24-25-26-31-33 sts = 81-93-101-109-125-137 sts remain on needle. Cut the yarn. Work next row from WS over the remaining sts as follows: 1 edge st in garter st, A.10 as before, stocking st over the next 67-79-87-95-111-123 sts, A.9 as before, 1 edge st in garter st. When A.9 and A.10 have been worked 1 time vertically, continue in stocking st with 1 edge st in garter st in each side of piece. When piece measures 3 cm from marker, inc 1 st in each side of piece inside 1 edge st (= 2 sts inc) - READ INCREASE TIP. Repeat inc every 1½-1½-1½-1-1-1 cm 12-10-12-14-12-13 times in total = 105-113-125-137-149-163 sts on needle. When piece measures 23-23-24-24-23-23 cm from marker (piece measures 53-55-57-59-61-63 cm in total from shoulder), adjust so that next row is from RS, switch to circular needle size 3.5 mm. Work next row from RS as follows: Work 1 edge st in garter st, work A.11 (= 2 sts) until 2 sts remain, work first st in A.11, finish with 1 edge st in garter st. On row with holes (i.e. 7th row) work next to last st K. Cast off when A.11 has been worked 1 time vertically. Piece measures 56-58-60-62-64-66 cm in total from shoulder. BACK PIECE: Piece is first worked in the round, then worked as front piece. Cast on 6 sts on double pointed needles size 4 mm with Belle, switch to circular needle when needed. K 1 row. On next row inc as follows: * K 1, 1 YO *, repeat from *-* = 12 sts on row, K YOs twisted on next row, they should not make holes. Work A.1 4 times in total, insert 1 marker between each A.1 (= 4 markers). When A.1 has been worked 1 time vertically, there are 156-156-156-156-164-164 sts on needle. Continue as follows: A.12 over the first 39-39-39-39-41-41 sts, work A.3 over the next 39-39-39-39-41-41 sts and A.13 over the last 39-39-39-39-41-41 sts, slip the remaining sts on a stitch holder for neck edge (= 39-39-39-39-41-41 sts), after A.13 cast on 11 sts at the end of row for shoulder (see diagram). Then work back and forth on needle. Work A.13/A.3/A.12 on next row, after A.12 cast on 11 sts at the end of row for shoulder (see diagram). When A.12/A.3/A.13 have been worked 1 time vertically, there are 165-165-183-183-193-193 sts on needle. Piece measures approx. 15-15-17-17-19-19 cm from cast-on edge. Now continue back piece as front piece. NECK EDGE: Worked back and forth on needle. Slip sts from stitch holder for neck edge on back piece back on circular needle size 3.5 mm. Work 2 ridges. Fasten ridges where sts were cast on for shoulder. Fasten off. ASSEMBLY: Sew the side seams inside 1 edge st in garter st. Sew shoulder seams inside 1 edge st in garter st. Tighten tog the middle (i.e. cast-on edge) on both front and back piece. |
|||||||||||||||||||||||||||||||
Diagram explanations |
|||||||||||||||||||||||||||||||
|
|||||||||||||||||||||||||||||||
 |
|||||||||||||||||||||||||||||||
 |
|||||||||||||||||||||||||||||||
 |
|||||||||||||||||||||||||||||||
 |
|||||||||||||||||||||||||||||||
 |
|||||||||||||||||||||||||||||||
Have you finished this pattern?Tag your pictures with #dropspattern #butterflyhearttop or submit them to the #dropsfan gallery. Do you need help with this pattern?You'll find 23 tutorial videos, a Comments/Questions area and more by visiting the pattern on garnstudio.com. © 1982-2026 DROPS Design A/S. We reserve all rights. This document, including all its sub-sections, has copyrights. Read more about what you can do with our patterns at the bottom of each pattern on our site. |
|||||||||||||||||||||||||||||||


With over 40 years in knitting and crochet design, DROPS Design offers one of the most extensive collections of free patterns on the internet - translated to 17 languages. As of today we count 324 catalogues and 12291 patterns translated into English (UK/cm). 12291
We work hard to bring you the best knitting and crochet have to offer, inspiration and advice as well as great quality yarns at incredible prices! Would you like to use our patterns for other than personal use? You can read what you are allowed to do in the Copyright text at the bottom of all our patterns. Happy crafting!
Post a comment to pattern DROPS 170-4
We would love to hear what you have to say about this pattern!
If you want to leave a question, please make sure you select the correct category in the form below, to speed up the answering process. Required fields are marked *.