Comments / Questions (108)
![]() Andreea wrote:
Andreea wrote:
Hello, I don't understand how to work the back in the round? Please explain to me how I can join the 6 stitches from the beginning in the round. Thank you very much.
14.08.2023 - 13:07DROPS Design answered:
Dear Andra, you can use the traditionnal cast on technique on double pointed needles for back piece, note that back piece is started in the round, and not worked back and forth as you did for front piece. You can also cast on with the magic loop. Happy knitting!
14.08.2023 - 13:37
![]() Vibeke Bekke wrote:
Vibeke Bekke wrote:
Hejsa. Jeg har et problem. I A1 på rk. 6 er der 4 nye masker og ikke 2 som udtaget til, er det en fejl, eller hvordan skal dette forstås? Mvh
03.08.2023 - 18:04DROPS Design answered:
Hej Vibeke, sådan skal det være, se videoen vi har lavet til dig :)
10.08.2023 - 13:24
![]() Laura wrote:
Laura wrote:
Buongiorno. Mi sono arenata iniziando i ferri accorciati. Io ho una taglia S, in teoria i ferri accorciati sono una volta. Quindi io accorcio il totale dei punti di 26 da una parte e 26 dall'altra e continuo gli schemi A5-A8 sulle maglie restanti?
24.07.2023 - 19:37DROPS Design answered:
Buonasera Laura, sul ferro di andata lavora fino a quando rimangono 26 maglie, poi gira il lavoro e sul ferro di ritorno lavora fino a quando rimangono 26 maglie. Buon lavoro!
31.07.2023 - 19:43
![]() Henny Vestjens wrote:
Henny Vestjens wrote:
Welke moeilijkheidsgraad heeft dit topje? Ik brei vaak sokken of kabels maar heb nog nooit een kantpatroon gebreid. Ik vind dit een heel mooi patroon maar vraag me af of het niet te moeilijk is. Alvast bedankt, Henny
23.06.2023 - 17:17DROPS Design answered:
Dag Henny,
Als je veel brei-ervaring hebt is dit patroon prima te doen als je rustig alles leest en stap voor stap volgt. Ook kun je meer informatie vinden bij de video's en stap-voor-stap instructies onderaan het patroon.
25.06.2023 - 18:03
![]() Randi wrote:
Randi wrote:
I fortsættelse af min tidligere besked vil jeg her uddybe mit egentlige spørgsmål. I følge opskriften skal jeg strikke over 4 masker mindre for hver gang der vendes 3 gange i hver side ved str L , altså i alt 6 pinde (de sidste forkortede pinde). Jeg når kun at strikke 5 pinde, da jeg ved sidste forkortede pind skal strikke helt ud til kanten, for at få resten af pindene til at passe. Er det rigtigt?
17.05.2023 - 17:01DROPS Design answered:
Hej Randi, Ja det er rigtigt, så du kan starte med at strikke over alle masker fra retsiden :)
23.05.2023 - 09:35
![]() Randi wrote:
Randi wrote:
Jeg strikker str. L og har et spørgsmål i forbindelse med den sidste forkortede pind på forstykket inden jeg fra vrangsiden skal strikke alle masterne ud til kanten. Jeg har regnet mig frem til, at jeg skal strikke helt ud til kanten på pind nr. 10, hvis jeg skal have 8 pinde tilbage, når jeg har lukket de 48 masker i hver side på pind nr. 14. Pind 10 er også den pind, hvor jeg skal strikke den sidste forkortede pind? (Forkortede pinde 24m*2p + 6m*2 + 4m*6p - jeg når kun 5p med 4m)
15.05.2023 - 21:55DROPS Design answered:
Hej Randi, jeg forstår ikke rigtigt hvad som er spørgsmålet. Du kan strikke som du beskriver her, så er jeg sikker på at det bliver tydeligt for dig når du kommer til aflukningen :)
17.05.2023 - 08:42
![]() Ewelina wrote:
Ewelina wrote:
Witam serdecznie . Czy rzędy skrócone z przodu są konieczne? Czy nie wykonanie ich wpłynie jakoś na rozmiar? czy kształt? pozdrawiam
08.05.2023 - 16:20DROPS Design answered:
Witaj Ewelino, rzędy skrócone nadają nieco objętości na wysokości klatki piersiowej. Ja robiłam tą bluzeczkę dla siebie i wydaje mi się, że mogłabym spokojnie te rzędy skrócone ominąć ze względu na mały obwód biustu. Mam nadzieję, że pomogłam. Pozdrawiam!
09.05.2023 - 08:25
![]() Nicole Carrier wrote:
Nicole Carrier wrote:
On a 6 rangs raccourcis, donc le dernier se fait sur l'envers. Il est dit :"Quand les rangs raccourcis ont été tricotés, tricoter le dernier rang sur l'envers, pour que le rang suivant commence à partir de l'épaule." Si je continue mon dernier rg à l'env. , il va me manquer un rang raccourci. Est-ce que je dois tourner mon ouvrage pour tricoter à l'end jusqu'à l'épaule pour ensuite revenir à l'env jusqu'à l'autre épaule? Je suis épatée de votre service. Merci!
03.04.2023 - 13:24DROPS Design answered:
Bonjour Mme Carrier, après votre dernier rang raccourci (sur l'envers), tricotez le rang suivant sur l'endroit jusqu'à la fin du rang, tournez et vous êtes maintenant prête à tricoter votre rang suivant sur l'envers, à partir de l'épaule. Bon tricot!
11.04.2023 - 11:01
![]() Nicole Carrier wrote:
Nicole Carrier wrote:
Bonjour! Je viens de terminer mes rangs raccourcis. Les augmentations: avec un jeté et tricoter normalement au rang suivant, donc ça va former un trou? Ou on tricote une maille torse au rang suivant?
03.04.2023 - 12:45DROPS Design answered:
Bonjour Nicole, pour savoir comment tricotez les jetes dans les diagrammes A.5-A.8, consultez-vous la legende (le jete peut etre tricote torse /ovale noir; ou il est tricote normalement / on va avoir un trou a cet endroit). Bon tricot!
04.04.2023 - 08:05
![]() Nicole Carrier wrote:
Nicole Carrier wrote:
Je fais la taille médium et je voudrais être sûre de bien comprendre l'étape des rangs raccourcis sur A3 à A5. 2 rangs raccourcis à 26 m des bouts et ensuite 4 rangs raccourcis à 6 m des bouts donc 6 rangs raccourcis? Merci! Ce patron représente un bon défi mais il est magnifique.
27.03.2023 - 15:36DROPS Design answered:
Bonjour Mme Carrier, vous tricotez les mailles comme avant sur l'endroit en laissant les 26 dernières mailles non tricotées, puis vous tournez et tricotez les mailles sur l'envers comme avant jusqu'à ce qu'il reste 26 mailles, tournez. Tricotez maintenant comme avant mais tricotez 6 mailles en moins à la fin des 4 rangs suivant (vous avez en attente: 26 m + 2 x 6 m de chaque côté). Bon tricot!
27.03.2023 - 15:47
Butterfly Heart Top#butterflyhearttop |
|||||||||||||||||||||||||||||||
 |
 |
||||||||||||||||||||||||||||||
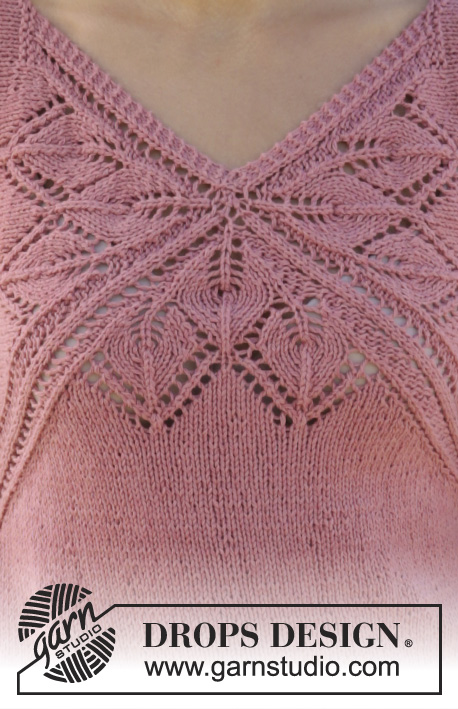
Knitted DROPS top with lace pattern and V-neck in ”Belle”. Worked top down. Size: S - XXXL.
DROPS 170-4 |
|||||||||||||||||||||||||||||||
|
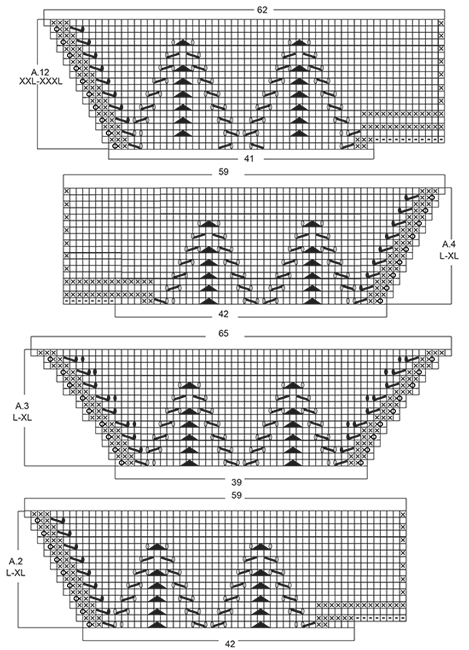
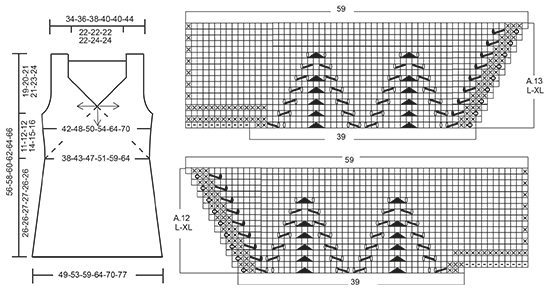
GARTER ST (back and forth): K all rows. 1 ridge = 2 rows K. PATTERN: See diagrams A.1 to A.13. The diagrams show all rows in pattern seen from RS. See diagram for correct size. SHORT ROWS: When turning in short rows, slip first st as if to K. Tighten thread and make sure to avoid big holes. INCREASE TIP: All inc are done from RS. Inc 1 st by making 1 YO, on next row P YO twisted to avoid holes. ---------------------------------------------------------- TOP: Work from the middle of V-neck and out in 3 triangles on front piece and 4 triangles on back piece, then work downwards. FRONT PIECE: Work back and forth from neck and down. Cast on 8 sts on circular needle size 4 mm with Belle. K 1 row. On next row inc as follows: * K 1, 1 YO *, repeat from *-* until 1 st remains and finish with K 1 = 15 sts on needle. Work next row as follows (from RS): Work YOs from previous row twisted, they should not make holes. Work 3 sts in GARTER ST - see explanation above, A.1, insert 1st marker, A.1, insert 2nd marker, A.1 (= repeat A.1 3 times in total on row), finish with 3 sts in garter st. REMEMBER THE KNITTING TENSION When A.1 has been worked 1 time vertically, there are 123-123-123-123-129-129 sts on needle. Piece measures approx. 11-11-11-11-12-12 cm from cast-on edge. Work next row as follows from RS: Work A.2 over the first 42-42-42-42-44-44 sts, A.3 over the next 39-39-39-39-41-41 sts and A.4 over the last 42-42-42-42-44-44 sts, after A.4 cast on 8 sts at the end of row for shoulder (see diagram). Work A.4 to A.2 on next row, after A.2 cast on 8 sts at the end of row for shoulder (see diagram). When A.2 to A.4 have been worked 1 time vertically, there are 165-165-183-183-193-193 sts on needle. Piece measures approx. 15-15-17-17-19-19 cm from cast-on edge. READ ALL OF THE FOLLOWING SECTION BEFORE CONTINUING! WORK PATTERN AS BEFORE WHILE AT THE SAME TIME WORKING SHORT ROWS IN EACH SIDE OF PIECE. PATTERN: Work next row as follows from RS: Work 1 st in garter st, 48-48-52-52-55-55 sts in stocking st, work A.5 over the next 6 sts, (marker), A.6 over the next 6 sts, 43-43-53-53-57-57 sts in stocking st, A.7 over the next 6 sts, (marker), A.8 over the next 6 sts, 48-48-52-52-55-55 sts in stocking st, finish with 1 st in garter st. Repeat A.5 to A.8 over the 6 sts on each side of each marker 2-3-2-3-4-5 times in total, then repeat the first 0-0-6-4-4-4 rows of A.5 to A.8 1 more times. SHORT ROWS: AT THE SAME TIME when 2-6-0-2-0-6 rows of A.5 to A.8 have been worked, work SHORT ROWS - see explanation above - in each side of piece as follows: Work until 26-26-24-23-18-18 sts remain on row (work A.5 to A.8 as before), turn and work until 26-26-24-23-18-18 sts remain, turn piece. Then work short rows in the different sizes as follows: SIZE M: Work 6 sts less for every turn 2 times in each side of piece. SIZE L-XL: Work 6 sts less for every turn 1-2 times in each side of piece, then work 4 sts less on every turn 3-2 times in each side of piece. SIZE XXL-XXXL: Work 6 sts less for every turn 1-1 time in each side of piece, then work 4 sts less for every turn 4-4 times in each side of piece, then work 2 sts less on every turn 4-5 times in each side of piece. ALL SIZES: When the short rows have been worked, work last row from WS, so that next row beg from shoulder. Then work over all sts from RS as follows: Work in garter st over the first 42-44-46-48-50-52 sts AT THE SAME TIME inc 0-2-4-4-6-6 sts evenly, work as before (i.e. A.5 to A.8 and stocking st) until 42-44-46-48-50-52 sts remain, work in garter st over the last sts AT THE SAME TIME inc 0-2-4-4-6-6 sts evenly (= 42-46-50-52-56-58 sts in garter st in each side of piece). Work 3 rows in garter st over the outermost 42-46-50-52-56-58 sts in garter st in each side of piece, pattern and stocking st over the remaining sts. On next row from WS work as follows: Cast off with K over the first 40-44-48-50-54-56 sts for armhole, work 2 sts in garter st, work in stocking st and pattern as before until 42-46-50-52-56-58 sts remain, 2 sts in garter st, cast off with K over the last 40-44-48-50-54-56 sts for armhole. Cut the yarn. 8-8-8-12-12-12 rows of A.5 to A.8 remain. Beg next row from RS. Continue to work in garter st over the first and last 2 sts in each side of piece. When A.5 to A.8 have been worked, there are 23-25-26-27-32-34 sts before 1st marker, 79-91-99-107-123-135 sts between 1st and 2nd marker and 23-25-26-27-32-34 sts after 2nd marker = 125-141-151-161-187-203 sts in total on row. Piece measures approx. 21-24-25-27-32-35 cm on the widest measured from cast-on edge. Insert 1 marker in piece, NOW MEASURE PIECE FROM HERE. On next row from RS loosely cast off the first 22-24-25-26-31-33 sts with K, work 1 edge st in garter st, (marker), work A.9 over the first 6 sts after marker, stocking st over the next 67-79-87-95-111-123 sts, A.10 over the last 6 sts before second marker, (marker), 1 edge st in garter st, loosely cast off the last 22-24-25-26-31-33 sts = 81-93-101-109-125-137 sts remain on needle. Cut the yarn. Work next row from WS over the remaining sts as follows: 1 edge st in garter st, A.10 as before, stocking st over the next 67-79-87-95-111-123 sts, A.9 as before, 1 edge st in garter st. When A.9 and A.10 have been worked 1 time vertically, continue in stocking st with 1 edge st in garter st in each side of piece. When piece measures 3 cm from marker, inc 1 st in each side of piece inside 1 edge st (= 2 sts inc) - READ INCREASE TIP. Repeat inc every 1½-1½-1½-1-1-1 cm 12-10-12-14-12-13 times in total = 105-113-125-137-149-163 sts on needle. When piece measures 23-23-24-24-23-23 cm from marker (piece measures 53-55-57-59-61-63 cm in total from shoulder), adjust so that next row is from RS, switch to circular needle size 3.5 mm. Work next row from RS as follows: Work 1 edge st in garter st, work A.11 (= 2 sts) until 2 sts remain, work first st in A.11, finish with 1 edge st in garter st. On row with holes (i.e. 7th row) work next to last st K. Cast off when A.11 has been worked 1 time vertically. Piece measures 56-58-60-62-64-66 cm in total from shoulder. BACK PIECE: Piece is first worked in the round, then worked as front piece. Cast on 6 sts on double pointed needles size 4 mm with Belle, switch to circular needle when needed. K 1 row. On next row inc as follows: * K 1, 1 YO *, repeat from *-* = 12 sts on row, K YOs twisted on next row, they should not make holes. Work A.1 4 times in total, insert 1 marker between each A.1 (= 4 markers). When A.1 has been worked 1 time vertically, there are 156-156-156-156-164-164 sts on needle. Continue as follows: A.12 over the first 39-39-39-39-41-41 sts, work A.3 over the next 39-39-39-39-41-41 sts and A.13 over the last 39-39-39-39-41-41 sts, slip the remaining sts on a stitch holder for neck edge (= 39-39-39-39-41-41 sts), after A.13 cast on 11 sts at the end of row for shoulder (see diagram). Then work back and forth on needle. Work A.13/A.3/A.12 on next row, after A.12 cast on 11 sts at the end of row for shoulder (see diagram). When A.12/A.3/A.13 have been worked 1 time vertically, there are 165-165-183-183-193-193 sts on needle. Piece measures approx. 15-15-17-17-19-19 cm from cast-on edge. Now continue back piece as front piece. NECK EDGE: Worked back and forth on needle. Slip sts from stitch holder for neck edge on back piece back on circular needle size 3.5 mm. Work 2 ridges. Fasten ridges where sts were cast on for shoulder. Fasten off. ASSEMBLY: Sew the side seams inside 1 edge st in garter st. Sew shoulder seams inside 1 edge st in garter st. Tighten tog the middle (i.e. cast-on edge) on both front and back piece. |
|||||||||||||||||||||||||||||||
Diagram explanations |
|||||||||||||||||||||||||||||||
|
|||||||||||||||||||||||||||||||
 |
|||||||||||||||||||||||||||||||
 |
|||||||||||||||||||||||||||||||
 |
|||||||||||||||||||||||||||||||
 |
|||||||||||||||||||||||||||||||
 |
|||||||||||||||||||||||||||||||
Have you finished this pattern?Tag your pictures with #dropspattern #butterflyhearttop or submit them to the #dropsfan gallery. Do you need help with this pattern?You'll find 23 tutorial videos, a Comments/Questions area and more by visiting the pattern on garnstudio.com. © 1982-2026 DROPS Design A/S. We reserve all rights. This document, including all its sub-sections, has copyrights. Read more about what you can do with our patterns at the bottom of each pattern on our site. |
|||||||||||||||||||||||||||||||


Post a comment to pattern DROPS 170-4
We would love to hear what you have to say about this pattern!
If you want to leave a question, please make sure you select the correct category in the form below, to speed up the answering process. Required fields are marked *.