
Popular categories
Looking for a yarn?


Comments / Questions (64)
![]() Hanne Andersen wrote:
Hanne Andersen wrote:
I opskriften på forstykket står der noget om at tage m ud på sidste p i 1. Rapport ved vendinger. Hvad eller hvor er 1. Rapport ? Jeg mener desuden der er fejl i mønster A1. Burde der ikke stå : strik omslaget og m RET sammen ?
10.10.2015 - 11:39DROPS Design answered:
Hej Hanne, 1 rapport med vendinger = de første 10 pinde vendinger som står beskrevet. For hver gang man gentager disse 10 pinde strikker du en ny rapport. Omslaget strikkes drejet på næste p uanset om det strikkes Ret eller Vrang ifølge opskriften. God fornøjelse!
12.10.2015 - 12:20
![]() Wendy Hawkins wrote:
Wendy Hawkins wrote:
I cannot find the instructions on how to finish the neck--I have read the pattern many times but cannot find them anywhere this is for drops 157-25
31.08.2015 - 13:55DROPS Design answered:
Dear Mrs Hawkins, the neck edge is worked when all pieces are done - see "Neck Edge" at the very end of written pattern - ie picking up approx. 72 sts (incl sts from st holders) around neck. Happy knitting!
31.08.2015 - 14:33Stephanie wrote:
This pattern makes no sense. It looks like it starts at the waist. I'm an avid knitter and I can't make heads or tails of this. Really disappointed as it was going to be a gift.
28.06.2015 - 05:58DROPS Design answered:
Dear Stephanie, you first work the back piece, then work 2 "edges" starting from mid back (side ways), with short rows (curved edge) and front piece - see also chart at the end of the pattern. For any individual assistance remember your DROPS store will give you tips & advices. Happy knitting!
29.06.2015 - 11:36
![]() Willy wrote:
Willy wrote:
Bedankt voor de uitleg.
16.06.2015 - 20:06
![]() Willy wrote:
Willy wrote:
Moet je na 1 omslag en 1 st av afhalen 3 recht of 3 av breien.
16.06.2015 - 13:58DROPS Design answered:
Hoi Willy. Recht breien op de verkeerde kant - zoals er staat in de symboolbeschrijving. Zie ook mijn reactie hieronder
16.06.2015 - 15:34
![]() Willy wrote:
Willy wrote:
Is de binnenkant van het achterpand recht of ribbels?
16.06.2015 - 13:29DROPS Design answered:
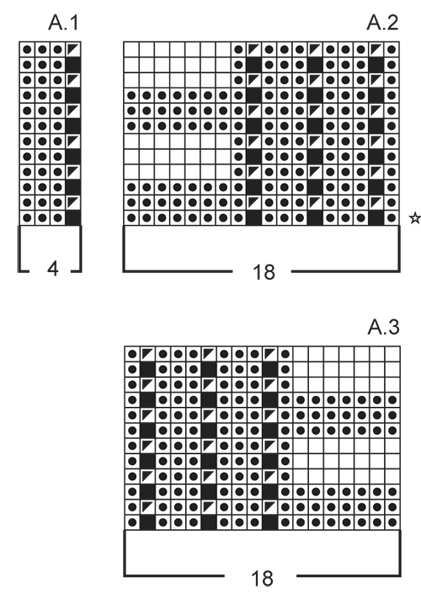
Hoi Willy. Je breit telpatroon A.1 op het achterpand. De stipjes zijn: averecht aan de goede kant, recht aan de verkeerde kant (averechte tricotsteek) en het symbool met een driehoekje is brei omsl en st av samen. Zie ook hier hoe je onze telpatronen moet lezen
16.06.2015 - 15:34
![]() Marion wrote:
Marion wrote:
Bonjour ! J'ai un souci avec le diagramme A1 et les fausses cotes anglaises, le rendu que j'ai est très différent de la photo : au lieu d'avoir une maille endroit, j'ai une maille envers tordue... Quand je regarde votre vidéo sur les fausses cotes anglaise, la méthode est différente des explications du gilet. Puis je utiliser cette technique ? Merci pour votre aide précieuse.
03.04.2015 - 17:38DROPS Design answered:
Bonjour Marion, tricotez A.1 ainsi: Rang1 (sur l'endroit): *passez le fil devant l'ouvrage, glissez la m suiv comme pour la tricoter à l'envers, repassez le fil devant (mais il doit entourer l'aiguille droite et la m glissée), et tricotez 3 m env*, au Rang2 (sur l'envers): *tricotez 3 m end, puis tricotez ens à l'env le jeté et la m glissée du rang 2* - répétez de *-*. Bon tricot!
03.04.2015 - 18:02
![]() Lara wrote:
Lara wrote:
Moin! Ich bin gerade am Stricken dieser wunderschönen Jacke und habe nun eine Frage zu den verkürzten Reihen: Bedeutet "Ab der ersten Reihe insgesamt 5 x arbeiten", dass ich die gesamten verkürzten Reihen 1-10 insgesamt nach dem ersten Stricken noch 4 mal genau so wiederhole? Liebe Grüße Lara
07.03.2015 - 11:34DROPS Design answered:
Liebe Lara, ja das haben Sie genau richtig verstanden. Die 1. bis 10. R werden insgesamt 5 x gestrickt, nach der 10. beginnen Sie also wieder mit der 1.
08.03.2015 - 09:48
![]() Marijke Van Wermeskerken wrote:
Marijke Van Wermeskerken wrote:
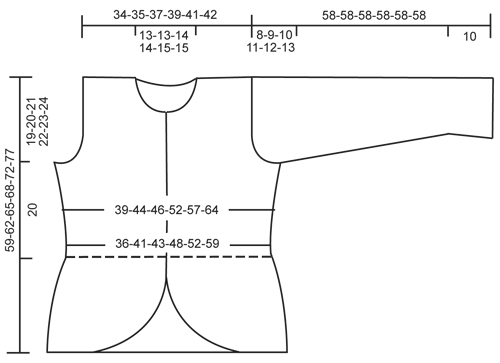
Dank voor je antwoord op mijn vraag maar het is niet wat ik bedoelde. A2 is het linkerpand en A3 het rechter. Als je eenmaal de bocht om bent zijn er verder geen verkorte toeren meer. Tussen de panden kun je geen verkorte toeren breien. Ik heb ze nu met veel gepruts middenachter gebreid waar A2 en A3 aan elkaar komen. Het effect is goed, nl. lichte ronding middenachter, maar ik had graag gelezen hoe ik dat moest doen.
06.03.2015 - 16:07
![]() Marijke Van Wermeskerken wrote:
Marijke Van Wermeskerken wrote:
Wat wordt er bedoeld met de opmerking brei ook verkorte toeren tussen patroon A2 / A3 ! (staat onder het kopje verkorte toeren.)
03.03.2015 - 17:38DROPS Design answered:
Hoi Marijke. Het betekent dat je ook de verkorte toeren moet breien als je A2/A3 breit (patroon op de voorpanden).
04.03.2015 - 14:58
|
|||||||||||||||||||
Enchanted#enchantedcardigan |
|||||||||||||||||||
 |
 |
||||||||||||||||||
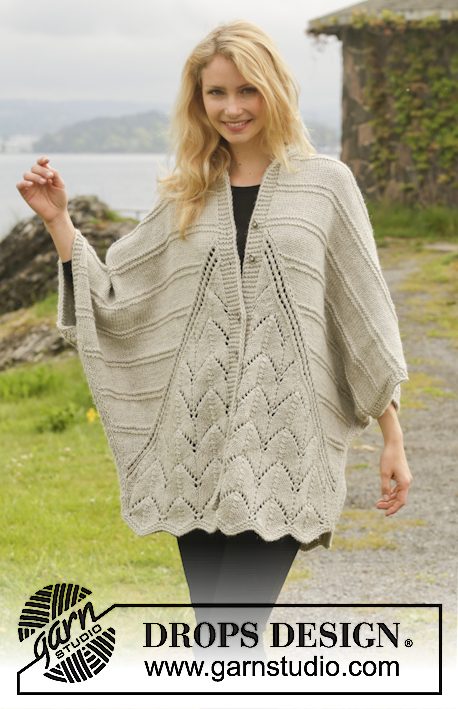
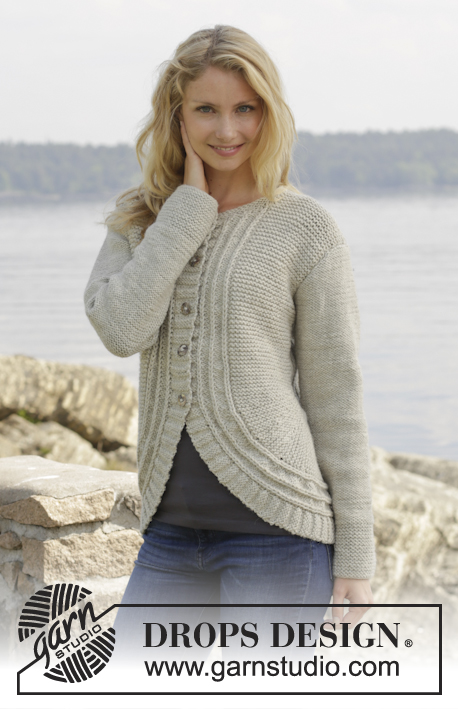
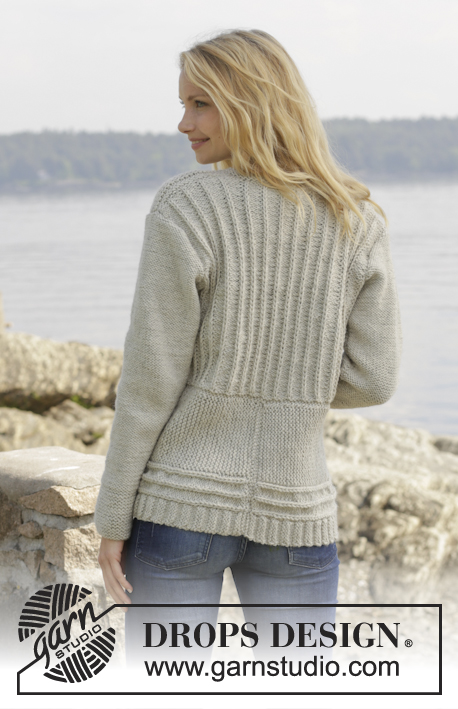
Knitted DROPS jacket with False English rib and short rows in "Nepal". Size S-XXXL
DROPS 157-25 |
|||||||||||||||||||
|
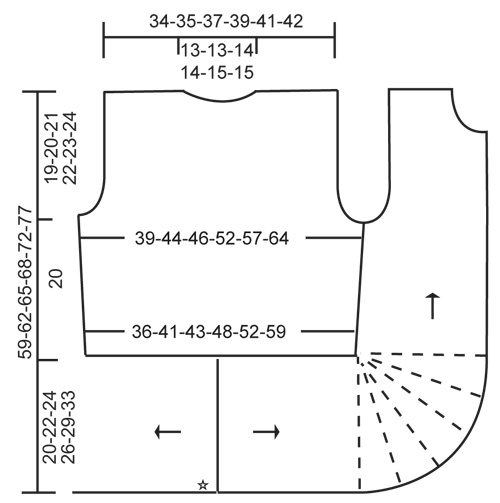
GARTER ST (back and forth on needle): K all rows. 1 ridge = 2 rows K. PATTERN: See diagrams A.1-A.3. The diagram shows all rows in pattern seen from RS. INCREASE TIP (applies to sleeve): Inc inside 1 edge st in garter st and 1 P by making 1 YO. On next round work YO twisted, i.e. work in the back loop of st instead of front, to avoid holes. DECREASE TIP: Dec inside 1 edge st in garter st. All dec are done from RS! Dec before 1 edge st as follows: K 2 tog. Dec after 1 edge st as follows: Slip 1 st as if to K, K 1, psso. SHORT ROWS: Work short rows on front piece to get a rounded edge on the piece. Also work short rows between pattern A.2/A.3! Work short rows as follows with 1st row from RS: Row 1 and 2: Work 8 sts in all sizes, turn and work back. Row 3 and 4: Work 12 sts in all sizes, turn and work back. Row 5 and 6: Work 16 sts in all sizes, turn and work back. Row 7 and 8: Work 19-19-20-20-19-20 sts, turn and work back. Row 9 and 10: Work 21-21-23-23-21-23 sts, turn and work back. Continue to work 3 sts more on every turn until all sts have been worked. Repeat from 1st row a total of 5 times. (The rounded edge now measures approx. 28-31-34-37-41-46 cm on the outer side and 3 cm on the inside.) BUTTONHOLES: Dec for buttonholes on right band. 1 buttonhole = K tog second and third st from mid front and make 1 YO. Dec for buttonholes when piece measures (measured from the marker in the side): SIZE S: 1-8-15-22-29 cm SIZE M: 1-8-15-22-30 cm SIZE L: 1-8-15-22-30 cm SIZE XL: 1-8-16-23-31 cm SIZE XXL: 1-8-16-23-31 cm SIZE XXXL: 1-9-17-25-32 cm ---------------------------------------------------------- JACKET: Worked back and forth in parts on circular needle and sewn tog when finished. BACK PIECE: Cast on 63-71-75-83-91-103 sts (incl 1 edge st in garter st in each side) on circular needle size 5 mm with Nepal. Work 1 ridge in GARTER ST - see explanation above. Then work as follows: 1 edge st in garter st, A.1 (= 4 sts) until 2 sts remain on row, work 1st st in A.1, 1 edge st in garter st. Continue like this with pattern, AT THE SAME TIME when piece measures 4 cm, inc inside 1 edge st in garter st in each side of piece by making 1 YO. On next row work YOs twisted to avoid holes, then P the new sts (seen from RS)! Repeat inc every 4-4-4-3-3-3 cm 2-2-2-3-3-3 more times = 69-77-81-91-99-111 sts. REMEMBER THE KNITTING TENSION! When piece measures 20 cm in all sizes, cast off for armholes on each side as follows: Cast off 3-4-5-6-7-8 sts 1 time and 1 st 1-3-3-6-7-11 times = 61-63-65-67-71-73 sts. Continue with pattern as before until piece measures 37-38-39-40-41-42 cm. On next row from RS cast off for neck as follows: Work the first 21-22-22-23-24-25 sts, cast off the next 19-19-21-21-23-23 sts and work the remaining 21-22-22-23-24-25 sts. Then finish each shoulder separately as follows: Continue back over left shoulder and dec 1 st towards the neck on next row from RS = 20-21-21-22-23-24 sts for shoulder. When piece measures 38-39-40-41-42-43 cm, work 1 ridge and loosely cast off. Work the other shoulder the same way. RIGHT EDGE PIECE/FRONT PIECE: Cast on 35-38-42-45-50-57 sts (incl 1 edge st in garter st) on circular needle size 5 mm with Nepal. Work 1 ridge in garter st. Then work as follows from RS: Pattern A.3 (= 18 sts), 16-19-23-26-31-38 sts in garter st, 1 edge st in garter st. When piece measures approx. 18-21-23-24-26-30 cm, work SHORT ROWS - see explanation above, AT THE SAME TIME on last row in 1st repetition with short rows, inc 1 st by making a YO between A.3 and sts in garter st = 36-39-43-46-51-58 sts. Work YOs twisted on next row to avoid holes. Repeat inc on last row in the remaining repetitions of short rows 3-4-1-2-0-0 more times = 39-43-44-48-51-58 sts on needle. When all short rows have been worked, insert 1 marker. NOW MEASURE PIECE FROM HERE! Continue with garter st and pattern as before. Remember BUTTONHOLES - see explanation above. When piece measures 4 cm, inc in the side as on back piece (i.e. the shorter side). After all inc, there are 42-46-47-52-55-62 sts on needle. When piece measures 20 cm, cast off for armhole in the side as on back piece (i.e in same side of piece as inc) = 38-39-39-40-41-43 sts. When piece measures 30-31-31-32-32-33 cm, slip the first 9 sts on needle from RS on a stitch holder for neck. Then cast off sts as follows on every row from neck: 3 sts 1 time, 2 sts 2 times and 1 st 2 times = 20-21-21-22-23-25 sts remain for shoulder. When piece measures 38-39-40-41-42-43 cm, work 1 ridge and cast off. LEFT EDGE PIECE/FRONT PIECE: Cast on and work as right edge piece/front piece but reversed. I.e. K 1 row from WS before working pattern like this: 1 edge st in garter st, 16-19-23-26-31-38 sts in garter st, A.2 over the remaining 18 sts on needle. Do not dec for buttonholes. SLEEVE: Worked back and forth on circular needle in reversed stocking st. Cast on 42-42-44-44-46-48 sts (incl 1 edge st each side) on needle size 5 mm with Nepal. Work 10 cm in garter st. Continue with reversed stocking st. On next row inc 1 st in each side of sleeve - Read INCREASE TIP! Repeat inc every 4-3-3-2½-2-2 cm 8-10-10-12-13-14 more times = 60-64-66-70-74-78 sts. When piece measures 50-49-48-47-46-45 cm (shorter measurements in the larger sizes because of longer sleeve cap and wider shoulders) cast off for sleeve cap at beg of every row in each side: 3 sts 1 time, 2 sts 3 times and 1 st 1-2-3-4-5-6 times, then cast off 2 sts in each side until piece measures 57 cm, then cast off 3 sts 1 time in each side, cast off remaining sts. Piece measures approx. 58 cm. Knit another sleeve. ASSEMBLY: Sew cast on edge on edge pieces tog mid back - sew edge to edge to avoid a chunky seam. Then sew edge piece to bottom edge of back piece. Sew the shoulder seams. Sew side seams and sleeve seams inside 1 edge st and sew sleeves in body. Sew the buttons on to the left band. NECK EDGE: Pick up approx. 72 sts (incl sts on stitch holders) around the neck. Work 2 ridges and cast off from WS. Cut and fasten the yarn. |
|||||||||||||||||||
Diagram explanations |
|||||||||||||||||||
|
|||||||||||||||||||
 |
|||||||||||||||||||
 |
|||||||||||||||||||
 |
|||||||||||||||||||
Have you finished this pattern?Tag your pictures with #dropspattern #enchantedcardigan or submit them to the #dropsfan gallery. Do you need help with this pattern?You'll find 27 tutorial videos, a Comments/Questions area and more by visiting the pattern on garnstudio.com. © 1982-2026 DROPS Design A/S. We reserve all rights. This document, including all its sub-sections, has copyrights. Read more about what you can do with our patterns at the bottom of each pattern on our site. |
|||||||||||||||||||


With over 40 years in knitting and crochet design, DROPS Design offers one of the most extensive collections of free patterns on the internet - translated to 17 languages. As of today we count 324 catalogues and 12290 patterns translated into English (UK/cm). 12290
We work hard to bring you the best knitting and crochet have to offer, inspiration and advice as well as great quality yarns at incredible prices! Would you like to use our patterns for other than personal use? You can read what you are allowed to do in the Copyright text at the bottom of all our patterns. Happy crafting!
Post a comment to pattern DROPS 157-25
We would love to hear what you have to say about this pattern!
If you want to leave a question, please make sure you select the correct category in the form below, to speed up the answering process. Required fields are marked *.