
Popular categories
Looking for a yarn?


Comments / Questions (130)
![]() Stina wrote:
Stina wrote:
Rad 4 i Framkant: ...2 v rätst.... Ska vara 1 kantmaska!
25.08.2015 - 09:42
![]() Kerstin Lindblom wrote:
Kerstin Lindblom wrote:
I mönstret under rubriken "Framkant" står det att efter man gjort varvet för knapphål ska man sticka 2 v rätstickning. Tittar man på bilden så är det inte någon rätstickning utan man fortsätter med resårstickningen. Vilket är rätt?
21.08.2015 - 13:35DROPS Design answered:
Hej. Precis efter att du plockat upp maskorna och innan du börjar sticka resåren ska du sticka 2 v rätstickning, vilket du även kan se på bilden. Lycka till!
25.08.2015 - 07:52
![]() Karen wrote:
Karen wrote:
J'en suis à la bordure devant taille 6-9 mois. Pour les boutonnières, je ne comprends pas les explications. Si je les suis, il me faudrait 81 mailles mais je n'en ai que 75. Pourriez-vous me donner le détail (10m côtes, 2 ens, 1 jeté, 10m...)? merci
31.07.2015 - 13:19DROPS Design answered:
Bonjour Karen, en taille 6/9 mois, ouvrez les boutonnières ainsi: 10 m en côtes, (*2 m ens à l'end, 1 jeté, 10 m en côtes* répétez de *-* 5 fois au total soit 12 m x 5 = 60 m), terminez par 2 m ens à l'end, 1 jeté, 2 m end, 1 m point mousse = 10 + 60 + 5 = 75 m. Bon tricot!
01.08.2015 - 10:37Selam wrote:
Hi I am working on the hood picked up 72st then it says adjust stiches to 48 does that mean? decrease to 48? working size 2 Thanks
03.06.2015 - 00:37DROPS Design answered:
Dear Selam, that's correct, you dec evenly to get 48 sts at the end of this row in 2nd size. Happy knitting!
03.06.2015 - 08:33Selam wrote:
Thank you for the earlier answer:-) How many st in total are to decreased for the just neck ?(total of 16 stiches) Working on size 2
30.05.2015 - 01:03DROPS Design answered:
Dear Selam, you are correct, you cast off a total of 16 sts for neck, ie 8 sts each side (2 sts 3 times + 1 st 2 times). Happy knitting!
30.05.2015 - 14:43Selam wrote:
Hi I have dec 6 times for the reglan and then have started have the neck dec 2 st 2 times (total of 4 st)on each side. After working the 7th dec for reglan.im left only with 5 st on the fron left and right sides. What im i doing wrong? I have no enough st to do all the decreases. Im working on size 3-6 months. Thanks
28.05.2015 - 08:45DROPS Design answered:
Dear Selam, on each front piece you dec 1 st for raglan (and 2 sts for each sleeve + back piece), so that you have 17 sts on each front piece before yoke, after 7 dec for raglan you should have 10 sts for each front piece (1st size). Happy knitting!
28.05.2015 - 10:02
![]() Ann-Mari Isaksen wrote:
Ann-Mari Isaksen wrote:
Hva betyr følgende: ...videre strikkes det glattstrikk med 1 m rille i hver side mot midt foran til heten måler....Hvor skal rillemaskene strikkes? Mot midt foran?
01.05.2015 - 20:34DROPS Design answered:
Hej Ann-Mari, Ja den yderste maske mod midt foran strikkes i rillestrik, det bliver kantmasken som strikkes således. God fornøjelse!
13.05.2015 - 12:03
![]() Undine wrote:
Undine wrote:
Liebes Dropsteam, beim Bein sollen nach 6cm je 1 M. aufgenommen werde und das aller 3 cm 4 Mal (3x4=12cm) wiederholt werden. Da wäre ich bei einer Gesamthöhe von 18cm. sollen aber die Randm. schon abgenommen werden. Nach 16cm soll auf beiden Seiten je 1 neue M. angeschlagen (52 M) werden. Bei 16cm bin ich allerding erst bei 48 M. Wo liegt mein Denkfehler? Vielen Dank im Voraus!
27.04.2015 - 02:09DROPS Design answered:
Liebe Undine, es sind nur 9 cm für die Zunahmen, denn Sie machen die 1. Zunahme ja bei der Gesamtlänge von 6 cm. Die 2. Zunahme nach weiteren 3 cm, die 3. nach weiteren 3 cm, die 4. nach weiteren 3 cm = 15 cm insgesamt (6 cm + 9 cm). Sie haben dann insgesamt 8 M zugenommen und müssten dann bei einer Gesamtlänge von 15 cm bei 50 M sein. Messen Sie am besten immer ab der ersten Zunahmen oder ab dem Anschlag, damit sich keine Abweichungen ergeben (d.h. die 1. Zunahme bei 6 cm, die 2. bei 9 cm Gesamtlänge, die 3. bei 12 cm Gesamtlänge und die 4. bei 15 cm Gesamtlänge).
27.04.2015 - 15:10
![]() Kyla Rytting wrote:
Kyla Rytting wrote:
I am in the yoke section where it says "at the same time when you have dec 7 times for raglan dec for neck at the beg of every row each side: 2 sts 3 times and then 1 st 0 times." I am so confused. How does that decrease work? Is it at the beginning of the row only or is it at the beginning and the end of each row? And how do you decrease 1 st? I'm making the smallest size so i know that part doesn't apply to me but i plan on using the pattern again for a larger size.
26.04.2015 - 02:42DROPS Design answered:
Dear Mrs Rytting, after dec for raglan, cast off at the beg of every row on each side 2 sts 3 times, ie on next row from RS, cast off the first 2 sts, work next sts with raglan dec as before to the end of row, turn and cast off the first 2 sts from WS, work remaining sts as before to the end of row. Repeat these 2 rows a total of 3 times = 2 sts have been cast off 3 times each side. Happy knitting!
27.04.2015 - 11:02
![]() Sylvia wrote:
Sylvia wrote:
Hallo liebes drops Team. Ich versteh die Kapuze nicht. 48 Maschen angepasst. Nun zwei krausrippe stricken. Zwei Reihen oder? Weiter glatt mit je 1 Masche krausrippe? Ich verstehe dies nicht und bitte nochmals um Erklärung. Vielen lieben Dank.
07.04.2015 - 21:17DROPS Design answered:
1 Krausrippe = 2 R kraus re, Sie müssen also für 2 Krausrippen 4 R re stricken. Dann stricken Sie 1 Hin-R re und nehmen in dieser Hin-R gleichmäßig verteilt 24 M zu (d.h. Sie verdoppeln jede 2. M).Dann stricken Sie glatt re weiter, aber rechts und links (also beidseitig) stricken Sie eine Rand-M kraus rechts. Also: 1 M kraus re, glatt re bis zur letzten M, diese letzte M kraus re. So stricken Sie bis zum Abketten.
08.04.2015 - 09:04
|
|
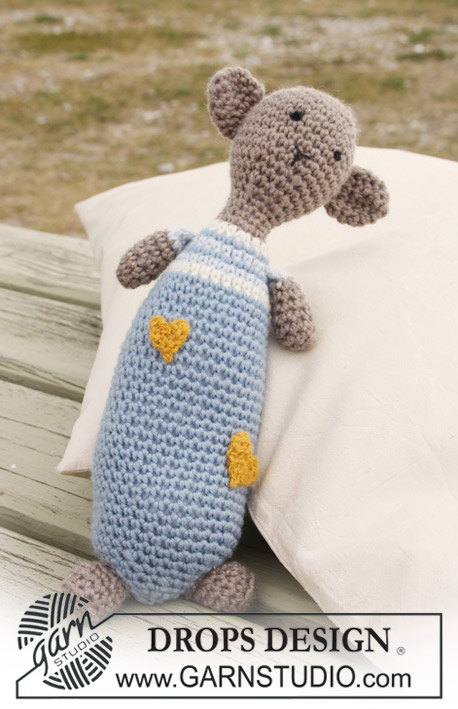
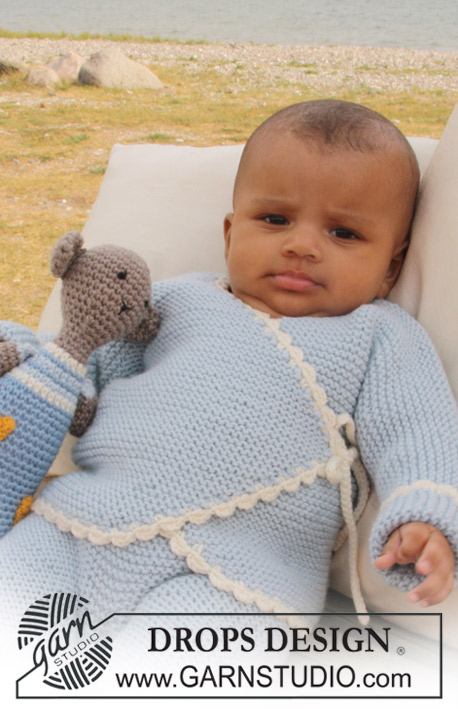
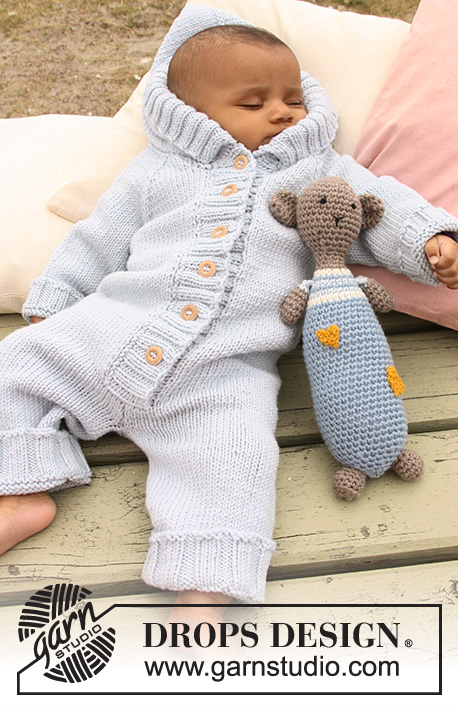
Little Blue Dream#littlebluedreamoverall |
|
 |
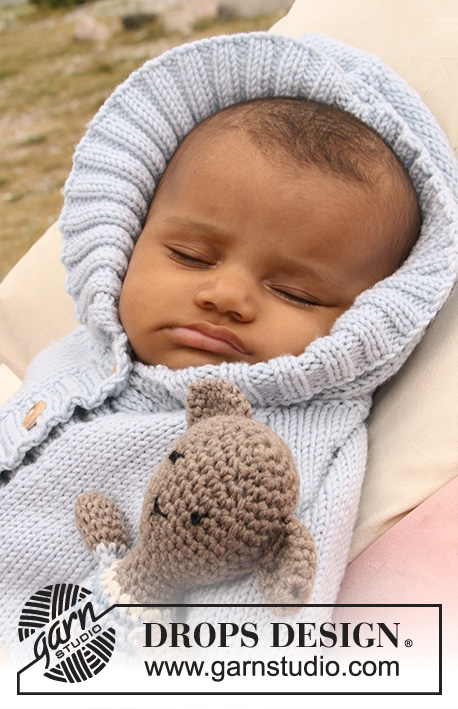 |
Set of knitted jumpsuit with raglan and crochet teddy bear for baby and children in DROPS Merino Extra Fine
DROPS Baby 20-23 |
|
|
JUMPSUIT: GARTER ST (back and forth on needle): K all rows. DECREASING TIP: Make all dec from RS. Dec as follows before marker: K2 tog. Dec as follows after marker: slip 1 st as if to K, K1, psso. -------------------------------------------------------- LEG: Worked in the round. Cast on 48-54-60 (66-72) sts on double pointed needles size 3.5 mm with Merino Extra Fine. Insert a marker at beg of round = inside of leg. K 1 round and continue in rib K3/ P3. When rib measures 4-4-4 (5-5) cm K 1 round, AT THE SAME TIME dec 6 sts evenly = 42-48-54 (60-66) sts. Change to double pointed needles size 4.5 mm. P 1 round and continue in stocking st. When piece measures 6-6-6 (7-7) cm inc 1 st each side of marker, and repeat the inc on every 3-4-5 (5-7) cm a total of 4 times = 50-56-62 (68-74) sts. When piece measures 16-20-23 (25-32) cm divide piece at inside of leg and complete piece back and forth on needle (to make it easier to slip sts on circular needle later on). Cast on 1 edge st each side = 52-58-64 (70-76) sts. When piece measures 18-22-25 (29-34) cm cast off 1 edge st each side. Put piece aside and knit the other leg in the same way. BODY PIECE: Slip legs on the same circular needle size 4.5 mm = 100-112-124 (136-148) sts. Continue back and forth from mid front as follows (first row = RS): Cast off 4 sts, K remaining sts on row. Turn piece, cast off 4 sts and P remaining sts on row = 92-104-116 (128-140) sts. Continue in stocking st back and forth on all sts. When piece measures 37-45-53 (58-65) cm work next row as follows (from RS): 17-20-23 (26-29) stocking sts (= right front piece), cast of 8 sts for armhole, work 42-48-54 (60-66) stocking sts (= back piece), cast off 8 sts for armhole, work 17-20-23 (26-29) stocking sts (= left front piece). Put piece aside and knit the sleeves. SLEEVE: Worked in the round. Cast on 36-42-42 (48-48) sts on double pointed needles size 3.5 mm with Merino Extra Fine. K 1 round and continue in rib K3/P3. When piece measures approx 3 cm K 1 round, AT THE SAME TIME dec 6-10-8 (12-10) sts evenly = 30-32-34 (36-38) sts. Change to double pointed needles size 4.5 mm and P 1 round. Insert a marker at beg of round = mid under sleeve. Continue in stocking st. AT THE SAME TIME when piece measures 5 cm inc 1 st each side of marker mid under sleeve, and repeat the inc on every 5-5-6 (6-6) round a total of 6-6-7 (8-9) times = 42-44-48 (52-56) sts. When piece measures 17-18-21 (24-28) cm cast off 8 sts mid under sleeve (4 sts each side of marker) = 34-36-40 (44-48) sts. Put piece aside and knit the other sleeve. YOKE: Slip sleeves on the same circular needle as body piece where cast off for armhole = 144-160-180 (200-220) sts. Insert a marker in all transitions between body piece and sleeves = 4 markers. Work stocking st back and forth on all sts. AT THE SAME TIME on 3rd row dec 1 st each side of all markers for raglan - see DECREASING TIP! Repeat the dec on every other row (= every row from RS) a total of 10-11-12 (13-15) times. AT THE SAME TIME when you have dec 7-6-6 (6-7) times for raglan cast off for neck at the beg of every row each side: 2 sts 3-3-4 (5-5) times and then 1 st 0-2-2 (2-3) times. After all dec for raglan and neck are complete there are 52-56-64 (72-74) sts left on needle and piece measures approx 45-53-62 (68-77) cm. Cast off all sts. FRONT BAND: Pick up 63-75-91 (95-103) sts along right front piece from bottom edge towards the neck on circular needle size 3.5 mm with Merino Extra Fine. K 1 row from WS, K 1 row from RS and continue in rib as follows (from WS): 1 garter st, * P2, K2 *, repeat from *-* and finish with P2. When rib measures 2 cm make buttonholes on next row from RS as follows: rib on the first 10-10-2 (6-2) sts, * P2 tog, 1 YO, 10 sts rib * repeat from *-* a total of 4-5-7 (7-8) times, finish with P2 tog, 1 YO, K2, 1 garter st. Continue in rib until front band measures 4 cm, cast off with K over K and P over P. Repeat on left front piece – do not make buttonholes. HOOD: Pick up approx 60 to 100 sts (do not pick up on front bands) round neck on circular needle size 4.5 mm. K 1 row from WS, AT THE SAME TIME adjust no of sts to 44-48-52 (56-60) sts. Work 4 rows garter st. Then K 1 row from RS, AT THE SAME TIME inc 24 sts evenly = 68-72-76 (80-84) sts. Continue in stocking st with 1 garter st each side towards mid front until hood measures 21-23-25 (27-28) cm, cast off. Fold hood double and sew tog at the top, sew edge to edge to avoid a chunky seam. Pick up 112-124-136 (144-152) sts round opening of hood on circular needle size 3.5 mm. K 1 row from WS, K 1 row from RS and continue in rib as follows (from WS): 1 edge st, * P2, K2 *, repeat from *-* on the next 108-120-132 (140-148) sts and finish with P2 and 1 edge st. Work rib for 8 cm, cast off with K over K and P over P. ASSEMBLY: Sew openings under sleeves and sew seam on the inside of leg inside 1 edge st. Sew left front band to the bottom of body piece. Sew buttons to left front band. Sew the first 4 cm from hood to the top edge of front band each side. Fold the other 4 cm towards RS and fasten with a few sts. -------------------------------------------------------- TEDDY: TEDDY: CROCHET INFO: Replace first dc on round with 1 ch and finish each round with 1 sl st in first dc from beg of round. CROCHET DC TOG: Crochet 2 dc tog to 1 dc as follows: Insert hook in first st, pick up thread, insert hook in next st, pick up thread, make 1 YO and pull thread through all 3 sts on hook. --------------------------------------------------------- --------------------------------------------------------- HEAD AND BODY: Beg at the top of head and after the head crochet the body. Then crochet ears, arms, and the hearts, which are sewn on afterwards. HEAD: SEE CROCHET INFO! Crochet 4 ch with crochet hook size 4 mm with light brown mix and form a ring with 1 sl st in first ch. ROUND 1: Crochet 6 dc in ring. ROUND 2: 2 dc in each dc = 12 dc. ROUND 3: * 1 dc in first dc, 2 dc in next dc *, repeat from *-* = 18 dc. ROUND 4: * 1 dc in each of the first 2 dc, 2 dc in next dc *, repeat from *-* = 24 dc. ROUND 5: * 1 dc in each of the first 3 dc, 2 dc in next dc *, repeat from *-* = 30 dc. ROUND 6-11: Crochet 1 dc in each dc = 30 dc. ROUND 12: * 1 dc in each of the first 3 dc, then crochet the next 2 dc tog (see above) *, repeat from *-* = 24 dc. ROUND 13: Crochet 1 dc in each dc = 24 dc. ROUND 14: * 1 dc in each of the first 2 dc, then crochet the next 2 dc tog *, repeat from *-* = 18 dc. ROUND 15: * 1 dc in first dc, then crochet the next 2 dc tog *, repeat from *-* = 12 dc. Now fill the head with cotton wool and continue in the round for body without cutting the thread. ROUND 16-18: Crochet 1 dc in each dc = 12 dc. ROUND 19: * 1 dc in each of the first 2 dc, 2 dc in next dc *, repeat from *-* = 16 dc. Change to off-white. ROUND 20: * 1 dc in each of the first 3 dc, 2 dc in next dc *, repeat from *-* = 20 dc. Change to light grey/blue. ROUND 21: Crochet 1 dc in each dc = 20 dc. Change to light grey/green. ROUND 22: * 1 dc in each of the first 4 dc, 2 dc in next dc *, repeat from *-* = 24 dc. Change to light grey/blue. ROUND 23: Crochet 1 dc in each dc = 24 dc. Change to light grey/green. ROUND 24: * 1 dc in each of the first 3 dc, 2 dc in next dc *, repeat from *-* = 30 dc. Change to off-white. ROUND 25: Crochet 1 dc in each dc = 30 dc. Change to light grey blue and crochet the rest of the body as follows: ROUND 26-29: Crochet 1 dc in each dc = 30 dc. ROUND 30: * 1 dc in each of the first 9 dc, 2 dc in next dc *, repeat from *-* = 33 dc. ROUND 31-39: Crochet 1 dc in each dc = 33 dc. ROUND 40: * 1 dc in each of the first 10 dc, 2 dc in next dc *, repeat from *-* = 36 dc. ROUND 41-46: Crochet 1 dc in each dc = 36 dc. ROUND 47: * 1 dc in each of the first 10 dc, then crochet the next 2 dc tog *, repeat from *-* = 33 dc. ROUND 48: Crochet 1 dc in each dc = 33 dc. ROUND 49: * 1 dc in each of the first 9 dc, then crochet the next 2 dc tog *, repeat from *-* = 30 dc. ROUND 50: * 1 dc in each of the first 3 dc, then crochet the next 2 dc tog *, repeat from *-* = 24 dc. ROUND 51: Crochet 1 dc in each dc = 24 dc. ROUND 52: * 1 dc in each of the first 2 dc, then crochet the next 2 dc tog *, repeat from *-* = 18 dc. ROUND 53: Crochet 1 dc in each dc = 18 dc. ROUND 54: * 1 dc in first dc, then crochet the next 2 dc tog *, repeat from *-* = 12 dc. ROUND 55: Crochet 2 dc tog all the way round = 6 dc. Fill the body with cotton wool, cut the thread, pull thread through remaining sts, tighten and fasten. LEGS: Crochet 4 ch with crochet hook size 4 mm with light brown mix and form a ring with 1 sl st in first ch. ROUND 1: Crochet 8 dc in ring. ROUND 2: * 1 dc in first dc, 2 dc in next dc *, repeat from *-*= 12 dc. ROUND 3: Crochet 1 dc in each dc = 12 dc – NOTE: Crochet in back loop of st. ROUND 4: Crochet 1 dc in each dc = 12 dc – NOTE: Crochet through both loops again. ROUND 5: Crochet 1 dc in each dc, at the same time crochet 2 dc tog at the beg and at the end of round = 10 dc. ROUND 6: Crochet 1 dc in each dc, at the same time crochet tog 5th and 6th dc and crochet tog 7th and 8th dc on round = 8 dc. Cut the thread. Crochet 1 more leg in the same way. Fill the legs with cotton wool and sew the legs to bottom of body. ARMS: Crochet 4 ch with crochet hook size 4 mm with light brown mix and form a ring with 1 sl st in first ch. ROUND 1: Crochet 4 dc in ring. ROUND 2: Crochet 2 dc in each dc = 8 dc. ROUND 3-6: Crochet 1 dc in each dc = 8 dc. Change to light grey/green. ROUND 7: Crochet 1 dc in each dc = 8 dc Fill the arm with cotton wool, place piece flat and crochet 1 dc in each dc through both layers = 4 dc. Cut the thread. Crochet 1 more arm in the same way and sew arms to the side of body at the top. EARS: Crochet 4 ch with crochet hook size 4 mm with light brown mix and form a ring with 1 sl st in first ch. ROUND 1: Crochet 6 dc in ring. ROUND 2: * 1 dc in first dc, 2 dc in next dc *, repeat from *-* = 9 dc. ROUND 3: * 1 dc in each of the first 2 dc, 2 dc in next dc *, repeat from *-* = 12 dc. ROUND 4-6: Crochet 1 dc in each dc = 12 dc. Place piece flat and crochet 1 dc in each dc through both layers = 6 dc, turn piece and crochet 2 dc tog across the row = 3 dc. Cut the thread and sew ear to the top of head to the side. Crochet 1 more ear and attach to the opposite side of head. SMALL HEART: Crochet 2 ch with crochet hook size 3 mm with guacamole (try to find a yellow section of the yarn) and crochet 3 dc in first ch, turn piece. Crochet 1 ch, then 1 dc in each st = 5 dc (includes ch at beg and end of row), turn piece. Crochet 3 ch, 1 tr in first ch, 1 dc in middle of heart, 3 ch, 1 tr in first ch, 1 sl st in ch from beg of previous row. Cut the thread and sew the heart to the front of teddy. LARGE HEART: Crochet 2 ch with crochet hook size 3 mm with guacamole (try to find a yellow section of the yarn) and crochet 3 dc in first ch, turn piece. Crochet 1 ch, then 1 dc in each st = 5 dc (includes ch at beg and end of row), turn piece. Crochet 1 ch, then 1 dc in each st = 6 dc (includes ch at beg of row), turn piece. Crochet 4 ch, 1 tr in first ch, 1 dc in the middle of heart, 4 ch,1 tr in first ch, 1 sl st in ch from beg of previous row. Cut the thread and sew the heart to the front of teddy. Crochet 1 more heart and sew to the back of teddy. Embroider eyes and mouth at the front of teddy with black. |
|
 |
|
Have you finished this pattern?Tag your pictures with #dropspattern #littlebluedreamoverall or submit them to the #dropsfan gallery. Do you need help with this pattern?You'll find 25 tutorial videos, a Comments/Questions area and more by visiting the pattern on garnstudio.com. © 1982-2026 DROPS Design A/S. We reserve all rights. This document, including all its sub-sections, has copyrights. Read more about what you can do with our patterns at the bottom of each pattern on our site. |
|


With over 40 years in knitting and crochet design, DROPS Design offers one of the most extensive collections of free patterns on the internet - translated to 17 languages. As of today we count 324 catalogues and 12290 patterns translated into English (UK/cm). 12290
We work hard to bring you the best knitting and crochet have to offer, inspiration and advice as well as great quality yarns at incredible prices! Would you like to use our patterns for other than personal use? You can read what you are allowed to do in the Copyright text at the bottom of all our patterns. Happy crafting!
Post a comment to pattern DROPS Baby 20-23
We would love to hear what you have to say about this pattern!
If you want to leave a question, please make sure you select the correct category in the form below, to speed up the answering process. Required fields are marked *.