
Popular categories
Looking for a yarn?


Comments / Questions (243)
![]() Astraea Blom wrote:
Astraea Blom wrote:
Ik begrijp het achterpand-linkerkant niet: Eerst 2 nld ribbelst, dan de vlg nld aan de goede kant, o.k.maar dan: Ga zo verder. Hoe? Want de naald terug is toch anders. Begin je dan met 1 kant st ribbelst zoals je geeindigd bent in de nld ervoor? Zou je de vlgd nld helemaal voor mij kunnen beschrijven zodat ik begrijp hoe ik verder moet gaan? Met vrl groet,
26.05.2014 - 21:40DROPS Design answered:
Hoi Astraea. Ja, in de beschrijving staat hoe je het motief moet breien: 1 kant st in ribbelst, 22-26-30-34-38-44 tricotst, 2 ribbelst, M.4 (= 10 st) en 6 voorbies st in ribbelst. Dus als je je de teruggaande nld (verkeerde kant) breit, dan begin je met de 6 voorbies st (ribbelst), M.4 (zie teltekening), 2 ribbelst (= rechts), dan 22 tot 44 tricotst - afhankelijk van je gekozen maat (= averecht op de verkeerde kant) en 1 ribbelst.
27.05.2014 - 15:48Astraea Blom wrote:
Ik begrijp het achterpand-linkerkant niet: Eerst 2 nld ribbelst, dan de vlg nld aan de goede kant, o.k.maar dan: Ga zo verder. Hoe? Want de naald terug is toch anders. Begin je dan met 1 kant st ribbelst zoals je geeindigd bent in de nld ervoor? Zou je de vlgd nld helemaal voor mij kunnen beschrijven zodat ik begrijp hoe ik verder moet gaan? Met vrl groet,
17.05.2014 - 21:47
![]() Milena wrote:
Milena wrote:
Sono arrivata al colletto cosa vuol dire lavarare le 8 maglie a legaccio se n'è ho 12 di maglie delle restanti 4 cosa ci faccio? Mi potete aiutare
07.04.2014 - 08:02DROPS Design answered:
Buongiorno Milena, iniziando a lavorare il colletto, deve lavorare 2 ferri a legaccio solo sulle prime 6 maglie (sono ferri accorciati) e poi continuare come prima. Ci riscriva se ha altri dubbi. Buon lavoro!!
07.04.2014 - 17:00
![]() Patricia Whiteley wrote:
Patricia Whiteley wrote:
On back for M1 it says. work inc st in M.1 in stocking st. is this a increase on every row or just on first row.
26.02.2014 - 14:49DROPS Design answered:
Dear Mrs Whiteley, the inc in M.1 and M.2 are the yos made on every RS rows at the end (in M.1) or at the beg (in M.2) of diagram. Happy knitting!
26.02.2014 - 15:46
![]() Nuria wrote:
Nuria wrote:
Estoy haciendo este patrón y no comprendo como en el delantero a más talla hay que hacer menos cm de M6 sin iniciar las disminuciones Me refiero a este párrafo PATRÓN: Continuar de la manera sig por el LD: 1 pt de orillo en pt musgo, 22-26-30-34-38-44 pts jersey, 2 pts musgo, M.4 (= 10 pts) y 6 pts del borde delantero en pt musgo. Continuar de esta manera hasta que la pieza mida aprox 12-10-8-6-5-3 cm
17.01.2014 - 22:44DROPS Design answered:
Hola Nuria. En las tallas más grandes el patrón M.6 (desvío de la trenza) comienza antes.
20.01.2014 - 20:48
![]() Miny wrote:
Miny wrote:
Ik zoek voor dit patroon garen wat niet kriebelt, maar wel een mooie kwaliteit?
09.12.2013 - 10:37DROPS Design answered:
Beste Miny. Neem contact op met uw verkooppunt. Zij helpen u graag verder met dit soort vragen. Veel breiplezier.
09.12.2013 - 11:08
![]() Lucia wrote:
Lucia wrote:
Buonasera- PER IL DAVANTI non riesco a capire come regolarmi per gli aumenti del colletto e le diminuzioni scollo: cosa vuol dire dim. 1 m. per il collo all'interno delle m. del bordo davanti+ le m. che sono state aumentate per il colletto? Devo contemporaneamente aumentare e diminuire le maglie aumentate? Grazie.
01.12.2013 - 19:50DROPS Design answered:
Buonasera Lucia, per lavorare le diminuzioni per lo scollo, deve diminuire dopo la m di vivagno e delle m che sono state aumentate per il collo, come indicato all'inizio delle istruzioni. Ci riscriva se non è ancora chiaro. Buon lavoro!
01.12.2013 - 21:15
![]() Lucia wrote:
Lucia wrote:
E il mio triangolo misura meno di 20 cm. e 23 cm.. E' possibile ingrandirlo un po'?grazie.
09.11.2013 - 20:01DROPS Design answered:
Buonasera Lucia, se il suo triangolo risulta più piccolo provi a rifarlo con una o mezza misura di uncinetto in più per vedere se in questo modo raggiunge la misura corretta. Buon lavoro!
10.11.2013 - 17:49
![]() Lucia wrote:
Lucia wrote:
Non capisco bene cosa fare con m1. al gettato succ.sul 3°f. devo lavorare 8 dir+1 gett.(9 dir.)+1 gett.-2rov- 21 m.a maglia rasata? dove va collocato ESATTAMENTE il gettato? grazie
09.11.2013 - 12:37DROPS Design answered:
Buonasera Lucia, abbiamo modificato leggermente il testo del modello, provi a vedere se in questo modo le risulta più chiaro; in ogni caso sul 1° f di M.1 deve lavorare 8 m dir e 1 gettato, sul f successivo lavorerà il gettato a m rasata, come tutte le m che verranno aumentate in M.1. Ci riscriva se incontra altri dubbi. Buon lavoro!!
10.11.2013 - 18:03
![]() Kerlau Muriel wrote:
Kerlau Muriel wrote:
Bonjour, Je ne comprends pas le début du tricot Dos coté gauche (et droite) vous dites de monter 24 m (tL) et tricoter ensuite après les 2rgs pt mousse : 2 m point mousse 13 m jersey 1 m point mousse, et le reste des mailles il y en reste 8 ! comment les tricoter
02.09.2013 - 17:54DROPS Design answered:
Bonjour Mme Kerlau, en taille L, après les 2 rangs point mousse vous tricotez : 2 m point mousse, les 8 m du diag. M.1 (voir en bas de page), 13 m jersey et 1 m point mousse = 24 m. Bon tricot !
03.09.2013 - 10:02
|
||||||||||||||||||||||||||||||||||
Sweet Erica#sweetericacardigan |
||||||||||||||||||||||||||||||||||
|
|
||||||||||||||||||||||||||||||||||
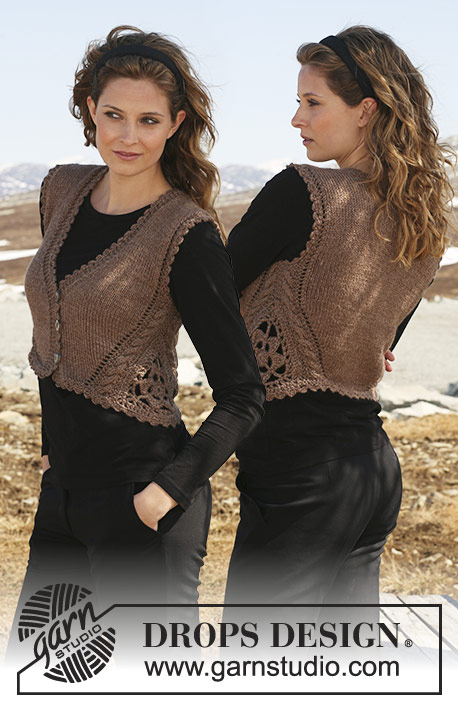
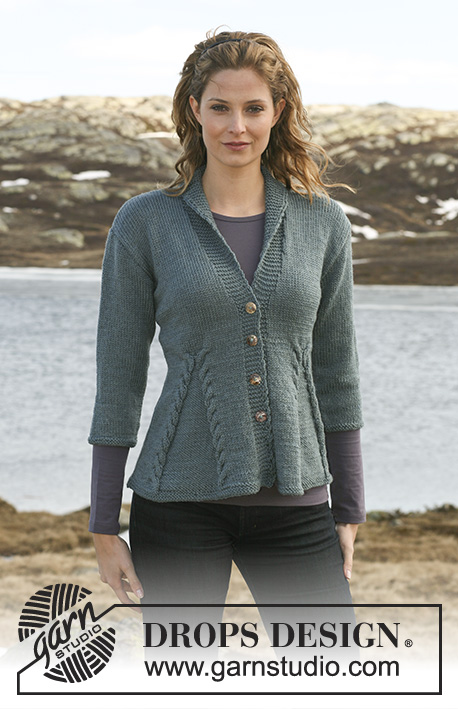
DROPS Jacket in 2 threads ”Alpaca” with cable and lace pattern and crochet triangle on back piece. Size S to XXXL
DROPS 117-1 |
||||||||||||||||||||||||||||||||||
|
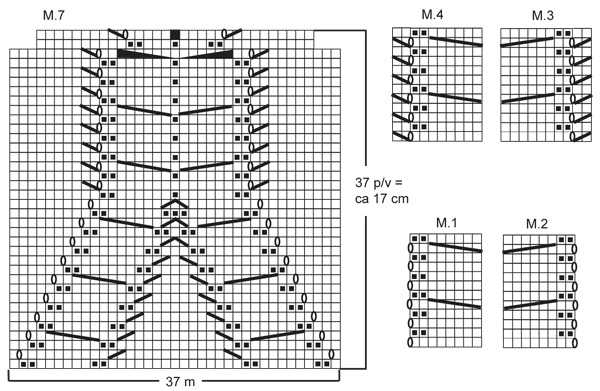
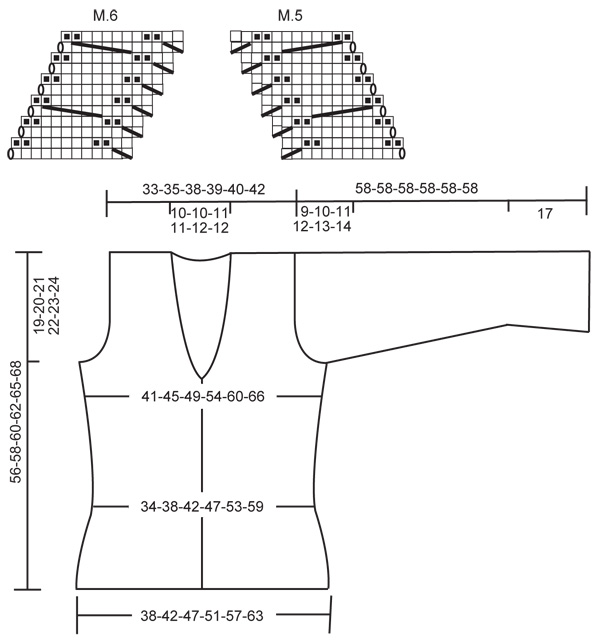
QUADRUPLE TR: Make 4 YO, insert hook in st below, pull thread through st (= 6 loops on hook) , * YO round hook, pull thread through 2 loops *, repeat from *-* a total of 5 times = 1 st left on hook. PATTERN: See diagram M.1 to M.7 – diagrams are seen from RS and show 1 pattern repeat. GARTER ST (back and forth on needle): K all rows. DECREASING TIP (neckline): Make all dec from RS. Dec as follows before all garter sts: K2 tog. Dec as follows after all garter sts: slip 1 st as if to K, K1, psso. BUTTONHOLES: Make buttonholes on right front band by K tog 3rd and 4th st from mid front and make 1 YO. Make buttonholes when piece measures: SIZE S: 6, 11, 17, 22, 27 and 32 cm. SIZE M: 6, 12, 17, 22, 28 and 33 cm. SIZE L: 6, 12, 18, 23, 29 and 34 cm. SIZE XL: 6, 12, 18, 24, 30 and 35 cm. SIZE XXL: 6, 13, 19, 25, 31 and 37 cm. SIZE XXXL: 6, 13, 19, 26, 32 and 39 cm. BACK PIECE: Worked back and forth on needle with an opening mid back for the crochet triangle. Crochet the triangle first and then work back piece in 2 pieces until after the opening for triangle. CROCHET TRIANGLE: Crochet 6 ch with 2 threads Alpaca on hook size 4.5 mm and form a ring with 1 sl st in first ch. ROUND 1: 3 ch (= 1 tr), 11 tr in ring, finish with 1 sl st in 3rd ch from beg of round (= 12 tr). ROUND 2: 3 ch (= 1 tr), * 5 ch, skip 1 tr, 1 tr in next tr *, repeat from *-* a total of 5 times and finish with 5 ch and 1 sl st in 3rd ch from beg of round (= 6 ch-loops on round). ROUND 3: Crochet as follows in each ch-loop: 1 dc, 1 ch, 1 tr, 1 ch, 1 dtr, 1 ch, 2 treble-tr, 1 ch, 1 dtr, 1 ch, 1 tr, 1 ch and 1 dc. Finish with 1 sl st in first dc from beg of round (= 6 leaves). ROUND 4: 6 ch (= 1 quadruple-tr = corner), 8 ch, 1 dc at the top of first leaf (between the 2 treble-tr), 9 ch, 1 dc at the top of next leaf, 8 ch, 1 QUADRUPLE-TR – see above - between the 2 dc between the next 2 leaves, * 7 ch, 1 dc at the top of next leaf (between the 2 treble-tr), 8 ch, 1 dc at the top of next leaf, 7 ch, 1 quadruple-tr between the 2 dc between the next 2 leaves *, repeat from *-* 1 more time along the last side, but finish with 1 sl st in 6th ch from beg of round (instead of 1 quadruple-tr between 2 leaves) = 9 ch-loops round the flower with 1 quadruple-tr in each corner - the one side (= towards bottom edge) is a little longer than the 2 other sides. ROUND 5: Crochet as follows in quadruple-tr in corner: 4 ch (= 1 dtr), 2 ch, 1 treble-tr, 2 ch and 1 dtr. In each of the 3 ch-loops along the first side crochet as follows: 1 ch, 1 dtr, 1 ch, 1 dtr, 1 ch, 1 dtr, 1 ch, 1 dtr, (= 4 dtr in each loop), * in quadruple-tr in corner crochet as follows: 1 ch, 1 dtr, 2 ch, 1 treble-tr, 2 ch and 1 dtr, and then crochet as follows in each of the 3 ch-loops along the next side: 1 ch, 1 dtr, 1 ch, 1 dtr, 1 ch, 1 dtr (= a total of 3 dtr in each loop) *, repeat from *-* 1 more time along the last side, and finish with 1 ch and 1 sl st in 4th ch from beg of round. ROUND 6: 4 ch, 1 dtr in first ch-loop, in treble-tr in each corner crochet as follows: 1 dtr, 2 ch, 1 treble-tr, 2 ch and 1 dtr, then crochet 1 dtr in each dtr and 1 dtr in each ch-loop from previous round. Finish round with 1 sl st in 4th ch from beg of round. Along one side there are now 31 dtr (= towards bottom edge) and along the 2 other sides there are 25 dtr. Cut the thread. Triangle measures approx 23 cm along the longest side and 20 cm along the 2 other sides. BACK PIECE – LEFT SIDE: Cast on 17-20-24-28-33-38 sts (includes 1 edge st at the side) with 2 threads Alpaca on needle size 5 mm. Work 2 rows GARTER ST – see above. Work next row as follows from RS: 2-2-2-3-3-3 garter sts, M.1 (= 8 sts), 6-9-13-16-21-26 stocking sts and 1 edge st in garter st. Continue like this – work inc st in M.1 in stocking st. AT THE SAME TIME when piece measures 3 cm dec 1 st at the side (from RS) by K2 tog inside 1 edge st, and repeat the dec on every 3 cm a total of 5 times. When you have inc a total of 21 sts in M.1 put piece aside - finish after 1 row from RS. Piece now measures approx 20 cm and there are 33-36-40-44-49-54 sts on needle. BACK PIECE – RIGHT SIDE: Cast on 17-20-24-28-33-38 sts (includes 1 edge st at the side) with 2 threads Alpaca on needle size 5 mm. Work 2 rows garter st. Work next row as follows from RS: 1 edge st in garter st, 6-9-13-16-21-26 stocking sts, M.2 (= 8 sts) and 2-2-2-3-3-3 garter sts. Continue like this – work inc sts in M.2 in stocking st. AT THE SAME TIME when piece measures 3 cm dec at the side as described for left side – but K tog into back of loop the 2nd and 3rd st on row. When there are as many sts and as many rows as on left side put piece aside. BACK PIECE: Slip the 2 back pieces on the same needle with pattern towards pattern = 66-72-80-88-98-108 sts. Continue as follows: 1 edge st in garter st, 20-23-27-30-35-40 stocking sts, M.3 (make sure to have the same number of rows between each cable row throughout), 4-4-4-6-6-6 garter sts, M.4, 20-23-27-30-35-40 stocking sts and 1 edge st in garter st. Continue like this. AT THE SAME TIME when piece measures 22 cm from cast on row inc 1 st each side by K 2 sts in the last but one st, and repeat the inc on every 2-2.5-2.5-2.5-3-3 cm a total of 6 times = 78-84-92-100-110-120 sts. When piece measures 37-38-39-40-42-44 cm cast off for armhole each side at the beg of every row: 3 sts 1-1-1-1-2-2 times, 2 sts 1-1-2-3-4-5 times and 1 st 3-4-4-5-4-5 times = 62-66-70-72-74-78 sts. When piece measures 54-56-58-60-63-66 cm K2 tog on the 6 sts on each cable = 56-60-64-66-68-72 sts. On next row cast off the middle 16-16-18-18-20-20 sts for neck = 20-22-23-24-24-26 sts left on each shoulder. Complete each shoulder separately and cast off when piece measures 56-58-60-62-65-68 cm. Sew the crochet triangle to the opening at bottom of back piece – make sure to have the longer side towards bottom edge. Sew edge to edge and make sure the seam is even. LEFT FRONT PIECE: Cast on 41-45-49-53-57-63 sts (includes 1 edge st at the side and 6 front band sts towards mid front) with 2 threads Alpaca on needle size 5 mm. Work 2 rows garter st. READ ALL OF THE FOLLOWING SECTION BEFORE CONTINUING! PATTERN: Continue as follows from RS: 1 edge st in garter st, 22-26-30-34-38-44 stocking sts, 2 garter sts, M.4 (= 10 sts) and 6 front band sts in garter st. Continue like this until piece measures approx 12-10-8-6-5-3 cm (adjust to after 1 row from WS after 1 cable-row). Continue as follows: 1 edge st in garter st, stocking st until 20 sts remain, M.6 (= 12 sts), 2 stocking sts, and 6 front band sts in garter st. Continue like this – M.6 will shift 1 st towards the side on every other row (i.e. there will gradually be less stocking sts on right side of piece and more stocking sts on left side of piece). DECREASES AND INCREASES: At the same time when piece measures 3 cm dec at the side as described for back piece and when piece measures 22 cm inc at the side as described for back piece. When all dec and inc are complete there are 42-46-50-54-58-64 sts on needle. COLLAR: When piece measures 32-33-34-35-37-39 cm work 2 rows garter st on the 6 front band sts only (to make neckline neater). On next row inc 1 st for collar towards mid front by making 1 YO inside the first front band st, on next row work YO into back of loop to avoid a hole. Repeat the inc on every other row a total of 12 times = 18 garter sts incl front band-sts towards mid front. DEC FOR NECK: When piece measures 34-35-36-37-39-41 cm dec 1 st for neck inside front band sts + inc sts for collar – SEE DECREASING TIP! Repeat the dec on every other row a total of 6-7-7-7-7-8 times and then on every 4th row a total of 5-5-6-6-6-6 times. PATTERN: When M.6 has shifted all the way to the side (only 1 edge st left) continue as follows: 1 edge st in garter st, 3 garter sts, M.1 (but without the YO – make sure to have the same number of rows between each cable-row), then stocking st and garter st on remaining sts as before. When piece measures 36-37-38-39-41-43 cm K2 tog on the 6 sts on cable. Continue in stocking st over stocking st and garter st over garter st. ARMHOLE: When piece measures 37-38-39-40-42-44 cm cast off for armhole at the beg of every row from the side as described for back piece. When all dec for armhole and neck and inc for collar are complete there are 32-34-35-36-36-38 sts on needle – continue in stocking st and garter st as before. When piece measures 56-58-60-62-65-68 cm cast off 20-22-23-24-24-26 sts from shoulder towards neckline = 12 collar sts left on needle. Continue on these as follows (beg from WS): * 2 rows garter st on all sts, 2 rows garter st on the 8 sts towards mid front only *, repeat from *-* until collar measures 5-5-5.5-5.5-6-6 cm (measured where shortest) and cast off loosely. RIGHT FRONT PIECE: Like left front piece, but after the first 2 rows garter st continue as follows: 6 front band sts in garter st, M.3, 2 garter sts, 22-26-30-34-38-44 stocking sts and 1 edge st in garter st. Then work M.5 instead of M.6 and M.2 instead of M.1. AT THE SAME TIME when piece measures 6 cm make BUTTONHOLES on front band – see above! SLEEVE: Worked back and forth on needle. Cast on 57-59-61-63-65-67 sts (includes 1 edge st each side) with 2 threads Alpaca on needle size 5 mm. K 1 row from RS and continue as follows from WS: 1 edge st in garter st, 9-10-11-12-13-14 stocking sts, M.7 (= 37 sts), 9-10-11-12-13-14 stocking sts and 1 edge st in garter st. AT THE SAME TIME when piece measures 2 cm dec 1 st each side, repeat the dec on every 3 cm a total of 5 times. When M.7 and dec at the sides are complete there are 41-43-45-47-49-51 sts on needle and piece measures approx 17 cm. Continue in stocking st on all sts. When piece measures 19 cm inc 1 st each side, and repeat the inc on every 3.5-3-2.5-2-2-1.5 cm a total of 9-10-11-12-13-14 times = 59-63-67-71-75-79 sts. When piece measures 49-48-47-46-45-44 cm (less for the larger sizes because of longer sleeve cap and wider shoulder) cast off for sleeve cap each side at the beg of every row: 4 sts 1 time, 2 sts 2 times and 1 st 4-5-6-7-8-9 times, then 2 sts each side until piece measures 57 cm, now cast off 3 sts 1 time each side. Cast off remaining sts, piece measures approx 58 cm. ASSEMBLY: Sew shoulder seams. Sew collar tog mid back, edge to edge, and sew to neckline. Set in sleeves and sew side and sleeve seams inside 1 edge st. Crochet a border round the whole opening with crochet hook size 4.5 mm and 2 threads Alpaca – beg mid back, continue down along collar, left front band, along bottom edge, up along right front band, collar and finish mid back. Crochet as follows: 1 dc in first st, * 4 ch, 1 tr in the first ch (= 1 picot), skip approx 1.5 cm, 1 dc in next st *, repeat from *-*. Crochet a similar border round sleeve edges. Sew on buttons |
||||||||||||||||||||||||||||||||||
Diagram explanations |
||||||||||||||||||||||||||||||||||
|
||||||||||||||||||||||||||||||||||
 |
||||||||||||||||||||||||||||||||||
 |
||||||||||||||||||||||||||||||||||
Have you finished this pattern?Tag your pictures with #dropspattern #sweetericacardigan or submit them to the #dropsfan gallery. Do you need help with this pattern?You'll find 34 tutorial videos, a Comments/Questions area and more by visiting the pattern on garnstudio.com. © 1982-2026 DROPS Design A/S. We reserve all rights. This document, including all its sub-sections, has copyrights. Read more about what you can do with our patterns at the bottom of each pattern on our site. |
||||||||||||||||||||||||||||||||||


With over 40 years in knitting and crochet design, DROPS Design offers one of the most extensive collections of free patterns on the internet - translated to 17 languages. As of today we count 324 catalogues and 12290 patterns translated into English (UK/cm). 12290
We work hard to bring you the best knitting and crochet have to offer, inspiration and advice as well as great quality yarns at incredible prices! Would you like to use our patterns for other than personal use? You can read what you are allowed to do in the Copyright text at the bottom of all our patterns. Happy crafting!
Post a comment to pattern DROPS 117-1
We would love to hear what you have to say about this pattern!
If you want to leave a question, please make sure you select the correct category in the form below, to speed up the answering process. Required fields are marked *.