
Popular categories
Looking for a yarn?


Comments / Questions (11)
![]() Rita Maas wrote:
Rita Maas wrote:
Bij voorpand staat nadat je de middelste steken op een draad zet voor de hals, dat je daarna moet meerderen in elke 2de naald . Is het niet de bedoeling dat je juist mindert ?
07.06.2023 - 14:43DROPS Design answered:
Dag Rita,
Je hebt helemaal gelijk, het stond er verkeerd en je moet inderdaad minderen in plaats van meerderen. Het is nu aangepast.
10.06.2023 - 18:34
![]() Rosa Maria wrote:
Rosa Maria wrote:
È possibile avere traduzione in italiano? Grazie
11.01.2023 - 10:04DROPS Design answered:
Buonasera Rosa Maria, aggiungeremo questo modello a quelli da tradurre. Buon lavoro!
08.03.2023 - 19:58
![]() Fé Te Nuijl wrote:
Fé Te Nuijl wrote:
Heb deze trui gebreid voor een kindje van 5 en een kindje van 3 jaar. In beide gevallen was de hals te krap om over het hoofdje te trekken. Heb veel meer steken opgenomen en heel los afgehecht. Doe ik iets fout bij het breien van de hals?
06.10.2018 - 09:03DROPS Design answered:
Dag Fé Te Nuijl
Je hebt niks fout gedaan als ik het zo lees, de hals moet inderdaad vrij losjes gebreid worden voor kleine kinderen (die in verhouding een groter hoofd hebben). Mijn persoonlijke ervaring is dat er nogal verschil in kan zitten per kind.
11.11.2018 - 14:07
![]() Angie wrote:
Angie wrote:
When picking up stitches what does divisible by 6+5 mean?
04.08.2018 - 18:29DROPS Design answered:
Dear Angie, it means that the pattern repeat is 6 stitch and you need to add 5 stitches to make it simmetric on both side. So you should pic up stitches in a number that, after taking out these 5 stitches, can be divided by six. Happy Crafting!
04.08.2018 - 23:23Jessi Bauer wrote:
Hallo Werden die beiden Spitzen nach der bind off mid front und mid back in geschlossenen Runden gestricket oder in Hin und Rueckrunden?
19.07.2018 - 23:18DROPS Design answered:
Liebe Frau Bauer, jede Spitze werden hin und zurück gestrickt: es wird auf beiden Seiten der Markierung zugenonmmen und gleichzeitig am Anfang jeder Reihe abgekettet. Am Ende wird die Mütze (= die beiden Spitzen) oben zusammengenäht. Viel Spaß beim stricken!
20.07.2018 - 14:46
![]() Christine Rider wrote:
Christine Rider wrote:
Where is the beginning of the row on the hat, for the 2 sts bind for the top 1 and top 2? Is the beginning in the mid front and mid back? Is the top knitted in closed rounds, or in back and forward rows? Do understand it right and the markers are set on each outside?
20.03.2018 - 04:44DROPS Design answered:
Dear Mrs Rider, the markers are on the sides, so that the first marker can be the beg of rounds, you will cast off the middle sts (mid front and mid back) and finish each tip (= part of top of hat) back and forth separately increasing on each side of the marker and binding off at the same time at the beg of each row. Happy knitting!
20.03.2018 - 09:12
![]() Van Laer Eloisa wrote:
Van Laer Eloisa wrote:
Dankuwel voor uw uitleg. De merkdraden en het meerderen begrijp in intussen denk ik. Het afkanten aan weerszijden en hoeveel rijen een punt beslaat is me nog niet duidelijk. Waar juist kant je steken af ? Misschien wijst het zich wel uit al doende ? Het mutsje ziet er voor zover al geslaagd uit en ik wil de punten niet verknoeien.. ik ben geen beginneling maar ook niet gevorderd... vriendelijke groeten Eloisa
11.12.2017 - 23:45DROPS Design answered:
Hoi Laer Eloisa, Je kant steeds midden voor en midden achter af. Als je de instructie gewoon volgt, wijst dit zich inderdaad wel.
13.12.2017 - 08:52
![]() Eloisa Van Laer wrote:
Eloisa Van Laer wrote:
Ik zou deze muts graag breien voor mijn petekindje, is het mogelijk meer detail te krijgen over het breien van de punten, het meerderen en minderen is mij ondanks de reeds eerder gegeven uitleg bij de vragen toch niet duidelijk ? vriendelijke groet Eloisa
26.10.2017 - 19:13DROPS Design answered:
Hallo Eloisa, Je breit de muts in de rondte en bij een hoogte van 17-19-21 cm beginnen de punten. Op dat moment plaats je ook de markeerdraden; deze zitten aan weerskanten, zeg maar boven de oren. Dan begin je bij 1 markeerdraad te breien, je breit 10-11-12 steken en kant dan 1-2-3 steken af midden voor. Dit afkanten doe je ook middenachter. Vervolgens brei je elke punt heen en weer apart van elkaar verder. De maarkeerdraad zit dan in het midden als je een punt aan het breien bent. Aan weerskantn van de markeerdraad ga je meerderen en aan beide uiteinden ga je afkanten volgens instructie, op die manier ontstaat de vorm van de punten er in.
02.11.2017 - 16:12
![]() Marilyn Raffaele wrote:
Marilyn Raffaele wrote:
I am a very experienced knitter, but cannot understand the directions for making the top of the Harley child's hat. How do I increase on both sides of the marker and at the same time bind off??? Please help.
05.01.2015 - 16:26DROPS Design answered:
Dear Mrs Raffaele, you have first to put 2 markers on each side (24-24-27 sts between each markers for mid front and mid back) - then bind off the mid 1-2-3 sts on both mid front and mid back, and continue each side separately binding off sts at the beg of every row, at the same time, increase at marker (in the middle of the piece worked). Happy knitting!
05.01.2015 - 17:49
![]() Charlotte Houde wrote:
Charlotte Houde wrote:
Je veux savoir ou exactement mettre le marqueur. est ce que c,est sous la pointe dans le milieu de la pointe . plusieurs tricoteuses consultées ne sont pas capable de le faire. .
06.12.2014 - 00:15DROPS Design answered:
Bonjour Mme Houde, vous place 2 marqueurs : 1 de chaque côté, espacés tous les 2 de 21-27 m), puis rabattez 1-3 m au milieu devant et au milieu dos, les marqueurs se trouvent au milieu des 20-24 m sur les côtés, vous augmentez au niveau ce ces marqueurs et continuez à rabattre les mailles de chaque côté à partir du milieu dos et du milieu devant (= au début de chaque rang de chaque côté de chaque pointe). Bon tricot!
07.12.2014 - 12:33
|
|
Harley |
|
|
|
|
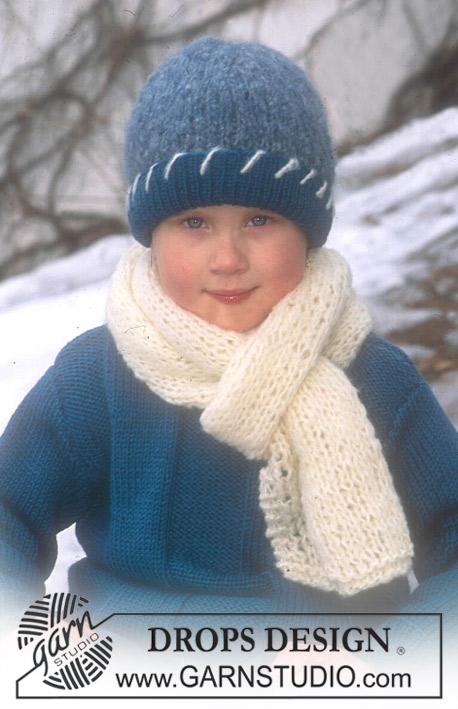
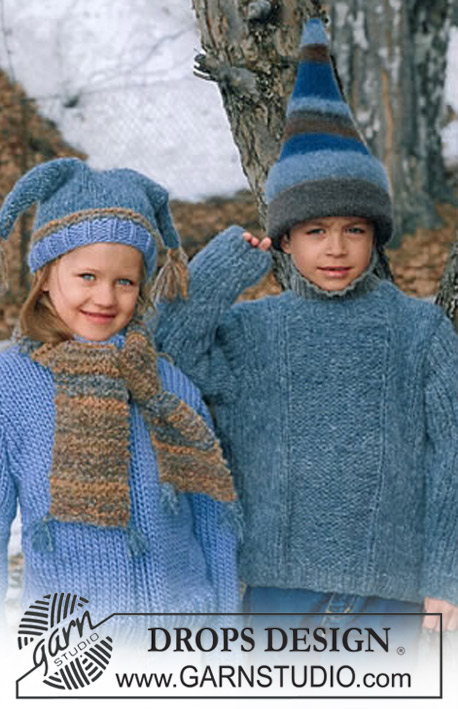
Jumper, hat and scarf in Snow and Highlander
DROPS Children 12-6 |
|
|
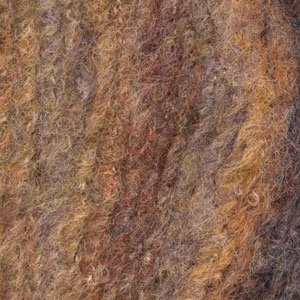
JUMPER Knitting tension: 10 sts x 14 rows on needles size 9mm in stocking sts = 10 x 10 cm. Rib: *K1, P2*, repeat from *-*. Front piece: When only one number is mentioned this applies to all sizes. Cast on 35-35-41 (41-47-47) sts (incl 1 edge st each side) on needle size 8 mm with Snow. Knit Rib as follows (1st row = right side): 1 edge st, P1, *K1, P2*, repeat from *-* until there are 3 sts left, K1, P1, 1 edge st. Continue like this until Rib measures 6 cm. Change to needle size 9mm and continue in stocking sts, but knit the 5 middle sts as follows: P2, K1, P2 (as in Rib) until finished measurements. At the same time, on the first row after the Rib inc 1 st on each side of the middle 5 sts in size 5/6, 9/10 and 13/14 (do not inc in the other sizes) = 35-37-41 (43-47-49) sts. Remember your knitting tension! When piece measures 8-8-9 (9-10-10) cm inc 1 st each side and repeat the inc when piece measures 16-17-18 (19-20-21) cm = 39-41-45 (47-51-53) sts. When piece measures 22-24-26 (28-30-32) cm cast off for armhole each side on every other row as follows: 3 sts 1 time, 2 sts 0-0-1 (1-1-2) times and 1 st 1-2-1 (2-3-2) times = 31-31-33 (33-35-35) sts. When piece measures 31-34-37 (39-42-45) cm put the middle 5-5-7 (7-9-9) sts on thread for neck. Now dec to shape the neckline on every other row as follows: 2 sts 1 times and 1 st 2 times = 9 sts left on each shoulder. Cast off when piece measures 37-40-43 (46-49-52) cm. Back piece: Cast on and knit as front piece, but after the Rib knit stocking sts over all sts until finished measurements. Inc on first row after the Rib and at sides as for front piece. Cast off for armhole as described for front piece and continue until piece measures 35-38-41 (44-47-50) cm. Now cast off the middle 11-12-13 (13-15-15) sts for neck. On next row dec 1 st on neckline = 9 sts left on each shoulder. Cast off when piece measures 37-40-43 (46-49-52) cm. Sleeves: Cast on 23-23-23 (26-26-26) sts (incl 1 edge st each side) on needle size 8 mm with Snow and knit 6 cm Rib with 1 edge st each side in garter sts. Change to needle size 9mm and continue in stocking sts. At the same time after the Rib, inc 1 st each side on every 5.5-5-4.5 (6.5-6-5.5) cm a total of 4-5-6 (5-6-7) times = 31-33-35 (36-38-40) sts. When sleeve measures 25-29-31 (35-38-43) cm, dec for sleeve cap each side on every other row as follows: 3 sts 1 time and 2 sts each side until sleeve measures 29-34-37 (42-46-52) cm. Now cast off 3 sts each side 1 time and cast off remaining sts on next row. Sleeve measures approx 30-35-38 (43-47-53) cm. Assembly: Sew right shoulder seam. Neck: Pick up approx 36 to 45 sts (divisible by 3 and incl sts on thread) round the neck on needle size 8mm and Snow. Knit 5-5-6 (5-6-7) cm Rib – make sure there’s K1 mid front so that the Rib on neck follows the pattern on front piece. Cast off in Rib. Sew left shoulder seam and continue along the neck – sew the neck in the outer loop of the outermost st in order the seam doesn’t become to heavy. Sew in sleeves. Sew sleeve and side seams within 1 edge st. HAT: Knitting tension: 10 sts x 16 rows on needles size 8mm with Highlander in garter sts = 10 x 10 cm. Garter sts (on circular needle): 1st row: Knit, 2nd row: purl. Rib: *K1, P2*, repeat from *-* Hat: Cast on 45-51-57 sts on small circular needle size 8mm with Snow. Knit 4-4-5 cm Rib. Change to beige-mix Highlander and knit 4 rounds garter sts decreasing 3 sts evenly of first round = 42-48-54 sts. Now change to turquoise Highlander and stocking sts until finished measurements. When piece measures 17-19-21 cm insert a marking thread each side (= 21-24-27 sts between marking threads). Knit next round as follows from 1st marking thread: 10-11-12 sts, cast off 1-2-3 sts (= mid front), 20-22-24 sts, cast off 1-2-3 sts (mid back), 10-11-12 sts. Now finish each top separately. 1st top: Continue in stocking sts whilst inc and cast off for top as follows: Inc on each side of marking thread: 1 st on every 4th row 2 times and 1 st on every other row 3 times. At the same time cast off 2 sts each side on every other row a total of 6 times. Cast off remaining sts. 2nd top: Knit as 1st top. Sew the hat tog at the top. The hat measures approx 24-26-28 cm. Tassels: Attach a tassel to each top. 1 tassel = 12 threads of beige-mix Snow each measuring 16cm. Fold the threads double SCARF: Knitting tension: 8 sts x 18 rows on needles size 10mm with Highlander in garter sts = 10 x 10 cm. Garter sts (back and forth on needle): Knit all rows Loosely cast on 11-13-15 sts on needle size 10mm with beige-mix and knit garter sts until scarf measures approx 85-100-110 c. Cast off loosely. Tassels: Attach a turquoise tassel in each corner. 1 tassel = 4 threads measuring 10 cm each. Fold the threads double and pull loop through the first st in corner, pull ends through loop. |
|
 |
|
Have you finished this pattern?Tag your pictures with #dropspattern or submit them to the #dropsfan gallery. Do you need help with this pattern?You'll find 21 tutorial videos, a Comments/Questions area and more by visiting the pattern on garnstudio.com. © 1982-2026 DROPS Design A/S. We reserve all rights. This document, including all its sub-sections, has copyrights. Read more about what you can do with our patterns at the bottom of each pattern on our site. |


With over 40 years in knitting and crochet design, DROPS Design offers one of the most extensive collections of free patterns on the internet - translated to 17 languages. As of today we count 324 catalogues and 12290 patterns translated into English (UK/cm). 12290
We work hard to bring you the best knitting and crochet have to offer, inspiration and advice as well as great quality yarns at incredible prices! Would you like to use our patterns for other than personal use? You can read what you are allowed to do in the Copyright text at the bottom of all our patterns. Happy crafting!
Post a comment to pattern DROPS Children 12-6
We would love to hear what you have to say about this pattern!
If you want to leave a question, please make sure you select the correct category in the form below, to speed up the answering process. Required fields are marked *.