
Popular categories
Looking for a yarn?


Comments / Questions (7)
![]() Ewa wrote:
Ewa wrote:
Witam. Pytanie dotyczy rozmiaru L. Skąd wzięło się 180 oczek - we fragmencie opisu TYŁ & PRZODY, skoro po skończonym karczku i podziale oczek na części swetra podano: obszycie 7 oczek, przód 36 oczek, tył 74 oczka, przód 36 oczek, obszycie 7 oczek. Stanowi to 160 oczek a nie 180 oczek jak podano
28.02.2026 - 11:55DROPS Design answered:
Witaj Ewo, w rozmiarze L przed podziałem były 244 oczka. Następnie zdejmiesz na nitki 2x42 oczka (2x42=84), a jednocześnie nabierzesz po 12 oczek pod każdym rękawem (2x12=24) : 244-84+24=184. Część TYŁ i PRZODY zaczynasz właśnie od 184 oczek. Pozdrawiamy!
02.03.2026 - 09:01
![]() Anette wrote:
Anette wrote:
Guten Tag, benötige ich für die o.g. Jacke nur 100 g von der kid silk wolle und nehme diese dann vierfädig? Viele Grüße Anette
06.01.2026 - 12:44DROPS Design answered:
Liebe Annette, in M brauchen Sie 100 g Kid-Silk in 4 verschiedenen Farben (so insgesamt 400 g Kid-Silk), dh 4 Knäuel jeder Farbe (und insgesamt 16 Knäuel). Viel Spaß beim Stricken!
07.01.2026 - 07:32
![]() Tut wrote:
Tut wrote:
Hvordan finder jeg ud af hvilken str. jeg skal strikke modelen i?
13.02.2025 - 11:18
![]() Kristin Gerhard wrote:
Kristin Gerhard wrote:
I plan to knit this in single color, using one strand of group D yarn. How much yarn do I need? Size L
09.02.2025 - 20:49DROPS Design answered:
Dear Kristin, for size L you needed 100gr of each colour of Kid-Silk. Since you will work with 1 thread of a group D yarn, like DROPS Melody, you needed 840m of yarn, which, with Melody's yardage, would be: 6 balls of DROPS Melody. Remember that if you are using a different yarn you will need to calculate the yardage according to that specific yarn; you can check a lesson on this here. Happy knitting!
10.02.2025 - 00:13
![]() Ilona wrote:
Ilona wrote:
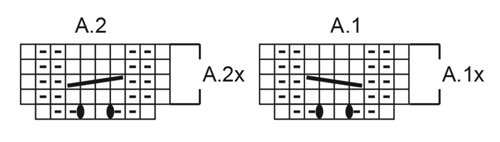
Warum hat man beim Stricken der Halsblende plötzlich 8 Maschen mehr. Anschlag sind 100 Maschen. Eine Zunahme dieser Maschen ist nicht beschrieben
09.02.2025 - 16:05DROPS Design answered:
Liebe Ilona, bei der 1. Reihe A.1 und A.2 wird man jeweils 2 Maschen zunehmen (siehe 3. Symbol + Beschreibung), so sind es insgesamt 8 Zunahmen und 108 Maschen auf der Nadel. Viel Spaß beim Stricken!
10.02.2025 - 10:48
![]() Kris Gerhard wrote:
Kris Gerhard wrote:
I plan to knit this in single color, using one strand of group D yarn. How much yarn do I need?
07.02.2025 - 21:51DROPS Design answered:
Dear Kris, you can work with 1 thread of Melody instead of 4 different color threads of Kid-Silk together, you can see in this lesson how to calculate the new yarn amount. For example, for size S you need 75gr of Kid-Silk, which is 3 balls of Kid-Silk, and a total of 660m (210m per ball). With the total yardage, we calculate how many balls of DROPS Melody we will need to get that yardage, which is 660/140 = 5 balls of Melody for the smallest size. You can make the same calculations for the other sizes. Happy knitting!
09.02.2025 - 23:03
![]() Ilona Boller wrote:
Ilona Boller wrote:
Ich finde die Anleitung leider nicht zu dieser Strickjacke
07.02.2025 - 13:46DROPS Design answered:
Liebe Frau Boller, hier finden Sie die Anleitung für diese Jacke. Viel Spaß beim Stricken!
07.02.2025 - 15:30
|
||||||||||||||||
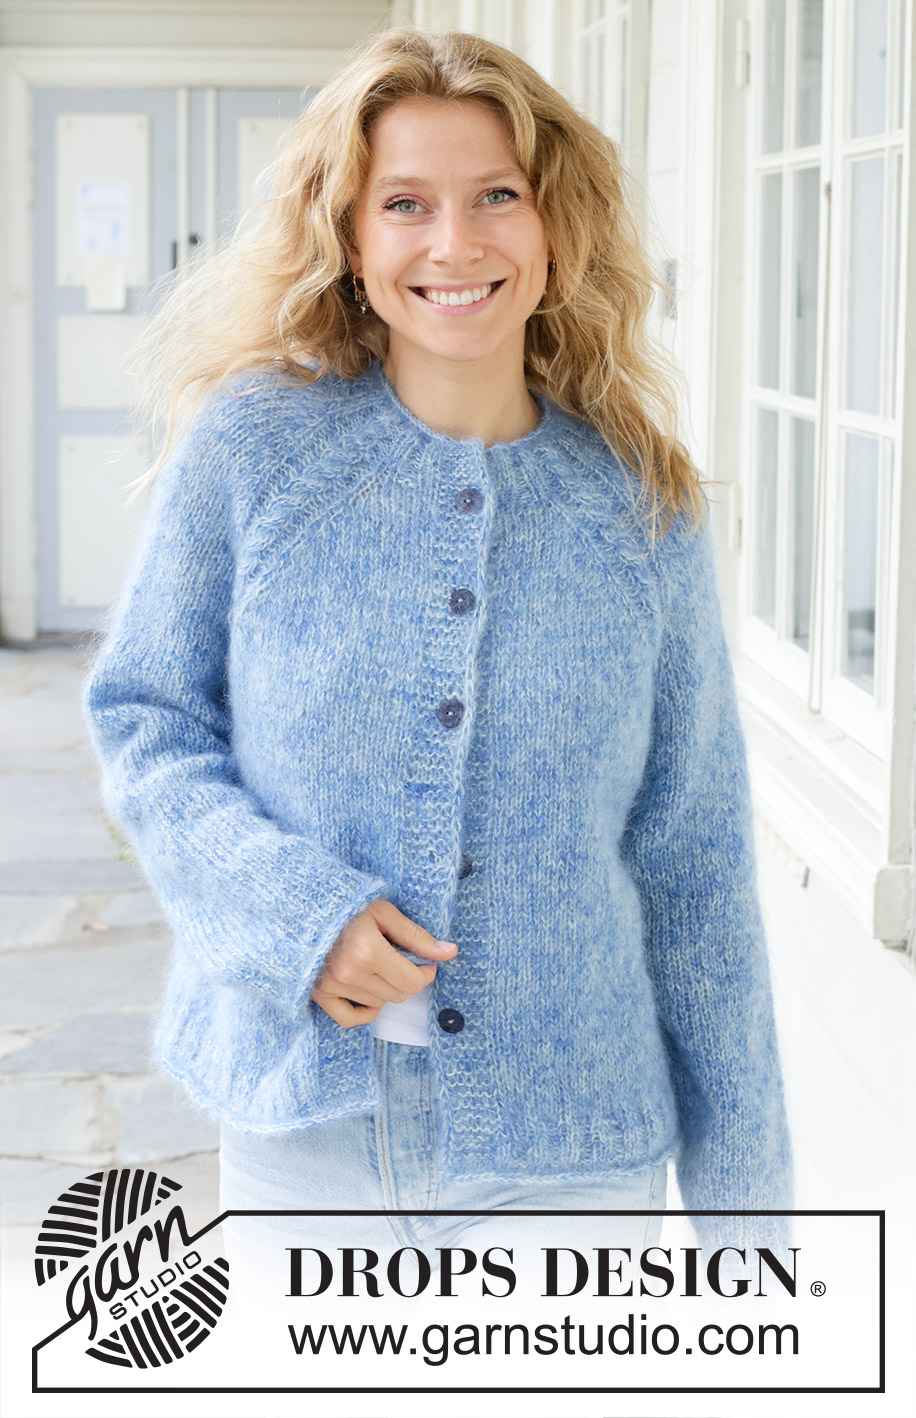
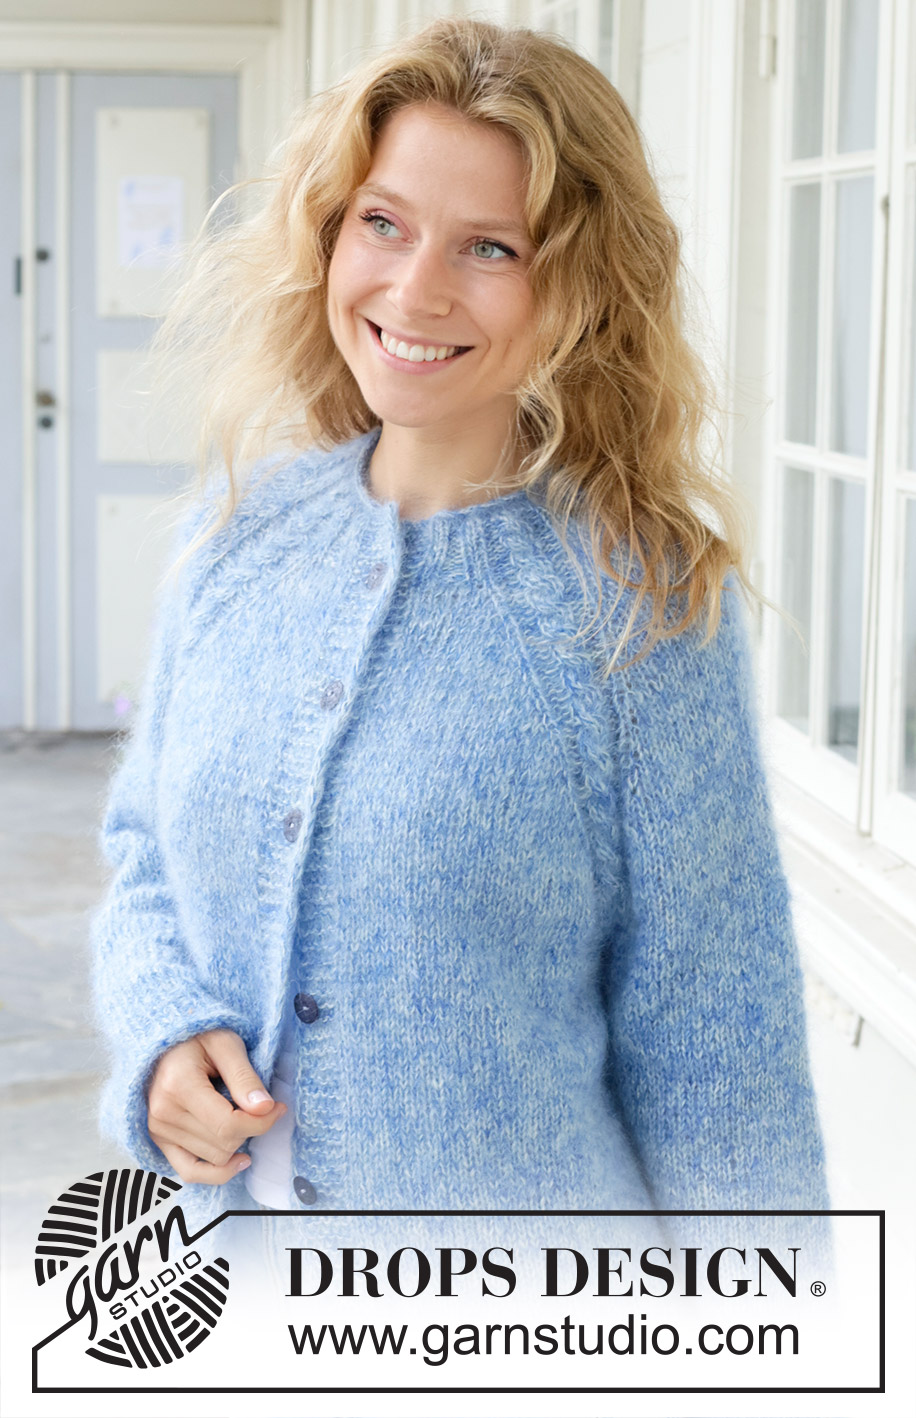
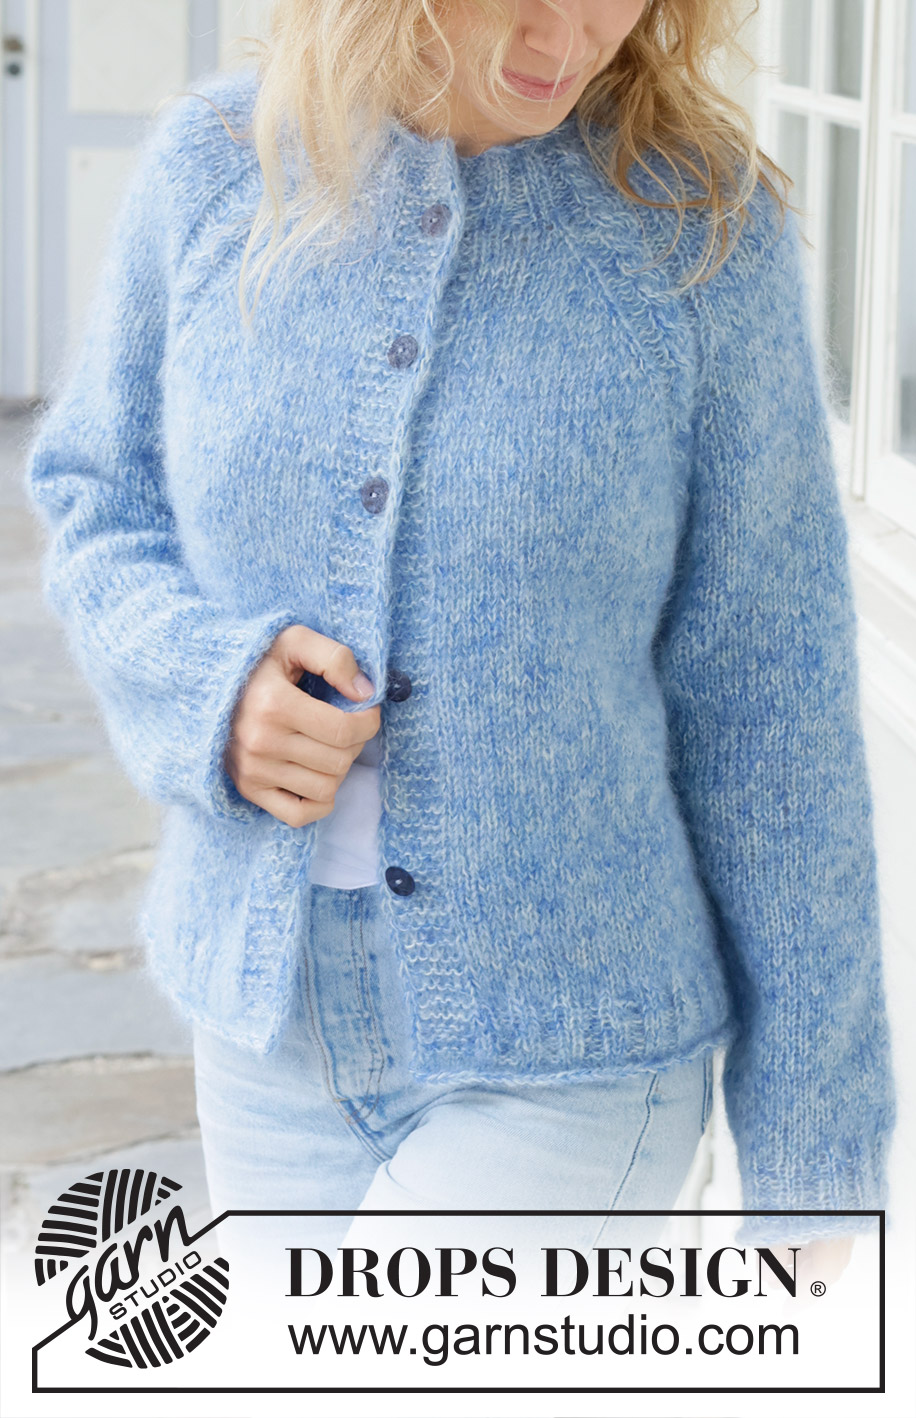
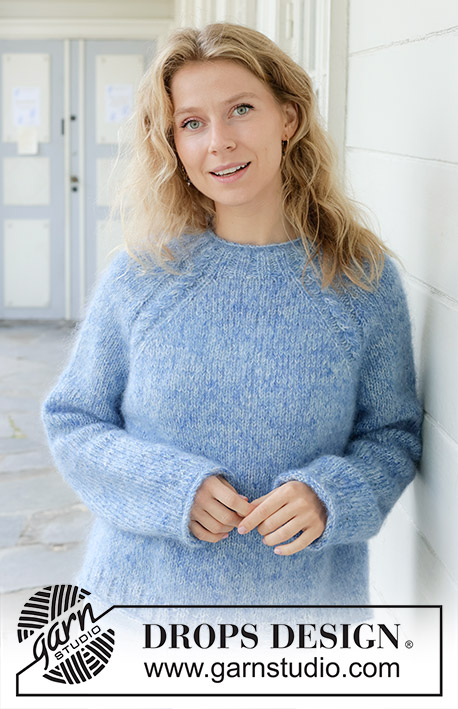
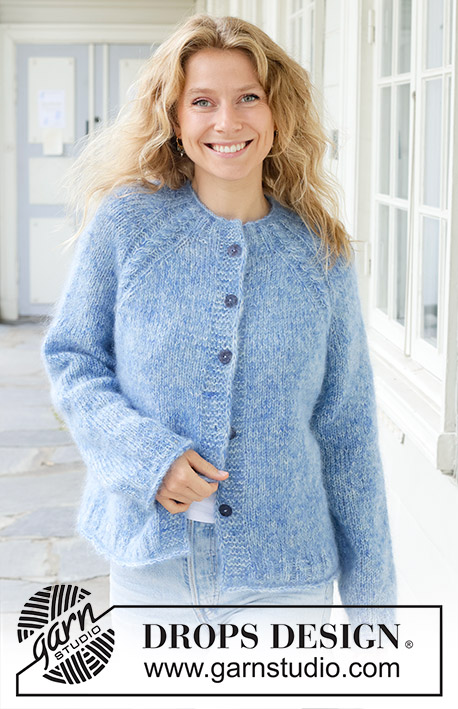
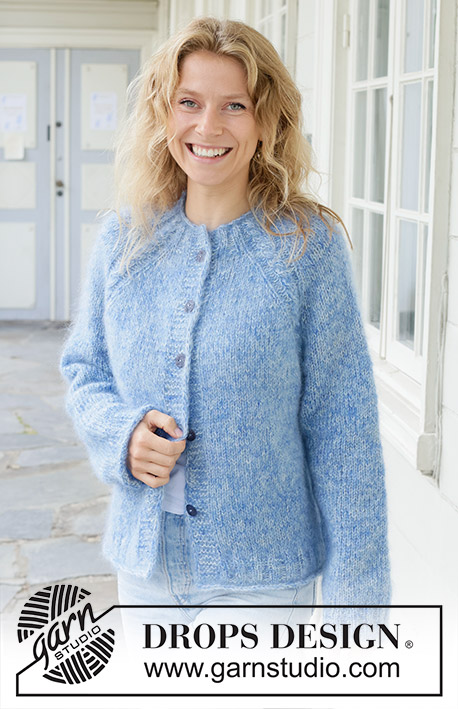
Frosted Sky Cardigan#frostedskycardigan |
||||||||||||||||
 |
 |
|||||||||||||||
Knitted jacket in 4 strands DROPS Kid-Silk. The piece is worked top down with raglan, cables, rolled edges and I-cord. Sizes S - XXXL.
DROPS 259-6 |
||||||||||||||||
|
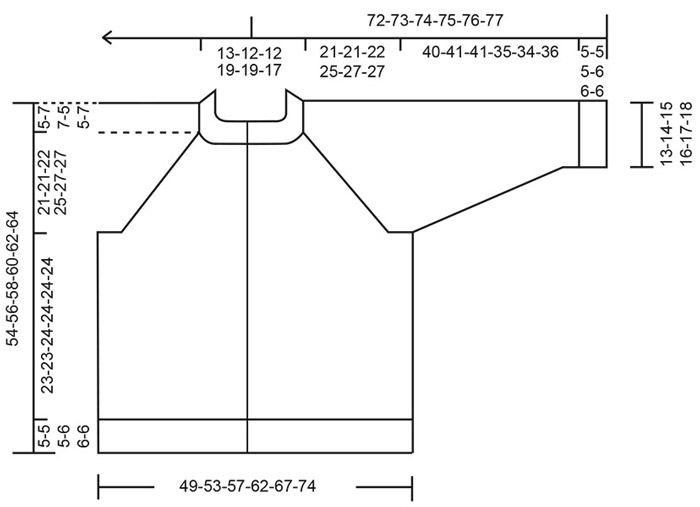
------------------------------------------------------- EXPLANATIONS FOR THE PATTERN: ------------------------------------------------------- GARTER STITCH (worked back and forth): Knit all rows, from both the right and wrong side. 1 ridge in height = knit 2 rows. BANDS WITH I-CORD BEGINNING OF ROW: Slip 1 stitch purl-wise with strand in front, knit 1, work 5 garter stitches. END OF ROW: Work until there are 7 stitches left on the row, work 5 garter stitches, slip 1 stitch purl-wise with strand in front, knit 1. Work in the same way from both the right and wrong side. PATTERN: See diagrams A.1 and A.2. The diagrams show the pattern from the right side. RAGLAN: Increase on each side of A.1/A.2 by making 1 yarn over, which is worked as follows on the next row: BEFORE A.1/A.2: Slip the yarn over off the left needle and replace it the other way round (insert the left needle through the back when replacing it). Work through the front loop to avoid a hole. Then work the new stitch in stocking stitch. AFTER A.1/A.2: Work through the back loop to avoid a hole. Then work the new stitch in stocking stitch. BUTTONHOLES: Work the buttonholes on the right band (when garment is worn) from the right side, when there are 5 stitches left on the row. ROW 1 (right side): Make 1 yarn over, knit 2 together, knit 1, slip 1 purl-wise with strand in front, knit 1. ROW 2 (wrong side): Work the band as before, knit the yarn over to leave a hole. The first buttonhole is worked on the first row from the right side after the neck is finished. Then work the other 4-4-4-5-5-5 buttonholes with 9½-9½-10-8½-9-9 cm between each one. INCREASE TIP (evenly spaced): To work out how to increase evenly, count the total number of stitches on the needle (e.g., 164 stitches) minus the bands (e.g., 14 stitches) and divide the remaining stitches by the number of increases to be made (e.g., 20) = 7.5. In this example, increase by making 1 yarn over after alternately each 7th and 8th stitch. Do not increase on bands. On the next row work the yarn overs twisted to avoid holes. SLEEVE TIP: When knitting up stitches under the sleeve, you can get a small hole in the transition between stitches on the body and sleeve. This hole can be closed by picking up the strand between 2 stitches and working this strand twisted together with the first stitch between body and sleeve. DECREASE TIP (for sleeves): Decrease 1 stitch on each side of the marker as follows: Work until there are 3 stitches left before the marker, knit 2 together, knit 2 (marker sits between these 2 stitches), slip 1 stitch knit-wise, knit 1 and pass the slipped stitch over the knitted stitch (2 stitches decreased). ------------------------------------------------------- START THE PIECE HERE: ------------------------------------------------------- JACKET – SHORT OVERVIEW OF THE PIECE. The pattern uses both long and short needles; start with the length which fits the number of stitches and change when necessary. The neck and yoke are worked back and forth with circular needle, from mid front and top down. When the yoke is finished, it is divided for body and sleeves and the body continued back and forth, while the sleeves wait. The sleeves are worked in the round, top down. NECK: Cast on 84-92-92-100-100-108 stitches with circular needle size 5.5 and 1 strand of each colour DROPS Kid-Silk (= 4 strands). Change to circular needle size 4.5 mm. ROW 1 (wrong side): Work 7 stitches according to BANDS WITH I-CORD – read description above, purl until there are 7 stitches left and work 7 stitches according to bands with I-cord. The bands are worked like this to finished length. ROW 2 (right side): Work 7 band-stitches, knit until there are 7 stitches left, work 7 band-stitches. ROW 3 (wrong side): Work 7 band-stitches, purl until there are 7 stitches left, work 7 band-stitches. ROW 4 (right side): Work 7 band-stitches, rib (knit 2, purl 2) until there are 9 stitches left, knit 2, 7 band-stitches. ROW 5 (wrong side): Work 7 band-stitches, rib (purl 2, knit 2) until there are 9 stitches left, purl 2, 7 band-stitches. ROW 6 (right side): Work 7 band-stitches, work rib as before across the next 5-5-5-9-9-9 stitches, A.1 across 8 stitches, work rib as before across the next 8-12-12-8-8-12 stitches, A.2 across 8 stitches, work rib as before across the next 12-12-12-20-20-20 stitches, A.1 across 8 stitches, work rib as before across the next 8-12-12-8-8-12 stitches, A.2 across 8 stitches, work rib as before across the next 5-5-5-9-9-9 stitches, 7 band-stitches = 92-100-100-108-108-116 stitches. Continue the bands, rib and the diagrams until A.1/A.2 are finished in height. Continue as before but now work A.1x above A.1 and A.2x above A.2 one time in height. Then work the first row in A.1x/A.2x so the next row is from the right side. Insert 1 marker inside one of the bands; the yoke is now measured from here. YOKE: Change to circular needle size 5.5 mm and work as follows from the right side: 7 band-stitches, work 5-5-5-9-9-9 stocking stitches, A.1x (= left front piece), work 8-12-12-8-8-12 stocking stitches (= sleeve), A.2x, work 12-12-12-20-20-20 stocking stitches, A.1x (= back piece), work 8-12-12-8-8-12 stocking stitches (= sleeve), A.2x, work 5-5-5-9-9-9 stocking stitches and 7 band-stitches (= right front piece) – remember the first BUTTONHOLE - read description above. Work back from the wrong side, continuing the bands, stocking stitch and pattern. Continue the bands, stocking stitch and pattern and start to increase for RAGLAN – read description above, as follows: ROW 1 (right side): Increase for raglan before and after each A.1x/A.2x (= 8 increased stitches). ROW 2 (wrong side): Work back as before, working the yarn overs as described under RAGLAN. Work ROWS 1 and 2 a total of 5-5-10-7-9-15 times (= 10-10-20-14-18-30 rows worked) = 132-140-180-164-180-236 stitches. Remember to maintain the knitting tension. Now increase for raglan as follows: ROW 1 (right side): Continue the pattern, stocking stitch and bands and increase for raglan before and after each A.1x/A.2x (= 8 increased stitches). ROW 2 (wrong side): Work back as before with the new stitches worked in stocking stitch. ROW 3 (right side): Increase for raglan before A.1 and after A.2, i.e., only on the front and back pieces, not on the sleeves (= 4 increased stitches). ROW 4 (wrong side): Work back as before with the new stitches worked in stocking stitch. Work ROWS 1 to 4 a total of 7-7-5-8-8-5 times (= 28-28-20-32-32-20 rows worked = you have increased 7-7-5-8-8-5 times on the sleeves and 14-14-10-16-16-10 times on the front and back pieces) = 216-224-240-260-276-296 stitches. Now work ROWS 1 to 4 one more time but work stocking stitch across the patterned stitches and, on row 1, knit together the 2 purled stitches on each side of each cable. 8 stitches decreased on the row, you have increased 2 more times on the front and back pieces and 1 more time on each sleeve. There are 220-228-244-264-280-300 stitches. You have increased 8-8-6-9-9-6 times on the sleeves and 16-16-12-18-18-12 times on the front and back pieces). All increases for raglan are finished; you have increased a total of 21-21-22-25-27-27 times on the front and back pieces and 13-13-16-16-18-21 times on the sleeves. Continue with the band-stitches and stocking stitch across all other stitches until the yoke measures 21-21-22-25-27-27 cm from the marker mid-front. Now divide for the body and sleeves. DIVIDE FOR BODY AND SLEEVES: When dividing, A.1x/A.2x will not necessarily be positioned in the middle of the transitions between body and sleeves in all sizes. Work 7 band-stitches, 32-34-36-39-42-46 stocking stitches (= front piece), place the next 38-38-42-46-48-50 stitches on 1 thread for the sleeve, cast on 8-10-12-14-16-18 stitches (under the sleeve), work 66-70-74-80-86-94 stocking stitches (= back piece), place the next 38-38-42-46-48-50 stitches on 1 thread for the sleeve, cast on 8-10-12-14-16-18 stitches (under the sleeve), work 32-34-36-39-42-46 stocking stitches and 7 band-stitches (= front piece). The body and sleeves are finished separately. BODY: = 160-172-184-200-216-236 stitches. Continue back and forth with the bands and stocking stitch until the piece measures 44-44-46-49-51-51 cm from the marker mid-front. On the next row from the right side begin the rib, AT THE SAME TIME increase 20-20-24-24-28-32 stitches evenly on this row– read INCREASE TIP = 180-192-208-224-244-268 stitches, as follows: Change to circular needle size 4.5 mm, work 7 band-stitches, work rib (knit 2, purl 2 – remember to increase) until there are 9 stitches left, knit 2, work 7 band-stitches. When the rib measures 4-4-4-5-5-5 cm (with the last row from the wrong side), work 3 rows of stocking stitch, then change to circular needle size 5.5 mm and cast off slightly loosely with knit from the right side (= rolled edge). The jacket measures approx. 49-49-51-55-57-57 cm from the marker mid-front and 54-56-58-60-62-64 cm from top of shoulder. SLEEVES: Place the 38-38-42-46-48-50 sleeve-stitches from one thread on circular needle size 5.5 mm and knit up 1 stitch in each of the 8-10-12-14-16-18 stitches cast on under the sleeve – read SLEEVE TIP = 46-48-54-60-64-68 stitches. Insert a marker in the middle of the 8-10-12-14-16-18 stitches under the sleeve. Start at the marker and work stocking stitch in the round. When the sleeve measures 3 cm, decrease 2 stitches under the sleeve – read DECREASE TIP. Decrease like this every 10-11-6½-4½-3½-3½ cm a total of 3-3-5-6-7-7 times = 40-42-44-48-50-54 stitches. Continue working until the sleeve measures 40-41-41-35-34-36 cm from the division. Change to double pointed needles size 4.5 mm. Work rib (knit 2, purl 2), AT THE SAME TIME increase 4-6-8-8-10-10 stitches evenly on the first round = 44-48-52-56-60-64 stitches. When the rib measures 4-4-4-5-5-5 cm, knit 3 rounds. Change to needle size 5.5 mm and cast off a little loosely with knit. The sleeve measures approx. 45-46-46-41-40-42 cm. ASSEMBLY: Sew the buttons onto the left band. |
||||||||||||||||
Diagram explanations |
||||||||||||||||
|
||||||||||||||||
 |
||||||||||||||||
 |
||||||||||||||||
Have you finished this pattern?Tag your pictures with #dropspattern #frostedskycardigan or submit them to the #dropsfan gallery. Do you need help with this pattern?You'll find 34 tutorial videos, a Comments/Questions area and more by visiting the pattern on garnstudio.com. © 1982-2026 DROPS Design A/S. We reserve all rights. This document, including all its sub-sections, has copyrights. Read more about what you can do with our patterns at the bottom of each pattern on our site. |
||||||||||||||||


With over 40 years in knitting and crochet design, DROPS Design offers one of the most extensive collections of free patterns on the internet - translated to 17 languages. As of today we count 324 catalogues and 12290 patterns translated into English (UK/cm). 12290
We work hard to bring you the best knitting and crochet have to offer, inspiration and advice as well as great quality yarns at incredible prices! Would you like to use our patterns for other than personal use? You can read what you are allowed to do in the Copyright text at the bottom of all our patterns. Happy crafting!
Post a comment to pattern DROPS 259-6
We would love to hear what you have to say about this pattern!
If you want to leave a question, please make sure you select the correct category in the form below, to speed up the answering process. Required fields are marked *.