
Popular categories
Looking for a yarn?


Comments / Questions (189)
![]() Cf32 wrote:
Cf32 wrote:
Bonjour, une demande de précision concernant A2 : doit-on faire le jeté comme sur une maille envers ou comme sur une maille endroit ? Ou, plus simplement, avant de glisser la maille comme pour la tricoter a l'envers, le fil doit-il se trouver derrière ou devant l'ouvrage ? Merci
28.04.2026 - 12:59DROPS Design answered:
Bonjour Cf32, dans cette façon de faire les côtes anglaises (2ème maille de A.2 sur l'endroit), on va passer le fil devant l'ouvrage (entre les 2 aiguilles) puis glisser la maille suivante à l'envers et tricoter la maille suivante à l'endroit (le fil va ainsi s'enrouler automatiquement autour de la maille glissée et former le jeté. Cette vidéo pourra peut-être vous aider, on y tricote des côtes anglaises avec 1 m jersey envers entre chaque. Bon tricot!
28.04.2026 - 16:33
![]() Anneli wrote:
Anneli wrote:
Hej Jag stickar st M Är det riktigt att jag ska sticka 43 cm innan avmaskning för ärmhål på bakstycket och bara 35 cm på framstycket innan avmaskning för ärmhål? Tacksam för svar Mvh Anneli Andersson
23.03.2026 - 18:00DROPS Design answered:
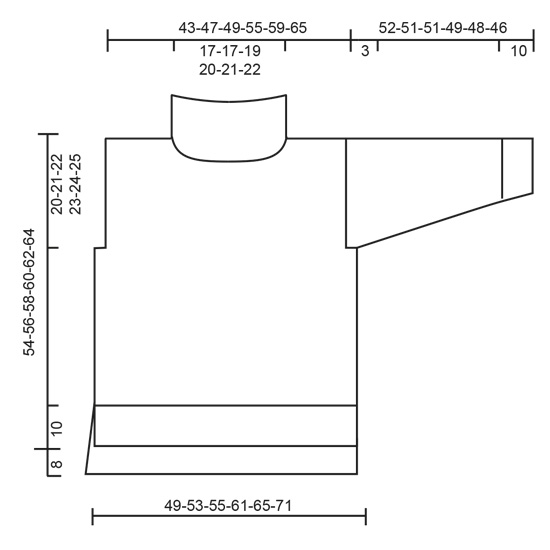
Hej Anneli. Ja det stämmer. Om du ser på måttskissen så ser du att bakstycket är 8 cm längre än framstycket. Mvh DROPS Design
24.03.2026 - 10:35
![]() Eija Winlund wrote:
Eija Winlund wrote:
Hej, vore bra om man såg en bild bakifrån på tröjan med, det är tre bilder framifrån dock, och med tanke på hur mönstret är uppbyggt vore det bra så man ser att det blir rätt
18.03.2026 - 13:44
![]() RÉGNIER wrote:
RÉGNIER wrote:
Bonjour, Peut-on tricoter le corps de ce modèle avec des aiguilles circulaires ? Cordialement.
08.03.2026 - 20:53DROPS Design answered:
Bonjour Mme Régnier, le dos et le devant se tricotent ici en allers et retours sur aiguille circulaire mais séparément, avec des coutures. Si vous voulez le tricoter en rond jusqu'aux emmanchures, notez la fente des côtés et le dos plus long et faites les ajustements nécessaires. Bon tricot!
09.03.2026 - 10:26
![]() Gayathri Jitendra wrote:
Gayathri Jitendra wrote:
Awesome
26.02.2026 - 17:30
![]() Laura wrote:
Laura wrote:
Non capisco che significa ferri accorciati per il collo. si potrebbe essere più chiari? grazie
24.02.2026 - 14:23DROPS Design answered:
Buonasera Laura, i ferri accorciati sono ferri in cui non si lavora su tutte le maglie del ferro, ma solo sul numero di maglie indicato nelle spiegazioni. Buon lavoro!
24.02.2026 - 16:18
![]() Carole Lalonde wrote:
Carole Lalonde wrote:
Est ce que les cotes de devant et les cotes de dos mesure toutes deux 10 cm? Sur le diagramme les cotes de devant ne semble pas avoir 10 cm. Désolée j ai déjà envoyé ma question, mais l adresse mail n était pas la bonne
14.02.2026 - 19:49DROPS Design answered:
Cf. réponse ci-dessous :)
16.02.2026 - 16:46
![]() Carole Lalonde wrote:
Carole Lalonde wrote:
Est-ce que les côtés de devant doivent mesurer 10 cm? Je voie sur le diagramme que les cotes de devant semble être moins que 10 cm ? Merci à l avance
14.02.2026 - 19:47DROPS Design answered:
Bonjour Mme Lalonde, les côtes en bas du devant et en bas du dos ont la même longueur = 10 cm, mais le dos est 8 cm plus long que le devant, vous aurez donc un décalage entre le dos/le devant. Bon tricot!
16.02.2026 - 16:46
![]() MARIE THERESE wrote:
MARIE THERESE wrote:
MERCI effectivement mais je n arrive qu'à 40cm je pense tricher un peu et ca devrait aller .
04.02.2026 - 17:58
![]() GUIBERT wrote:
GUIBERT wrote:
Bonjour, j ai le même problème qu 'une autre tricoteuse à savoir la manche finie mesure37cm alors que l emmanchure mesure 42 cm????
04.02.2026 - 09:02DROPS Design answered:
Bonjour Mme Guibert, si vous tricotez la taille M, vous avez 21 cm d'emmanchures x 2 = 42 cm au total; et vous devez avoir 43 mailles à la fin des augmentations de la manche soit environ 43 cm de large, la manche peut donc s'intégrer joliment dans l'emmanchure. Bon tricot!
04.02.2026 - 17:39
|
||||||||||||||||
Rain Chain#rainchainsweater |
||||||||||||||||
 |
 |
|||||||||||||||
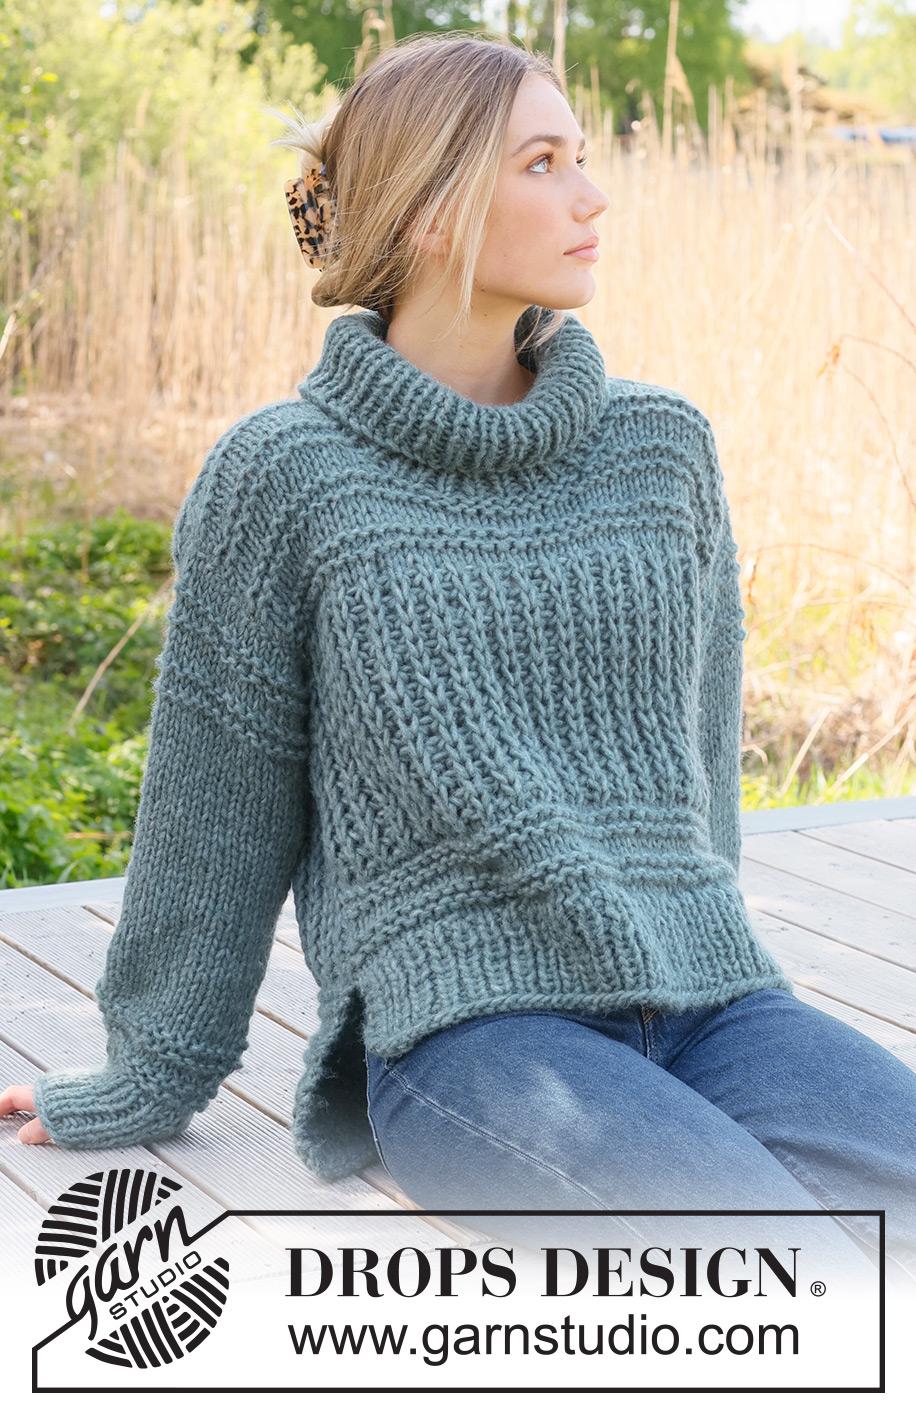
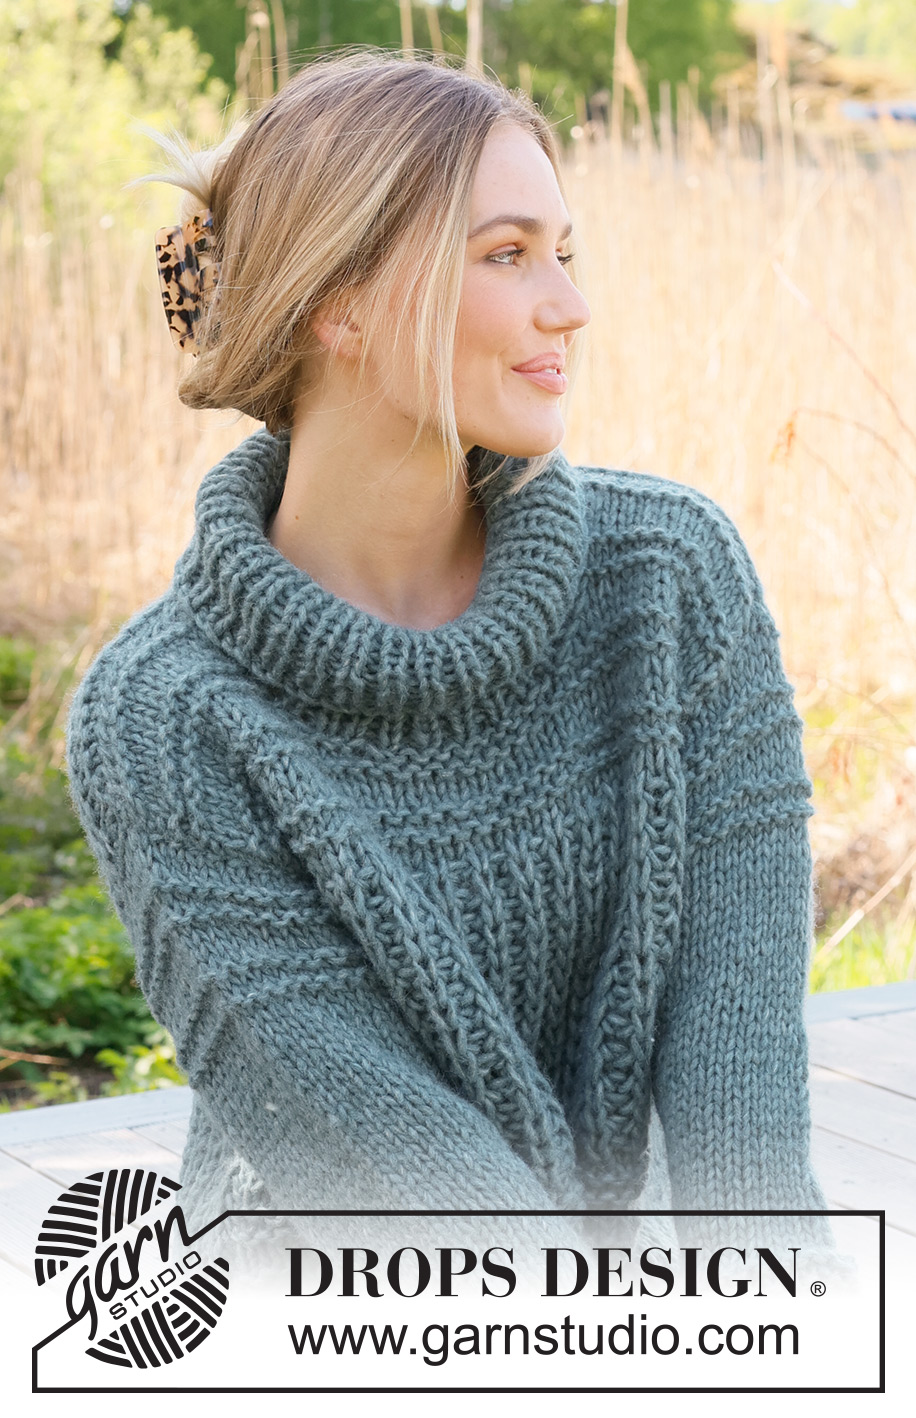
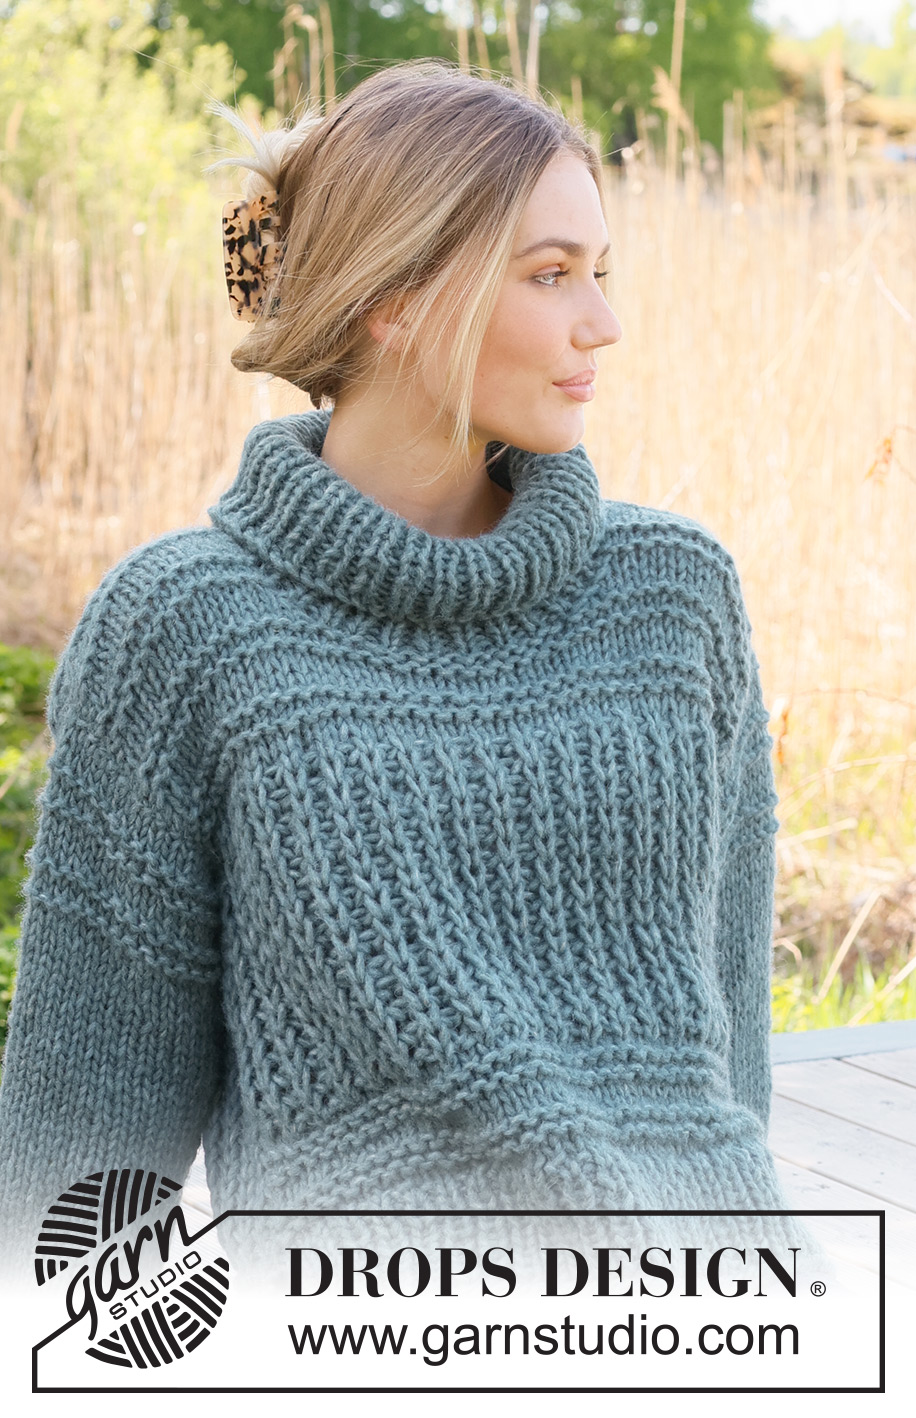
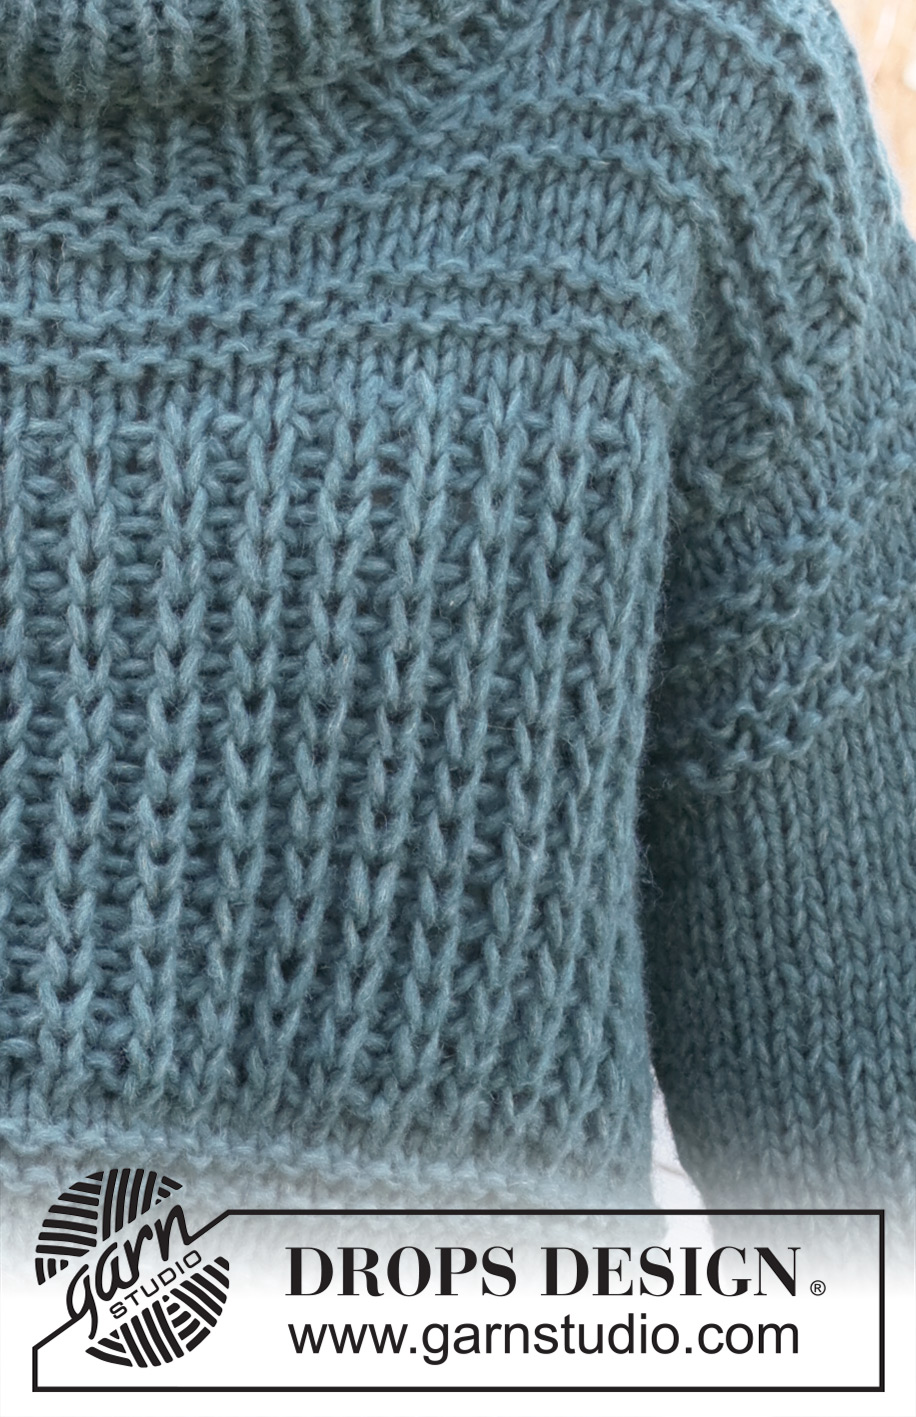
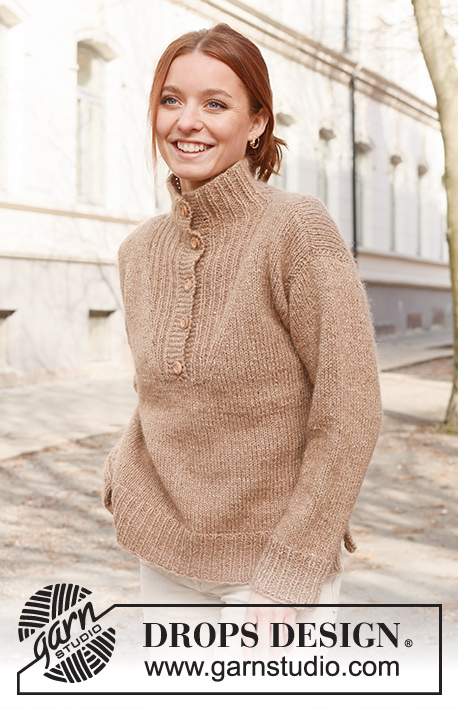
Knitted jumper in 1 strand DROPS Wish or 2 strands DROPS Air. The piece is worked bottom up with English rib, open garter stitch and split in the sides. Sizes S - XXXL.
DROPS 236-9 |
||||||||||||||||
|
------------------------------------------------------- EXPLANATIONS FOR THE PATTERN: ------------------------------------------------------- PATTERN: See diagrams A.1 and A.2. The diagrams show all rows in the pattern from the right side. RIDGE/GARTER STITCH (worked back and forth): Knit all rows. 1 ridge = knit 2 rows. INCREASE TIP (for sleeves): Work until there is 1 stitch left before the marker thread, 1 yarn over, knit 2 (marker thread sits between these stitches), 1 yarn over. On the next round knit the yarn overs twisted to avoid holes. Then work the new stitches in stocking stitch. ------------------------------------------------------- JUMPER – SHORT OVERVIEW OF THE PIECE: The piece is worked in sections, back and forth and bottom up, then sewn together. The sleeves are worked in the round with double pointed needles/short circular needle bottom up. The back piece is 8 cm longer than the front. BACK PIECE: Cast on 59-63-67-73-79-85 stitches with circular needle size 8 mm and 1 strand DROPS Wish or 2 strands DROPS Air. Purl 1 row from the wrong side then work rib as follows from the right side: 2 edge stitches in GARTER STITCH – read description above, * knit 1, purl 1 *, work from *-* until there are 3 stitches left, knit 1 and 2 edge stitches in garter stitch. Continue this rib for 10 cm. Purl 1 row from the wrong side and decrease 10-10-12-12-14-14 stitches evenly spaced = 49-53-55-61-65-71 stitches. Change to circular needle size 9 mm. REMEMBER THE KNITTING TENSION! Work A.1, 2-2-2-3-3-3 times in height. Now work 1 row as follows from the right side: 1 edge stitch in garter stitch, * knit 1, purl 1 *, work from *-* until there are 2 stitches left, knit 1 and 1 edge stitch in garter stitch. Work A.2 (first row from the wrong side, reading the diagram from left to right and the pattern beginning and ending with 1 knitted stitch in English rib inside 1 edge stitch in garter stitch, seen from the right side). Continue A.2 onwards. When the piece measures 42-43-44-45-46-47 cm, cast off 3 stitches at the beginning of the next 2 rows for the armholes = 43-47-49-55-59-65 stitches. Continue A.2. When the piece measures 44-46-48-50-52-54 cm, purl the next row from the wrong side. Then work according to A.1. When the piece measures 60-62-64-66-68-70 cm, cast off the middle 13-13-15-15-17-17 stitches for the neck and finish each shoulder separately. Cast off 1 stitch on the next row from the neck = 14-16-16-19-20-23 stitches on the shoulder. Cast off when the piece measures 62-64-66-68-70-72 cm. Work the other shoulder in the same way. FRONT PIECE: Cast on and work in the same way as the back piece until the front measures 34-35-36-37-38-39 cm. Cast off 3 stitches at the beginning of the next 2 rows for the armholes = 43-47-49-55-59-65 stitches. Continue A.2. When the piece measures 36-38-40-42-44-46 cm, purl the next row from the wrong side. Then work according to A.1. When the piece measures 47-49-51-53-55-57 cm, work the neck as follows: Place the middle 9-9-11-11-13-13 stitches on a thread and finish each shoulder separately. Cast off for the neck every 2nd row as follows: 2 stitches 1 time, 1 stitch 1 time = 14-16-16-19-20-23 stitches on the shoulder. Cast off when the piece measures 54-56-58-60-62-64 cm. Work the other shoulder in the same way. SLEEVES: Cast on 30-32-32-34-34-36 stitches with double pointed needles size 8 mm and 1 strand DROPS Wish or 2 strands DROPS Air. Insert 1 marker-thread at the beginning of the round (mid-under sleeve). Knit 1 round, then work rib in the round (knit 1, purl 1) for 10 cm. Knit 1 round and decrease 3-3-3-3-3-3-3 stitches evenly spaced = 27-29-29-31-31-33 stitches. Change to double pointed needles size 9 mm. Work A.1, 2 times in height then continue with stocking stitch. AT THE SAME TIME when the sleeve measures 12 cm, increase 1 stitch on each side of the marker-thread – read INCREASE TIP. Increase like this every 5½-5½-5-4-3½-3½ cm a total of 7-7-7-8-9-9 times = 41-43-43-47-49-51 stitches. When the sleeve measures 43-42-42-40-39-37 cm, continue with A.1. When the sleeve measures 49-48-48-46-45-43 cm, work the sleeve cap back and forth (from mid-under sleeve) to finished length. Cast off when the sleeve measures 52-51-51-49-48-46 cm. Work the other sleeve in the same way. ASSEMBLY: Sew the shoulder seams. Sew in the sleeves, inside the 1 edge stitch and sew the bottom of the armholes – see sketch. Sew the side seams as far as the rib (= 10 cm split on the front piece, 18 cm on the back), sew in the outermost loop of the outermost stitch so the seam is flat. NECK: Start at the top of the right shoulder and knit up (including the stitches on the thread) 60 to 72 stitches with short circular needle size 8 mm and 1 strand DROPS Wish or 2 strands DROPS Air. The number of stitches should be divisible by 2. Work rib in the round (knit 1, purl 1) for 20-20-20-22-22-22 cm. Cast off. |
||||||||||||||||
Diagram explanations |
||||||||||||||||
|
||||||||||||||||
 |
||||||||||||||||
 |
||||||||||||||||
 |
||||||||||||||||
Have you finished this pattern?Tag your pictures with #dropspattern #rainchainsweater or submit them to the #dropsfan gallery. Do you need help with this pattern?You'll find 35 tutorial videos, a Comments/Questions area and more by visiting the pattern on garnstudio.com. © 1982-2026 DROPS Design A/S. We reserve all rights. This document, including all its sub-sections, has copyrights. Read more about what you can do with our patterns at the bottom of each pattern on our site. |
||||||||||||||||


With over 40 years in knitting and crochet design, DROPS Design offers one of the most extensive collections of free patterns on the internet - translated to 17 languages. As of today we count 324 catalogues and 12290 patterns translated into English (UK/cm). 12290
We work hard to bring you the best knitting and crochet have to offer, inspiration and advice as well as great quality yarns at incredible prices! Would you like to use our patterns for other than personal use? You can read what you are allowed to do in the Copyright text at the bottom of all our patterns. Happy crafting!
Post a comment to pattern DROPS 236-9
We would love to hear what you have to say about this pattern!
If you want to leave a question, please make sure you select the correct category in the form below, to speed up the answering process. Required fields are marked *.