
Popular categories
Looking for a yarn?


Comments / Questions (25)
![]() Sylvie Lachance wrote:
Sylvie Lachance wrote:
Bonjour ! Je commence ce tricot. Est-ce que ce sont des côtes 1-1, dans le bas du pull (comme spécifié dans la méthode pour les poignets) ou bien c'est du point de riz? Il est seulement écrit de répéter 1 m. end, 1 m. env. après avoir fait la maille de bordure. Merci beaucoup!
22.01.2026 - 01:40DROPS Design answered:
Bonjour Mme Lachance, en bas du pull, ce sont des côtes 1 m end, 1 m env que l'on tricote. Bon tricot!
23.01.2026 - 09:24
![]() Marie wrote:
Marie wrote:
Je vous remercie de votre réponse. Merci pour ce beau patron.J'adore monter les bordures avant, je n'avais jamais fait comme ça et c'est très beau.
16.01.2026 - 10:23
![]() Marie wrote:
Marie wrote:
Bonjour, Je n'ai pas rabattu les mailles des manches car ce n'était pas précisé. Est ce qu'il faut les rabattre avant de les coudre aux emmanchures? merci
13.01.2026 - 13:45DROPS Design answered:
Bonjour Marie, vous pouvez les rabattre ou bien les coudre ainsi, sans les rabattre, au choix. Bon tricot!
14.01.2026 - 10:19
![]() Geertje B wrote:
Geertje B wrote:
Een opmerking bij mijn vraag van vanmorgen. Ik had het patroon al vele malen gelezen op zoek naar een antwoord, maar toen ik het net nog een keer deed zag ik wat ik moet doen. Wat ik al dacht! Ik trek mijn vraag terug.
03.10.2025 - 11:04
![]() Geertje B wrote:
Geertje B wrote:
Dag, ik ben bezig met dit vest en ga begin met de voorbiezen. Mijn vraag: hoe werk ik de halsrand achter af? De voorbiezen brei je van onder naar boven langs het voorpand. Moet ik de voorbies langer maken en later aan de halsrand bevestigen? Hoeveel naalden moet ik dan doorbreken?
03.10.2025 - 09:36DROPS Design answered:
Dag Geertje B,
Ja, je breit nog een stukje door met de bies nadat je alle opgenomen steken samen hebt gebreid met de voorbies. Het zelfde doe je bij het andere voorpand. Deze uiteindjes naai je dwars (met de kopse kant) aan elkaar en daarna naai je het aan de halsrand achter.
22.10.2025 - 20:20
![]() Mina wrote:
Mina wrote:
Hej! Hur ser tröjan ut bakifrån? Ska det det stickad någon bakkant på samma sätt som höger/vänster framkanter?
27.06.2025 - 10:27DROPS Design answered:
Hej, efter kanten nederst stickas det slätstickning på bakstycket. Det ska inte stickas bakkanter på bakstycket, men framkanterna från framstyckena sys ihop mitt bak och sedan sys kanten fast överst längs halsen bak.
27.06.2025 - 16:42
![]() Stefania wrote:
Stefania wrote:
Buongiorno, Non capisco la ripresa del bordo, perché bisogna aggiungere altre 16 maglie? Soprattutto nella parte bassa del davanti?
03.05.2025 - 12:43DROPS Design answered:
Buongiorno Stefania, in alto sotto il titolo può trovare dei video esplicativi dei bordi con e senza asole per capirne meglio la lavorazione. Buon lavoro!
01.06.2025 - 16:14
![]() Sylfil wrote:
Sylfil wrote:
Est-il vraiment nécessaire de faire les bordures en deux parties ? Est ce qu'il serait possible de les faire d'un seul coup y compris l'encolure dos. Merci pour votre réponse.
23.04.2025 - 17:00DROPS Design answered:
Bonjour Sylfil, probablement, mais les mailles jersey seraient alors inversées sur l'une des 2 bordures; en les tricotant séparément, les V des mailles endroit se présentent de la même façon pour les 2. Bon tricot!
24.04.2025 - 08:30
![]() Kaat Ramsdonck wrote:
Kaat Ramsdonck wrote:
Kan ik dit ook breien met 2 priemen? De panden en de mouwen apart? Zo ja ,hoeveel steken voor elk pand en de mouwen? Alvast bedankt
22.03.2025 - 14:47DROPS Design answered:
Dag Kaat,
Om een patroon aan te passen om op rechte naalden te breien hebben we een instructie gemaakt. Deze vind je hier.
22.03.2025 - 18:25
![]() Patricia wrote:
Patricia wrote:
Je ne comprend pas le montage des bordures . Est-ce qu'il y a une vidéo?
14.10.2024 - 17:36DROPS Design answered:
Bonjour Patricia, tout à fait, retrouvez-les sous l'onglet "vidéos" en haut de page, ou bien ici pour la bordure sans boutonnières et là pour celle avec boutonnières. Rappelez-vous que les vidéos montrent la technique, suivez bien les indications du nombre de mailles indiqué dans le modèle. Bon tricot!
15.10.2024 - 09:29
|
|||||||||||||||||||
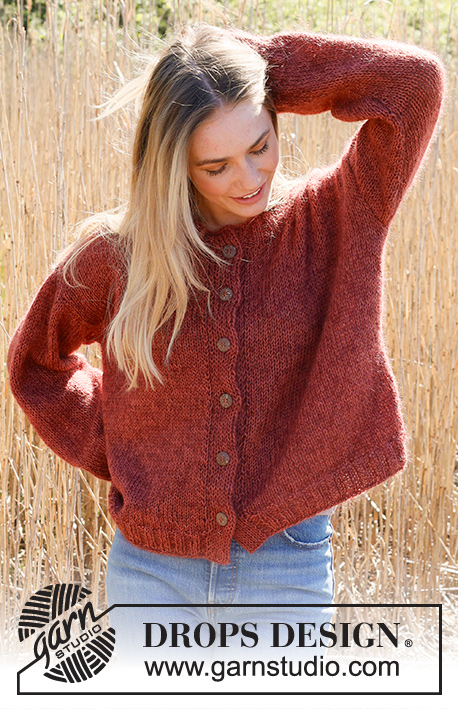
Simplicity Cardigan#simplicitycardigan |
|||||||||||||||||||
 |
 |
||||||||||||||||||
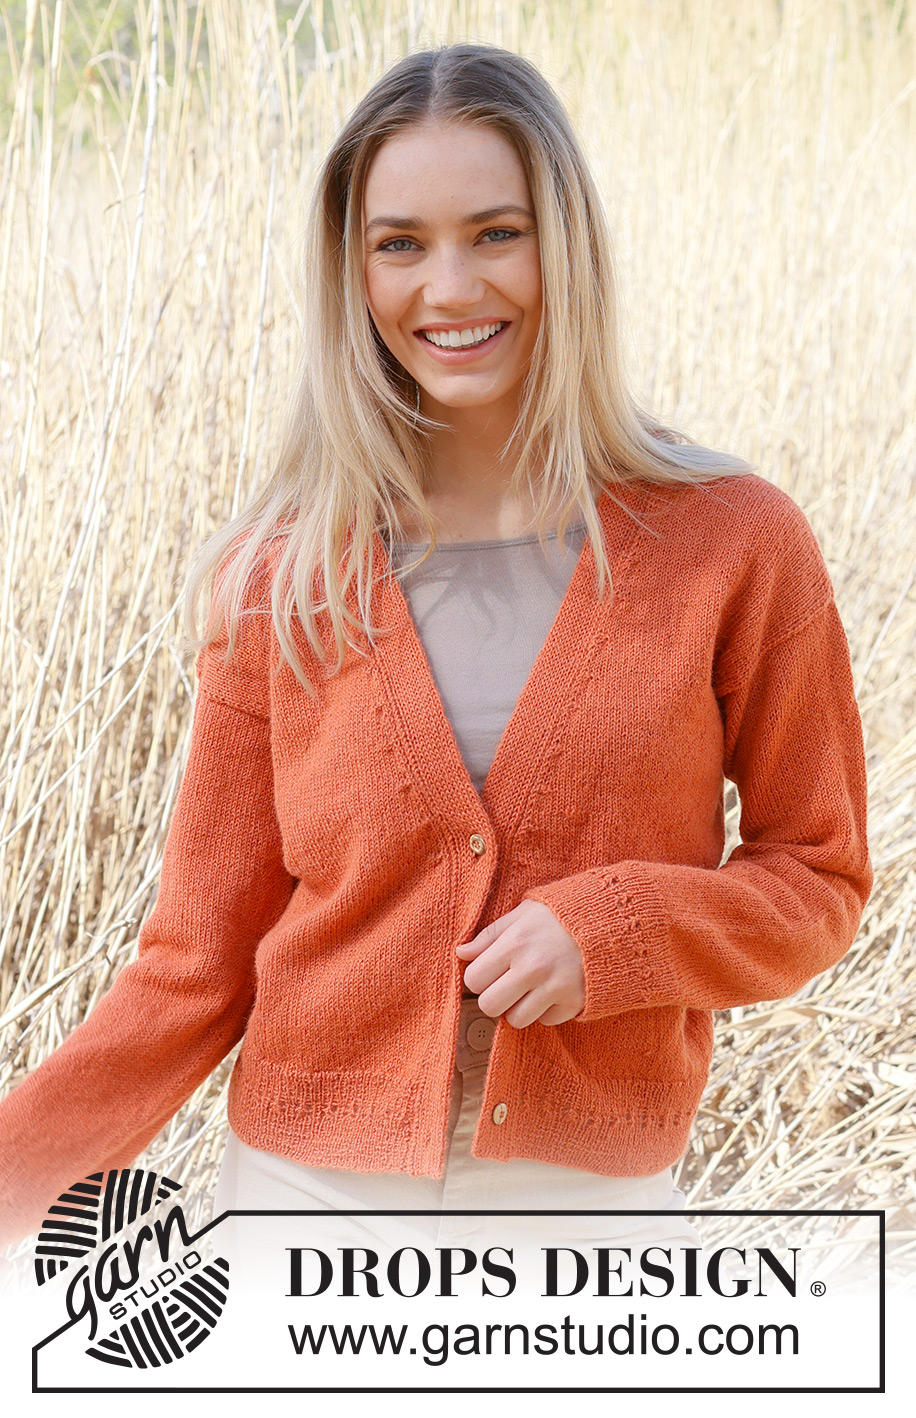
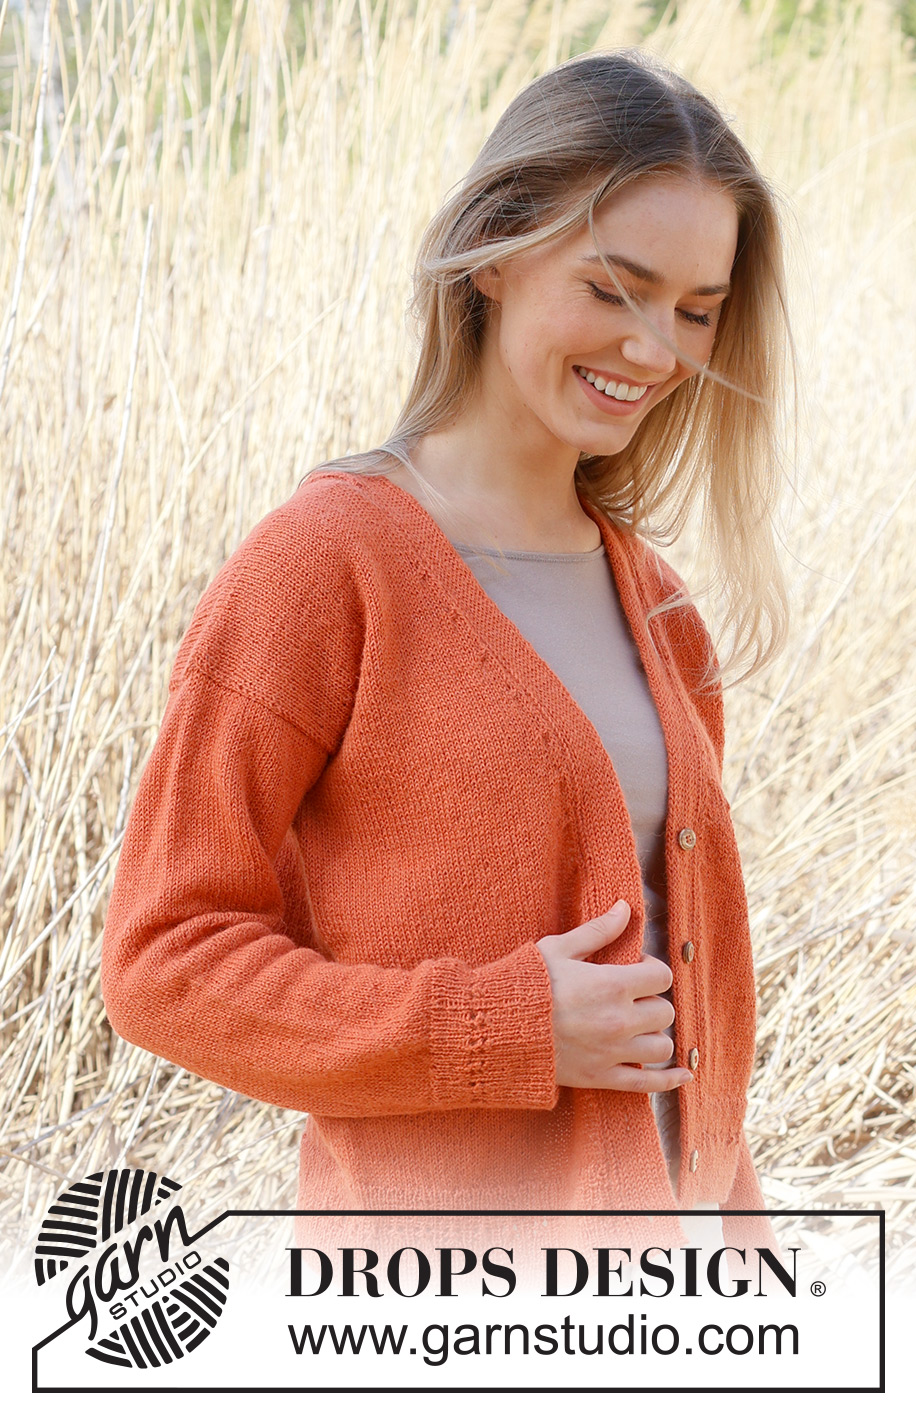
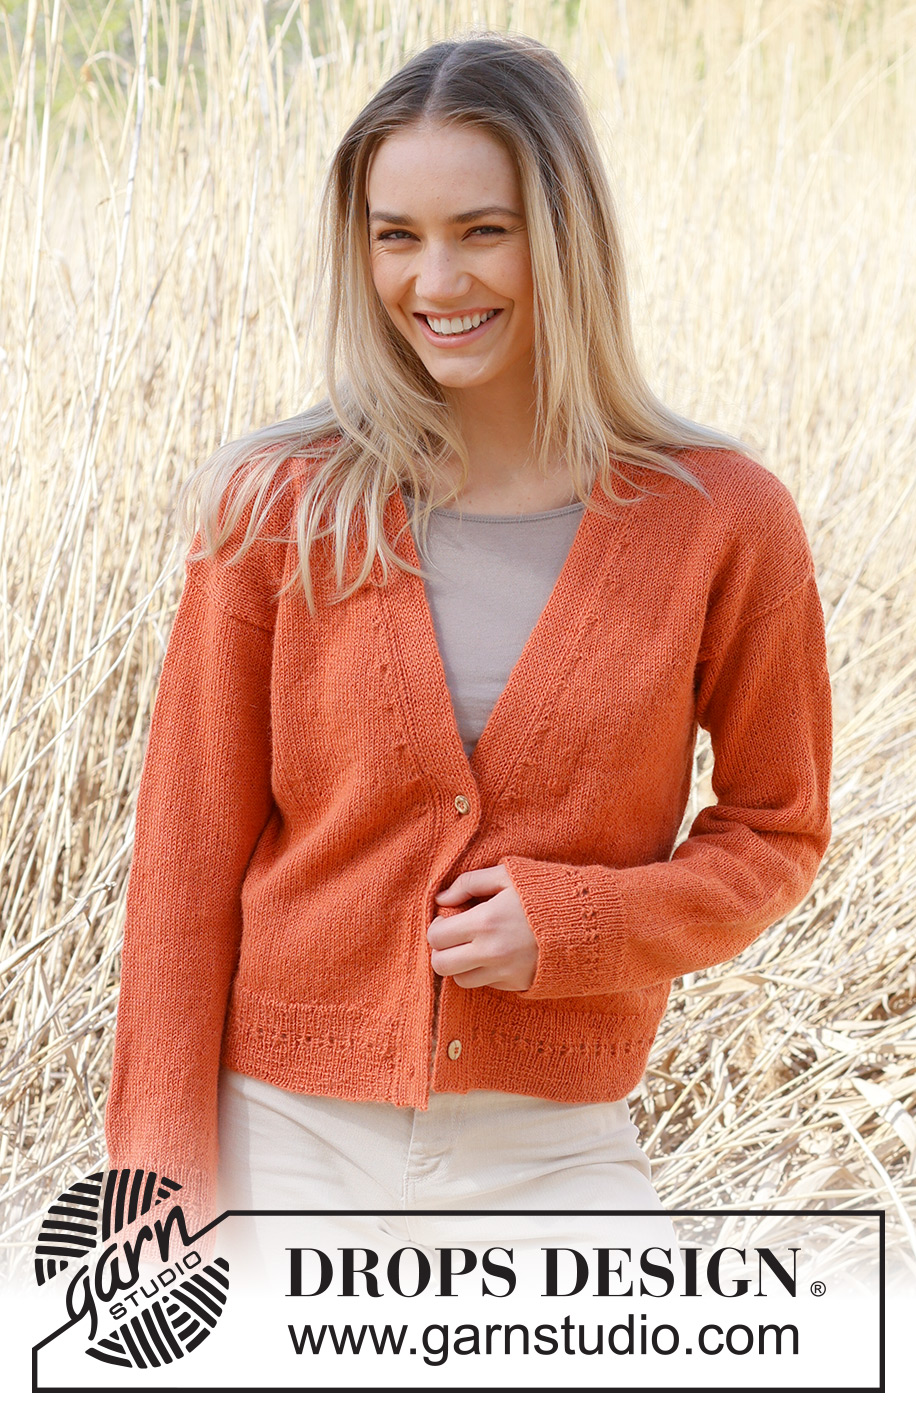
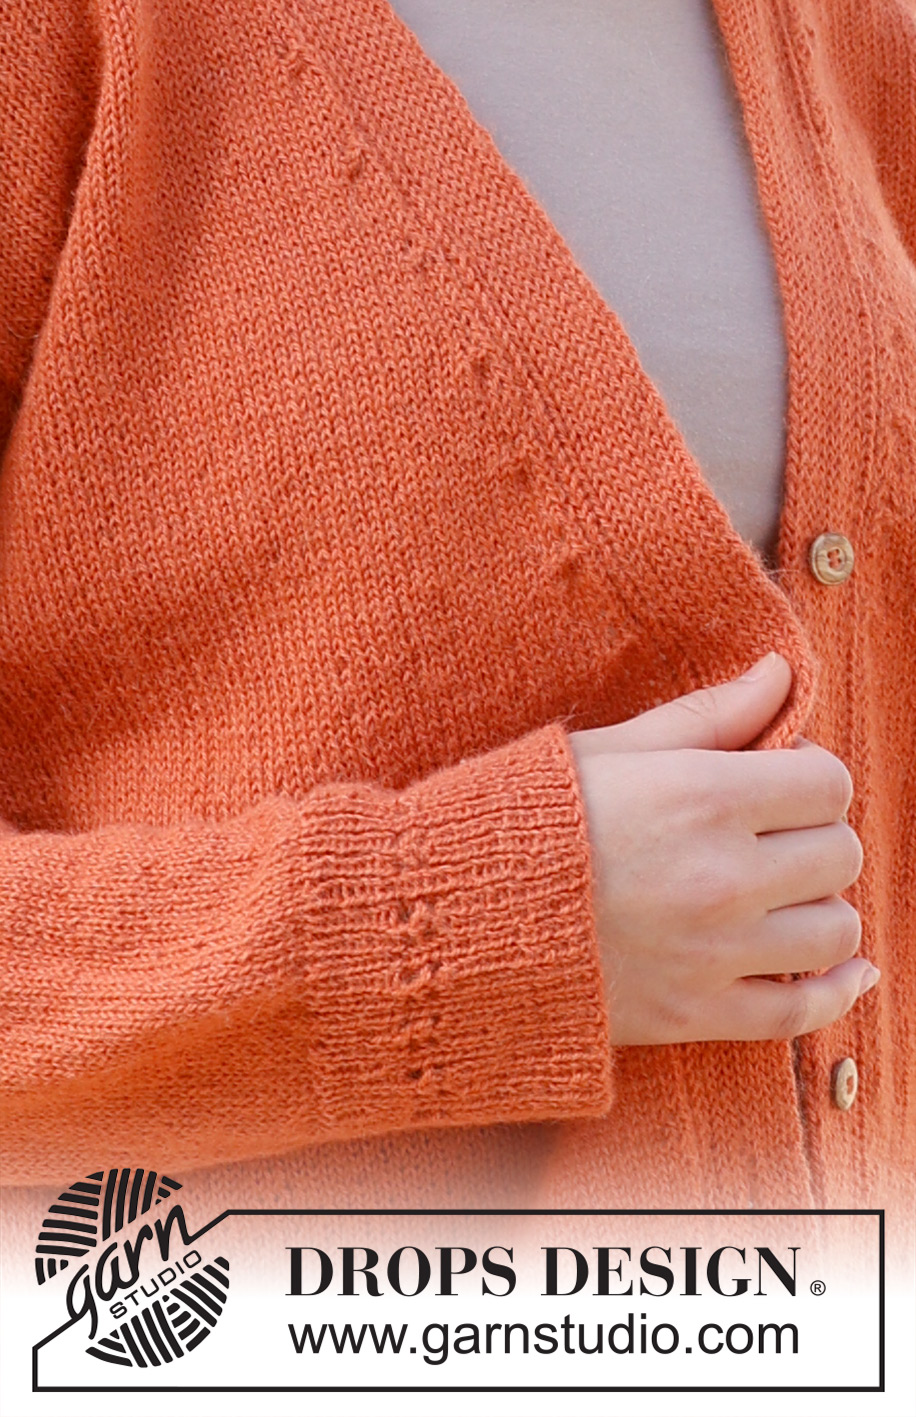
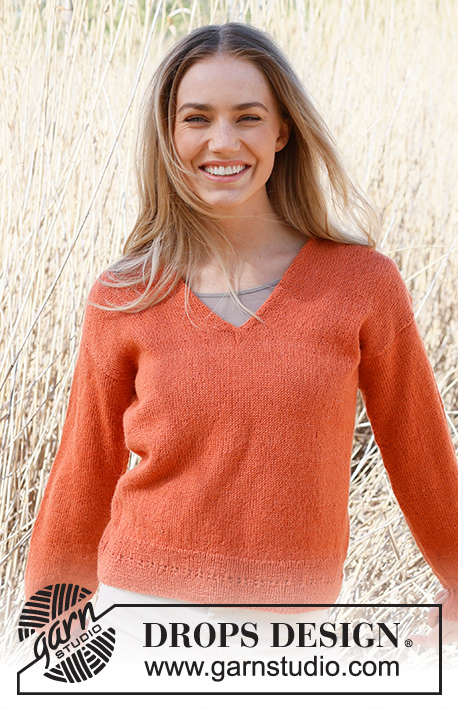
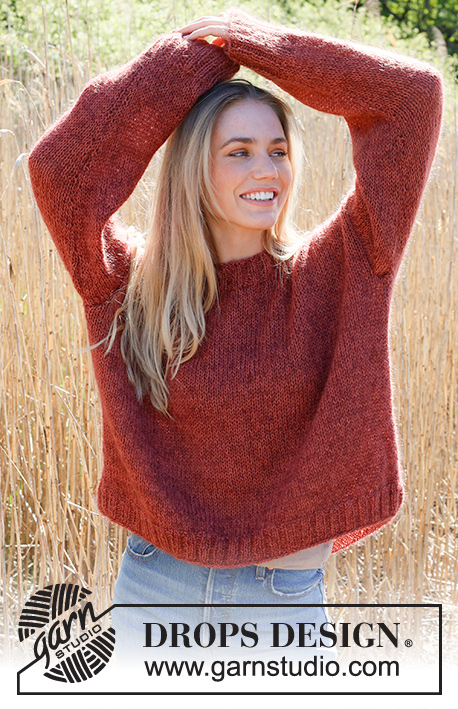
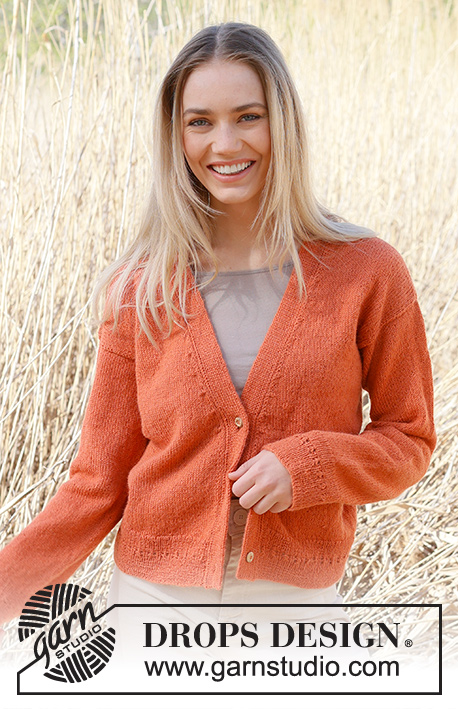
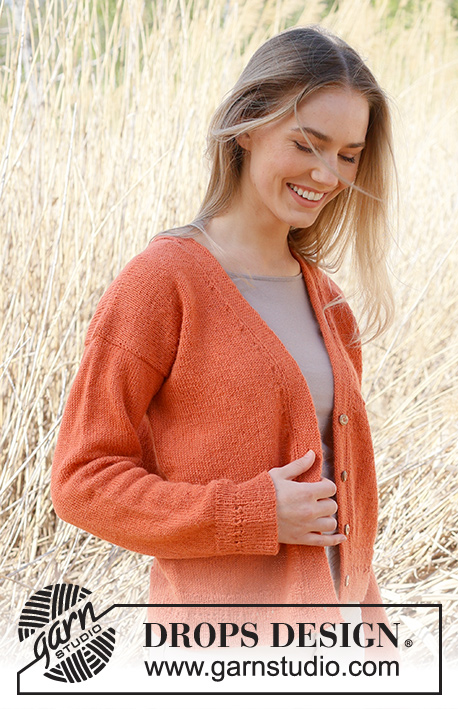
Knitted jacket in DROPS Alpaca. Piece is knitted bottom up in stocking stitch with V-neck and double knitted band. Size: S - XXXL
DROPS 236-30 |
|||||||||||||||||||
|
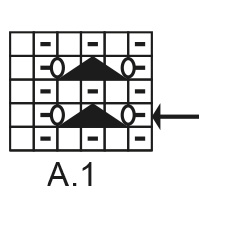
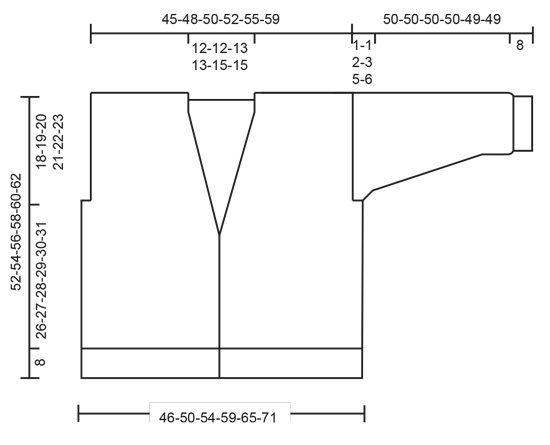
---------------------------------------------------------- EXPLANATION FOR THE PATTERN: ---------------------------------------------------------- PATTERN: See diagram A.1. Diagrams show all rows in pattern seen from the right side. GARTER STITCH (back and forth): Knit all rows. 1 ridge vertically = knit 2 rows. DECREASE TIP (applies to decreases for V-neck): All decreases are done from the right side! DECREASE 2 STITCHES AT THE BEGINNING OF ROW AS FOLLOWS: Work 1 edge stitch in garter stitch, knit 1, purl 3 stitches together. DECREASE 2 STITCHES AT THE END OF ROW AS FOLLOWS: Work until 5 stitches remain on row, purl 3 stitches together, knit 1 and 1 edge stitch in garter stitch. INCREASE TIP (applies to sleeves): Knit 1 past marker thread, make 1 yarn over, knit until 1 stitch remain before marker thread, make 1 yarn over. On next row knit yarn overs twisted. BUTTONHOLES: Work buttonhole, begin from right side, as follows: Work the first 8 stitches as before, turn and work over the 8 stitches as before, work 3 row in total over the 8 stitches (work last row from right side). Cut the yarn. Work 4 rows in total as before over the remaining 8 band stitches (work first row from right side) and work last stitch from right side together with next stitch along edge of jacket as before. On last row from wrong side work as before over all band stitches and continue as before over all band stitches. Work buttonholes when band measures: S: 4, 11, 17 and 23 cm. M: 4, 10, 17 and 24 cm. L: 4, 10, 17 and 24 cm. XL: 4, 11, 18 and 25 cm. XXL: 5, 12, 19 and 26 cm. XXXL: 5, 13, 20 and 27 cm. ---------------------------------------------------------- START THE PIECE HERE: ---------------------------------------------------------- JACKET - SHORT OVERVIEW OF THE PIECE: Work piece back and forth on circular needle, from the bottom up to armholes. Then divide the piece for back piece and front pieces, and work parts back and forth on circular needle separately. Work sleeves in the round on double pointed needles/short circular needle up to where sleeve cap begins, then work back and forth on circular needle. Pick up stitches along front pieces, and work a double knitted band. BODY: Cast on 283-307-331-361-397-433 stitches on circular needle size 2.5 mm with DROPS Alpaca. Work as follows, begin from wrong side: Work 1 edge stitch in GARTER STITCH - read explanation above, * knit 1, purl 1 *, work from *-* until 2 stitches remain, knit 1 and 1 edge stitch in garter stitch. Continue pattern like this. When piece measures 4½ cm, work next row as follows from right side: Work 1 edge stitch in garter stitch, work A.1 until 6 stitches remain, work the first 5 stitches in A.1 (so that pattern begins and ends the same) and 1 edge stitch in garter stitch. When A.1 has been worked 1 time vertically, continue with knit over knit and purl over purl until piece measures 8 cm. Work next row from right side as follows: Work 1 edge stitch in garter stitch, knit and decrease 41-45-49-51-55-63 stitches evenly until 1 stitch remains, 1 edge stitch in garter stitch= 242-262-282-310-342-370 stitches. Switch to circular needle size 3 mm. Insert 1 marker thread 61-66-71-78-86-93 stitches in from each side (there are 120-130-140-154-170-184 stitches between marker threads = back piece). Marker threads mark the sides of piece and should be used later when casting off stitches for armholes. Work piece in stocking stitch with 1 edge stitch in garter stitch in each side of piece. REMEMBER THE KNITTING TENSION! OVERVIEW OF NEXT SECTION: When piece measures 23-24-24-25-26-27 cm, begin decreases for V-neck. AT THE SAME TIME as decreasing for V-neck, cast off stitches for armholes, and then finish each part separately as explained below. Read V-NECK and ARMHOLES before continuing. V-NECK: When piece measures 23-24-24-25-26-27 cm, decrease for V-neck on each front piece and on next row from right side - read DECREASE TIP. Decrease 2 stitches on each front piece every 10th row 8-8-9-9-10-10 times in total. ARMHOLES: AT THE SAME TIME when piece measures 34-35-36-37-38-39 cm and next row is from right side, cast off for armholes as follows: Work as before until 1-3-5-9-14-15 stitches remain before first marker thread in the side, cast off 2-6-10-18-28-30 stitches for armhole, work as before until 1-3-5-9-14-15 stitches remain before the other marker thread, cast off 2-6-10-18-28-30 stitches for armholes, work as before the rest of row. Finish front pieces and back piece separately. LEFT FRONT PIECE (when garment is worn): Begin from wrong side, work in stocking stitch with 1 edge stitch in garter stitch towards the neck as before and continue decrease for V-neck. After all decreases for V-neck, 44-47-48-51-52-58 stitches remain on shoulder. Work in stocking stitch with 1 edge stitch in garter stitch towards the neck. Cast off when piece measures 52-54-56-58-60-62 cm. RIGHT FRONT PIECE: Begin from wrong side, work in stocking stitch with 1 edge stitch in garter stitch towards the neck as before and continue decrease for V-neck. After all decreases for V-neck, 44-47-48-51-52-58 stitches remain on shoulder. Work in stocking stitch with 1 edge stitch in garter stitch towards the neck. Cast off when piece measures 52-54-56-58-60-62 cm. BACK PIECE: = 118-124-130-136-142-154 stitches. Begin from wrong side, and work in stocking stitch. When piece measures 50-52-54-56-58-60, cast off the middle 28-28-32-32-36-36 stitches for neck (45-48-49-52-53-59 stitches remain on each shoulder). Finish each shoulder separately. On next row from the neck cast off 1 stitch for neck = 44-47-48-51-52-58 stitches. Cast off when piece measures 52-54-56-58-60-62 cm. Work the other shoulder the same way. SLEEVES: Cast on 90-90-90-96-96-102 stitches on double pointed needles size 2.5 mm with DROPS Alpaca. Work rib (purl 1/knit 1). When piece measures 4½ cm, work A.1 over all stitches. When A.1 has been worked 1 time vertically, continue with knit over knit and purl over purl until piece measures 8 cm. Switch to double pointed needles size 3 mm. Continue piece in stocking stitch. On first round decrease 18-16-16-18-18-22 stitches evenly = 72-74-74-78-78-80 stitches. Insert a marker thread at beginning of round (mid under sleeve). Move the marker thread upwards when working - marker thread should be used for increase mid under sleeve. When sleeve measures 16-18-16-16-16-13 cm, increase 1 stitch on each side of marker thread - read INCREASE TIP. Increase like this every 3-2½-2-2-1½-1½ cm 11-12-15-16-18-20 times in total = 94-98-104-110-114-120 stitches. When sleeve measures 49-49-48-47-44-43 cm, divide piece at the marker thread and work back and forth on circular needle until finished measurements. Work until sleeve measures approx. 50-50-50-50-49-49 cm, i.e. there is a vent of 1-1-2-3-5-6 cm at the top of sleeve. Work the other sleeve the same way. ASSEMBLY: Sew shoulder seams inside cast-off edges. Sew vent at the top of sleeve to bottom of armhole. Then sew sleeve into body - see chart. RIGHT BAND: Work band bottom up. Pick up stitches along right front piece with the end of yarn (to continue to work with the ball) as follows: Leave approx. 160-240 cm yarn at the end, use the end of yarn, begin at the bottom of front piece and pick up 1 stitch in every row along the entire front piece, inside 1 edge stitch with circular needle size 2.5 mm and DROPS Alpaca. Cast on 16 stitches on needle at the bottom of front piece (i.e. from wrong side). Work band over the 16 band stitches and work band together with stitches picked up along the edge on front piece as follows: ROW 1 (= right side): Slip first stitch on to right needle purlwise with strand in front of piece, * knit 1, slip 1 stitch on to right needle purlwise with strand in front of piece *, work from *-* until 1 stitch remains of the 16 band stitches, slip 1 stitch on to right needle knitwise, with strand behind piece, knit next stitch, pass slipped stitch over stitch worked, turn. ROW 2 (= wrong side): * Slip first/next stitch on to right needle purlwise with strand in front of piece, knit 1 *, work from *-* over all the 16 band stitches. Repeat row 1 and 2 and work BUTTONHOLES - read explanation above, until all stitches from front piece have been worked together with band. NB! If the band becomes too long for the front piece, the band stitches can be worked together with 1 extra stitch from the front piece. Then work every 10th row as follows from the right side: Work until 1 stitch remains of the 16 band stitches, slip the last stitch onto the right needle as if to knit, with the yarn behind the work, knit the next 2 stitches together, pass the slipped stitch over the stitches knitted together, turn. Now work over the 16 band stitches as follows: ROW 1: * Slip first/ next stitch on to right needle purlwise, with strand in front of piece, knit 1 *, work from *-* over the 16 stitches. Repeat row 1 both from right side and wrong side for 7-7-8-8-9-9 cm. On next row from right side knit all stitches together 2 by 2 and cast off. LEFT BAND: Work band bottom up. Begin at the shoulder on front piece and pick up 1 stitch in every row along the entire front piece, inside 1 edge stitch with circular needle size 2.5 mm and DROPS Alpaca and cast on 16 stitches at the end of row. Work band over the 16 stitches and work band together with stitches picked up along the edge on front piece as follows: ROW 1 (= wrong side): Knit 1, * slip 1 stitch on to right needle purlwise with strand in front of piece, knit 1 *, work from *-* until 1 stitch remains of the 16 band stitches, slip the next 2 stitches on to right needle purlwise with strand in front of piece, turn. ROW 2 (= right side): Knit 2 together, *, slip 1 stitch on to right needle purlwise with strand in front of piece, knit 1 *, work from *-* until 1 stitch remains, slip last stitch on to right needle purlwise with strand in front of piece. Repeat row 1 and 2 until all stitches from front piece have been worked together with band. NB! If the band becomes too long for the front piece, the band stitches can be worked together with 1 extra stitch from the front piece on every 9th and 10th row as follows: slip 3 stitches onto the right needle at the end of the row from the wrong side and knit 3 together from the right side. Now work over the 16 band stitches as follows: ROW 1: * Knit 1, slip next stitch on to right needle purlwise with strand in front of piece *, work from *-* over the 16 stitches. Repeat row 1 both from right side and wrong side for 7-7-8-8-9-9 cm. On next row from right side work all stitches together and cast off as follows: Slip 1 stitch on to right needle knitwise, knit 1, pass slipped stitch over stitch worked, cast off stitch. ASSEMBLY: Sew the band together mid back and sew it to the neck edge on back piece. Sew on buttons. |
|||||||||||||||||||
Diagram explanations |
|||||||||||||||||||
|
|||||||||||||||||||
 |
|||||||||||||||||||
 |
|||||||||||||||||||
 |
|||||||||||||||||||
Have you finished this pattern?Tag your pictures with #dropspattern #simplicitycardigan or submit them to the #dropsfan gallery. Do you need help with this pattern?You'll find 33 tutorial videos, a Comments/Questions area and more by visiting the pattern on garnstudio.com. © 1982-2026 DROPS Design A/S. We reserve all rights. This document, including all its sub-sections, has copyrights. Read more about what you can do with our patterns at the bottom of each pattern on our site. |
|||||||||||||||||||


With over 40 years in knitting and crochet design, DROPS Design offers one of the most extensive collections of free patterns on the internet - translated to 17 languages. As of today we count 324 catalogues and 12290 patterns translated into English (UK/cm). 12290
We work hard to bring you the best knitting and crochet have to offer, inspiration and advice as well as great quality yarns at incredible prices! Would you like to use our patterns for other than personal use? You can read what you are allowed to do in the Copyright text at the bottom of all our patterns. Happy crafting!
Post a comment to pattern DROPS 236-30
We would love to hear what you have to say about this pattern!
If you want to leave a question, please make sure you select the correct category in the form below, to speed up the answering process. Required fields are marked *.