
Popular categories
Looking for a yarn?


|
|||||||||||||||||||
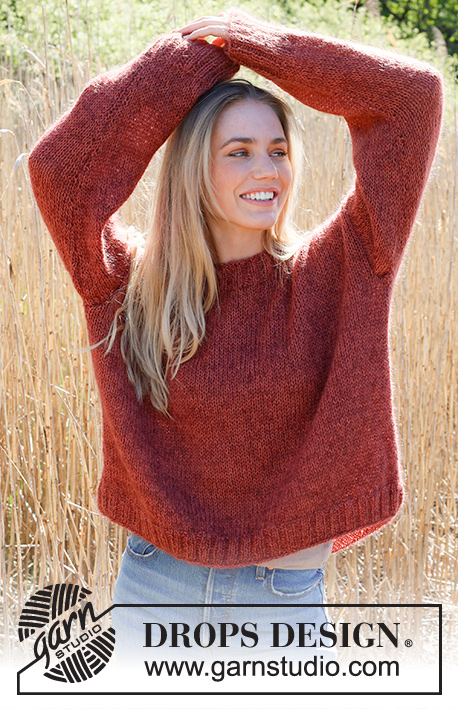
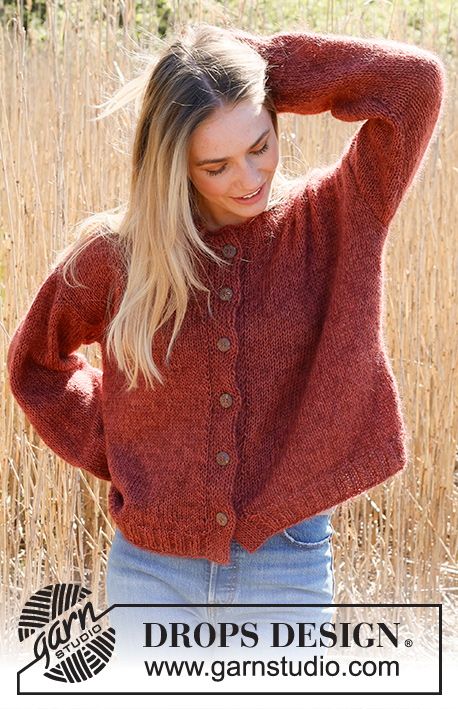
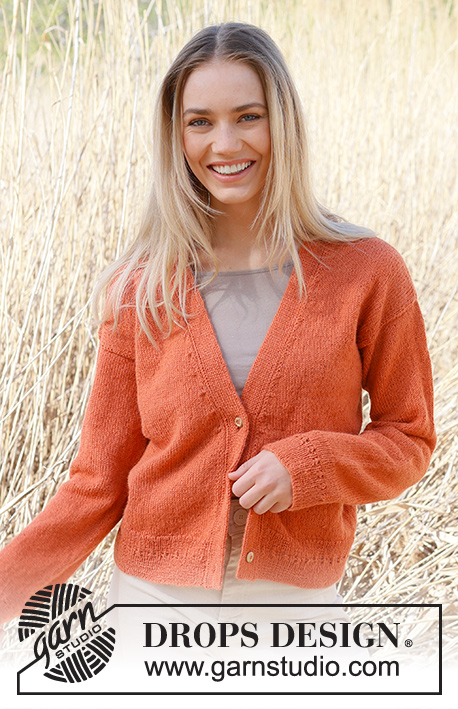
Simplicity Cardigan |
|||||||||||||||||||
 |
 |
||||||||||||||||||
Knitted jacket in DROPS Alpaca. Piece is knitted bottom up in stockinette stitch with V-neck and double knitted band. Size: S - XXXL
DROPS 236-30 |
|||||||||||||||||||
|
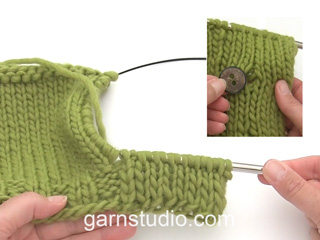
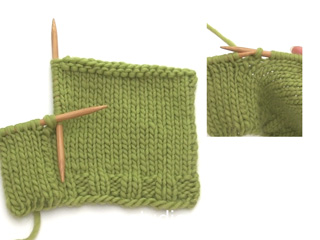
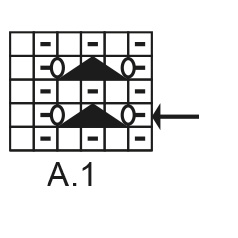
--------------------------------------------------------- EXPLANATION FOR THE PATTERN: ---------------------------------------------------------- PATTERN: See diagram A.1. Diagrams show all rows in pattern seen from the right side. GARTER STITCH (back and forth): Knit all rows. 1 ridge vertically = knit 2 rows. DECREASE TIP (applies to decreases for V-neck): All decreases are done from the right side! DECREASE 2 STITCHES AT THE BEGINNING OF ROW AS FOLLOWS: Work 1 edge stitch in garter stitch, knit 1, purl 3 stitches together. DECREASE 2 STITCHES AT THE END OF ROW AS FOLLOWS: Work until 5 stitches remain on row, purl 3 stitches together, knit 1 and 1 edge stitch in garter stitch. INCREASE TIP (applies to sleeves): Knit 1 past marker thread, make 1 yarn over, knit until 1 stitch remain before marker thread, make 1 yarn over. On next row knit yarn overs twisted. BUTTONHOLES: Work buttonhole, begin from right side, as follows: Work the first 8 stitches as before, turn and work over the 8 stitches as before, work 3 row in total over the 8 stitches (work last row from right side). Cut the yarn. Work 4 rows in total as before over the remaining 8 band stitches (work first row from right side) and work last stitch from right side together with next stitch along edge of jacket as before. On last row from wrong side work as before over all band stitches and continue as before over all band stitches. Work buttonholes when band measures: S: 4, 11, 17 and 23 cm = 1½", 4⅜", 6¾" and 9". M: 4, 10, 17 and 24 cm = 1½", 4", 6¾" and 9½". L: 4, 10, 17 and 24 cm = 1½", 4", 6¾" and 9½". XL: 4, 11, 18 and 25 cm = 1½", 4⅜", 7" and 9¾". XXL: 5, 12, 19 and 26 cm = 2", 4¾", 7½" and 10¼". XXXL: 5, 13, 20 and 27 cm = 2", 5⅛", 8" and 10⅝". ---------------------------------------------------------- START THE PIECE HERE: ---------------------------------------------------------- JACKET - SHORT OVERVIEW OF THE PIECE: Work piece back and forth on circular needle, from the bottom up to armholes. Then divide the piece for back piece and front pieces, and work parts back and forth on circular needle separately. Work sleeves in the round on double pointed needles/short circular needle up to where sleeve cap begins, then work back and forth on circular needle. Pick up stitches along front pieces, and work a double knitted band. BODY: Cast on 283-307-331-361-397-433 stitches on circular needle size 2.5 MM = US 1.5 with DROPS Alpaca. Work as follows, begin from wrong side: Work 1 edge stitch in GARTER STITCH - read explanation above, * knit 1, purl 1 *, work from *-* until 2 stitches remain, knit 1 and 1 edge stitch in garter stitch. Continue pattern like this. When piece measures 4½ cm = 1⅝", work next row as follows from right side: Work 1 edge stitch in garter stitch, work A.1 until 6 stitches remain, work the first 5 stitches in A.1 (so that pattern begins and ends the same) and 1 edge stitch in garter stitch. When A.1 has been worked 1 time vertically, continue with knit over knit and purl over purl until piece measures 8 cm = 3⅛". Work next row from right side as follows: Work 1 edge stitch in garter stitch, knit and decrease 41-45-49-51-55-63 stitches evenly until 1 stitch remains, 1 edge stitch in garter stitch= 242-262-282-310-342-370 stitches. Switch to circular needle size 3 MM = US 2.5. Insert 1 marker thread 61-66-71-78-86-93 stitches in from each side (there are 120-130-140-154-170-184 stitches between marker threads = back piece). Marker threads mark the sides of piece and should be used later when binding off stitches for armholes. Work piece in stockinette stitch with 1 edge stitch in garter stitch in each side of piece. REMEMBER THE KNITTING GAUGE! OVERVIEW OF NEXT SECTION: When piece measures 23-24-24-25-26-27 cm = 9"-9½"-9½"-9¾"-10¼"-10⅝", begin decreases for V-neck. AT THE SAME TIME as decreasing for V-neck, bind off stitches for armholes, and then finish each part separately as explained below. Read V-NECK and ARMHOLES before continuing. V-NECK: When piece measures 23-24-24-25-26-27 cm = 9"-9½"-9½"-9¾"-10¼"-10⅝", decrease for V-neck on each front piece and on next row from right side - read DECREASE TIP. Decrease 2 stitches on each front piece every 10th row 8-8-9-9-10-10 times in total. ARMHOLES: AT THE SAME TIME when piece measures 34-35-36-37-38-39 cm = 13⅜"-13¾"-14¼"-14½"-15"-15¼" and next row is from right side, bind off for armholes as follows: Work as before until 1-3-5-9-14-15 stitches remain before first marker thread in the side, bind off 2-6-10-18-28-30 stitches for armhole, work as before until 1-3-5-9-14-15 stitches remain before the other marker thread, bind off 2-6-10-18-28-30 stitches for armholes, work as before the rest of row. Finish front pieces and back piece separately. LEFT FRONT PIECE (when garment is worn): Begin from wrong side, work in stockinette stitch with 1 edge stitch in garter stitch towards the neck as before and continue decrease for V-neck. After all decreases for V-neck, 44-47-48-51-52-58 stitches remain on shoulder. Work in stockinette stitch with 1 edge stitch in garter stitch towards the neck. Bind off when piece measures 52-54-56-58-60-62 cm = 20½"-21¼"-22"-22¾"-23⅝"-24⅜". RIGHT FRONT PIECE: Begin from wrong side, work in stockinette stitch with 1 edge stitch in garter stitch towards the neck as before and continue decrease for V-neck. After all decreases for V-neck, 44-47-48-51-52-58 stitches remain on shoulder. Work in stockinette stitch with 1 edge stitch in garter stitch towards the neck. Bind off when piece measures 52-54-56-58-60-62 cm = 20½"-21¼"-22"-22¾"-23⅝"-24⅜". BACK PIECE: = 118-124-130-136-142-154 stitches. Begin from wrong side, and work in stockinette stitch. When piece measures 50-52-54-56-58-60, bind off the middle 28-28-32-32-36-36 stitches for neck (45-48-49-52-53-59 stitches remain on each shoulder). Finish each shoulder separately. On next row from the neck bind off 1 stitch for neck = 44-47-48-51-52-58 stitches. Bind off when piece measures 52-54-56-58-60-62 cm = 20½"-21¼"-22"-22¾"-23⅝"-24⅜". Work the other shoulder the same way. SLEEVES: Cast on 90-90-90-96-96-102 stitches on double pointed needles size 2.5 MM = US 1.5 with DROPS Alpaca. Work rib (purl 1/knit 1). When piece measures 4½ cm = 1⅝", work A.1 over all stitches. When A.1 has been worked 1 time vertically, continue with knit over knit and purl over purl until piece measures 8 cm = 3⅛". Switch to double pointed needles size 3 MM = US 2.5. Continue piece in stockinette stitch. On first round decrease 18-16-16-18-18-22 stitches evenly = 72-74-74-78-78-80 stitches. Insert a marker thread at beginning of round (mid under sleeve). Move the marker thread upwards when working - marker thread should be used for increase mid under sleeve. When sleeve measures 16-18-16-16-16-13 cm = 6¼"-7"-6¼"-6¼"-6¼"-5⅛", increase 1 stitch on each side of marker thread - read INCREASE TIP. Increase like this every 3-2½-2-2-1½-1½ cm = 1⅛"-1"-¾"-¾"-½"-½" 11-12-15-16-18-20 times in total = 94-98-104-110-114-120 stitches. When sleeve measures 49-49-48-47-44-43 cm = 19¼"-19¼"-19"-18½"-17¼"-17", divide piece at the marker thread and work back and forth on circular needle until finished measurements. Work until sleeve measures approx. 50-50-50-50-49-49 cm = 19¾"-19¾"-19¾"-19¾"-19¼"-19¼", i.e. there is a vent of 1-1-2-3-5-6 cm = ⅜"-⅜"-¾"-1⅛"-2"-2⅜" at the top of sleeve. Work the other sleeve the same way. ASSEMBLY: Sew shoulder seams inside bind-off edges. Sew vent at the top of sleeve to bottom of armhole. Then sew sleeve into body - see chart. RIGHT BAND: Work band bottom up. Pick up stitches along right front piece with the end of yarn (to continue to work with the ball) as follows: Leave approx. 160-240 cm = 63"-94" yarn at the end, use the end of yarn, begin at the bottom of front piece and pick up 1 stitch in every row along the entire front piece, inside 1 edge stitch with circular needle size 2.5 MM = US 1.5 and DROPS Alpaca. Cast on 16 stitches on needle at the bottom of front piece (i.e. from wrong side). Work band over the 16 band stitches and work band together with stitches picked up along the edge on front piece as follows: ROW 1 (= right side): Slip first stitch on to right needle purlwise with strand in front of piece, * knit 1, slip 1 stitch on to right needle purlwise with strand in front of piece *, work from *-* until 1 stitch remains of the 16 band stitches, slip 1 stitch on to right needle knitwise, with strand behind piece, knit next stitch, pass slipped stitch over stitch worked, turn. ROW 2 (= wrong side): * Slip first/next stitch on to right needle purlwise with strand in front of piece, knit 1 *, work from *-* over all the 16 band stitches. Repeat row 1 and 2 and work BUTTONHOLES - read explanation above, until all stitches from front piece have been worked together with band. Now work over the 16 band stitches as follows: ROW 1: * Slip first/ next stitch on to right needle purlwise, with strand in front of piece, knit 1 *, work from *-* over the 16 stitches. Repeat row 1 both from right side and wrong side for 7-7-8-8-9-9 cm = 2¾"-2¾"-3⅛"-3⅛"-3½"-3½". On next row from right side knit all stitches together 2 by 2 and bind off. LEFT BAND: Work band bottom up. Begin at the shoulder on front piece and pick up 1 stitch in every row along the entire front piece, inside 1 edge stitch with circular needle size 2.5 MM = US 1.5 and DROPS Alpaca and cast on 16 stitches at the end of row. Work band over the 16 stitches and work band together with stitches picked up along the edge on front piece as follows: ROW 1 (= wrong side): Knit 1, * slip 1 stitch on to right needle purlwise with strand in front of piece, knit 1 *, work from *-* until 1 stitch remains of the 16 band stitches, slip the next 2 stitches on to right needle purlwise with strand in front of piece, turn. ROW 2 (= right side): Knit 2 together, *, slip 1 stitch on to right needle purlwise with strand in front of piece, knit 1 *, work from *-* until 1 stitch remains, slip last stitch on to right needle purlwise with strand in front of piece. Repeat row 1 and 2 until all stitches from front piece have been worked together with band. Now work over the 16 band stitches as follows: ROW 1: * Knit 1, slip next stitch on to right needle purlwise with strand in front of piece *, work from *-* over the 16 stitches. Repeat row 1 both from right side and wrong side for 7-7-8-8-9-9 cm = 2¾"-2¾"-3⅛"-3⅛"-3½"-3½". On next row from right side work all stitches together and bind off as follows: Slip 1 stitch on to right needle knitwise, knit 1, pass slipped stitch over stitch worked, bind off stitch. ASSEMBLY: Sew the band together mid back and sew it to the neck edge on back piece. Sew on buttons. |
|||||||||||||||||||
Diagram explanations |
|||||||||||||||||||
|
|||||||||||||||||||
|
|||||||||||||||||||

|
|||||||||||||||||||

|
|||||||||||||||||||
|
Have you made this or any other of our designs? Tag your pictures in social media with #dropsdesign so we can see them! Do you need help with this pattern?You'll find tutorial videos, a Comments/Questions area and more by visiting the pattern on garnstudio.com. © 1982-2024 DROPS Design A/S. We reserve all rights. This document, including all its sub-sections, has copyrights. Read more about what you can do with our patterns at the bottom of each pattern on our site. |
|||||||||||||||||||


With over 40 years in knitting and crochet design, DROPS Design offers one of the most extensive collections of free patterns on the internet - translated to 17 languages. As of today we count 304 catalogs and 11422 patterns - 11417 of which are translated into English (US/in).
We work hard to bring you the best knitting and crochet have to offer, inspiration and advice as well as great quality yarns at incredible prices! Would you like to use our patterns for other than personal use? You can read what you are allowed to do in the Copyright text at the bottom of all our patterns. Happy crafting!
Comments / Questions (8)
Er staat bij de mouwen: Voeg een markeerdraad in op het begin van de naald. (MIDDEN ONDER DE MOUW)Verderop staat in het patroon: Als de mouw 49 cm meet, verdeel dan het werk op de markeerdraad en brei heen en weer gebreid op de rondbreinaald tot de gewenste afmetingen. Brei tot de mouw ongeveer 50 cm meet, dus er is een split van 1 cm OP DE BOVENKANT van de mouw. Waarom eerst MIDDEN ONDER, dan de BOVENKANT van de mouw? Ik begrijp sowieso het nut van de split niet. Kunt u dit uitleggen?
18.01.2024 - 19:43DROPS Design answered:
Dag Hannie,
Nee er is een split aan de onderkant van de mouw, niet aan de bovenkant. Deze split zit dus bij de oksel. Bij het in elkaar naaien wordt de split aan het pand genaaid zoals te zien is in de tekening onderaan het patroon.
21.01.2024 - 12:10Hello! I am currently making this sweater in a size medium, and I would like to raise the shoulder seam if possible. I have narrow shoulders, and I was wondering if following the directions for the size small at the v-neck section would help create this effect. Thanks so much!
25.03.2023 - 16:28DROPS Design answered:
Dear Heather, to raise the shoulder seam you need to work a new armhole and sleeve cap. The v-neck section won't affect the shoulder seam. You can check the following pattern for an alternative armhole and sleeve cap: https://www.garnstudio.com/pattern.php?id=11115&cid=19 Happy knitting!
26.03.2023 - 22:34Wie viele Maschen soll man denn für die Armausschnitte abketten? Es steht nur, dass man Maschen abketten soll. Leider nicht, wie viele.
14.03.2023 - 19:40DROPS Design answered:
Liebe Anja, sehen Sie unter ARMAUSSCHNITTE (nach dem Absatz V-AUSSCHNITT: - es wird zuerst für den V-Auschnitt abgenommen, aber bevor diese Abnahmen fertig sind, wird man für den Armausschnitt abketten. Viel Spaß beim stricken!
15.03.2023 - 09:47Hallo liebes Drops-Team! Bei angegebener Nadelstärke, erhalte ich mit 24 Maschen in der Breite 10cm. Nach Maschenproben mit verschiedenen Nadelstärken, kann ich 26 Maschen in der Breite nicht erreichen. Auf der Banderole für die Alpacawolle steht für die Maschenprobe 24 Maschen in der Breite. Liegt vielleicht ein Fehler vor, und man braucht nur 24 Maschen? Liebe Grüße Kirsten
03.01.2023 - 19:10DROPS Design answered:
Liebe Kristen, für diese Jacke sollen Sie 26 Maschen in der Breite haben, versuchen Sie mal mit kleineren Nadeln, z.B. 2,5 anstatt 3 oder eben 2. Hier lesen Sie mal mehr über Maschenprobe. Viel Spaß beim stricken!
04.01.2023 - 08:59Bonjour, Je me suis trompé dans le calcul de laine. Je l’ai fait avec de l’alpaga couleur lavande douce (8120) qui ne se fait plus.comment puis je faire?merci d’avance Celine
03.10.2022 - 23:27DROPS Design answered:
Bonjour Mme Bouchereau, vous pouvez contacter d'autres magasins DROPS qui pourraient en avoir encore, ou bien demander via notre groupe DROPS Workshop si une autre tricoteuse peut vous dépanner. Bon tricot!
04.10.2022 - 07:56Jeg mangler et mål-diagram på denne flotte trøje
03.10.2022 - 17:51DROPS Design answered:
Hei Therese, Du finner en målskisse på bunnen av oppskriften. God fornøyelse!
04.10.2022 - 06:52Energy boost
06.08.2022 - 11:26Pumpkin Spice
06.08.2022 - 09:39