
Popular categories
Looking for a yarn?


Comments / Questions (19)
![]() Manuela wrote:
Manuela wrote:
Buongiorno e grazie per mettere a disposizione questi bellissimi modelli. Sto per iniziare questo modello con Muskat n.82 per curiosità il corpo sul dietro verrà tutto a maglia rasata senza alcun pattern vero? Sarebbe bello se prossimamente metteste anche qualche foto del dietro. Grazie infinite e buona giornata.
19.03.2025 - 19:05DROPS Design answered:
Buonasera Manuela, è corretto. Buon lavoro!
20.03.2025 - 21:55
![]() Jacqueline wrote:
Jacqueline wrote:
Bonjour, concernant les dimensions taille L du croquis : 2cm pour les côtes du col, 4cm (je ne comprends pas à quoi ces cm correspondent), 23 cm pour l'empiècement... Ainsi l'empiècement ne mesure pas 23cm, mais 23+4=27cm pour commencer le dos/devant, puisque j'ai mis mon 1er marqueur après les côtes du col (2cm) et les 2 rangs augmentations/diminutions. Cela fait en tout 3cm au plus et non 2+4=6cm avant le marqueur. Donc je me retrouve avec 4cm ou 3cm en trop sur le croquis. Merci
05.03.2025 - 10:17DROPS Design answered:
Bonjour Jacqueline, les 4 cm sous les 2 cm du col correspondent à la hauteur des épaules, quand on tricote de haut en bas, une partie des mailles montées correspond aux épaules/haut des manches. Ainsi, en taille L vous avez: 4 cm d'épaules + 23 cm d'empiècement + 17 cm après la division + 2 cm de côtes = 46 cm de hauteur totale + les 2 cm du col. Pour l'empiècement, lorsque les augmentations du raglan sont terminées, votre ouvrage mesure 21 cm après le col, tricotez encore 2 cm mais sans augmenter pour atteindre les 23 cm après le col. Bon tricot!
05.03.2025 - 13:46
![]() Sigrid wrote:
Sigrid wrote:
Ik ben deze aan het maken in de maat XL. Na het herverdelen 58 -11(nieuwe opzet) -108 - 11(nieuwe opzet) -58 loopt het design niet mooi door. Er zijn 2 steken nieuwe opzet teveel opgezet. Om het patroon mooi te laten doorlopen.
15.04.2024 - 07:24
![]() NEKKACHE wrote:
NEKKACHE wrote:
Bonjour. Je souhaite réaliser le modèle 221 33 avec la laine Drops Muskat. Cependant jai des difficultés à comprendre les explications de ce modèle avec des aiguilles circulaires. Est-il possible de me faire parvenir les explications avec des aiguilles simples ? Dans l'attente de vous lire. Cordialement
25.03.2024 - 17:41
![]() NEKKACHE wrote:
NEKKACHE wrote:
Bonjour. Je souhaite réaliser le modèle 221 33 avec la l'ai.e Drops Muskat. Cependant jai des difficultés à comprendre les explications de ce modèle avec des aiguilles circulaires. Est-il possible de me faire parvenir les explications avec des aiguilles simples ? Dans l'attente de vous lire. Cordialement
25.03.2024 - 17:40DROPS Design answered:
Bonjour Mme Nekkache, ce modèle se tricote en allers et retours sur aiguille circulaire pour avoir suffisamment de place pour y loger toutes les mailles, vous pouvez ainsi tricoter l'empiècement + le bas du gilet en allers et retours sur aiguilles droites, vos mailles seront juste beaucoup plus serrées, pour les manches, cette leçon pourra vous aider. Bon tricot!
02.04.2024 - 09:44
![]() Vladimíra Fidrmucová wrote:
Vladimíra Fidrmucová wrote:
Dobrý den, děkuji za vaše krásné stránky o pletení a háčkování. Některé modely ze starších katalogů nejsou přeloženy do českého jazyka . Mohla bych vás poprosit o přeložení tohoto svetru do českého návodu ? Děkuji Vlaďka
23.05.2023 - 15:40DROPS Design answered:
Dobrý den, Vlaďko, díky za zpráci a za tip - český návod přidáme během 1-2 dnů. Hezký den! Hana
23.05.2023 - 18:06
![]() Hanna wrote:
Hanna wrote:
Are the band stitches included in the total number of cast on stitches, i.e I am knitting size m should i cast on an additional 10 stitches?
18.03.2023 - 15:47DROPS Design answered:
Dear Hanna, when it says "including 5 band stitches", those are included on the cast-on amount initially given. So you don't have to cast on anymore stitches. Happy knitting!
19.03.2023 - 18:23
![]() Phyllis Strahl wrote:
Phyllis Strahl wrote:
Hallo, Ich habe gerade mit dem Abschnitt fur die Passe angefangen. Ich habe 5 Maschen kraus rechts gestrickt und verstehe nun nicht was mit "den letzten 8 Maschen von A.1" gemeint sein soll. Sind das 8 Maschen aus der ersten Reihe (also nur rechts) oder 8 aus der dritten Reihe wo das Muster anfängt oder 8 aus der allerletzten Reihe?? Und später steht da die 7 ersten Maschen von A.1, sind die dann aus der gleichen Reihe im Diagramm? 🥵🥵🥵
04.07.2022 - 22:22DROPS Design answered:
Liebe Frau Strahl, bei der 1. Reihe der Passe stricken Sie nach den 5 Blenden-Maschen die 8 letzten Maschen von A.1 (= die 1. Masche überspringen und die 8 letzten Maschen stricken), und dann stricken Sie nur die 7 ersten Maschen vom Diagram (es sind nicht genügend Maschen um die 9 Maschen zu stricken), so werden die 2 ersten Rapporte nicht "ganz" aber so muss es gestrickt, damit das Muster schön passt. Diagramme lesen Sie von unten nach oben, rechts nach links bei den Hinreihen und links nach rechts bei den Rückreihen. Viel Spaß beim stricken!
05.07.2022 - 09:14
![]() Boon Hong LIM wrote:
Boon Hong LIM wrote:
Hello, I have different stitch count when separating body and sleeves for 2nd size. I have 49 = front piece, 71 stitches = sleeve, 90 stitches = back, 71 stitches = sleeve, 49 = front. Can you verify? Also, I love your yarns and designs. Thanks for all the free patterns.
28.12.2021 - 21:35DROPS Design answered:
Hi, you have 114 st. Then you increase 26 times for the raglan (26x8=208). Total number of stitches is 322. You should have 49 = front piece, 67 stitches = sleeve, 90 stitches = back, 67 stitches = sleeve, 49 = front > 322 st.
29.12.2021 - 12:06
![]() Mady Rose wrote:
Mady Rose wrote:
Bonjour, je ne comprends pas bien comment faire le premier rang de l 'empiècement, que signifie "tricoter au-dessus" des mailles ? Je n'arrive pas à placer les 4 marqueurs à leur place. Merci devotre réponse
29.10.2021 - 17:34DROPS Design answered:
Bonjour Mady Rose, vous tricotez simplement les mailles indiquées, par ex quand vous devez tricoter A.1 au-dessus des 9 mailles suivantes, vous tricotez 1 fois les 9 mailles de A.1. Cela vous aide-t'il? Bon tricot!
02.11.2021 - 13:32
|
||||||||||||||||
Rosebud Parade Cardigan#rosebudparadecardigan |
||||||||||||||||
 |
 |
|||||||||||||||
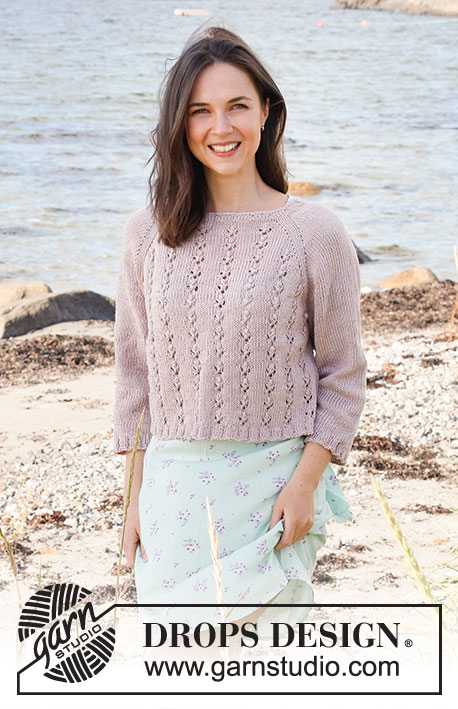
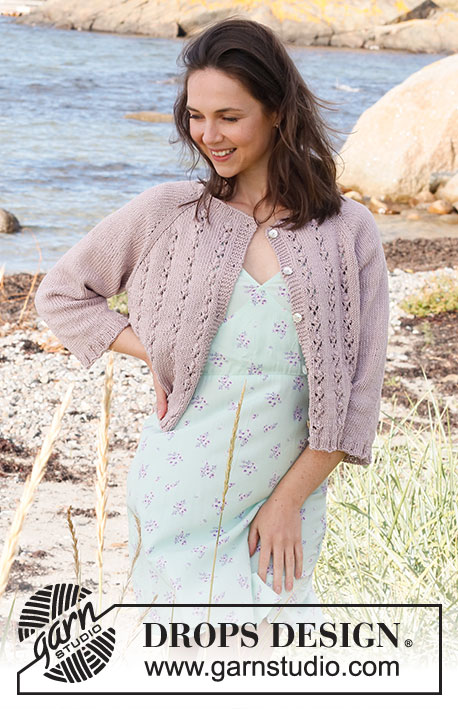
Knitted jacket in DROPS Muskat or DROPS Sky. The piece is worked top down with raglan, lace pattern, knots and ¾-length sleeves. Sizes S - XXXL.
DROPS 221-33 |
||||||||||||||||
|
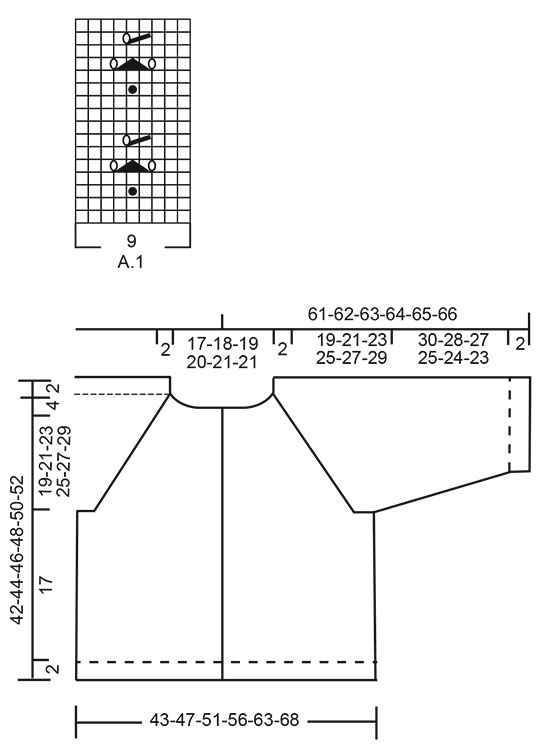
------------------------------------------------------- EXPLANATIONS FOR THE PATTERN: ------------------------------------------------------- RIDGE/GARTER STITCH (worked back and forth): Knit all rows. 1 ridge in height = Knit 2 rows. PATTERN: See diagram A.1. The diagram shows all the rows in the pattern from the right side. INCREASE/DECREASE TIP (evenly spaced): To work out how to increase/decrease evenly, count the total number of stitches on needle (e.g. 112 stitches), minus the bands (e.g. 10 stitches) and divide the remaining stitches by the number of increases/decreases to be made (e.g. 2) = 51. In this example, increase by making 1 yarn over after each 51st stitch. (Do not increase over the bands). On the next row work the yarn overs twisted to avoid holes. When decreasing, knit together each 50th and 51st stitch. (Do not decrease over the bands). RAGLAN: All increases are worked from the right side! Increase 1 stitch on each side of the 3 knitted stitches in the transitions between front/back pieces and the sleeves = 8 stitches increased on the row (there are 2 stitches between the increases on the front/back pieces and the marker and 1 stitch between the increases on the sleeves and the marker). Increase 1 stitch by making 1 yarn over. On the next row work the yarn over twisted to avoid a hole. Then on the sleeves knit the new stitches. On the front/back pieces, the new stitches are worked into the pattern A.1 (i.e. knitted until there are enough stitches to start a new repeat of lace pattern/knots = A.1). You can insert a marker thread before/after each repeat of A.1 to make it easier to see where a new repeat starts. DECREASE TIP (for sleeves): Decrease 1 stitch on either side of the marker-stitch as follows: Work until there are 3 stitches left before the marker-stitch, knit 2 together, knit 3 (marker-stitch is the middle stitch), slip 1 stitch as if to knit, knit 1 and pass the slipped stitch over the knitted stitch (2 stitches decreased). BUTTONHOLES: Work buttonholes on the right band (when the garment is worn). Work from the right side when there are 3 stitches left on the row as follows: Make 1 yarn over, knit 2 together and knit 1. On the next row (wrong side), knit the yarn over to leave a hole. The first buttonhole is worked when the rib on the neck measures approx. 2 cm. Then work the other 4-4-5-5-5-5 buttonholes with approx. 9-9-8-8-8½-9 cm between each one. CASTING-OFF TIP: To avoid the cast-off edge being tight you can cast off with a larger size needle. If the edge is still tight, make 1 yarn over after approx. each 5th stitch at the same time as casting off; the yarn overs are cast off as normal stitches. ------------------------------------------------------- START THE PIECE HERE: ------------------------------------------------------- JACKET – SHORT OVERVIEW OF THE PIECE. The neck and yoke are worked back and forth with circular needle, from mid front and top down. The yoke is divided for body and sleeves and the body continued back and forth with circular needle. The sleeves are worked in the round with double pointed needles/short circular needle, top down. NECK: Cast on 113-118-123-128-133-133 stitches (including 5 band stitches on each side towards mid-front) with circular needle size 3 mm and Muskat or Sky. Purl 1 row (= wrong side). The next row is worked as follows from the right side: Work 5 band stitches in GARTER STITCH – read description above, * knit 3, purl 2 *, work from *-* until there are 8 stitches left, knit 3 and finish with 5 band stitches in garter stitch. Continue this rib for 2 cm – remember the BUTTONHOLES on the right band – read description above. When the rib is finished, Knit 1 row where you adjust the number of stitches to 114-114-122-122-142-142 stitches by decreasing/increasing evenly – read INCREASE/DECREASE TIP. Purl 1 row from the wrong side (yarn overs purled twisted and bands in garter stitch). Change to circular needle size 4 mm. Insert a marker after the band at the beginning of the round; the yoke is measured from this marker! YOKE: Now work pattern and insert 4 markers in the piece as follows: Work 5 band stitches in garter stitch, work the last 8 stitches in A.1, then work A.1 over the next 0-0-9-9-9-9 stitches (= 0-0-1-1-1-1 repeats of 9 stitches), work the first 7-7-0-0-5-5 stitches in A.1, 1 yarn over, 2 stitches in stocking stitch, insert a marker here (= in transition between left front piece and left sleeve), 1 stitch in stocking stitch, 1 yarn over, stocking stitch over the next 15 stitches, 1 yarn over, 1 stitch in stocking stitch, insert a marker here (= in transition between left sleeve and back piece), 2 stitches in stocking stitch, 1 yarn over, work the last 7-7-0-0-5-5 stitches in A.1, work A.1 over the next 18-18-36-36-36-36 stitches (= 2-2-4-4-4-4 repeats of 9 stitches), work the first 7-7-0-0-5-5 stitches in A.1, 1 yarn over, 2 stitches in stocking stitch, insert a marker here (= in transition between back piece and right sleeve), 1 stitch in stocking stitch, 1 yarn over, work stocking stitch over the next 15 stitches, 1 yarn over, 1 stitch in stocking stitch, insert a marker here (= in transition between right sleeve and right front piece), 2 stitches in stocking stitch, 1 yarn over, work the last 7-7-0-0-5-5 stitches in A.1, work A.1 over the next 0-0-9-9-9-9 stitches (= 0-0-1-1-1-1 repeats of 9 stitches), work the first 8 stitches in A.1 and 5 band stitches in garter stitch. You have now increased 8 stitches to RAGLAN – read description above. Continue like this back and forth and increase to raglan every 2nd row (every row from the right side) a total of 24-26-29-32-35-38 times = 306-322-354-378-422-446 stitches. REMEMBER THE KNITTING TENSION. When all the increases to raglan are finished, the piece measures approx. 17-19-21-23-25-27 cm from the marker on the neck. Continue with pattern and stocking stitch until the yoke measures 19-21-23-25-27-29 cm from the marker. Now divide the piece for body and sleeves on the next row as follows: Work the first 46-49-53-58-65-70 stitches (= front piece), place the next 65-67-75-77-85-87 stitches on 1 thread for the sleeve, cast on 7-9-11-11-11-11 new stitches (= in side under sleeve), work 84-90-98-108-122-132 stitches (= back piece), place the next 65-67-75-77-85-87 stitches on 1 thread for the sleeve, cast on 7-9-11-11-11-11 new stitches (= in side under sleeve), work the last 46-49-53-58-65-70 stitches (= front piece). Body and sleeves are finished separately. THE PIECE IS NOW MEASURED FROM HERE. BODY: = 190-206-226-246-274-294 stitches. Continue back and forth with 5 band stitches in garter stitch as before, and with as many repeats of A.1 as you have room for towards each side under the sleeves. The remaining stitches are knitted. Continue like this until the piece measures 17 cm from the division – finish after row 8 or 16 in the pattern; continue with extra rows of stocking stitch if necessary, to reach the correct length. On the next row from the right side increase 28-32-32-37-39-44 stitches evenly spaced = 218-238-258-283-313-338 stitches. Change to circular needle size 3 mm and work 1 row back from the wrong side. Now work rib from the right side as follows: 5 band stitches in garter stitch, * knit 3, purl 2 *, work from *-* until there are 8 stitches left on the row, knit 3 and finish with 5 band stitches in garter stitch. Continue this rib for 2 cm. Cast off with knit over knit and purl over purl – read CASTING-OFF TIP. The jacket measures approx. 42-44-46-48-50-52 cm from the shoulder down. SLEEVE: Place the 65-67-75-77-85-87 stitches from the thread on the one side of the piece on double pointed needles/short circular needle size 4 mm and knit up 1 stitch in each of the 7-9-11-11-11-11 stitches cast on under the sleeve = 72-76-86-88-96-98 stitches. Insert a marker in the middle stitch under the sleeve. Allow the thread to follow your work onwards; it will be used when decreasing under the sleeve. Continue in the round with stocking stitch. When the piece measures 4-4-3-3-3-2 cm from the division, decrease 2 stitches under the sleeve – read DECREASE TIP. Decrease like this every 2½-2-1½-1½-1-1 cm a total of 11-12-16-15-19-19 times = 50-52-54-58-58-60 stitches. Continue working until the sleeve measures 30-28-27-25-24-23 cm. Now increase 5-8-6-7-7-10 stitches evenly spaced = 55-60-60-65-65-70 stitches. Change to double pointed needles size 3 mm and work rib (knit 3, purl 2) for 2 cm. Cast off with knit over knit and purl over purl – remember CASTING-OFF TIP. The sleeve measures approx. 32-30-29-27-26-25 cm. Work the other sleeve in the same way. ASSEMBLY: Sew the buttons onto the left band. |
||||||||||||||||
Diagram explanations |
||||||||||||||||
|
||||||||||||||||
 |
||||||||||||||||
Have you finished this pattern?Tag your pictures with #dropspattern #rosebudparadecardigan or submit them to the #dropsfan gallery. Do you need help with this pattern?You'll find 28 tutorial videos, a Comments/Questions area and more by visiting the pattern on garnstudio.com. © 1982-2026 DROPS Design A/S. We reserve all rights. This document, including all its sub-sections, has copyrights. Read more about what you can do with our patterns at the bottom of each pattern on our site. |
||||||||||||||||


With over 40 years in knitting and crochet design, DROPS Design offers one of the most extensive collections of free patterns on the internet - translated to 17 languages. As of today we count 325 catalogues and 12298 patterns translated into English (UK/cm). 12298
We work hard to bring you the best knitting and crochet have to offer, inspiration and advice as well as great quality yarns at incredible prices! Would you like to use our patterns for other than personal use? You can read what you are allowed to do in the Copyright text at the bottom of all our patterns. Happy crafting!
Post a comment to pattern DROPS 221-33
We would love to hear what you have to say about this pattern!
If you want to leave a question, please make sure you select the correct category in the form below, to speed up the answering process. Required fields are marked *.