
Popular categories
Looking for a yarn?


Comments / Questions (48)
![]() Kelli wrote:
Kelli wrote:
I am doing the 9/10 and the body says measure from the division which is the armpit area but say only go till measures 16 cm / 6.25" which I think is a bit to short. What am I missing? Thanks
20.04.2026 - 14:50DROPS Design answered:
Dear Kelli, this is the right measurement, just the 4 cm rib are missing so that body will be somewhat longer; and whole jacket will measure appprox. 42 cm from the top down when piece is lying down. Happy knitting!
20.04.2026 - 16:35
![]() Dominique wrote:
Dominique wrote:
Bonjour, je suis à l'endroit du tricot ou je commenc les augmentations des manches. Et donc aussi ou je reprends le motif du diagramme. J'ai maintenant assez de mailles pour faire 2 motifs entiers et un demi. Ma question: est ce qu'on ne fait que les motifs entiers ou on fait aussi des demis ? Merci et cordialement
18.04.2026 - 13:29DROPS Design answered:
Bonjour Dominique, quand on augmente pour les manches, on tricote les augmentations des manches en jersey, seules les augmentations des épaules puis de l'empiècement (sur les devants et le dos) se tricotent en point fantaisie. Quand vous augmentez dans le point ajouré, veillez juste à ce que vous ayez suffisamment de mailles pour 1 diminution et son jeté, vous pouvez avoir parfois juste 1/2 motif si vous n'avez pas suffisamment de mailles pour un motif complet sur les côtés. Bon tricot!
20.04.2026 - 09:30
![]() Jeanett wrote:
Jeanett wrote:
Hallo, ich bin Anfängerin und habe gleich am Anfang ein Problem! Ich habe 104 Maschen auf der Nadel und stricke 5re und dann immer im Wechsel 2re,2li bis 7 übrig bleiben und die auch rechts! Aber es kommt einfach kein rippmuster raus! Ich hab das jetzt schon 7 mal probiert und es klappt nicht!!! Was mache ich falsch?
07.04.2026 - 21:32DROPS Design answered:
Liebe Jeanett, so stricken Sie die 104 Maschen: 5 Maschen kraus rechts, dann stricken Sie insgesamt 23 Mal (2 M re, 2 M li), dann 2 M re und 5 M kraus rechts = 5+(23x4)+2+5=104. Bei den Rückreihen stricken Sie: 5 M kraus rechts, 2 M li, dann 23 Mal (2 M re, 2 M li) und 5 Maschen Krausrechts. Viel Spaß beim Stricken!
08.04.2026 - 14:18
![]() Maire wrote:
Maire wrote:
Eestikeelses juhendis on silmade kasvatuste varrukal kohta põhimõtteline viga, millal peab kasvatama. Antud juhendis on sarnane kasvatamine nii raglaanil kui ka varrukatel, kuid see peaks olema erinev.
23.02.2026 - 09:08DROPS Design answered:
Tänan tähelepanu juhtimast. Juhendit on uuendatud.
03.03.2026 - 14:16
![]() Elsemarie wrote:
Elsemarie wrote:
Jag får inte mönstret att stämma när jag har ökat 8 maskor under ärmen. Jag har totalt 187 maskor som mönstret säger men det stämmer inte när jag stickar in de 8 maskorna i mönstret
11.02.2026 - 17:30DROPS Design answered:
Hej Elsemarie, de masker som ikke går op i hver side strikkes i glatstrik. Mønsteret skal fortsat stemme over det mønster du allerede har strikket :)
12.02.2026 - 10:11
![]() Monica wrote:
Monica wrote:
Efter sista ökningen på sadelaxelökningen ska arbetet mäta 9 cm i min storlek 11/12. Jag har bara 5,5 cm! Ska jag fortsätta sticka mina 227 maskor tills det blir 9 cm och sedan börja med ärmökning? Jag stickar i Drops Baby Merino och rundsticka nr 3 och till halskanten 2,5. Tacksam för hjälp. Hälsningar Monica
18.10.2025 - 22:29DROPS Design answered:
Hei Monica. I str. 11/12 år skal arbeidet mål 8 cm, ikke 9 cm. Har du sjekket strikkefastheten din i høyden? Når du har strikket alle pinnene med økninger (24 pinner) burde arbeidet ha mål ca 7,5-8 cm om du har riktig strikkefasthet. Om du fortsetter fra 5,5 cm til 9 cm uten økninger, kan det bli litt ujevnt. mvh DROPS Design
27.10.2025 - 11:04
![]() Geralyn wrote:
Geralyn wrote:
The shoulder increase rows are confusing. I'm knitting size 5/6. Prior to these increase rows, my counts were: 24 sts., Mrk 1, 16 sts., Mrk 2, 39 sts., Mrk 3, 16 sts., Mrk 4, 24 sts. After the first right side increase, my counts were: 25, 16, 41, 16, 25. After the next wrong side increase, my counts were: 26, 16, 43, 16, and 26. Directions for the next row are for a pattern of 24, 16, 43, 16, and 24 stitches. How can the front panels be 24 after increasing before Mrk 1 and after Mrk 4?
25.07.2025 - 04:08DROPS Design answered:
Hi Mrs Geralyn, you are doing increases well. You have to adjust A.1, the motifs should be symmetrical. 'The increased stitches are worked into A.1, make sure that A.1 fits over the stitches from A.2, A.3 and A.4'. Happy knitting!
25.07.2025 - 09:13
![]() Hazel Belson wrote:
Hazel Belson wrote:
What do you mean before and after the markers as I have followed the instructions and it says place the markers between two sts and it’s says increase before and after the markers is this the same place or 1 stitch earlier or later I am knitting 3 size also the increase on the wrong side are increasing the number of sleeve stitches between the markers thanks
20.07.2025 - 19:39
![]() Anne wrote:
Anne wrote:
Bonjour.Jaimerai savoir si vos modeles ne peuvent etre realisés qu'avec des aiguilles circulaires?Est ce possible de les faire avec des aiguilles droites.Merci
05.07.2025 - 14:53DROPS Design answered:
Bonjour Anne, vous pouvez adapter la plupart des explications pour des aiguilles droites. Voir la lecon DROPS ICI sur ce sujet. Bon tricot!
14.07.2025 - 13:15
![]() Margareta wrote:
Margareta wrote:
Jag har stickat i nästan hela mitt liv men det här mönstret är alldeles för rörigt skrivet tycker jag. Tänkt ge upp flera gånger. Har garn till två stycken koftor men fått nog efter en. Får bli något annat av garnet som blir över.
30.05.2025 - 19:42
|
|||||||||||||||||||||||||
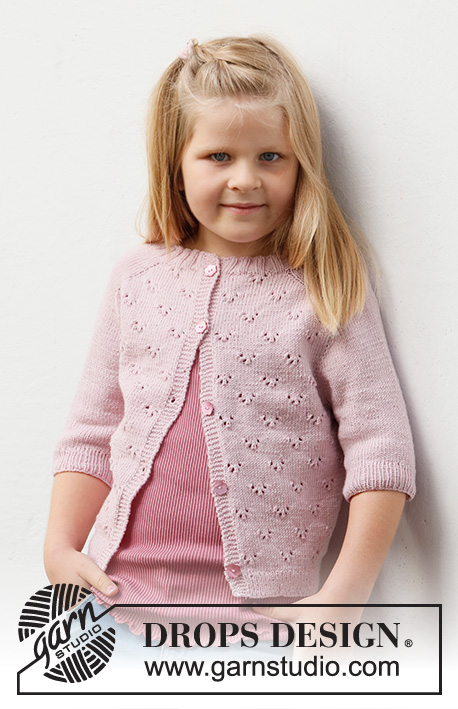
Pink Peony Cardigan#pinkpeonycardigan |
|||||||||||||||||||||||||
 |
 |
||||||||||||||||||||||||
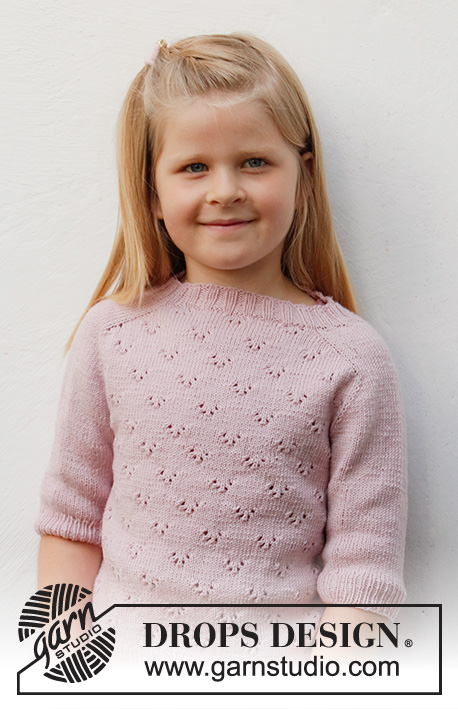
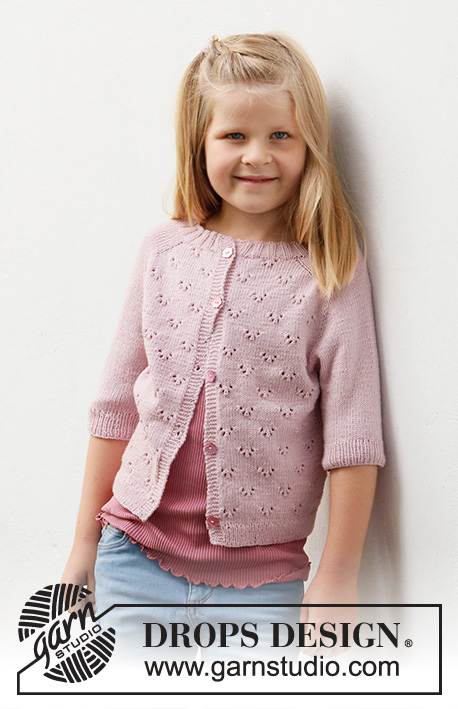
Knitted jacket for children in DROPS BabyMerino. The piece is worked top down with saddle-shoulders, lace pattern and short sleeves. Sizes 3-14 years.
DROPS Baby & Children 38-22 |
|||||||||||||||||||||||||
|
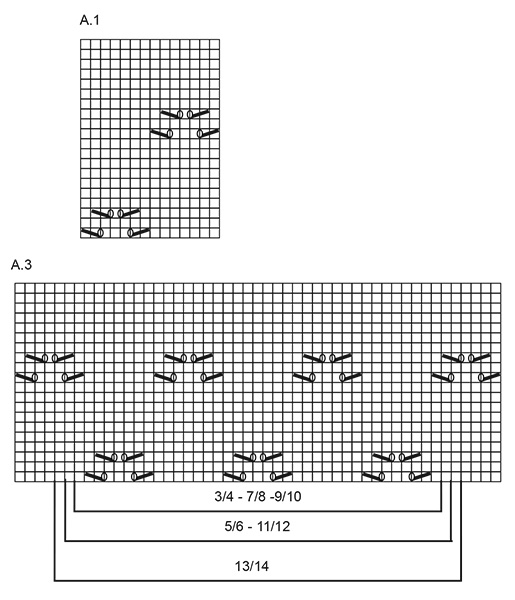
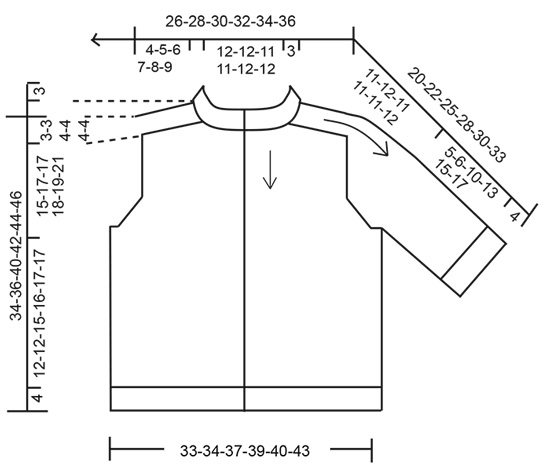
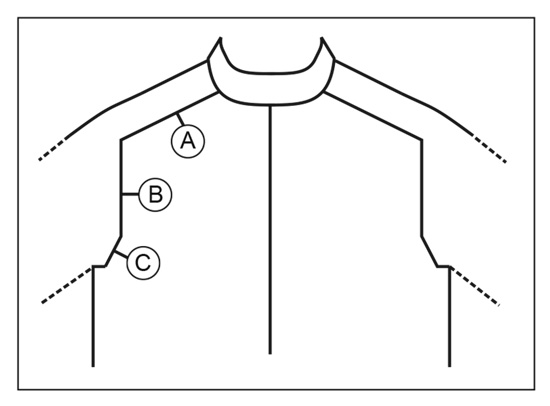
------------------------------------------------------- EXPLANATIONS FOR THE PATTERN: ------------------------------------------------------- RIDGE/GARTER STITCH (worked back and forth): Knit all rows. 1 ridge in height = Knit 2 rows. PATTERN: See diagrams A.1 to A.4. Find your size in the diagrams. The diagrams show all rows in the pattern from the right side. INCREASE TIP-1 (evenly spaced): To work out how to increase evenly, count the total number of stitches on the needle (e.g. 96 stitches), minus the bands (e.g. 10 stitches) and divide the remaining stitches by the number of increases to be made (e.g. 19) = 4.5. In this example, increase by making 1 yarn over after alternately each 4th and 5th stitch. Do not increase on the bands. On the next row work the yarn overs twisted to avoid holes. INCREASE TIP-2 (for saddle shoulders, sleeves and yoke from the RIGHT SIDE): BEFORE MARKER: The new stitch twists to the right. Use the left needle to pick up the strand between 2 stitches from the previous round, pick up the back strand and knit in the front loop. AFTER MARKER: The new stitch twists to the left. Use the left needle to pick up the strand between 2 stitches from the previous round, pick up the front strand and knit in the back loop. INCREASE TIP-3 (for saddle shoulders, sleeves and yoke from the WRONG SIDE): BEFORE MARKER: The new stitch twists to the right. Use the left needle to pick up the strand between 2 stitches from the previous round, pick up the front strand and purl in the back loop. AFTER MARKER: The new stitch twists to the left. Use the left needle to pick up the strand between 2 stitches from the previous round, pick up the back strand and purl in the front loop. BUTTONHOLES: Work buttonholes on the right band (when the garment is worn). Work from the right side when there are 3 stitches left on the row as follows: Make 1 yarn over, knit 2 together and knit 1. On the next row (wrong side), knit the yarn over to leave a hole. The first buttonhole is worked when the neck is finished (transition between neck and yoke). Then work the other 4-5-5-6-6-6 buttonholes with approx. 7-6-6½-6-6-6½ cm between each one. CASTING-OFF TIP: To avoid the cast-off edge being tight you can cast off with a larger size needle. If the edge is still tight, make 1 yarn over after approx. each 6th stitch at the same time as casting off; the yarn overs are cast off as normal stitches. ------------------------------------------------------- START THE PIECE HERE: ------------------------------------------------------- JACKET – SHORT OVERVIEW OF THE PIECE: The neck and yoke are worked back and forth with circular needle, from mid-front and top down. Stitches are increased for the shoulders, then for the sleeves and finally for the yoke. The yoke is divided for the body and sleeves and the body continued back and forth. The sleeves are worked in the round with double pointed needles/short circular needle, top down. NECK: Cast on 96-100-104-104-108-112 stitches (including 5 band stitches on each side towards mid-front) with circular needle size 2.5 mm and Baby Merino. Purl 1 row (= wrong side). The next row is worked as follows from the right side: 5 band stitches in GARTER STITCH – read description above, * knit 2, purl 2 *, work from *-* until there are 7 stitches left, knit 2 and 5 band stitches in garter stitch. Continue this rib for 3 cm. When the rib is finished, knit 1 row from the right side where you increase 19-19-23-23-23-23 stitches evenly spaced – read INCREASE TIP-1 = 115-119-127-127-131-135 stitches. Purl 1 row from the wrong side (yarn overs purled twisted and the bands worked in garter stitch). Change to circular needle size 3 mm. YOKE: Insert a marker after the band at the beginning of the row – THE PIECE IS MEASURED FROM HERE! In addition, insert 4 other markers as described below – without working the stitches and each marker inserted between 2 stitches. The markers should be of a different colour to the marker on the neck and are used when increasing. Marker 1: Count 23-24-23-23-24-25 stitches (= front piece), insert the marker before the next stitch. Marker 2: Count 16-16-22-22-22-22 stitches from marker 1 (= shoulder), insert the marker before the next stitch. Marker 3: Count 37-39-37-37-39-41 stitches from marker 2 (= back piece), insert the marker before the next stitch. Marker 4: Count 16-16-22-22-22-22 stitches from marker 3 (= shoulder), insert the marker before the next stitch. There are 23-24-23-23-24-25 stitches left on the front piece after marker 4. Allow the 4 markers to follow your work onwards. INCREASES FOR SADDLE SHOULDERS: Read the whole of the next section before continuing! Continue working 5 band stitches on each side, A.2 over the next 18-19-18-18-19-20 stitches, stocking stitch over the next 16-16-22-22-22-22 stitches, A.3 over the next 37-39-37-37-39-41 stitches, stocking stitch over the next 16-16-22-22-22-22 stitches, A.4 over the next 18-19-18-18-19-20 stitches. A.1 shows 1 repeat of the pattern. AT THE SAME TIME on the first row from the right side increase 4 stitches for the shoulders as follows: Increase 1 stitch BEFORE markers 1 and 3 and increase 1 stitch AFTER markers 2 and 4 – read INCREASE TIP-2. You are only increasing on the front and back pieces, the number of sleeve stitches remains the same. On the next row from the wrong side increase for the shoulders as follows: Increase 1 stitch BEFORE markers 4 and 2 and increase 1 stitch AFTER markers 3 and 1 – read INCREASE TIP-3. The increases are different on the right and wrong sides, so the stitches lie neatly. Continue the pattern and increase like this every row (i.e. both from the right and wrong side) a total of 12-16-20-22-24-26 times = 163-183-207-215-227-239 stitches. REMEMBER THE KNITTING TENSION! The increased stitches are worked into A.1, make sure that A.1 fits over the stitches from A.2, A.3 and A.4. After the last increase, the piece measures approx. 4-5-6-7-8-9 cm from the marker on the neck. Now increase for the sleeves as described below. INCREASES FOR SLEEVES: Continue with stocking stitch, pattern as before and 5 band stitches in garter stitch on each side. AT THE SAME TIME on the next row from the right side, increase 4 stitches as follows: Increase 1 stitch AFTER markers 1 and 3 and increase 1 stitch BEFORE markers 2 and 4. You are only increasing on the sleeves and the number of stitches on the front and back pieces remains the same. The increased stitches are worked in stocking stitch. Increase like this every 2nd row (i.e. every row from the right side) a total of 13-17-15-16-18-19 times = 215-251-267-279-299-315 stitches. The piece measures approx. 12-16-15-17-19-21 cm from the marker on the neck. INCREASES FOR YOKE: Now increase 1 stitch on each side of all 4 markers as follows: Work until there is 1 stitch left before markers 1 and 3, increase 1 stitch before the marker, work 1 stitch, move the marker to the right needle and increase 1 stitch after the marker. Work to markers 2 and 4, increase 1 stitch before the marker, move the marker to the right needle, work 1 stitch and increase 1 stitch after the marker (= 8 stitches increased). You are now increasing on both the front and back pieces and on the sleeves. The increased stitches are worked into A.1 on the back/front pieces and in stocking stitch on the sleeves. Increase like this every 2nd row a total of 5-2-2-1-0-0 times = 255-267-283-287-299-315 stitches. When all the increases are finished, the piece measures approx. 15-17-17-18-19-21 cm from the marker on the neck. If the piece is shorter than this, continue working without further increases to the correct length. Now divide the piece for body and sleeves on the next row as follows: Work the first 40-42-45-46-48-51 stitches (front piece), place the next 52-54-56-56-58-60 stitches on a thread for the sleeve, cast on 8-8-8-10-10-10 stitches, work 71-75-81-83-87-93 stitches (= back piece), place the next 52-54-56-56-58-60 stitches on a thread for the sleeve, cast on 8-8-8-10-10-10 stitches, work the last 40-42-45-46-48-51 stitches (= front piece). Body and sleeves are finished separately. THE PIECE IS NOW MEASURED FROM HERE. BODY: = 167-175-187-195-203-215 stitches. Work A.1 back and forth with 5 band stitches in garter stitch on each side; the stitches which do not fit into A.1 in the sides are worked in stocking stitch. Continue working until the piece measures 12-12-15-16-17-17 cm from the division. There is approx. 4 cm left to finished length; try the jacket on and continue to desired length. Knit 1 row from the right side, where you increase 36-36-36-40-44-44 stitches evenly spaced = 203-211-223-235-247-259 stitches. NOTE: You increase stitches here to prevent the rib being tight. Change to circular needle size 2.5 mm and work the next row from the wrong side as follows: 5 band stitches in garter stitch, * purl 1, knit 1 *, work from *-* until there are 6 stitches left, purl 1 and 5 band stitches in garter stitch. Continue this rib for 4 cm. Cast off with garter stitch over garter stitch, knit over knit and purl over purl – read CASTING-OFF TIP! The jacket measures approx. 34-36-40-42-44-46 cm from the shoulder down. SLEEVES: Place the 52-54-56-56-58-60 stitches from the thread on the one side of the piece on short circular needle/double pointed needles size 3 mm and knit up 1 stitch in each of the 8-8-8-10-10-10 stitches cast on under the sleeve = 60-62-64-66-68-70 stitches. Insert a marker thread in the middle of the new stitches under the sleeve. Start at the marker thread and work stocking stitch in the round. Continue working until the sleeve measures 5-6-10-13-15-17 cm from the division, There is approx. 4 cm left to finished length; try the jacket on and continue to desired length. Knit 1 round where you decrease 4 stitches evenly spaced = 56-58-60-62-64-66 stitches. Change to double pointed needles size 2.5 mm and work rib (knit 1, purl 1) for 4 cm. Cast off with knit over knit and purl over purl – remember CASTING-OFF TIP! The sleeve measures approx. 9-10-14-17-19-21 cm from the division. Work the other sleeve in the same way. ASSEMBLY: Sew the buttons onto the left band. |
|||||||||||||||||||||||||
Diagram explanations |
|||||||||||||||||||||||||
|
|||||||||||||||||||||||||
 |
|||||||||||||||||||||||||
 |
|||||||||||||||||||||||||
 |
|||||||||||||||||||||||||
 |
|||||||||||||||||||||||||
Have you finished this pattern?Tag your pictures with #dropspattern #pinkpeonycardigan or submit them to the #dropsfan gallery. Do you need help with this pattern?You'll find 29 tutorial videos, a Comments/Questions area and more by visiting the pattern on garnstudio.com. © 1982-2026 DROPS Design A/S. We reserve all rights. This document, including all its sub-sections, has copyrights. Read more about what you can do with our patterns at the bottom of each pattern on our site. |
|||||||||||||||||||||||||


With over 40 years in knitting and crochet design, DROPS Design offers one of the most extensive collections of free patterns on the internet - translated to 17 languages. As of today we count 324 catalogues and 12290 patterns translated into English (UK/cm). 12290
We work hard to bring you the best knitting and crochet have to offer, inspiration and advice as well as great quality yarns at incredible prices! Would you like to use our patterns for other than personal use? You can read what you are allowed to do in the Copyright text at the bottom of all our patterns. Happy crafting!
Post a comment to pattern DROPS Baby & Children 38-22
We would love to hear what you have to say about this pattern!
If you want to leave a question, please make sure you select the correct category in the form below, to speed up the answering process. Required fields are marked *.