
Popular categories
Looking for a yarn?


Comments / Questions (79)
![]() Terry wrote:
Terry wrote:
Xche non ci sono i video come gli altri modelli su questa maglia 212-39 ? Non capisco il suggerimento 1 x aumentare?grazie
19.05.2024 - 19:46DROPS Design answered:
Buonasera Terry, il suggerimento 1 indica di aumentare le maglie facendo 1 gettato. Buon lavoro!
20.05.2024 - 23:23
![]() Franziska wrote:
Franziska wrote:
Guten Tag, In der passe stebt, nach a3 kommt A380. Dann x Maschen auf der Nadel und im Muster wie zuvor weiterstricken, bis die Arbeit eine Länge von 18cm hat. Welches Muster ist denn nun hier gemeint? A3a und a3b sind doch nun fertig… Und mir ist ein Fehler unterlaufen.. ich habe beim ersten Mal a1b, a2b und a4b direkt raufgesetzt. Kann ich nun wie beschrieben nur a1a etc stricken oder fällt der Fehler zu sehr auf und ich muss meine Arbeit neu machen? Was meinen Sie?
18.03.2024 - 20:55DROPS Design answered:
Liebe Franziska, Diagramme A.1a, A.2a und A.4a werden in der Höhe wiederholt, dann wenn A.3a gestrickt wird, wird man A.3b stricken und wiederholen, A.1b, A.2b und A.4b wird man erst nach der Verteilung stricken. Viel Spaß beim Stricken!
19.03.2024 - 11:06
![]() Cait wrote:
Cait wrote:
Thank you so much for your prompt reply. It is much appreciated 😊
05.03.2024 - 09:30
![]() Cait wrote:
Cait wrote:
When working from diagram, e.g. A1, k1, p2, inc., p2, k1. This is row 1. Is the next row on the diagram row 2, wrong side, the return row or row 3, the right side?
05.03.2024 - 08:26DROPS Design answered:
Dear Cait, diagrams show all rows, the RS and the WS rows; rows from WS are read from the left towards the right, so that, on row 2 in A.1 work; P1, K2, P3, K2, P1. Happy knitting!
05.03.2024 - 09:23
![]() Cait wrote:
Cait wrote:
What does the symbol that looks like 0 between two squares mean
01.03.2024 - 12:57DROPS Design answered:
Dear Cait, this symbol is for a yarn over, see 6th and 7th symbol under diagram text; the 6th symbol = white 0 will be worked in the front loop of stitch on next row to make a hole; the 7th symbol = black 0 will be worked twisted on next row to avoid a hole. Happy knitting!
01.03.2024 - 14:31
![]() Stefanie wrote:
Stefanie wrote:
Hallo, ich habe nun die Blende gestrickt und würde bei der passe anfangen, allerdings frage ich mich, wie die rückreihe geht. Ich bin in der ersten Reihe von A1, die Hin Reihe ist klar, aber stricke ich den Teil, wo ich die drei Maschen gestrickt habe und zwei zugenommen habe, in der Rückreihe rechts?
20.02.2024 - 10:30DROPS Design answered:
Liebe Stefanie, die Rückreihe werden auch im Diagram gezeichnet, die lesen Sie aber links nach rechts, so bei der 2. Reihe A.1 stricken Sie: 1 M links, 2 M rechts, 3 M links, 2 M rechts, 1 M links. Viel Spaß beim stricken!
20.02.2024 - 15:39
![]() Diana wrote:
Diana wrote:
Hola, estoy haciendo un modelo talla L. No me queda claro cuántas veces hay que hacer los aumentos del raglán para llegar a los 401 puntos.
30.08.2023 - 04:11DROPS Design answered:
Hola Diana, en la primera fila de los diagramas A.1, A.2 y A.4 aumentas 2 puntos en cada repetición. Por lo tanto, partes de 137+8 aumentos de A.1, 4 aumentos de A.2 y 4 aumentos de A.4 en total en la vuelta = 153 puntos. Aparte de esto, tienes 12 aumentos en el diagrama A.3a en total en cada repetición, a medida que vas trabajando el diagrama. Con esto tendrías: 153 + 24 = 177 puntos. A estos puntos les sumas las 28 filas con 8 aumentos para el raglán en cada (224). 224+ 177 = 401 puntos.
03.09.2023 - 19:13
![]() Bernadette Durandiere wrote:
Bernadette Durandiere wrote:
Bonjour, n'y a-t-il pas un oubli de maille sur votre graphique A4 b ? il y a une augmentation à la 9ème ligne du diagramme mais elle n'apparaît pas au dessus contrairement au diag. A2 b en haut à gauche ? je ne suis pas encore arrivée à ce niveau (commencé avant-hier) mais je voudrais en avoir le coeur net. Merci
04.05.2023 - 16:21DROPS Design answered:
Bonjour Mme Durandiere, il semble effectivement qu'il manque une maille dans A.4b après l'augmentation - cette maille doit se tricoter à l'endroit, comme l'augmentation de A.2b, merci pour votre retour, nos stylistes vont vérifier et corriger cela le plus vite possible. Bon tricot!
05.05.2023 - 07:57
![]() Anni wrote:
Anni wrote:
200 g garn til str. L er for lidt. Jeg brugte 250 g.
28.03.2023 - 18:38
![]() Chantal Bonneton wrote:
Chantal Bonneton wrote:
Bonjour, J’ai une question concernant les augmentations du raglan : lorsque vous dites « augmenter 28 fois tous les 2 rangs » faut-il compter le rang envers - comme dans tous les tricots, et qui n’apparaît pas dans les diagrammes- où est-ce tous les 2 rangs endroit du diagramme. Et là, ce ne serait plus tous les 2 rangs, mais tous les 4 rangs ? Merci beaucoup pour votre réponse. Chantal
27.05.2022 - 09:17DROPS Design answered:
Bonjour Mme Bonneton, quand on doit augmenter pour le raglan tous les 2 rangs, on augmente tous les rangs sur l'endroit (= 1 rang sur l'endroit avec augmentation, 1 rang sur l'envers sans augmentation, et on répète ces 2 rangs) ; quand on doit augmenter tous les 4 rangs, on augmente tous les 2 rangs sur l'endroit (=1 rang sur l'endroit avec augmentation, 1 rang sur l'envers+1 sur l'endroit+1 sur l'endroit sans augmenter à chacun de ces 3 rangs et on répète ces 4 rangs). Bon tricot!
27.05.2022 - 09:31
|
|||||||||||||||||||||||||||||||
Springs Surrender Jacket#springssurrenderjacket |
|||||||||||||||||||||||||||||||
 |
 |
||||||||||||||||||||||||||||||
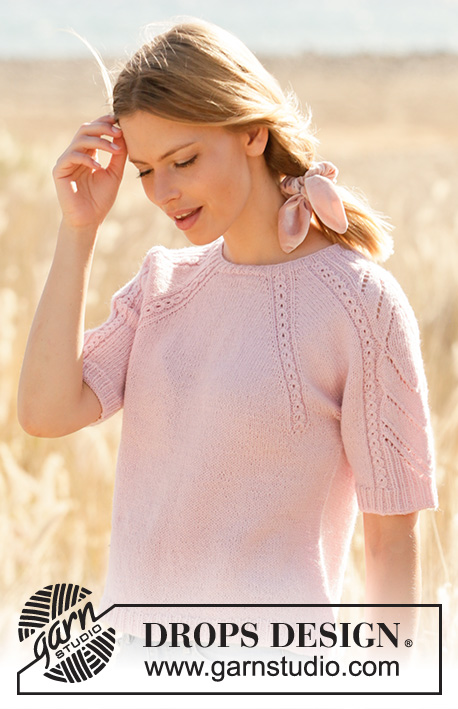
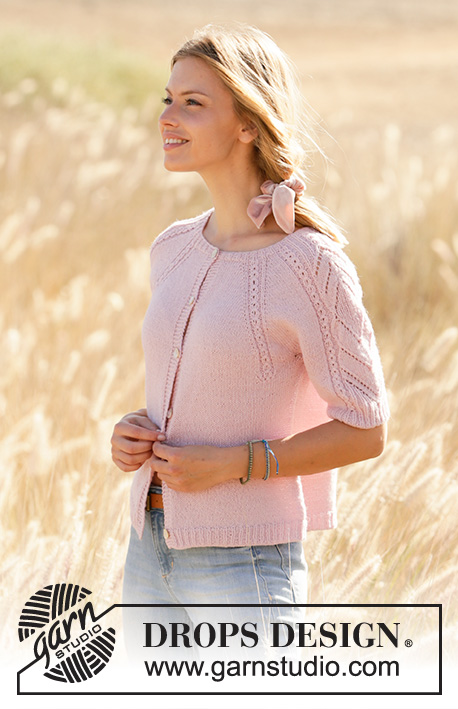
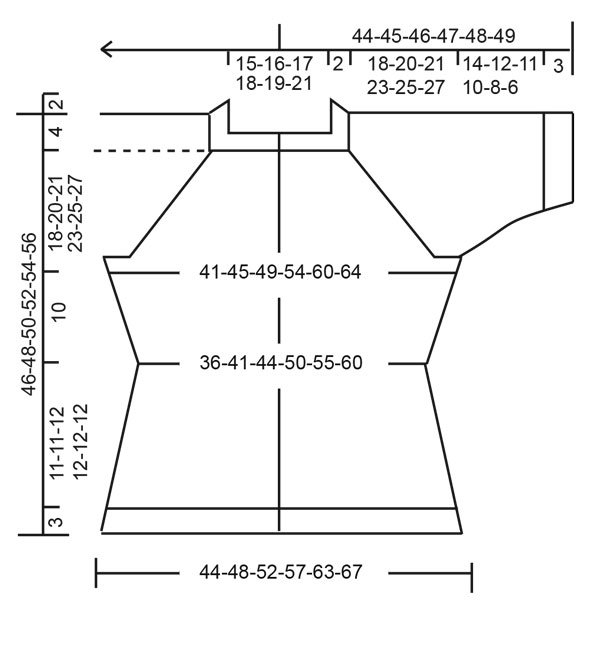
Knitted jacket with raglan in DROPS Alpaca. Piece is knitted top down with lace pattern and short sleeves. Size: S - XXXL
DROPS 212-39 |
|||||||||||||||||||||||||||||||
|
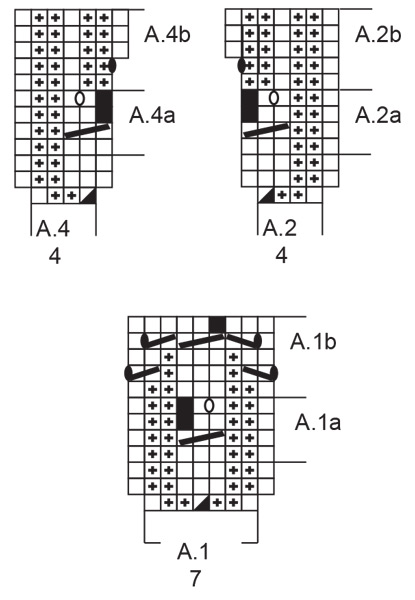
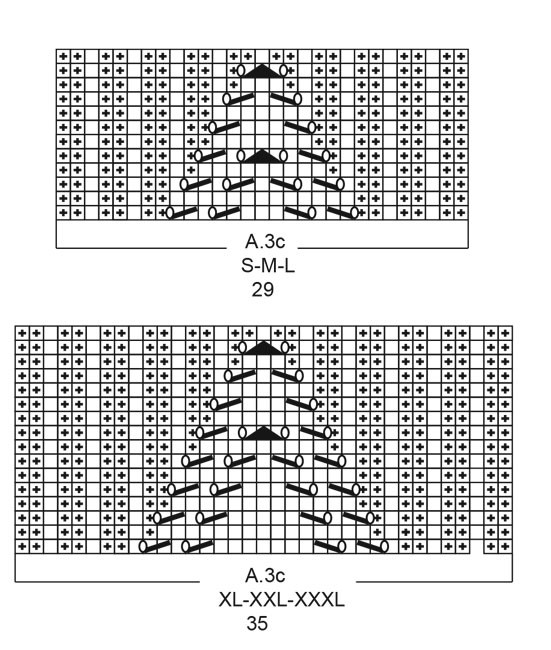
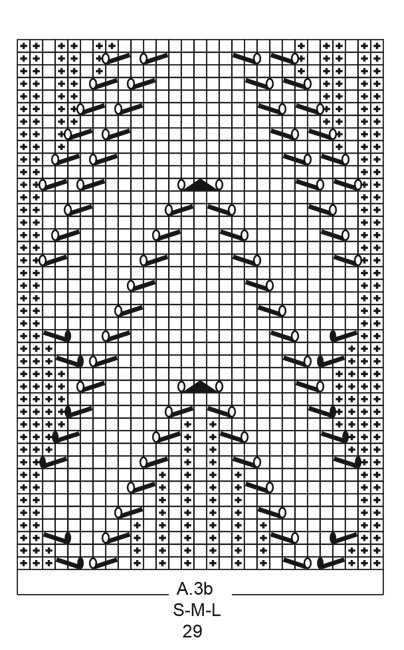
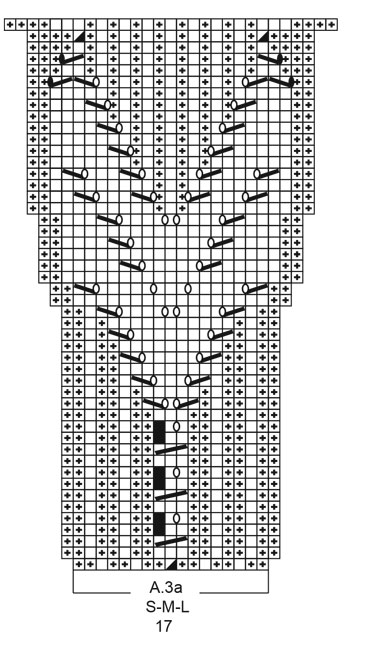
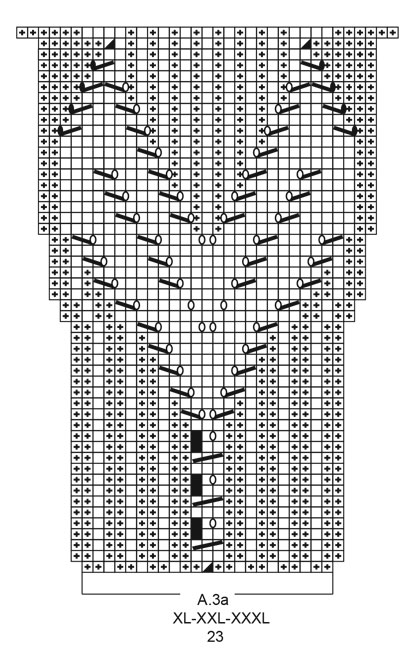
---------------------------------------------------------- EXPLANATION FOR THE PATTERN: ---------------------------------------------------------- GARTER STITCH (back and forth): Knit all rows. 1 ridge vertically = knit 2 rows. PATTERN: See diagrams A.1 to A.4. Choose diagram for your size. Diagrams show all rows in pattern seen from the right side. INCREASE TIP-1 (applies to raglan): All increases are done on a row from right side. Increase 1 stitch by making 1 yarn over between 2 stitches. On next row purl yarn over twisted to avoid hole. Then work the new stitches in stocking stitch. INCREASE TIP-2 (applies to sides of body): All increases are done on a row from right side. Work until 2 stitches remain before marker thread, 1 yarn over, knit 4 (marker thread is in the middle of these stitches), 1 yarn over. On next row purl yarn overs twisted to avoid holes. Then work the new stitches in stocking stitch. DECREASE TIP (applies to side on body and sleeves): All decreases are done on a row from right side. Decrease 1 stitch on each side of marker thread as follows: Work until 3 stitches remain before marker thread and knit 2 together, knit 2 (marker thread is between these stitches), slip 1 stitch knitwise, knit 1, pass slipped stitch over stitch worked. NUMBER OF STITCHES: As both increases and decreases are done in A.1a, A.2a, A.3a and A.4a, number of stitches vary according to which row it is counted on (depending on you are increasing/decreasing in pattern). CAST-OFF TIP: To avoid a tight cast-off edge you may use a larger needle. If this also is too tight, make 1 yarn over after approx. every 4th stitch and cast off these as regular stitches. BUTTONHOLES: Decrease for buttonholes on right band (when garment is worn). Decrease from right side when 3 stitches remain on row as follows: Make 1 yarn over, knit the next 2 stitches together, knit last stitch. On next row knit yarn over to make holes. Decrease first buttonhole when neck edge measures approx. 1½-2 cm. Then decrease the next 5-5-5-5-6-6, approx. 8-8½-8½-9-8-8 cm apart. ---------------------------------------------------------- START THE PIECE HERE: ---------------------------------------------------------- JACKET - SHORT OVERVIEW OF THE PIECE: Work neck edge and yoke back and forth on circular needle from mid front, top down. Now divide yoke for body and sleeves. Work body back and forth on circular needle, top down. Work sleeves in the round on double pointed needles, top down. NECK EDGE: Cast on 119-131-137-143-146-155 stitches (including 5 band stitches in each side towards mid front) on circular needle size 2.5 mm with Alpaca. Purl 1 row (= wrong side). Work next row as follows from right side: Work 5 band stitches in GARTER STITCH - read explanation above, * knit 1, purl 2 *, work from *-* until 6 stitches remain, knit 1 and finish with 5 band stitches in garter stitch. Decrease for BUTTONHOLES - read explanation above. Continue rib like this for 2 cm. Switch to circular needle size 3 mm. Insert 1 marker after band at the beginning of row mid front, measure yoke from this marker! YOKE: Now work as follows from right side: Left front piece: Work 5 band stitches in garter stitch, 6-9-9-9-9-12 stitches in stocking stitch, A.1 (= 7 stitches). Left sleeve: Work 2 stitches in stocking stitch, A.2 (= 4 stitches), A.3a (= 17-17-17-23-23-23 stitches), A.4 (= 4 stitches), 2 stitches in stocking stitch. Back piece: Work A.1 over 7 stitches, 11-17-23-17-20-23 stitches in stocking stitch, A.1 over 7 stitches. Right sleeve: Work 2 stitches in stocking stitch, A.2 over 4 stitches, A.3a over 17-17-17-23-23-23 stitches, A.4 over 4 stitches, 2 stitches in stocking stitch. Right front piece: Work A.1 over 7 stitches, 6-9-9-9-9-12 stitches in stocking stitch and finish with 5 band stitches in garter stitch. On next row from right side increase for raglan on each side of every A.1 – read INCREASE TIP-1 (= 8 stitches increased). REMEMBER THE KNITTING TENSION! Increase like this every other row 22-24-28-33-37-40 times in total. When the first 3 rows in pattern A.1, A.2 and A.4 has been worked, repeat A.1a, A.2a and A.4a in height. When A.3a has been worked 1 time vertically, work A.3b (= 29-29-29-35-35-35 stitches) over A.3a. When increase for raglan is done, there are 335-363-401-447-482-515 stitches on needle – read NUMBER OF STITCHES. Work in the established pattern until piece measures 18-20-21-23-25-27 cm from marker. Adjust so that next row is a row with total number of stitches (i.e. 335-363-401-447-482-515 stitches), this because number of stitches can vary because of decreases/increases in diagrams. On next row divide piece for body and sleeves as follows: Work over the first 50-55-59-66-72-77 stitches as before, slip the next 73-77-87-97-101-107 stitches on a stitch holder for sleeve and cast on 8 stitches under sleeve, work over the next 89-99-109-121-136-147 stitches, slip the next 73-77-87-97-101-107 stitches on a stitch holder for sleeve and cast on 8 stitches under sleeve and work the last 50-55-59-66-72-77 stitches. BODY: = 205-225-243-269-296-317 stitches. Insert 1 marker thread after 54-59-63-70-76-81 stitches in from each side (= in the side of body). There are 97-107-117-129-144-155 stitches between marker threads on back piece. Move the marker threads upwards when working; they should be used for increase and decrease later in the sides. When last repetition of A.1a from the yoke has been worked vertically, work A.1b over every A.1a. When A.1b has been worked 1 time vertically, there are 201-221-239-265-292-313 stitches on needle. Work in stocking stitch with 5 band stitches in garter stitch in each side. When piece measures 2 cm from division, decrease 1 stitch on each side of the marker thread in each side - read DECREASE TIP (= 4 stitches decreased). Decrease like this every 2 cm 4 times in total = 185-205-223-249-276-297 stitches. When piece measures 10 cm from division, increase 1 stitch on each side of marker threads in the sides - read INCREASE TIP-2(= 4 stitches increased). Increase like this every cm 9 times in total = 221-241-259-285-312-333 stitches. When piece measures 21-21-22-22-22-22 cm from division, increase 12-13-13-14-14-14 stitches evenly = 233-254-272-299-326-347 stitches. Switch to circular needle size 2.5 mm and work from right side as follows: Work 5 band stitches in garter stitch, * knit 1, purl 2 *, repeat from *-* until 6 stitches remain, finish with knit 1 and 5 band stitches in garter stitch. When piece measures 24-24-25-25-25-25 cm from division, cast off all stitches by knitting from right side - read CAST-OFF TIP. SLEEVES: Slip the 73-77-87-97-101-107 stitches from stitch holder in one side of piece on double pointed needles size 3 mm and pick up 1 new stitch in each of the 8 stitches cast on under sleeve = 81-85-95-105-109-115 stitches – remember number of stitches. Insert 1 marker thread in the middle of the 8 new stitches. Move the marker thread upwards when working; it should be used for decrease mid under sleeve. READ ALL OF THE FOLLOWING SECTION BEFORE CONTINUING! Work pattern and decrease stitches mid under sleeve as follows: Work A.2a, A.3b and A.4a over the middle stitches, knit the remaining stitches. When A.3b has been worked, work A.3c over A.3b. When sleeve measures 1 cm from division, decrease 1 stitch on each side of marker thread (= 2 stitches decreased). Decrease like this every cm 3-3-3-3-5-5 times in total, then decrease every other cm 2-2-2-2-0-0 times in total = 71-75-85-95-99-105 stitches. On last round in A.3c increase 0-1-2-0-1-1 stitches before pattern, and 2-0-1-2-0-0 stitches after the pattern = 73-76-88-97-100-106 stitches. When A.3c has been worked 1 time vertically, piece measures approx. 14-12-11-10-8-6 cm from division. Switch to double pointed needles size 2.5 mm. Work next round as follows: * Knit 1, purl 2 *, work from *-* over the first 15-18-24-24-27-30 stitches, A.2b over A.2a, continue with knit over knit and purl over purl over stitches in A.3c, A.4b over A.4a, * purl 2, knit 1 *, work from *-* over 15-15-21-24-24-27 stitches and finish with purl 2 = 75-78-90-99-102-108 stitches. Continue with knit over knit and purl over purl until piece measures 17-15-14-13-11-9 cm from division, then cast off by knitting. Work the other sleeve the same way. ASSEMBLY: Sew the buttons on to the left band. |
|||||||||||||||||||||||||||||||
Diagram explanations |
|||||||||||||||||||||||||||||||
|
|||||||||||||||||||||||||||||||
 |
|||||||||||||||||||||||||||||||
 |
|||||||||||||||||||||||||||||||
 |
|||||||||||||||||||||||||||||||
 |
|||||||||||||||||||||||||||||||
 |
|||||||||||||||||||||||||||||||
 |
|||||||||||||||||||||||||||||||
 |
|||||||||||||||||||||||||||||||
Have you finished this pattern?Tag your pictures with #dropspattern #springssurrenderjacket or submit them to the #dropsfan gallery. Do you need help with this pattern?You'll find 29 tutorial videos, a Comments/Questions area and more by visiting the pattern on garnstudio.com. © 1982-2026 DROPS Design A/S. We reserve all rights. This document, including all its sub-sections, has copyrights. Read more about what you can do with our patterns at the bottom of each pattern on our site. |
|||||||||||||||||||||||||||||||


With over 40 years in knitting and crochet design, DROPS Design offers one of the most extensive collections of free patterns on the internet - translated to 17 languages. As of today we count 324 catalogues and 12290 patterns translated into English (UK/cm). 12290
We work hard to bring you the best knitting and crochet have to offer, inspiration and advice as well as great quality yarns at incredible prices! Would you like to use our patterns for other than personal use? You can read what you are allowed to do in the Copyright text at the bottom of all our patterns. Happy crafting!
Post a comment to pattern DROPS 212-39
We would love to hear what you have to say about this pattern!
If you want to leave a question, please make sure you select the correct category in the form below, to speed up the answering process. Required fields are marked *.