
Popular categories
Looking for a yarn?


Comments / Questions (79)
![]() Elisabeth MARIE wrote:
Elisabeth MARIE wrote:
Bonjour. Je souhaite faire ce modèle. Avant de commencer j'aimerais être certaine de ne pas me tromper. Les diagrammes représentent tous les rangs ou uniquement les rangs impairs (endroit du tricot) ? Merci d'avance
07.01.2026 - 20:37DROPS Design answered:
Bonjour Mme Marie, tous les rangs sont représentés dans les diagrammes, lisez-le de bas en haut et de droite à gauche sur l'endroit, de gauche à droite sur l'envers. retrouvez plus d'infos ici. Bon tricot!
08.01.2026 - 09:39
![]() Silvie wrote:
Silvie wrote:
Hello, can you please advise on the raglan increase? You write "Increase like this every other row 22-24-28-33-37-40 times in total." Do you mean every other row (it means every other row counting all - so I would increase every row on the right side - exactly every 2nd row) or every other row on the right side (meaning every 4th row). Thank you.
09.07.2025 - 23:34DROPS Design answered:
Hello Silvia, yes, increase exacatly every other (= 2nd) row, i.e. every row from RS. Happy knitting! Dobrý den, Silvie, ano, přidáváme v každé 2. řadě, tj. v každé lícové. Hodně zdaru! Hana
14.07.2025 - 05:20
![]() Wies wrote:
Wies wrote:
Over patroon 212-39 Op de 4e blz van het patroon staat dat je nadat de eerste 3 naalden in patroon A.1a, A2a en A4a gebreid zijn moet je A1a, A2a en A4a in de hoogte herhalen. Het zijn steeds 4 nld in de hoogte. Welke moet ik dan herhalen? Snap niet zo goed vanaf waar ik welke naalden moet herhalen. Vindt het een super mooi vest welke ik graag wil maken. Groetjes Wies.
08.06.2025 - 17:12DROPS Design answered:
Dag Wies,
Je herhaalt inderdaad steeds die 4 naalden in de hoogte, dus A.1a, A.2a en A.4a. (A.1b, A.2b en A.4b doe je nu even niks mee.
09.06.2025 - 09:22
![]() Tone wrote:
Tone wrote:
Kommentar til mitt tidligere spørsmål: Glem det, skjønte plutselig at jeg tenker motsatt av hvordan det blir når man strikker ovenfra og ned..
16.03.2025 - 11:07
![]() Tone wrote:
Tone wrote:
Det står at knappestolpe skal være på høyre stolpe, og at det skal felles av fra retten? Da blir det vel på venstre stolpe når du tar plagget på?? Siden dere allerede har svart at vrangen strikkes fra venstre mot høyre... evt må man jo felle av til knappestolpe fra vrangen for å få det på høyre side?
16.03.2025 - 10:43
![]() Tanja wrote:
Tanja wrote:
Wie müssen die Rückreihen der Musterdiagramme gestrickt werden? So wie sie in Rückreihe erscheinen? Oder ist die 2.,4 ,6. ff. Reihe immer die Rückreise? Ergibt für mich aber nicht das Muster
12.03.2025 - 11:58DROPS Design answered:
Liebe Tanja, Rückreihen stricken Sie genauso wie in den Diagrammen gezeigt, dh 2. 4.6. usw Reihe sind die Rückreihen, die werden links nach rechts gelesen. Viel Spaß beim Stricken!
14.03.2025 - 08:22
![]() Tanya wrote:
Tanya wrote:
Hur ska man sticka det här i A3a? \"= sticka 3 rätmaskor, lyft den första maskan som stickades över de 2 andra så att denna maskan ligger runt de 2 andra maskorna (= 1 maska minskad), verkligen oklart!!! Tack för hjällpen
16.07.2024 - 16:33DROPS Design answered:
Hej Tanya. Du gör på samma sätt som när du lyfter en maska över till höger sticka, stickar 2 maskor och drar maskan över de stickade maskorna (se gärna våra videor på det), men nu stickar du även första maskan och drar den över de andra 2 stickade maskorna. Mvh DROPS Design
17.07.2024 - 11:55
![]() Martine wrote:
Martine wrote:
Bonjour, Je commence le pull que je trouve très beau, (merci pour le modèle) et lorsque je calcule les augmentations de l'empiècement, je me retrouve avec un total de 339 m au lieu de 335 (119m + 176 aug. + 20 m du 1er rg + 20 m pour a3 + 4m pour a2 et a4. pour la taille S. Me suis-je trompée quelque part? merci de votre aide et bonne journée.
13.07.2024 - 17:14DROPS Design answered:
Bonjour Martine, vous augmentez également 2 x 12 mailles dans chaque A.3, vous aurez ainsi: 119 m + 176 m de raglan + 8 m augmentées dans A.1 + 4 m augmentées dans A.2 et A.3 et 24 m augmentées dans A.3 soit 40 m dans les diagrammes, on a ainsi: 119+176+40=335 mailles. Bon tricot!
29.07.2024 - 09:59
![]() Martine wrote:
Martine wrote:
Bonjour, Je commence le pull que je trouve très beau, (merci pour le modèle) et lorsque je calcule les augmentations de l'empiècement, je me retrouve avec un total de 339 m au lieu de 335 (119m + 176 aug. + 20 m du 1er rg + 20 m pour a3 + 4m pour a2 et a4. pour la taille S. Me suis-je trompée quelque part? merci de votre aide et bonne journée
11.07.2024 - 11:34
![]() Terry wrote:
Terry wrote:
Buonasera purtroppo non mi viene il diagramma A1a rifatto un sacco di volte non mi risulta come la foto ho addirittura pensato che il diagramma è un ferro andata e uno di ritorno se mi potete aiutare grazie
22.05.2024 - 00:49DROPS Design answered:
Buonasera Terry, i diagrammi mostrano tutti i ferri di andata e ritorno. Buon lavoro!
22.05.2024 - 23:27
|
|||||||||||||||||||||||||||||||
Springs Surrender Jacket#springssurrenderjacket |
|||||||||||||||||||||||||||||||
 |
 |
||||||||||||||||||||||||||||||
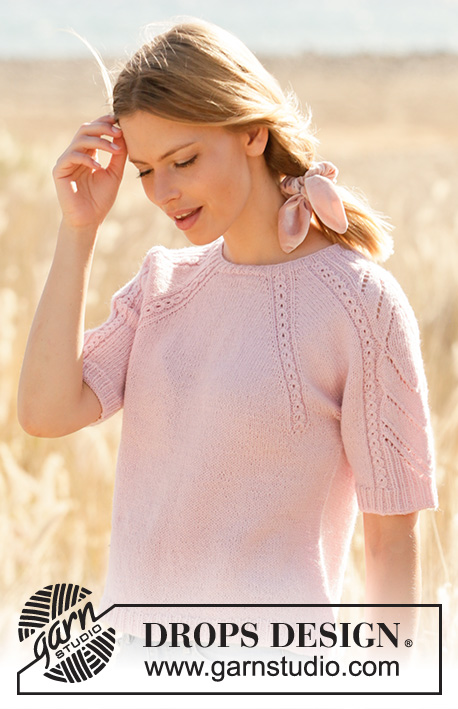
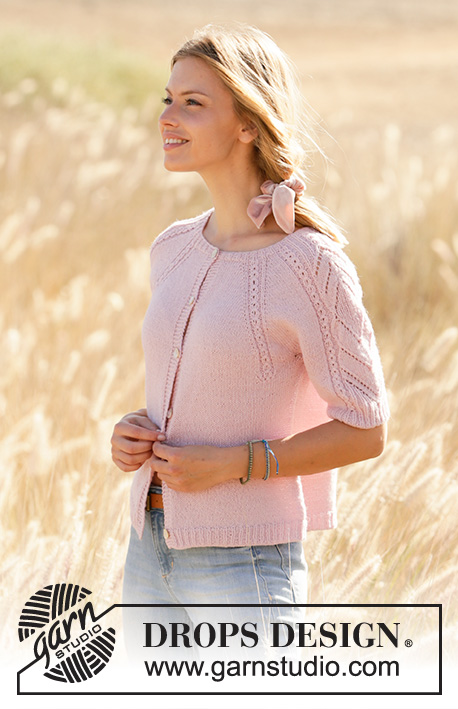
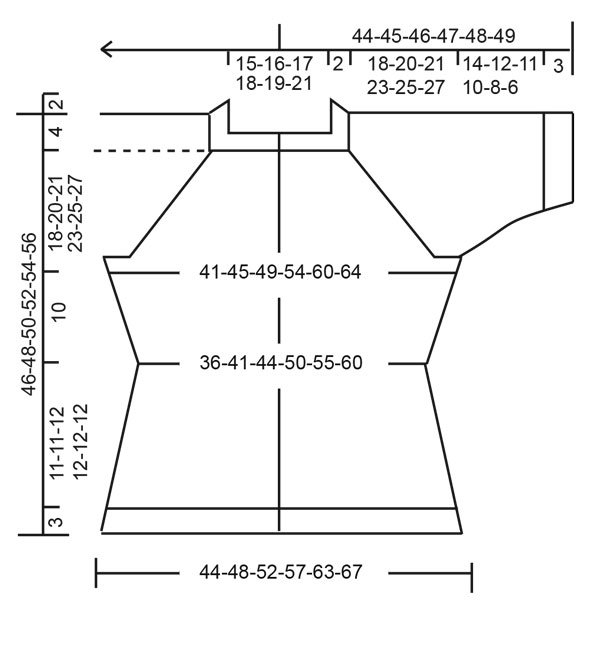
Knitted jacket with raglan in DROPS Alpaca. Piece is knitted top down with lace pattern and short sleeves. Size: S - XXXL
DROPS 212-39 |
|||||||||||||||||||||||||||||||
|
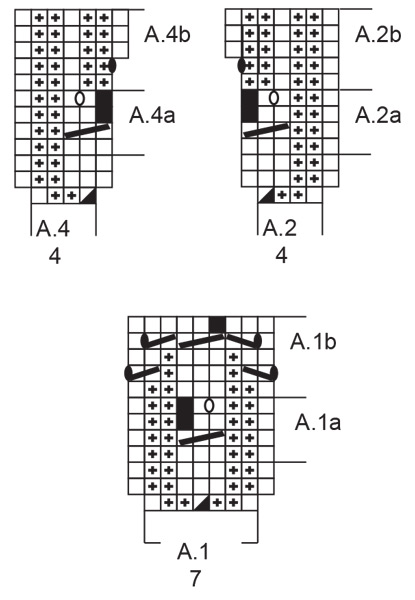
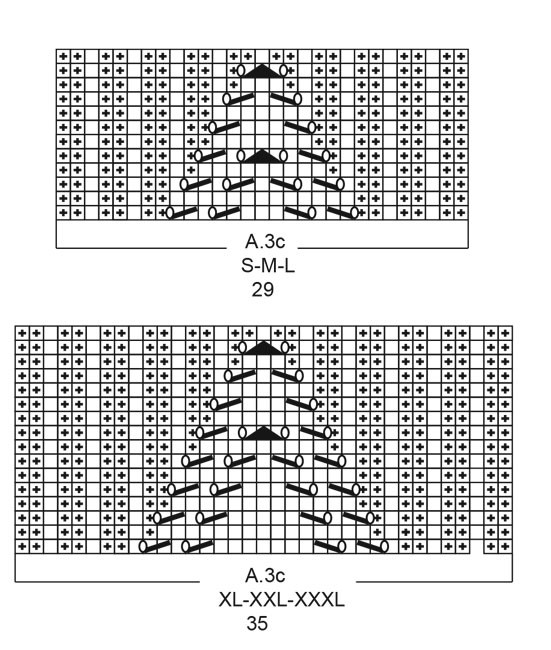
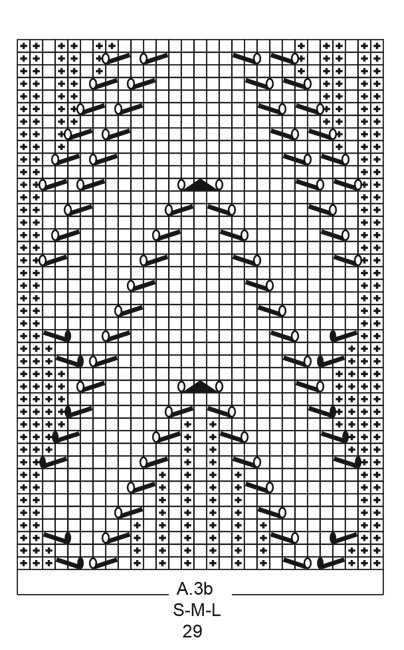
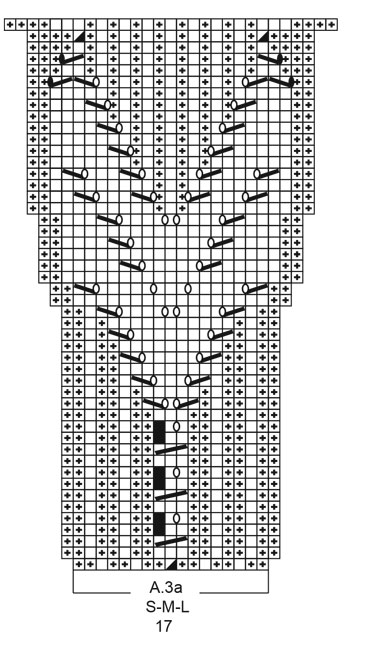
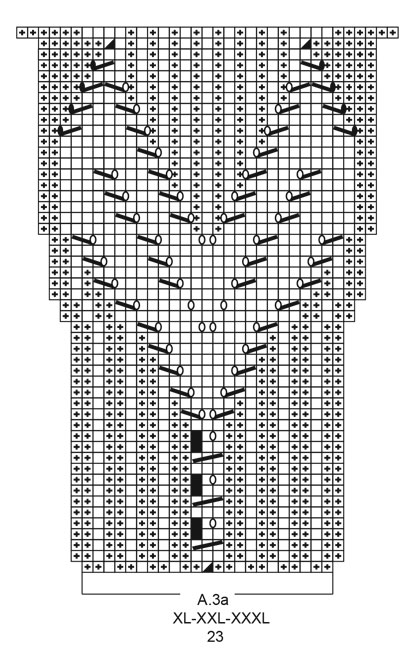
---------------------------------------------------------- EXPLANATION FOR THE PATTERN: ---------------------------------------------------------- GARTER STITCH (back and forth): Knit all rows. 1 ridge vertically = knit 2 rows. PATTERN: See diagrams A.1 to A.4. Choose diagram for your size. Diagrams show all rows in pattern seen from the right side. INCREASE TIP-1 (applies to raglan): All increases are done on a row from right side. Increase 1 stitch by making 1 yarn over between 2 stitches. On next row purl yarn over twisted to avoid hole. Then work the new stitches in stocking stitch. INCREASE TIP-2 (applies to sides of body): All increases are done on a row from right side. Work until 2 stitches remain before marker thread, 1 yarn over, knit 4 (marker thread is in the middle of these stitches), 1 yarn over. On next row purl yarn overs twisted to avoid holes. Then work the new stitches in stocking stitch. DECREASE TIP (applies to side on body and sleeves): All decreases are done on a row from right side. Decrease 1 stitch on each side of marker thread as follows: Work until 3 stitches remain before marker thread and knit 2 together, knit 2 (marker thread is between these stitches), slip 1 stitch knitwise, knit 1, pass slipped stitch over stitch worked. NUMBER OF STITCHES: As both increases and decreases are done in A.1a, A.2a, A.3a and A.4a, number of stitches vary according to which row it is counted on (depending on you are increasing/decreasing in pattern). CAST-OFF TIP: To avoid a tight cast-off edge you may use a larger needle. If this also is too tight, make 1 yarn over after approx. every 4th stitch and cast off these as regular stitches. BUTTONHOLES: Decrease for buttonholes on right band (when garment is worn). Decrease from right side when 3 stitches remain on row as follows: Make 1 yarn over, knit the next 2 stitches together, knit last stitch. On next row knit yarn over to make holes. Decrease first buttonhole when neck edge measures approx. 1½-2 cm. Then decrease the next 5-5-5-5-6-6, approx. 8-8½-8½-9-8-8 cm apart. ---------------------------------------------------------- START THE PIECE HERE: ---------------------------------------------------------- JACKET - SHORT OVERVIEW OF THE PIECE: Work neck edge and yoke back and forth on circular needle from mid front, top down. Now divide yoke for body and sleeves. Work body back and forth on circular needle, top down. Work sleeves in the round on double pointed needles, top down. NECK EDGE: Cast on 119-131-137-143-146-155 stitches (including 5 band stitches in each side towards mid front) on circular needle size 2.5 mm with Alpaca. Purl 1 row (= wrong side). Work next row as follows from right side: Work 5 band stitches in GARTER STITCH - read explanation above, * knit 1, purl 2 *, work from *-* until 6 stitches remain, knit 1 and finish with 5 band stitches in garter stitch. Decrease for BUTTONHOLES - read explanation above. Continue rib like this for 2 cm. Switch to circular needle size 3 mm. Insert 1 marker after band at the beginning of row mid front, measure yoke from this marker! YOKE: Now work as follows from right side: Left front piece: Work 5 band stitches in garter stitch, 6-9-9-9-9-12 stitches in stocking stitch, A.1 (= 7 stitches). Left sleeve: Work 2 stitches in stocking stitch, A.2 (= 4 stitches), A.3a (= 17-17-17-23-23-23 stitches), A.4 (= 4 stitches), 2 stitches in stocking stitch. Back piece: Work A.1 over 7 stitches, 11-17-23-17-20-23 stitches in stocking stitch, A.1 over 7 stitches. Right sleeve: Work 2 stitches in stocking stitch, A.2 over 4 stitches, A.3a over 17-17-17-23-23-23 stitches, A.4 over 4 stitches, 2 stitches in stocking stitch. Right front piece: Work A.1 over 7 stitches, 6-9-9-9-9-12 stitches in stocking stitch and finish with 5 band stitches in garter stitch. On next row from right side increase for raglan on each side of every A.1 – read INCREASE TIP-1 (= 8 stitches increased). REMEMBER THE KNITTING TENSION! Increase like this every other row 22-24-28-33-37-40 times in total. When the first 3 rows in pattern A.1, A.2 and A.4 has been worked, repeat A.1a, A.2a and A.4a in height. When A.3a has been worked 1 time vertically, work A.3b (= 29-29-29-35-35-35 stitches) over A.3a. When increase for raglan is done, there are 335-363-401-447-482-515 stitches on needle – read NUMBER OF STITCHES. Work in the established pattern until piece measures 18-20-21-23-25-27 cm from marker. Adjust so that next row is a row with total number of stitches (i.e. 335-363-401-447-482-515 stitches), this because number of stitches can vary because of decreases/increases in diagrams. On next row divide piece for body and sleeves as follows: Work over the first 50-55-59-66-72-77 stitches as before, slip the next 73-77-87-97-101-107 stitches on a stitch holder for sleeve and cast on 8 stitches under sleeve, work over the next 89-99-109-121-136-147 stitches, slip the next 73-77-87-97-101-107 stitches on a stitch holder for sleeve and cast on 8 stitches under sleeve and work the last 50-55-59-66-72-77 stitches. BODY: = 205-225-243-269-296-317 stitches. Insert 1 marker thread after 54-59-63-70-76-81 stitches in from each side (= in the side of body). There are 97-107-117-129-144-155 stitches between marker threads on back piece. Move the marker threads upwards when working; they should be used for increase and decrease later in the sides. When last repetition of A.1a from the yoke has been worked vertically, work A.1b over every A.1a. When A.1b has been worked 1 time vertically, there are 201-221-239-265-292-313 stitches on needle. Work in stocking stitch with 5 band stitches in garter stitch in each side. When piece measures 2 cm from division, decrease 1 stitch on each side of the marker thread in each side - read DECREASE TIP (= 4 stitches decreased). Decrease like this every 2 cm 4 times in total = 185-205-223-249-276-297 stitches. When piece measures 10 cm from division, increase 1 stitch on each side of marker threads in the sides - read INCREASE TIP-2(= 4 stitches increased). Increase like this every cm 9 times in total = 221-241-259-285-312-333 stitches. When piece measures 21-21-22-22-22-22 cm from division, increase 12-13-13-14-14-14 stitches evenly = 233-254-272-299-326-347 stitches. Switch to circular needle size 2.5 mm and work from right side as follows: Work 5 band stitches in garter stitch, * knit 1, purl 2 *, repeat from *-* until 6 stitches remain, finish with knit 1 and 5 band stitches in garter stitch. When piece measures 24-24-25-25-25-25 cm from division, cast off all stitches by knitting from right side - read CAST-OFF TIP. SLEEVES: Slip the 73-77-87-97-101-107 stitches from stitch holder in one side of piece on double pointed needles size 3 mm and pick up 1 new stitch in each of the 8 stitches cast on under sleeve = 81-85-95-105-109-115 stitches – remember number of stitches. Insert 1 marker thread in the middle of the 8 new stitches. Move the marker thread upwards when working; it should be used for decrease mid under sleeve. READ ALL OF THE FOLLOWING SECTION BEFORE CONTINUING! Work pattern and decrease stitches mid under sleeve as follows: Work A.2a, A.3b and A.4a over the middle stitches, knit the remaining stitches. When A.3b has been worked, work A.3c over A.3b. When sleeve measures 1 cm from division, decrease 1 stitch on each side of marker thread (= 2 stitches decreased). Decrease like this every cm 3-3-3-3-5-5 times in total, then decrease every other cm 2-2-2-2-0-0 times in total = 71-75-85-95-99-105 stitches. On last round in A.3c increase 0-1-2-0-1-1 stitches before pattern, and 2-0-1-2-0-0 stitches after the pattern = 73-76-88-97-100-106 stitches. When A.3c has been worked 1 time vertically, piece measures approx. 14-12-11-10-8-6 cm from division. Switch to double pointed needles size 2.5 mm. Work next round as follows: * Knit 1, purl 2 *, work from *-* over the first 15-18-24-24-27-30 stitches, A.2b over A.2a, continue with knit over knit and purl over purl over stitches in A.3c, A.4b over A.4a, * purl 2, knit 1 *, work from *-* over 15-15-21-24-24-27 stitches and finish with purl 2 = 75-78-90-99-102-108 stitches. Continue with knit over knit and purl over purl until piece measures 17-15-14-13-11-9 cm from division, then cast off by knitting. Work the other sleeve the same way. ASSEMBLY: Sew the buttons on to the left band. |
|||||||||||||||||||||||||||||||
Diagram explanations |
|||||||||||||||||||||||||||||||
|
|||||||||||||||||||||||||||||||
 |
|||||||||||||||||||||||||||||||
 |
|||||||||||||||||||||||||||||||
 |
|||||||||||||||||||||||||||||||
 |
|||||||||||||||||||||||||||||||
 |
|||||||||||||||||||||||||||||||
 |
|||||||||||||||||||||||||||||||
 |
|||||||||||||||||||||||||||||||
Have you finished this pattern?Tag your pictures with #dropspattern #springssurrenderjacket or submit them to the #dropsfan gallery. Do you need help with this pattern?You'll find 29 tutorial videos, a Comments/Questions area and more by visiting the pattern on garnstudio.com. © 1982-2026 DROPS Design A/S. We reserve all rights. This document, including all its sub-sections, has copyrights. Read more about what you can do with our patterns at the bottom of each pattern on our site. |
|||||||||||||||||||||||||||||||


With over 40 years in knitting and crochet design, DROPS Design offers one of the most extensive collections of free patterns on the internet - translated to 17 languages. As of today we count 324 catalogues and 12290 patterns translated into English (UK/cm). 12290
We work hard to bring you the best knitting and crochet have to offer, inspiration and advice as well as great quality yarns at incredible prices! Would you like to use our patterns for other than personal use? You can read what you are allowed to do in the Copyright text at the bottom of all our patterns. Happy crafting!
Post a comment to pattern DROPS 212-39
We would love to hear what you have to say about this pattern!
If you want to leave a question, please make sure you select the correct category in the form below, to speed up the answering process. Required fields are marked *.