
Popular categories
Looking for a yarn?


Comments / Questions (151)
![]() Marja wrote:
Marja wrote:
Hei. En ymmärrä, miksi hihan ja helman resorit jälkeen ohjeistetaan heti vähentämään silmukoita. Kastelin paidan valmistumisen jälkeen ja tasokuivasin. Hihansuut ja helma ovat nyt hassusti leveämmät.
10.02.2025 - 16:57
![]() Dorthe Adler Petersen wrote:
Dorthe Adler Petersen wrote:
Jeg valgte så størrelse M også for lille, nu håber jeg L , men undre mig da jeg normalt bruger 36/38
09.02.2025 - 14:04
![]() Dorthe Adler Petersen wrote:
Dorthe Adler Petersen wrote:
Der bør være mål på , hvor stor er fx small. Jeg bruger normal 36/38 og valgte dette, men måtte halvvejs pille op, da den var alt for lille.
09.02.2025 - 14:01
![]() Alexandra wrote:
Alexandra wrote:
Jag är inne på ärmen och har maskat av 6 maskor (3 på vardera sida om markören). Men ska jag sticka ett varv rät och ett varv avigt för att sen maska av 2 maskor 1 gång på vardera sida om de avmaskade, eller ska jag påbörja att maska av direkt efter första 6 maskorna? Då blir det ju egentligen 5 maskor efter markören om man slår ihop dem.
29.01.2025 - 21:23DROPS Design answered:
Hei Alexandra. Når du har felt av 6 masker, strikk en pinne rett, snu og fell 2 masker fra vrangen (begynnelsen av pinnen). Strikk pinnen ut, snu og fell 2 masker fra retten (begynnelsen av pinnen). Deretter strikkes det videre og felles 1 maske 3 ganger på samme måte ( begynnelsen av hver pinne = både fra retten og fra vrangen). mvh DROPS Design
03.02.2025 - 11:27
![]() Stacy L Walker wrote:
Stacy L Walker wrote:
I have watched videos on line of how to "purl 1 row from the wrong side," but all of the tutorials show work on both needles. I don't know how to do this when I've just cast on stitches. I have 113 stitches on the needle but don't know how to proceed from here. I can knit, purl and knit into the back but I don't know how to purl from the wrong side --unless I'm supposed to purl and this traditional "right side" becomes the new "wrong side?"
20.01.2025 - 02:18DROPS Design answered:
Dear Mrs Walker, the very first row after casting on stitches will be here purled, ie cast on the 113 stitches, turn and purl all stitches = this is the wrong side of piece. Turn and start rib now from right side. That way, you will have 1 row stocking stitch before ribbing edge. Happy knitting!
20.01.2025 - 08:52
![]() Hannah Parrott wrote:
Hannah Parrott wrote:
Hi, I'm working this pattern and am just on the back piece at the point of needing to cast off for the arm holes. This reads to cast off 3 stitches 1 time, 2 stitches 1 time and 1 stitches 1 time on both sides. I have a few questions Does this mean I need to knit together 3 stitches, then 2, then 1 or does this mean I need to cast off a total of 6 stitches individually on each side as in a traditional bind off? Is this worked on the same row for both sides?
08.01.2025 - 13:16DROPS Design answered:
Dear Mrs Parrott, you have to cast off (traditionnal cast off) these stitches at the beginning of each row on each side, ie cast off first 3 stitches at the beg of next row from RS then 3 sts at the beg of next row from WS, then 2 sts at the beg of next row from RS and 2 sts at the beg of next row from WS and 1 st at the beg of next 2 rows. Happy knitting!
08.01.2025 - 16:12
![]() Aukje Van Os wrote:
Aukje Van Os wrote:
Klopt het dat de mouw van de kleinste maat het langst is en die van de grootste maat het kortst?
13.12.2024 - 17:28DROPS Design answered:
Dag Aukje,
Ja, dat klopt. Dit komt omdat de schouders breder zijn in de grotere maten.
19.12.2024 - 18:26
![]() Ann-Cathrin wrote:
Ann-Cathrin wrote:
Hallo, macht es Sinn am Hals elastisch abzuketten? Ich hab etwas Sorge, dass der Pullover sich sonst nicht gut über den Kopf ziehen lässt.
02.11.2024 - 21:41DROPS Design answered:
Liebe Ann-Cathrin, es soll schon elastisch abgekettet werden, aber dann auch beim annähen soll die Naht auch nicht zu fest sein. Viel Spaß beim Stricken!
04.11.2024 - 08:50
![]() Sarah wrote:
Sarah wrote:
I don’t understand the increase instructions on the sleeve. I’m making the forth size . Is it saying stocking stitch and when the sleeve measures 10 cms I then start increasing and that over the next 3 cms I should increase 26 times so I have 70 stitches then continue straight until I start the cast off . Or increase every 3 cms
14.10.2024 - 16:38DROPS Design answered:
Dear Sarah, you should increase 13 times on every 3rd cm starting after the first 10 cm with 44 sts, so that you will have 44 + (2x13) = 70 sts. Increasing on every 3rd cm means increase first time after 10 cm, then after 13 cm (3 cm more), then after 16 cm (3 cm more), then after 19 cm (3 cm more) and so on until you have increased a total of 13 times and you get the 70 sts. Happy knitting!
15.10.2024 - 09:06
![]() Carina Humle wrote:
Carina Humle wrote:
Jeg er lidt udfordret på at forstå opskriften til ærmerne, der skal tages 2 m ud 11 x men hvad er afstanden mellem de sidste udtagninger? De første er 3,5, 3,5, 3, 3, 2 og 2 cm, dette får jeg kun til at være de 6 gange?
10.10.2024 - 09:08DROPS Design answered:
Hej Carina, start med at markere hvilken størrelse du strikker, så vil du se at du skal tage alle masker ud for hver 3,5 cm hvis du feks strikker de 2 mindste størrelser :)
16.10.2024 - 11:52
|
|
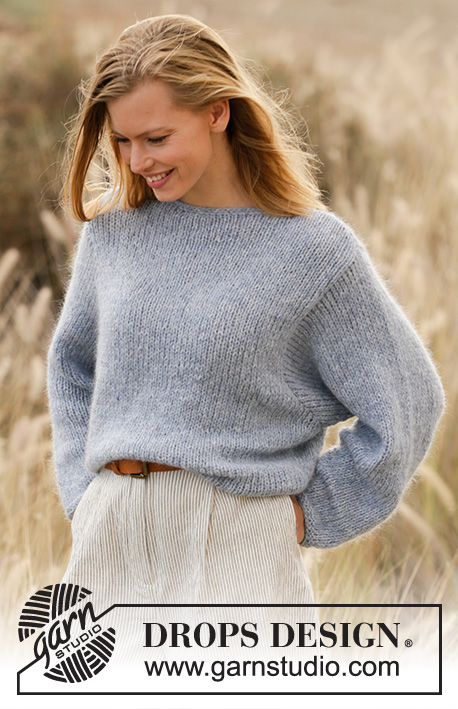
Grey Pearl#greypearlsweater |
|
 |
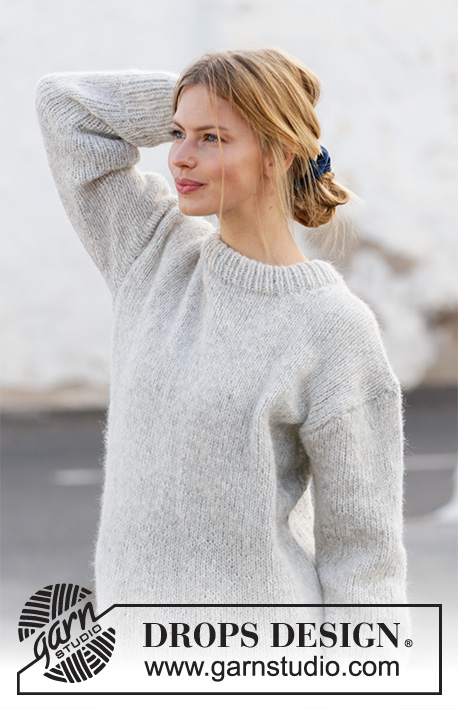 |
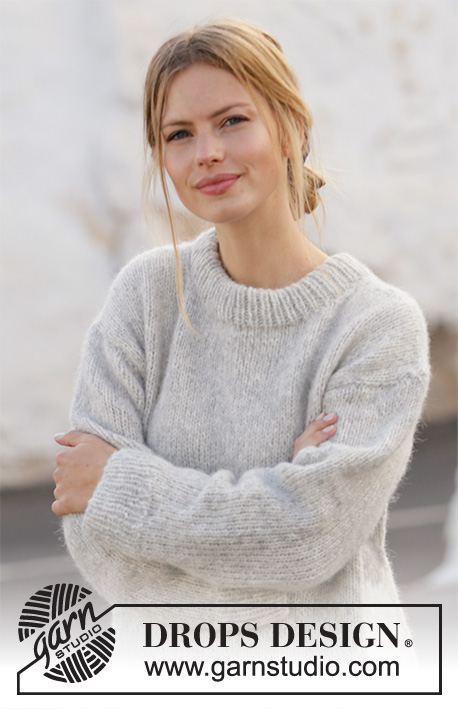
Knitted jumper in DROPS Air. Sizes S - XXXL.
DROPS 210-36 |
|
|
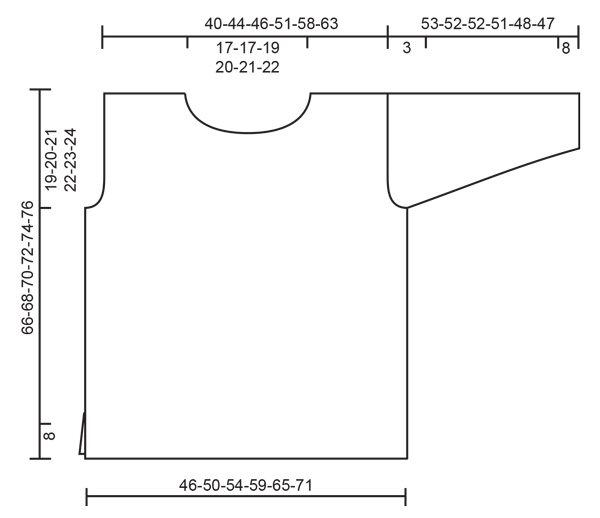
------------------------------------------------------- EXPLANATIONS FOR THE PATTERN: ------------------------------------------------------- RIDGE/GARTER STITCH (worked back and forth): Knit all rows. 1 ridge in height = Knit 2 rows. DECREASE TIP (evenly spaced): To work out how to decrease evenly, count the total number of stitches on needle (e.g. 89 stitches) and divide by number of decreases to be made (e.g. 13) = 6.8. In this example decrease by knitting together alternately each 5th and 6th stitch and each 6th and 7th stitch (approx.). INCREASE TIP (for sleeves): Start 1 stitch before the marker thread, 1 yarn over, work 2 stitches (marker thread sits between these 2 stitches), 1 yarn over. On the next round knit the yarn overs twisted to avoid holes. ------------------------------------------------------- START THE PIECE HERE: ------------------------------------------------------- JUMPER – SHORT OVERVIEW OF THE PIECE: The jumper is worked back and forth in 2 parts which are sewn together to finish. The sleeves are worked in the round with double pointed needles/short circular needle. BACK PIECE: Cast on 89-97-103-113-125-137 stitches with circular needle size 4.5 mm and Air. Purl 1 row from the wrong side then work as follows – from the right side: 2 edge stitches in GARTER STITCH – see description above, *knit 1, purl 1 *, work from *-* until there are 3 stitches left, knit 1 and 2 edge stitches in garter stitch. Continue like this until the piece measures 8 cm. Change to circular needle size 5.5 mm and knit 1 row from the right side where you decrease 13-15-15-17-19-21 stitches evenly spaced – read DECREASE TIP = 76-82-88-96-106-116 stitches. Continue with stocking stitch and 1 edge stitch in garter stitch on each side. When the piece measures 47-48-49-50-51-52 cm, cast off for the armholes on both sides at the beginning of each row as follows: Cast off 3 stitches 1-1-1-1-1-1 time, 2 stitches 1-1-1-1-1-1 time and 1 stitch 1-1-2-2-2-3 times = 64-70-74-82-92-100 stitches. Continue with stocking stitch until the piece measures 64-66-68-70-72-74 cm. Now cast off the middle 26-26-28-30-32-34 stitches for the neck and each shoulder is finished separately. Then cast off at the beginning of next row from the neck as follows: 1 stitch 1 time = 18-21-22-25-29-32 stitches on the shoulder. Continue working until the piece measures 66-68-70-72-74-76 cm and cast off. Work the other shoulder in the same way. FRONT PIECE: Cast on and work as for the back piece until the piece measures 60-62-64-66-68-70 cm. Now place the middle 20-20-22-24-26-28 stitches on 1 thread for the neck and finish each shoulder separately. Then cast off at the beginning of each row from the neck as follows: 2 stitches 1 time and 1 stitch 2 times = 18-21-22-25-29-32 stitches left on the shoulder. Continue working until the piece measures 66-68-70-72-74-76 cm, then cast off. Work the other shoulder in the same way. SLEEVE: The sleeves are worked bottom up, in the round, with double pointed needles/short circular needle. The piece is then divided and worked back and forth for the sleeve cap. Cast on 46-48-50-52-52-56 stitches with double pointed needles size 4.5 mm and Air. Knit 1 round, then work rib (knit 1 / purl 1) for 8 cm. Change to double pointed needles size 5.5 mm and continue with stocking stitch. On the first round decrease 8-8-8-8-8-10 stitches evenly spaced = 38-40-42-44-44-46 stitches. Insert a marker thread at the beginning of the round = mid under sleeve. Continue with stocking stitch, AT THE SAME TIME when the piece measures 10-10-10-10-12-12 cm, increase 1 stitch on each side of the marker thread – read INCREASE TIP. The yarn overs are worked twisted on the next round to avoid holes. Increase like this 3½-3½-3-3-2-2 cm a total of 11-12-13-13-15-15 times = 60-64-68-70-74-76 stitches. When the sleeve measures 50-49-49-48-45-44 cm, cast off 3 stitches on each side of the marker thread (= 6 stitches cast off mid under the sleeve), then continue working back and forth. Cast off for the sleeve cap at the beginning of each row on both sides as follows: 2 stitches 1 time, 3 stitches 1 time, then cast off the remaining stitches. Work the other sleeve in the same way. ASSEMBLY: Sew the shoulder seams. Sew in the sleeves and sew the side seams, inside the 1 edge stitch and until there is 8 cm left at the bottom = split. NECK: Knit up approx. 92-106 stitches with circular needle size 4,5 mm around the neck (including the stitches on the thread and the number divisible by 2). Work rib (knit 1 / purl 1) for 9 cm. Then cast off. Fold the rib at the top to the wrong side and fasten down. To avoid the neck being tight and turning outwards, make sure the seam is elastic. |
|
 |
|
Have you finished this pattern?Tag your pictures with #dropspattern #greypearlsweater or submit them to the #dropsfan gallery. Do you need help with this pattern?You'll find 30 tutorial videos, a Comments/Questions area and more by visiting the pattern on garnstudio.com. © 1982-2026 DROPS Design A/S. We reserve all rights. This document, including all its sub-sections, has copyrights. Read more about what you can do with our patterns at the bottom of each pattern on our site. |
|


With over 40 years in knitting and crochet design, DROPS Design offers one of the most extensive collections of free patterns on the internet - translated to 17 languages. As of today we count 324 catalogues and 12290 patterns translated into English (UK/cm). 12290
We work hard to bring you the best knitting and crochet have to offer, inspiration and advice as well as great quality yarns at incredible prices! Would you like to use our patterns for other than personal use? You can read what you are allowed to do in the Copyright text at the bottom of all our patterns. Happy crafting!
Post a comment to pattern DROPS 210-36
We would love to hear what you have to say about this pattern!
If you want to leave a question, please make sure you select the correct category in the form below, to speed up the answering process. Required fields are marked *.