
Popular categories
Looking for a yarn?


Comments / Questions (33)
![]() Ingrid wrote:
Ingrid wrote:
Bonsoir, puis-je savoir de combien de pourcentage positif est le patron svp? Merci d’avance et bonne soirée
11.03.2026 - 20:23DROPS Design answered:
Bonjour Ingrid, découvrez ici comment trouver votre taille et choisir l'aisance souhaitée. Bon tricot!
12.03.2026 - 09:38
![]() Lampecco wrote:
Lampecco wrote:
Bonjour, Beaucoup de modèles m’intéresse mais à tricoter avec des aiguilles circulaires. Je souhaiterais savoir comment les tricoter avec aiguilles pointes avez vous des astuces ou c’est possible d’avoir les explications sur votre site ? Merci
18.01.2025 - 13:02DROPS Design answered:
Bonjour Mme Lampecco, nombre de nos modèles sont effectivement tricotés sur aiguilles circulaires, mais pour beaucoup d'entre eux, comme celui-ci, on va tricoter le dos et le devant séparément en allers et retours sur aiguille circulaire, vous pourrez donc tricoter sur aiguilles droites - pour les manches, retrouvez quelques astuces ici. Bon tricot!
20.01.2025 - 09:23
![]() Anne Kristin wrote:
Anne Kristin wrote:
Hei, Winter delight. De 4 maskene til riller på hver side, når en har felt av til ermene, er rillene inkludert i antall masker som gjenstår etter fellingen, eller skal de legges til?
04.12.2024 - 19:27DROPS Design answered:
Hei Anne Kristin. De 4 rillemaskene i hver side er inkludert i maskeantallet. mvh DROPS Design
09.12.2024 - 10:43
![]() Cindy Newman wrote:
Cindy Newman wrote:
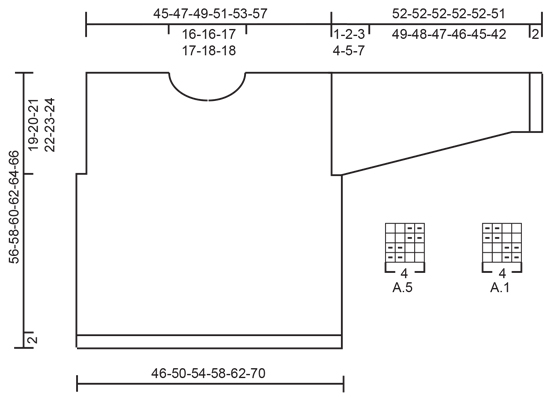
I cannot find the A1 diagram. Can you please advise me where to find this?
09.03.2024 - 17:05DROPS Design answered:
Dear Cindy, please check the schematic drawing, and there under the sleeve you will find it. I hope this helps. Happy Knitting!
10.03.2024 - 22:24
![]() Isabelle wrote:
Isabelle wrote:
Bonjour, j'ai une suggestion à faire. Pourriez vous indiquer le numéro de rang dans vos diagrammes. Ainsi, ce serait plus facile pour nous de suivre l'avancée. Merci !
30.11.2023 - 07:27
![]() Renate wrote:
Renate wrote:
Ich habe gleich am Anfang ein Problem mit diesem tollen Modell. Wenn ich 116 M anschlage, eine gerade Anzahl, und 2 RM habe, dann ist der Rest 114 M, also immer noch eine gerade Anzahl. Wenn ich jetzt das Rippenmuster mit 1r 1l stricke, dann Ende ich nicht mit einer rechten sondern mit einer linken Masche. Wo ist der Fehler? Wie immer bin ich für Ihre Hilfe dankbar!
22.12.2022 - 11:39DROPS Design answered:
Liebe Renate, ja richtig, unser Design Team wird hier hingewiesen, stricken Sie die 114 Maschen im Bündchen 1 M rechts, 1 M links, und genauso bei dem Rückenteil und Vorderteil (so stimmen die Bündchen an den Seiten wenn am zusammennäht). Viel Spaß beim stricken!
22.12.2022 - 12:04
![]() Nika wrote:
Nika wrote:
I'm having trouble understanding the pattern when I knit the back up to the 60cm part. Anything after that I don't understand.
15.02.2022 - 00:01DROPS Design answered:
Dear Nika, when piece measures 60 cm in 4th size, you have to prepare neck shaping: on the next row from RS decrease evenly 10 sts (= work K2 tog a total of 10 times) over the middle 48 sts; 38 sts remain now, place these 38 sts on a thread or a stitch holder for neck, they will be knit up later. and continue now each shoulder separately. These decreases will allow you keeping the correct width on mid front. Happy knitting!
15.02.2022 - 09:29
![]() Zee wrote:
Zee wrote:
Please disregard my email from before. I saw my mistake. Thanks again.
04.11.2021 - 07:05
![]() Zee wrote:
Zee wrote:
I am doing this pattern in large. For the front piece the pattern stitches add up to 122 stitches yet the cast on amount is 108. I am assuming that I would decrease A1 and A5 to a smaller number. Am I correct in this thinking? Thanks
04.11.2021 - 06:05DROPS Design answered:
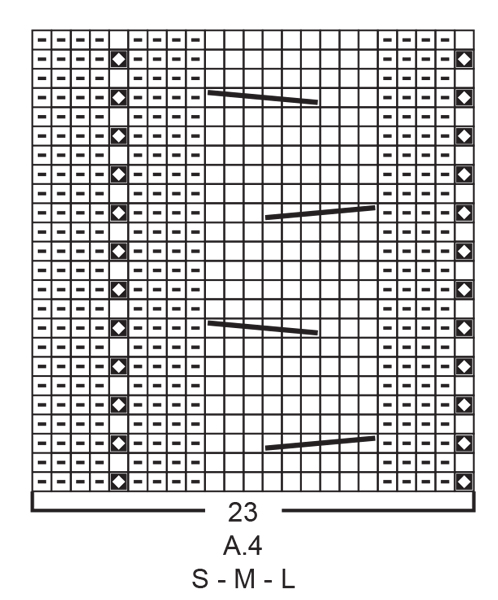
Dear Zee, size L is the 3rd size and you cast on 124 sts for front piece and work pattern (after ribbing edge) as follows: 1 edge st, A.1 over 24 sts, A.2 (= 23 sts), A.3 (= 28 sts), A.4 (= 23 sts), A.5 over 24 sts, 1 edge st = 1+24+23+28+23+24+1=124 sts. Can this help?
04.11.2021 - 06:59
![]() Merel wrote:
Merel wrote:
Hallo Drops-Team. Bij het voorpand moet men bij 49cm (maat m) 10 steken verdeeld minderen over de middelste 44 steken en dan elke schouder apart verder breien in patroon. Hoe kan ik het patroon op een juiste manier verder volgen na de minderingen? Met vriendelijke groet, Merel
16.08.2021 - 12:00
|
|||||||||||||||||||||||||
Winter Delight#winterdelightsweater |
|||||||||||||||||||||||||
 |
 |
||||||||||||||||||||||||
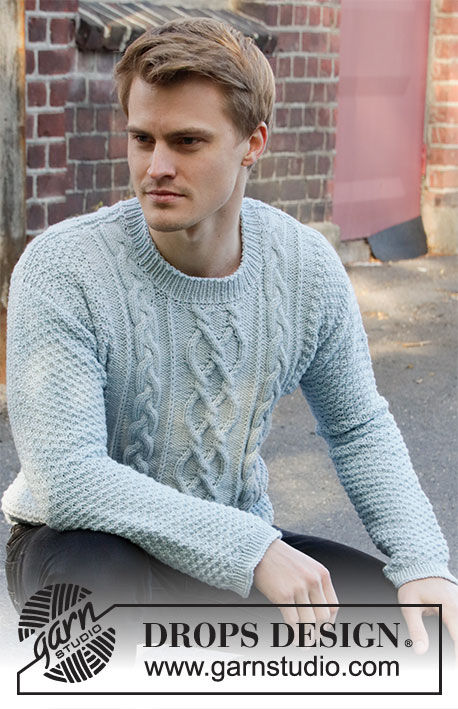
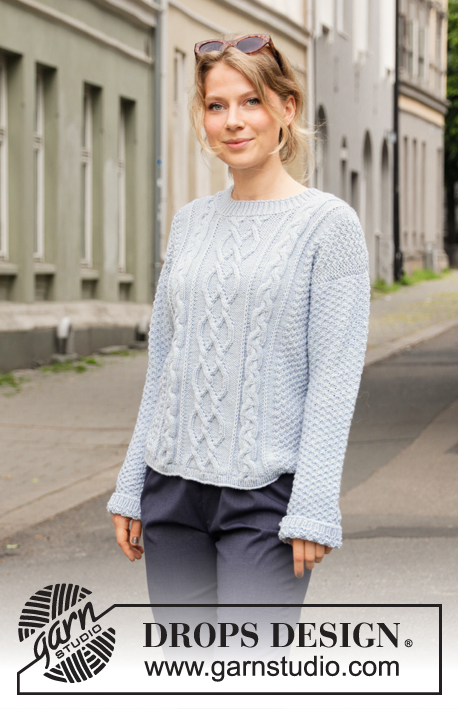
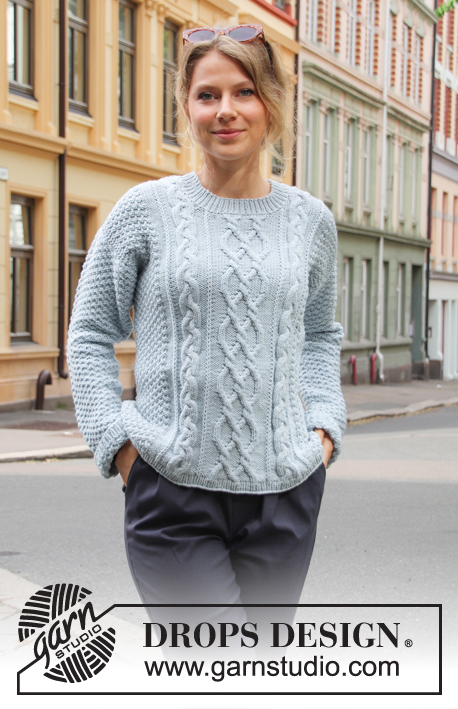
Knitted jumper with cables and double moss stitch. The piece is worked in DROPS Merino Extra Fine. Sizes S – XXXL.
DROPS 205-7 |
|||||||||||||||||||||||||
|
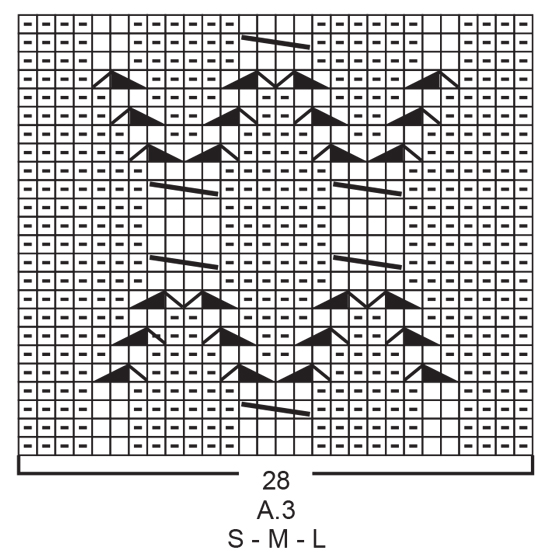
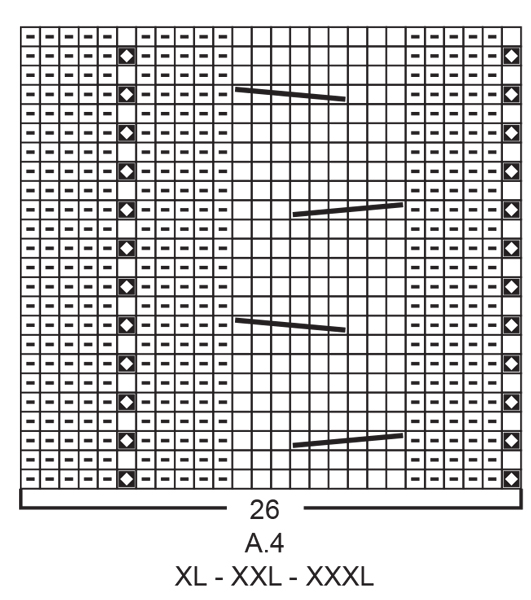
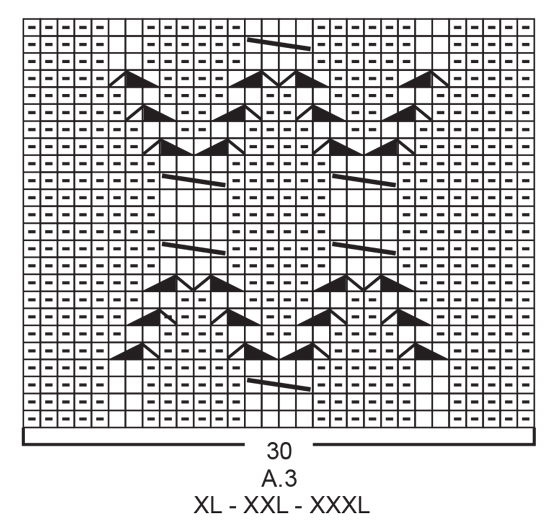
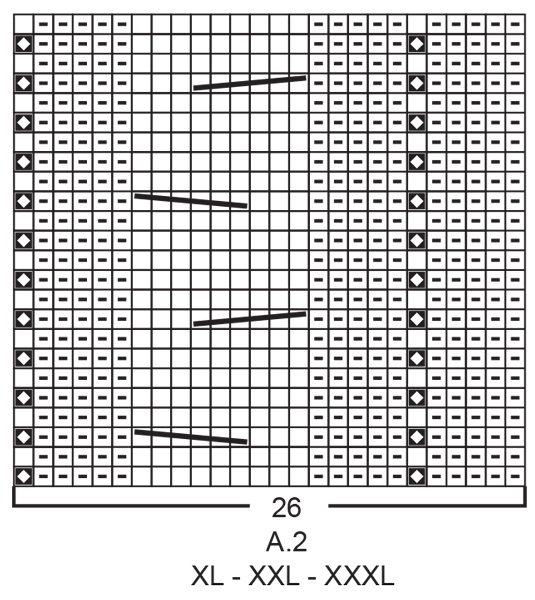
------------------------------------------------------- EXPLANATIONS FOR THE PATTERN: ------------------------------------------------------- RIDGE/GARTER STITCH (worked back and forth): Knit all rows. 1 ridge in height = Knit 2 rows. PATTERN: See diagrams A.1 to A.5. Choose diagram for your size (applies to A.2, A.3 and A.4). The diagrams show all rows in the pattern seen from the right side. KNITTING TIP: In this pattern you knit up stitches along the armholes and the sleeves are worked top down. This is to control the sleeve-length. If you would like to work the sleeves separately and sew them in afterwards, this can be done by casting on the same number of stitches as are knitted up along the armholes and then follow the instructions in the text. To sew in the sleeves place the sleeve under the garter stitch edge along the armholes so the edge is visible – sew in the outermost stitch along the garter stitch edge. DECREASE TIP-1 (evenly spaced): To work out how to decrease evenly, count the total number of stitches on needle (e.g. 44 stitches) and divide by number of decreases to be made (e.g. 10) = 4.4. All decreases are worked from the right side! In this example decrease by knitting together alternately each 3rd and 4th stitch and each 4th and 5th stitch. DECREASE TIP-2 (for mid under sleeve): Decrease 1 stitch before the marker thread as follows: Work until there are 2 stitches left before the marker thread, knit 2 together if this stitch should be a knit stitch or purl 2 together if this stitch should be a purl stitch. Decrease 1 stitch after the marker thread as follows: Knit 2 twisted if this stitch should be a knit stitch or purl 2 twisted together if this stitch should be a purl stitch. ------------------------------------------------------- START THE PIECE HERE: ------------------------------------------------------- JUMPER – SHORT OVERVIEW OF THE PIECE: The front and back pieces are worked back and forth with circular needle, bottom up. The shoulder seams are sewn together, then stitches are knitted up around the armholes for the sleeves – read KNITTING TIP! The sleeves are worked back and forth with circular needle until the sleeve cap is finished, then the sleeve is continued in the round with short circular needle/double pointed needles to finished length. The bottom of the armhole is sewn together and finally the neck is worked. BACK PIECE: Cast on 108-116-124-132-140-156 stitches with circular needle size 3.5 mm and Merino Extra Fine. Purl 1 row (= wrong side). The next row is worked as follows from the right side: 1 edge stitch in GARTER STITCH – read description above, * knit 1, purl 1 *, work from *-* until there is 1 stitch left on the row, finish with 1 edge stitch in garter stitch. Continue this rib for 2 cm but adjust so the last row is worked from the right side. Purl 1 row from the wrong side with 1 edge stitch in garter stitch in each side. Change to circular needle size 4.5 mm. Now start the pattern by working the next row from the right side as follows: 1 edge stitch in garter stitch, work A.1 over the next 16-20-24-24-28-36 stitches (= 4-5-6-6-7-9 repeats of 4 stitches), work A.2 (= 23-23-23-26-26-26 stitches), A.3 (= 28-28-28-30-30-30 stitches), A.4 (= 23-23-23-26-26-26 stitches), A.5 over the next 16-20-24-24-28-36 stitches (= 4-5-6-6-7-9 repeats of 4 stitches), and finish with 1 edge stitch in garter stitch. Continue this pattern. REMEMBER THE KNITTING TENSION! When the piece measures 37-38-39-40-41-42 cm cast off 1-3-5-7-9-13 stitches at the beginning of the next 2 rows for the armholes = 106-110-114-118-122-130 stitches. Continue the pattern as before but now with 4 edge stitches in garter stitch on each side towards the armholes. When the piece measures 54-56-58-60-62-64 cm, decrease 10 stitches evenly over the middle 44-44-44-48-48-48 stitches on the row – read DECREASE TIP-1 = 96-100-104-108-112-120 stitches left. On the next row (wrong side), cast off the middle 36-36-38-38-40-40 stitches for the neck and each shoulder is finished separately. Continue the pattern and cast off 1 stitch on the next row from the neck = 29-31-32-34-35-39 stitches left on shoulder. Continue working until the piece measures 55-57-59-61-63-65 cm. Knit 1 row from the right side and knit 1 row from the wrong side. Loosely cast off with knit from the right side. Work the other shoulder in the same way. The back piece measures approx. 56-58-60-62-64-66 cm from the shoulder down. FRONT PIECE: Cast on 108-116-124-132-140-156 stitches with circular needle size 3.5 mm and Merino Extra Fine. Purl 1 row (= wrong side). The next row is worked as follows from the right side: 1 edge stitch in GARTER STITCH – read description above, * knit 1, purl 1 *, work from *-* until there is 1 stitch left on the row, finish with 1 edge stitch in garter stitch. Continue this rib for 2 cm but adjust so the last row is worked from the right side. Purl 1 row from the wrong side with 1 edge stitch in garter stitch on each side. Change to circular needle size 4.5 mm. Now start the pattern by working the next row from the right side as follows: 1 edge stitch in garter stitch, work A.1 over the next 16-20-24-24-28-36 stitches (= 4-5-6-6-7-9 repeats of 4 stitches), A.2 (= 23-23-23-26-26-26 stitches), A.3 (= 28-28-28-30-30-30 stitches), A.4 (= 23-23-23-26-26-26 stitches), A.5 over the next 16-20-24-24-28-36 stitches (= 4-5-6-6-7-9 repeats of 4 stitches) and finish with 1 edge stitch in garter stitch. Continue this pattern. When the piece measures 37-38-39-40-41-42 cm, cast off 1-3-5-7-9-13 stitches at the beginning of the next 2 rows for the armholes = 106-110-114-118-122-130 stitches. Continue the pattern as before but now with 4 edge stitches in garter stitch on each side towards the armholes. When the piece measures 47-49-51-52-54-56 cm, decrease 10 stitches evenly over the middle 44-44-44-48-48-48 stitches on the row = 96-100-104-108-112-120 stitches left. On the next row (wrong side) place the middle 20-20-22-22-22-22 stitches on 1 thread for the neck and each shoulder is finished separately. Continue the pattern and cast off at the beginning of each row from the neck as follows: Cast off 2 stitches 3 times and then 1 stitch 3-3-3-3-4-4 times = 29-31-32-34-35-39 stitches left on the shoulder. Continue working until the piece measures 55-57-59-61-63-65 cm. Knit 1 row from the right side and knit 1 row from the wrong side. Loosely cast off with knit from the right side. Work the other shoulder in the same way. ASSEMBLY: Sew the shoulder seams inside the cast-off edge. SLEEVE: Knit up stitches along the armhole on the front and back pieces. Start in the corner of the armhole on the one side of the piece where stitches were cast off for the armhole and knit up from the right side 76-80-84-88-92-96 stitches inside the 1 edge stitch in garter stitch with circular needle size 4.5 mm and Merino Extra Fine (do not knit up stitches along the bottom of the armhole) – read KNITTING TIP! Work A.1 back and forth with 1 edge stitch in garter stitch on each side. When the sleeve measures 1-2-3-4-5-7 cm from where stitches were knitted up insert 1 marker on the row; this marker shows where the sleeve will be sewn to the bottom of the armhole and the sleeve is now measured from this marker! Continue by working the sleeve in the round. Change to short circular needle or double pointed needles size 4.5 mm. Insert 1 marker thread at the beginning of the round and allow it to follow your work onwards; it will be used when decreasing mid under the sleeve. Continue A.1 in the round over all stitches (= 19-20-21-22-23-24 repeats of 4 stitches). When the sleeve measures 3-2-3-2-3-2 cm from the marker decrease 2 stitches mid under sleeve – read DECREASE TIP-2. Decrease like this every 3-3-2½-2½-2-2 cm a total of 15-16-17-18-19-20 times = 46-48-50-52-54-56 stitches. Continue working until the sleeve measures 49-48-47-46-45-42 cm from the marker (there is approx. 2 cm left to finished length; you can try the jumper on and work to desired length). Change to double pointed needles size 3.5 mm and work rib (= knit 1 / purl 1) for 2 cm. Loosely cast off with knit. The sleeve measures approx. 52-52-52-52-52-51 cm from where stitches were knitted up. Work the other sleeve in the same way. ASSEMBLY: Sew the side seams – sew in the outermost loop of the outermost stitch so the seam is flat. Sew the sleeve to the bottom of the armhole from the marker to the corner on each side. NECK: Knit up from the right side with short circular needle size 3.5 mm approx. 80 to 94 stitches around the neck (including the stitches on the thread in front). Purl 1 round. Knit 1 round where you increase evenly to 90-92-94-96-100-102 stitches. Then work rib in the round (= knit 1 / purl 1) for approx. 3 cm. Cast off with knit over knit and purl over purl. |
|||||||||||||||||||||||||
Diagram explanations |
|||||||||||||||||||||||||
|
|||||||||||||||||||||||||
 |
|||||||||||||||||||||||||
 |
|||||||||||||||||||||||||
 |
|||||||||||||||||||||||||
 |
|||||||||||||||||||||||||
 |
|||||||||||||||||||||||||
 |
|||||||||||||||||||||||||
 |
|||||||||||||||||||||||||
Have you finished this pattern?Tag your pictures with #dropspattern #winterdelightsweater or submit them to the #dropsfan gallery. Do you need help with this pattern?You'll find 32 tutorial videos, a Comments/Questions area and more by visiting the pattern on garnstudio.com. © 1982-2026 DROPS Design A/S. We reserve all rights. This document, including all its sub-sections, has copyrights. Read more about what you can do with our patterns at the bottom of each pattern on our site. |
|||||||||||||||||||||||||


With over 40 years in knitting and crochet design, DROPS Design offers one of the most extensive collections of free patterns on the internet - translated to 17 languages. As of today we count 324 catalogues and 12290 patterns translated into English (UK/cm). 12290
We work hard to bring you the best knitting and crochet have to offer, inspiration and advice as well as great quality yarns at incredible prices! Would you like to use our patterns for other than personal use? You can read what you are allowed to do in the Copyright text at the bottom of all our patterns. Happy crafting!
Post a comment to pattern DROPS 205-7
We would love to hear what you have to say about this pattern!
If you want to leave a question, please make sure you select the correct category in the form below, to speed up the answering process. Required fields are marked *.