
Popular categories
Looking for a yarn?


Comments / Questions (10)
![]() Susanna wrote:
Susanna wrote:
Hallo, ich brauche bitte Hilfe bei der Ferse :) Ich verstehe die Anleitung so, dass die Ferse lediglich mit den 22 Maschen gestrickt wird, da die anderen stillgelegt werden. Dadurch wird die Ferse aber sehr schmal und kurz für Größe 43, nur 16 Reihen. Oder muss ich mit den 38 Maschen stricken?
26.03.2023 - 14:17DROPS Design answered:
Liebe Susanna, die Ferse stricken Sie über die 38 Maschen - die deutsche Anleitung wird angepasst. Viel Spaß beim stricken!
27.03.2023 - 09:23
![]() Undine wrote:
Undine wrote:
Hallo liebes DropsTeam, der Teil 2 soll insgesamt 3x gearbeitet werden und dann noch 1x wiederholen. Verstehe ich es richtig, dass Teil 2 dann insgesamt 4x gearbeitet wird? Dankeschön. Liebe Grüße
23.01.2022 - 11:00DROPS Design answered:
Liebe Undine, Teil 2 stricken Sie 4 Mal gestrickt und gleichzeitig am Anfang der 2 letzten Reihen beim 4. Mal werden die Randmaschen beidseitig abgekettet. Viel Spaß beim stricken!
24.01.2022 - 09:23
![]() Anja wrote:
Anja wrote:
Hallo liebes Team, ich komme bei der Ferse einfach nicht klar. Kann man mir das bitte besser erklären? WAS genau soll gemacht werden, nachdem mir 14 Maschen in der Mitte geblieben sind? Maschen aufnehmen, wenn ja WO? Zwischen den 14 Maschen? Ich versteh das leider überhaupt nicht. Danke für eure Hilfe.
07.05.2020 - 20:38DROPS Design answered:
Liebe Anja, dieses Video zeigt, wie man solche Ferse strickt, dh in 2 Teilen: zuerst 1 Masche weniger am Ende jeder Reihe bis 14 Maschen übrig sind, dann 1 Masche mehr am Ende jeder Reihe bis alle Maschen der Fersen wieder gestrickt sind. Viel Spaß beim stricken!
08.05.2020 - 08:52
![]() Ugne wrote:
Ugne wrote:
My bad - forgot about increases in Part 1. "Bind off" is correct (decrease by 2 sts)
10.07.2019 - 11:19
![]() Ugne wrote:
Ugne wrote:
I think, there is an error in pattern. "Repeat PART 2 (row 16 to 29) a total of 3 times. Then repeat PART 2 again, but on the last 2 rows (= with texMex) ----bind off---- first edge stitch in each side of piece = 52-56-60 stitches." It should be "cast on" as stitch count increases by 4.
10.07.2019 - 11:02
![]() Magda Roos wrote:
Magda Roos wrote:
Dank voor de uitleg
25.03.2019 - 18:30
![]() Magda Roos wrote:
Magda Roos wrote:
Bezig met country fair sock maar snap niet hoe ik de steken moet verdelen om rond te gaan breien heb de 42 steken op rechter NLD gezet maar hoe moet ik zelf verder gaan verdelen. Kunt u me aub verder op weg helpen welk deel wordt hiel? Heb dit nog nooit gedaan. Bij voorbaat dank
12.03.2019 - 16:49DROPS Design answered:
Dag Magda Roos,
Bij naald 1 wordt aangegeven waar je markeerdraden moet plaatsen, op deze plek zou je ook over kunnen gaan naar een nieuwe naald als je met sokkenbreinaalden werkt. Verder kun ze naar eigen inzicht verdelen. Tijdens het breien wordt precies aangegeven wat je moet doen en dan wijst het zich ook wel hoe je de steken over de naalden moet verdelen.
Kijk anders ook even bij de video's die bij het patroon staan.
25.03.2019 - 10:22
![]() Garnbaciller wrote:
Garnbaciller wrote:
Det är jävligt beklagligt att ni återigen snor andras mönster!
06.03.2019 - 08:21
![]() Carmen wrote:
Carmen wrote:
Sehr nah am Original eines anderen Designers !!!
18.01.2019 - 09:58
![]() Jensen wrote:
Jensen wrote:
Smart måde at afslutte tæerne på - følger fint fodens form.
16.12.2018 - 09:26
|
|||||||
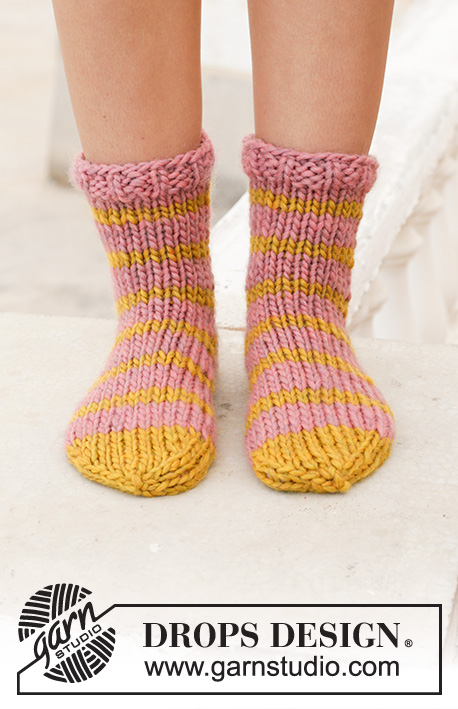
Country Fair Socks#countryfairsocks |
|||||||
 |
 |
||||||
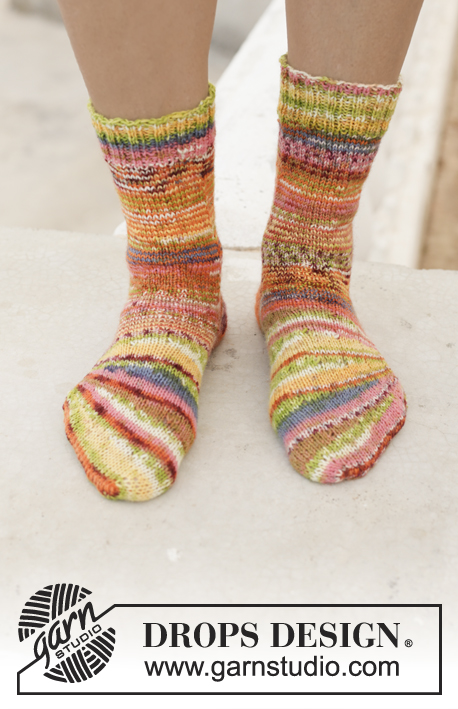
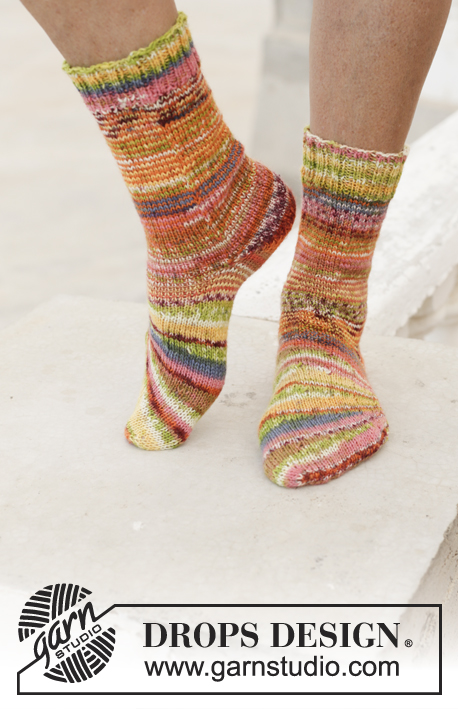
Knitted socks in DROPS Fabel. Worked in an angle and stripes from toe and up. Size 35 to 43
DROPS 198-20 |
|||||||
|
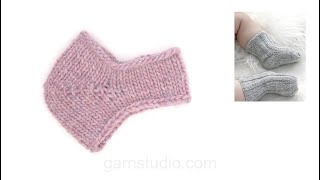
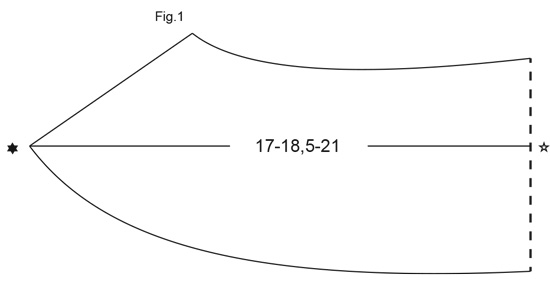
---------------------------------------------------------- EXPLANATION FOR THE PATTERN: ---------------------------------------------------------- GARTER STITCH (back and forth): Knit all rows. STRIPES: Work piece in stripes as follows: Work 1 round in yellow/pink. Work 1 round in texMex. HEEL: Work in stocking stitch back and forth with texMex as follows: ROW 1 (= right side): Work until 1 stitch remains, turn piece. ROW 2 (= wrong side): Slip first stitch purlwise, tighten yarn and work until 1 stitch remains, turn piece. ROW 3 (= right side): Slip first stitch knitwise, tighten yarn and work until 2 stitches remains, turn piece. ROW 4 (= wrong side): Slip first stitch purlwise, tighten yarn and work until 2 stitches remains, turn piece. Continue short rows the same way until 14 stitches remain in the middle of row. Continue back and forth but now work 1 stitch more for every row (i.e. from both right and wrong side) over heel. To avoid holes in every transition at the turns, lift the horizontal yarn before the stitch to be knitted up and slip it twisted on the needle. Work strand tog with next stitch on left needle (from right side knit strand and stitch together and from wrong side purl strand and stitch together). Work like this until all heel stitches have been worked. ---------------------------------------------------------- START THE PIECE HERE: ---------------------------------------------------------- SOCKS - SHORT OVERVIEW OF THE PIECE: Piece is worked from the toe and up. Work first back and forth at an angle with short rows before working in the round on double pointed needles. Work heel back and forth with short rows. Work leg in the round on double pointed needles. RIGHT SOCK: Cast on 48-52-56 stitches (including 1 edge stitch in garter stitch in each side of piece) on circular needle size 2.5 mm with texMex. PART 1: Switch to yellow/pink. ROW 1 (= wrong side): Work 1 edge stitch in GARTER STITCH – read explanation above, purl 23-25-27, insert 1 marker, purl 23-25-27, finish with 1 edge stitch in garter stitch. ROW 2 (= right side): Knit until 2 stitches remain before marker, 1 yarn over (= 1 stitch increased), knit 4 (= marker is in the middle of these stitches), 1 yarn over (= 1 stitch increased), knit until 2 stitches remain on needle, turn piece (= 50-54-58 stitches on needle). ROW 3 (= wrong side): Slip 1 stitch on to right needle purlwise, purl until 2 stitches remain on needle (work yarn overs twisted, there should not be holes), turn piece. ROW 4 (= right side): slip 1 stitch onto right needle knitwise, knit until 2 stitches remain before marker, 1 yarn over (= 1 stitch increased), knit 4 (= marker is in the middle of these stitches), 1 yarn over (= 1 stitch increased), knit until 5-7-9 stitches in total remain on needle, turn piece (= 52-56-60 stitches on needle). ROW 5 (= wrong side): Slip 1 stitch on to right needle purlwise, purl until 5-7-9 stitches in total remain on needle (work yarn overs twisted, there should not be holes), turn piece. ROW 6 (= right side): slip 1 stitch onto right needle knitwise, knit until 2 stitches remain before marker, 1 yarn over (= 1 stitch increased), knit 4 (= marker is in the middle of these stitches), 1 yarn over (= 1 stitch increased), knit until 10-12-14 stitches remain on needle, turn piece (= 54-58-62 stitches on needle). ROW 7 (= wrong side): Slip 1 stitch on to right needle purlwise, purl until 10-12-14 stitches in total remain on needle (work yarn overs twisted, there should not be holes), turn piece. ROW 8 (= right side): Slip 1 stitch on to right needle knitwise, knit until 15-17-19 stitches in total remain on needle, turn piece. ROW 9 (= wrong side): Slip 1 stitch on to right needle purlwise, purl until 15-17-19 stitches in total remain on needle, turn piece. ROW 10 (= right side): Slip 1 stitch on to right needle knitwise, knit until 20-22-24 stitches in total remain on needle, turn piece. ROW 11 (= wrong side): Slip 1 stitch on to right needle purlwise, purl until 20-22-24 stitches in total remain on needle, turn piece. ROW 12 (= right side): Slip 1 stitch on to right needle knitwise, knit until 1 stitch remains on needle, finish with 1 edge stitch in garter stitch, turn piece. ROW 13 (= wrong side): Work 1 edge stitch in garter stitch, purl until 1 stitch remains on needle, finish with 1 edge stitch in garter stitch. Switch to texMex. ROW 14 (= right side): Knit all stitches. ROW 15 (= wrong side): Work 1 stitch in garter stitch, purl until 1 stitch remains, finish with 1 edge stitch in garter stitch. PART 2: Switch to yellow/pink. ROW 16 (= right side): Knit until 2 stitches remain, turn piece. ROW 17 (= wrong side): Slip 1 stitch on to right needle purlwise, purl until 2 stitches remain on needle, turn piece. ROW 18 (= right side): Slip 1 stitch on to right needle knitwise, knit until 5-7-9 stitches in total remain on needle, turn piece. ROW 19 (= wrong side): Slip 1 stitch on to right needle purlwise, purl until 5-7-9 stitches in total remain on needle, turn piece. ROW 20 (= right side): Slip 1 stitch on to right needle knitwise, knit until 10-12-14 stitches in total remain on needle, turn piece. ROW 21 (= wrong side): Slip 1 stitch on to right needle purlwise, purl until 10-12-14 stitches in total remain on needle, turn piece. ROW 22 (= right side): Slip 1 stitch on to right needle knitwise, knit until 15-17-19 stitches in total remain on needle, turn piece. ROW 23 (= wrong side): Slip 1 stitch on to right needle purlwise, purl until 15-17-19 stitches in total remain on needle, turn piece. ROW 24 (= right side): Slip 1 stitch on to right needle knitwise, knit until 20-22-24 stitches in total remain on needle, turn piece. ROW 25 (= wrong side): Slip 1 stitch on to right needle purlwise, purl until 20-22-24 stitches in total remain on needle, turn piece. ROW 26 (= right side): Slip 1 stitch on to right needle knitwise, knit until 1 stitch remains on needle, finish with 1 edge stitch in garter stitch, turn piece. ROW 27 (= wrong side): Work 1 edge stitch in garter stitch, purl until 1 stitch remains on needle, finish with 1 edge stitch in garter stitch. Switch to texMex. ROW 28 (= right side): Knit all stitches. ROW 29 (= wrong side): Work 1 stitch in garter stitch, purl until 1 stitch remains, finish with 1 edge stitch in garter stitch. REMEMBER THE KNITTING TENSION! Repeat PART 2 (row 16 to 29) a total of 3 times. Then repeat PART 2 again, but on the last 2 rows (= with texMex) cast off first edge stitch in each side of piece = 52-56-60 stitches. Now displace round by slipping the first 39-42-45 stitches from right side loosely on to right needle. Cut the yarn. Beginning of round = mid under foot. Then put pieces together and work in the round on double pointed needles. Work STRIPES in stocking stitch - see explanation above. When piece measures 17-18½-21 cm, see Fig.1 (when measuring place piece flat with cast-on edge in the side, measure in the middle of piece from tip/toe). Now divide the piece for heel and adjust so that last row is worked with texMex. Leave the middle 22 stitches on top of foot on the needle (i.e. 11 stitches on 2nd and 3rd double pointed needle). Distribute the remaining 30-34-38 stitches on 1st and 4th double pointed needle with 15-17-19 stitches on each needle. Work HEEL – read explanation above (work heel in stocking stitch). When heel has been worked, continue with stripes and in stocking stitch – NOTE: To avoid holes in the corner on heel when beginning first round after heel, lift the horizontal thread before next stitch on left needle up and slip it twisted on needle. Work yarn together with next stitch on left needle. When piece measures 4 cm from heel, increase 2 stitches evenly = 54-58-62 stitches. Repeat increase when piece measures 8 cm from heel = 56-60-64 stitches. When piece measures 12-14-16 cm from heel, adjust so that next round is worked with yellow/pink, increase 4 stitches evenly = 60-64-68 stitches. Work rib (= knit 2/purl 2) with yellow/pink for 4 cm. Loosely cast off by knitting. ASSEMBLY: Fold cast-on edge and sew together, sew up to where piece was put together and work in the round with texMex. LEFT SOCK: Work as right sock but when parts are done and round is displaced to mid under foot slip the first 13-14-15 stitches from right side loosely on to right needle. |
|||||||
Diagram explanations |
|||||||
|
|||||||
 |
|||||||
Have you finished this pattern?Tag your pictures with #dropspattern #countryfairsocks or submit them to the #dropsfan gallery. Do you need help with this pattern?You'll find 24 tutorial videos, a Comments/Questions area and more by visiting the pattern on garnstudio.com. © 1982-2026 DROPS Design A/S. We reserve all rights. This document, including all its sub-sections, has copyrights. Read more about what you can do with our patterns at the bottom of each pattern on our site. |
|||||||


With over 40 years in knitting and crochet design, DROPS Design offers one of the most extensive collections of free patterns on the internet - translated to 17 languages. As of today we count 324 catalogues and 12290 patterns translated into English (UK/cm). 12290
We work hard to bring you the best knitting and crochet have to offer, inspiration and advice as well as great quality yarns at incredible prices! Would you like to use our patterns for other than personal use? You can read what you are allowed to do in the Copyright text at the bottom of all our patterns. Happy crafting!
Post a comment to pattern DROPS 198-20
We would love to hear what you have to say about this pattern!
If you want to leave a question, please make sure you select the correct category in the form below, to speed up the answering process. Required fields are marked *.