
Popular categories
Looking for a yarn?


Comments / Questions (38)
![]() Anna wrote:
Anna wrote:
Oh jetzt habe ich es überhaupt gesehen. Das AX steht seitlich. Ich habe es erst nur unten drunter gesucht und den Text noch nicht richtig verarbeitet. Sorry.
09.08.2025 - 13:19
![]() Anna wrote:
Anna wrote:
Hallo. Ich bin gerade dabei mit dieser Anleitung auf meine Größe zu reduzieren, innen ich alles andere lösche. Dabei bin ich beim Rückenteil auf AX gestoßen. ( In dieser Weise hin und zurück im Muster weiterstricken, aber wenn A.X 1 x in der Höhe gestrickt wurde, die mit einem Stern markierten Rapporte in der Höhe wiederholen.) Habe ich noch etwas nicht begriffen? AX kann ich gerade nicht zuzuordnen. Ich bitte um Hilfe.
08.08.2025 - 15:44DROPS Design answered:
Liebe Anna, stricken Sie zuerst die Diagramme A.9, A.10 und A.11 wie beschrieben, und wenn die Diagramme fertig sind, dh. inkcl; das Teil mit A.X gezeichnent, wiederholen Sie die Reihen mit dem Sternchen, dh zuerst stricken Sie die Reihen mit A.X auf der linken Seiten, dann stricken Sie wie die Reihen mit dem Sternchen gezeigt, beachten Sie nur, daß die verschiedene Muster nicht über dieselbe Reihenanzahl gestrickt werden. Viel Spaß beim Stricken!
08.08.2025 - 16:19
![]() Sylvie Chevalier-Levasseur wrote:
Sylvie Chevalier-Levasseur wrote:
Bonjour est ce qu' il y a une explication du modèle en commençant par le bas
28.10.2024 - 15:49DROPS Design answered:
Bonjour Mme Chevalier-Levasseur, il n'existe qu'une version "de haut en bas" pour ce modèle, retrouvez ici tous les modèles de gilets et de vestes tricotés de bas en haut -n'hésitez pas à ajouter autant de filtres que souhaités pour affiner votre recherche. Bon tricot!
28.10.2024 - 16:34
![]() Ylva wrote:
Ylva wrote:
Hei! Hva betyr det når det står på høyre forstykke at de neste fem og de neste åtte og de neste tolv maskene skal strikkes? Er de de samme maskene lagt sammen, ellet er det fem, åtte og tolv nye masker etter hverandre?
26.08.2022 - 15:30DROPS Design answered:
Hei Ylva. Litt usikker på hva du mener med og hvor i oppskriften under HØYRE FORSTYKKE du henvender deg til når du skriver: "....neste fem og de neste åtte og de neste tolv maskene skal strikkes...." Om du mener der det står:" ...totalt 5-8-8-11-12-16 ganger..." Så skal du i str. S øke som forklart i oppskriften på hver 2. pinne (dvs på hver pinne fra retten) totalt 5 ganger. I str. M og L 8 ganger, i str. XL 11 ganger, i str. XXL 12 ganger og i str. XXL 16 ganger. Om det ble feil forklart, send oss gjerne et nytt spørsmål + hvilken str du strikker. mvh DROPS Design
29.08.2022 - 11:25
![]() Josée wrote:
Josée wrote:
Bonjour,je fais la grandeur large. Au diagramme A2 lorsque nous avons fait les 4 premiers rang . Je ne comprends pas comment terminer le diagramme? J’espère que vous allez pouvoir m’aider. Merci.
04.07.2022 - 01:36DROPS Design answered:
Bonjour Josée, dans A.2 (notamment) les motifs ne se répètent pas au même rythme, autrement dit, lorsque vous avez tricoté les 4 premiers rangs sur les 19 premières mailles, reprenez au 1er rang et répétez ainsi ces 4 rangs sur ces 19 mailles. En même temps, continuez les 8 dernières mailles jusqu'à ce que les 10 rangs soient terminés et répétez ces 10 rangs sur ces 8 mailles. Bon tricot!
04.07.2022 - 08:30
![]() Pernille wrote:
Pernille wrote:
Skøn trøje! Er det muligt at strikke ærmerne fra vrangen, så jeg undgår at skulle stikke alle de vrangmasker? I bekræftende fald har jeg brug for hjælp til, hvordan jeg strikker mønster masken fra forrige pind korrekt.
04.04.2022 - 16:57DROPS Design answered:
Hej Pernille, ja det kan du sikkert gøre - prøv at lave en lille strikkeprøve hvor du har mønsteret fra retsiden, så kan du sammenligne med en prøve fra vrangen og se om du får samme mønster :)
05.04.2022 - 08:19
![]() Laetitia LAIR wrote:
Laetitia LAIR wrote:
Bonjour, Je vous remercie pour votre réponse. Pouvez-vous me préciser les différents diagrammes que l'on retrouve sur les 73 mailles du demi-devant droit après les augmentations des emmanchures. Je suis un peu perdue et que deviennent les 3 mailles au point mousse du côté emmanchure ? Merci d'avance.
16.10.2021 - 18:01DROPS Design answered:
Bonjour Mme Lair, en XXL voustricotez ainsi les 73 m (vu sur l'endroit) du devant droit: 1 m lis au point mousse, 6 m jersey envers, A.12 (= 8 m), 5 m jersey envers (= 1+6+8+5= 20 soit 12 x 1 m augmentées + 8 m montées), A.2 (= 30 m), A.3 (= 18 m), 5 m de bordure devant = 1+6+8+5+30+18+5=73. Bon tricot!
18.10.2021 - 08:54
![]() Laetitia LAIR wrote:
Laetitia LAIR wrote:
Bonjour, Je tricote la taille XXL. J'ai fait les augmentations des emmanchures et monter les 8 mailles à la fin du rang envers. J'ai tricoté à l'envers sur l'endroit les 5 premières augmentations , en A12 les 8 augmentations suivantes et 6mailles à l'envers sur l'endroit et 1 maille lisière. Que devient les 3 mailles au point mousse ? On continue de continuer ces 3 mailles au point mousse jusqu'à la fin de l'ouvrage ? Merci d'avance pour votre réponse.
13.10.2021 - 16:36DROPS Design answered:
Bonjour Mme Lair, quand toutes les mailles ont été montées, vous continuez comme avant (avec les différents diagrammes, les mailles endroit et les mailles envers comme avant) avec 5 mailles de bordure point mousse pour la bordure devant et 1 maille lisière au point mousse sur le côté. Bon tricot!
14.10.2021 - 09:16
![]() Kattis wrote:
Kattis wrote:
Jag ska öka till höger ärmhål och har lagt upp 8 nya maskor innanför de tre kantmaskorna. Jag ska nu lägga upp 4 till i slutet på nästa aviga varv. Dessa 12 nya maskorna ska stickas som 3 maskor slätstickning, 8 maskor mönster enl A12 och en kantmaska. Men var hamnar de 3 ursprungliga kantmaskorna? Känns som jag har 3 maskor för mycket?
05.03.2021 - 10:32DROPS Design answered:
Hej Kattis, när du ökar 1 maska innanför 3 kantmaskor på vartannat varv, stickas de 3 kantmaskorna fortfarande i rätstickning. Först när du är klar med ökningarna och skall lägga upp nya maskor i slutet av varvet från avigsidan, stickas alla maskorna i mönstret och 1 kanmaska i sidan i rätst. Lycka till :)
05.03.2021 - 13:10
![]() Carmen wrote:
Carmen wrote:
Hallo, ich bin noch ganz am Anfang dieser schönen Weste. Gibt es denn keine Randmaschen? Oder werden diese extra zum Muster noch hinzugestrickt? Es wäre nett, wenn mir jemand antworten könnte.
13.10.2020 - 21:26DROPS Design answered:
Liebe Carmen, bis alle Maschen für die Blende angeschlagen sind, gibt es keine Randmaschen, die Maschen werden wie im Diagram A.1 bzw A.4 gestrickt. Viel Spaß beim stricken!
14.10.2020 - 07:55
|
||||||||||||||||||||||||||||||||||||||||
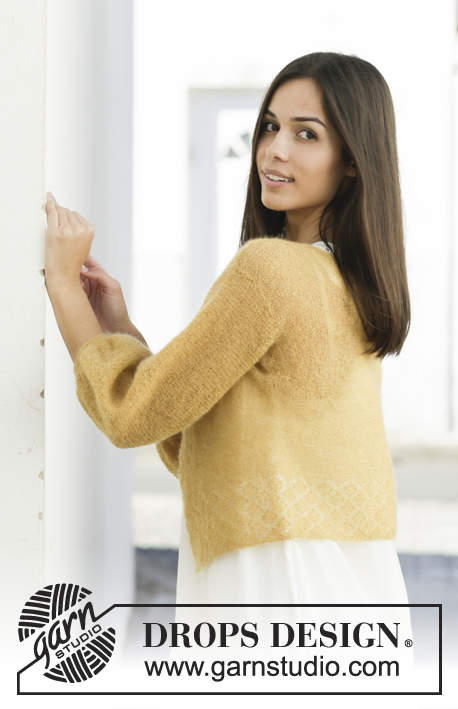
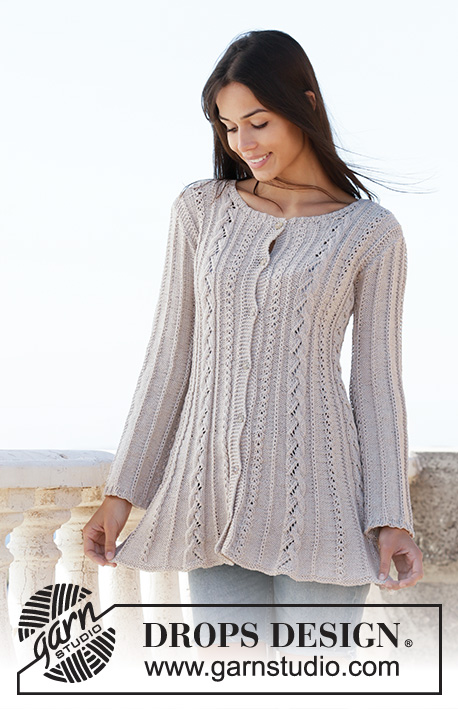
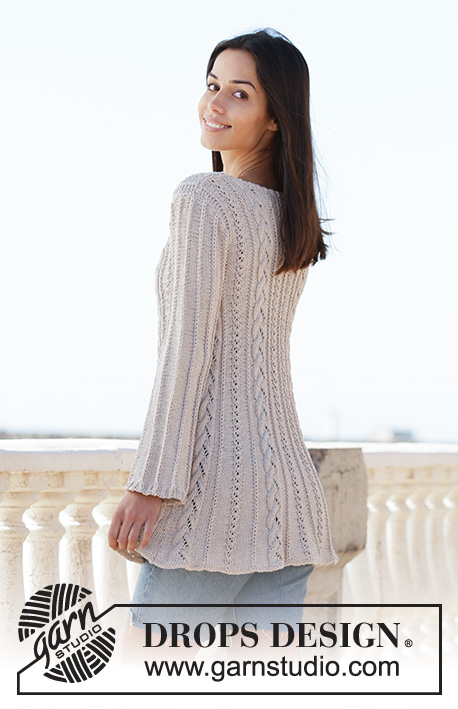
Victoria's Twirl#victoriastwirlcardigan |
||||||||||||||||||||||||||||||||||||||||
 |
 |
|||||||||||||||||||||||||||||||||||||||
Knitted long, shaped jacket in DROPS Cotton Merino. The piece is worked top down with lace pattern and cables. Sizes S - XXXL.
DROPS 200-8 |
||||||||||||||||||||||||||||||||||||||||
|
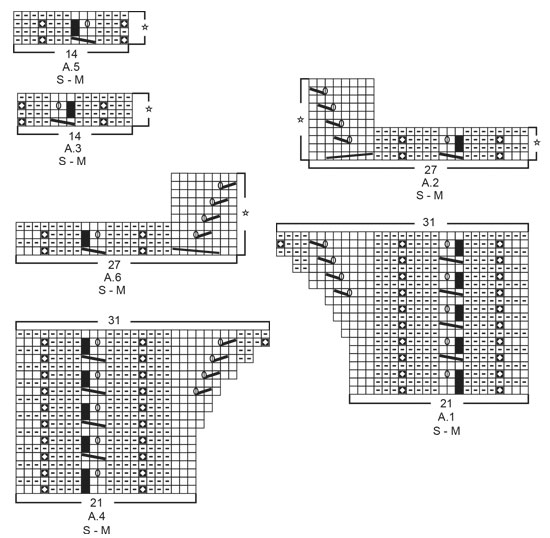
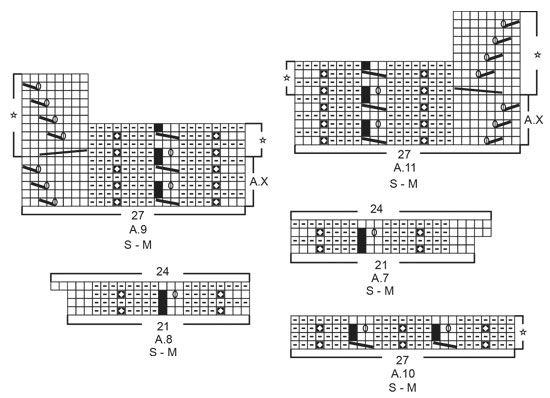
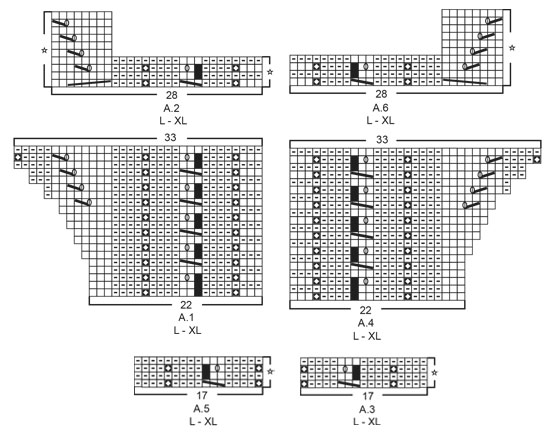
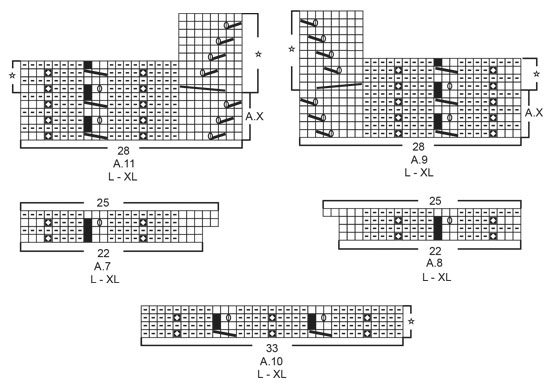
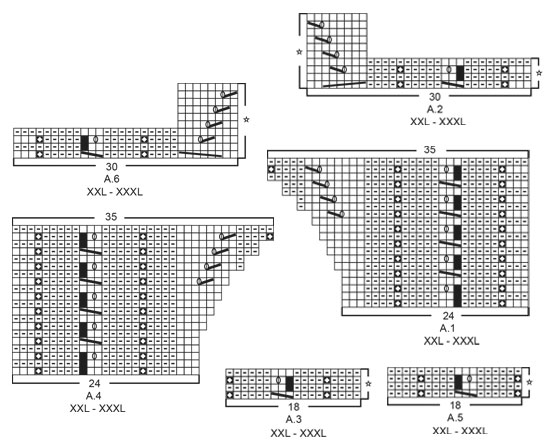
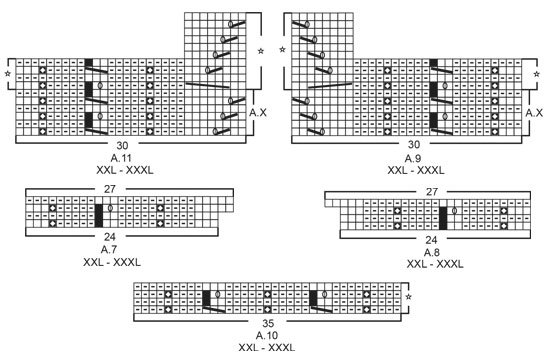
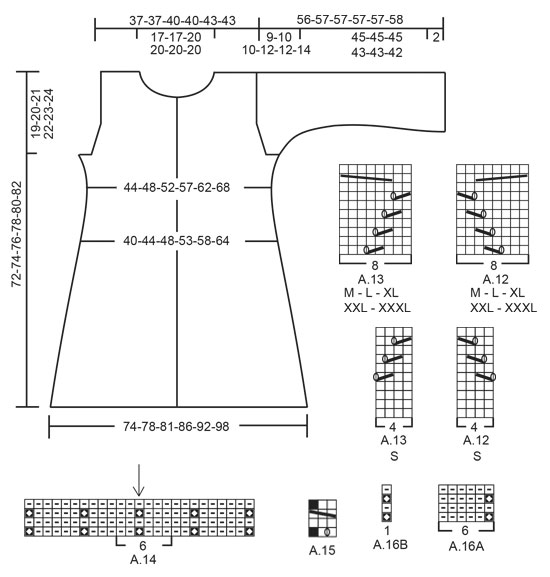
------------------------------------------------------- EXPLANATIONS FOR THE PATTERN: ------------------------------------------------------- RIDGE/GARTER STITCH (worked back and forth): Knit all rows. 1 ridge in height = Knit 2 rows. PATTERN: Right front piece: See diagrams A.1, A.2, A.3 and A.12. Left front piece: See diagrams A.4, A.5, A.6 and A.13. Back piece: See diagrams A.7 to A.13. Sleeve: See diagrams A.14. to A.16. The diagrams show all rows in pattern seen from right side. Choose correct diagram for your size. DIAGRAM TIP: This pattern contains a lot of diagrams. It is a good idea to draw a ring around the diagrams for your size to make it easier to see where you are. Another option is to cut out the diagrams for your size and separate them into groups; right/left front pieces, back piece etc. (see PATTERN). KNITTING TIP: All numbers for stitches on front and back pieces are based on there being 3 stitches on the small cables; but be aware that the number of stitches in the small cables can vary between 3 and 2 and this will affect the number of stitches on the row. On the sleeves the number of stitches is based on there being 2 stitches in the cable, as A.15 starts with 2 stitches. BUTTONHOLES: Work buttonholes on right band (when garment is worn). Work from the right side when there are 3 stitches left on the row as follows: 1 yarn over, knit 2 together and knit 1. On the next row (wrong side) knit the yarn over to leave a hole. The first buttonhole is worked on the first row from the right side, after the last stitch is cast on for neck. Then work the next 6-7-7-7-8-8 buttonholes with approx. 9-8-8½-8½-7½-8 cm between each one. INCREASE FOR ARMHOLE: All increases are worked from the right side! Increase 1 stitch for the armhole on the inside of 3 edge stitches in garter stitch by making 1 yarn over. On the next row (wrong side) knit or purl the yarn overs twisted to avoid holes. The new stitches are worked into the pattern as follows: The first 3-3-3-4-5-5 stitches are purled from the right side/knitted from the wrong side, the next 4-8-8-8-8-8 stitches are worked into A.12 (on right front piece and on right side of back piece), or into A.13 (on left front piece or left side of back piece), the next 0-0-0-4-6-12 stitches are purled from right side/knitted from wrong side, then finish with 1 edge stitch in garter stitch towards the side. DECREASE FRONT PIECE (for decreasing in purled sections): All decreases are worked from the right side! When decreasing evenly in the purled sections, decrease in every other purled section, but it’s not decreased inn all purl sections on the row. Skip the purl section closest to band, decrease 1 stitch in the next purl section, skip the next purl section and then decrease 1 stitch in the next purled section. The next time you decrease, skip the purl section closest to the band, skip the next purl section, decrease 1 stitch in the next purl section, skip the next purl section, decrease 1 stitch in the next purl section. Decrease 1 stitch in a purled section by purling 2 stitches together. NOTE: It is neatest if you alternately decrease at the beginning and end of a purled section (not in the middle). DECREASE BACK PIECE (for decreasing in purled sections): All decreases are worked from the right side! When decreasing evenly in the purled sections, decrease in every other purled section, but it’s not decreased inn all purl sections on the row Count from the middle stitch on the row to calculate where to start decreasing. Decrease 1 stitch in the purl section on both sides of the middle stitch, skip the next purl section each side of the middle stitch, and decrease in the next purl section on each side. Next time you decrease, skip the first purl section on each side of the middle stitch, decrease 1 stitch in the next purl section on each side, skip the next purl section on each side and decrease 1 stitch in the next purl section on each side. Decrease 1 stitch in a purled section by purling 2 stitches together. NOTE: It is neatest if you alternately decrease at the beginning and end of a purled section (not in the middle). INCREASE FRONT PIECE (for increasing in purled sections): All increases are worked from the right side! When increasing evenly in the purled sections, increase in every other purled section, but it’s not increased inn all purl sections on the row Skip the purl section closest to band, increase 1 stitch in the next purl section, skip the next purl section and then increase 1 stitch in the next purled section. The next time you increase, skip the purl section closest to the band, skip the next purl section, increase 1 stitch in the next purl section, skip the next purl section, increase 1 stitch in the next purl section. Increase 1 stitch in a purled section (seen from the right side) by making 1 yarn over. On the next row (wrong side) knit the yarn overs twisted to avoid holes. Then purl the new stitches from the right side/knit from the wrong side. NOTE: It is neatest if you alternately increase at the beginning and end of a purled section (not in the middle). INCREASE BACK PIECE (for increasing in purled sections): All increases are worked from the right side! When increasing evenly in the purled sections, increase in every other purled section across the middle 14 purl sections on the row. Count the middle 14 purl sections and place a marker in each side to indicate where the increases start and end. The first time you increase 7 stitches evenly spaced, increase 1 stitch in the first purl section, skip the next purl section, increase 1 stitch in the next purl section etc until a total of 7 stitches are increased. The next time you increase, skip the first purl section, increase 1 stitch in the next purl section, skip the next purl section, increase in the next purl section etc, until a total of 7 stitches are increased. Increase 1 stitch in a purled section (seen from the right side) by making 1 yarn over. On the next row (wrong side) knit the yarn overs twisted to avoid holes. Then purl the new stitches from the right side/knit from the wrong side. NOTE: It is neatest if you alternately increase at the beginning and end of a purled section (not in the middle). DECREASE TIP (for mid under sleeves): Decrease 1 stitch on each side of A.15 as follows: Work until there are 2 stitches left before A.15, purl 2 together, work A.15 (= 2/3 stitches), purl 2 twisted together (= 2 stitches decreased). ------------------------------------------------------- START THE PIECE HERE: ------------------------------------------------------- JACKET - SHORT OVERVIEW OF THE PIECE: The piece is worked back and forth with circular needle in sections, top down. Start with right front piece; i.e. work right shoulder, cast on new stitches for neck and increase to armhole. Then decrease and increase in purled sections to shape. Left front piece is worked in the same way, but reversed. Back piece is also worked in the same way; i.e. work right shoulder, left shoulder, cast on new stitches for neck, increase for armholes in sides and decrease and increase in purled sections to shape. The sleevecap is worked back and forth on circular needle, top down, before the sleeve is worked in the round with short circular needle/double pointed needles, top down. The piece is then sewn together and the neck worked to finish. RIGHT FRONT PIECE (when garment is worn): Cast on 21-21-22-22-24-24 stitches with circular needle size 3 mm and Cotton Merino. Work 1 RIDGE - read description above. Change to circular needle size 4 mm and work A.1 (first row = right side). AT THE SAME TIME increase to neck as follows: On the 7th-7th-5th-5th-5th-5th row in A.1 start to increase for neck, i.e. cast on new stitches for the neck at the end of each row from the right side as follows: Cast on 1 stitch a total of 3-3-4-4-4-4 times and 2 stitches a total of 3 times = 31-31-33-33-35-35 stitches – read KNITTING TIP! The new stitches are worked as shown in diagram. Then on 19th row in A.1 cast on 15-15-17-17-18-18 new stitches for neck at the end of the row from the right side = 46-46-50-50-53-53 stitches. These 15-15-17-17-18-18 stitches are purled on the next row; the remaining stitches are worked as shown in the last row in A.1. When A.1 is finished, work the next row as follows from the right side: Work A.2 (= 27-27-28-28-30-30 stitches), A.3 (= 14-14-17-17-18-18 stitches) and finish with 5 band stitches in garter stitch towards mid front – remember BUTTONHOLES on band – read description above. Continue this pattern. When the piece measures 15-14-15-13-14-12 cm from the cast-on edge, increase 1 stitch for armhole on the inside of the 3 edge stitches in garter stitch towards the armhole – read INCREASE TO ARMHOLE (the increased stitches are worked as described in INCREASE TO ARMHOLE). Increase like this every 2nd row (i.e. every row from the right side) a total of 5-8-8-11-12-16 times then cast on 3-4-4-6-8-10 new stitches at the end of the next row from the wrong side = 54-58-62-67-73-79 stitches. When the last stitches have been cast on for the armhole, the piece measures approx. 19-20-21-22-23-24 cm from the cast-on edge. Insert 1 marker at the beginning of the row in the side. THE PIECE IS NOW MEASURED FROM HERE! Continue the pattern as before, with 1 edge stitch in garter stitch towards the side and 5 band stitches in garter stitch towards mid front. When the piece measures 3 cm from the marker in all sizes, decrease 2 stitches evenly spaced – read DECREASE FRONT PIECE. Repeat this decrease when the piece measures 7 cm from the marker = 50-54-58-63-69-75 stitches. When the piece measures 10 cm from the marker in all sizes, increase 3 stitches evenly spaced – read INCREASE FRONT PIECE. When the piece measures 14½ cm from the marker, increase 4 stitches evenly spaced. Continue this increase, with alternately 3 and 4 stitches every 4½ cm a total of 10 times (increase alternately 3 stitches 5 times and 4 stitches 5 times) = 85-89-93-98-104-110 stitches. Continue working until the piece measures 52-53-54-55-56-57 cm from the marker (or to desired length; there is 1 cm left to finished length). Change to circular needle size 3 mm and work 2 ridges back and forth over all stitches. Cast off with knit from the right side. The front piece measures approx. 72-74-76-78-80-82 cm from the shoulder down. LEFT FRONT PIECE (when garment is worn): Cast on 21-21-22-22-24-24 stitches with circular needle size 3 mm and Cotton Merino. Work 1 RIDGE - read description above. Change to circular needle size 4 mm and work A.4 (first row = right side). AT THE SAME TIME increase for neck as follows: On the 8th-8th-6th-6th-6th-6th row in A.4 start to increase for neck by casting on new stitches at the end of each row from the wrong side as follows: Cast on 1 stitch a total of 3-3-4-4-4-4 times and 2 stitches a total of 3 times. The new stitches are worked as shown in diagram. Then on the last row of A.4 (wrong side), cast on 15-15-17-17-18-18 new stitches for neck at the end of the row = 46-46-50-50-53-53 stitches. The next row is worked as follows from the right side: Work 5 band stitches in garter stitch, A.5 (= 14-14-17-17-18-18 stitches) and A.6 (= 27-27-28-28-30-30 stitches). Read KNITTING TIP and continue this pattern. When the piece measures 15-14-15-13-14-12 cm from the cast-on edge, increase 1 stitch for the armhole on the inside of the 3 edge stitches in garter stitch towards the armhole – read INCREASE FOR ARMHOLE (the increased stitches are worked as described in INCREASE FOR ARMHOLE). Increase like this every 2nd row (i.e. every row from the right side) a total of 5-8-8-11-12-16 times, then cast on 3-4-4-6-8-10 new stitches at the end of the next row from the right side = 54-58-62-67-73-79 stitches. When the last stitches have been cast on for the armhole, the piece measures approx. 19-20-21-22-23-24 cm from the cast-on edge. Insert 1 marker at the beginning of the row in the side. THE PIECE IS NOW MEASURED FROM HERE! Continue the pattern as before, with 5 band stitches in garter stitch towards mid front and 1 edge stitch in garter stitch towards the side. When the piece measures 3 cm from the marker in all sizes, decrease 2 stitches evenly spaced – read DECREASE FRONT PIECE. Repeat this decrease when the piece measures 7 cm from the marker = 50-54-58-63-69-75 stitches. When the piece measures 10 cm from the marker in all sizes, increase 3 stitches evenly spaced – read INCREASE FRONT PIECE. When the piece measures 14½ cm from the marker, increase 4 stitches evenly spaced. Continue this increase, with alternately 3 and 4 stitches every 4½ cm a total of 10 times (increase alternately 3 stitches 5 times and 4 stitches 5 times) = 85-89-93-98-104-110 stitches. Continue working until the piece measures 52-53-54-55-56-57 cm from the marker (or to desired length; there is 1 cm left to finished length). Change to circular needle size 3 mm and work 2 ridges back and forth over all stitches. Cast off with knit from the right side. The front piece measures approx. 72-74-76-78-80-82 cm from the shoulder down. BACK RIGHT SHOULDER (when garment is worn): Cast on 21-21-22-22-24-24 stitches with circular needle size 3 mm and Cotton Merino. Work 1 ridge. Change to circular needle size 4 mm and work A.7 (first row = right side). AT THE SAME TIME at the end of the 2nd row in A.7 (wrong side), cast on 2 new stitches for neck. Complete A.7. AT THE SAME TIME at the end of the last row in A.7 cast on 33-33-39-39-41-41 new stitches for neck (mid back of neck) = 57-57-64-64-68-68 stitches. Lay the piece to one side and work back left shoulder as described below. BACK LEFT SHOULDER (when garment is worn): Cast on 21-21-22-22-24-24 stitches with circular needle size 3 mm and Cotton Merino. Work 1 ridge. Change to circular needle size 4 mm and work A.8 (first row = right side). AT THE SAME TIME at the end of the 3rd row in A.8 (right side), cast on 2 new stitches for neck. Complete A.8 = 24-24-25-25-27-27 stitches. Now the two sides are worked together for back piece as described below. BACK PIECE: Place the stitches from the right and left sides on same circular needle size 4 mm = 81-81-89-89-95-95 stitches. The first row is worked as follows from the right side (start working the stitches on left shoulder): Work A.9 (= 27-27-28-28-30-30 stitches), A.10 (= 27-27-33-33-35-35 stitches) and A.11 (= 27-27-28-28-30-30 stitches). Continue this pattern back and forth, but when A.X has been worked 1 time in height, work the repeats marked with a star upwards. When the piece measures 15-14-15-13-14-12 cm from the cast-on edge, increase for armholes on each side. Increase 1 stitch on the inside of the 3 edge stitches in garter stitch on each side – read INCREASE FOR ARMHOLE (the increased stitches are worked as described in INCREASE FOR ARMHOLE). Increase like this every 2nd row (i.e. each row from the right side) a total of 5-8-8-11-12-16 times, then cast on 3-4-4-6-8-10 new stitches at the end of the next two rows = 97-105-113-123-135-147 stitches. When the last stitches have been cast on for the armholes, the piece measures approx. 19-20-21-22-23-24 cm from the cast-on edge. Insert 1 marker at the end of the row in the side. THE PIECE IS NOW MEASURED FROM HERE! Continue the pattern as before with 1 edge stitch in garter stitch on each side. When the piece measures 3 cm from the marker in all sizes, decrease 4 stitches evenly spaced – read DECREASE BACK PIECE. Repeat this decrease when the piece measures 7 cm from the marker = 89-97-105-115-127-139 stitches. When the piece measures 10 cm from the marker in all sizes, increase 7 stitches evenly spaced – read INCREASE BACK PIECE. Increase like this every 4½ cm a total of 10 times = 159-167-175-185-197-209 stitches. Continue working until the piece measures 52-53-54-55-56-57 cm from the marker (or to desired length; there is 1 cm left to finished length). Change to circular needle size 3 mm and work 2 ridges back and forth over all stitches. Cast off with knit from the right side. The back piece measures approx. 72-74-76-78-80-82 cm from the shoulder down. SLEEVE: The sleeve is worked top down. The sleeve cap is worked first, back and forth with circular needle, and then the sleeve is worked in the round with short circular needle/double pointed needles to finished length. Cast on 23-27-31-25-31-29 stitches with short circular needle size 4 mm and Cotton Merino. Work A.14 back and forth, but count out from the middle – mid-stitch in A.14 should match mid-stitch on row. AT THE SAME TIME cast on new stitches for sleeve cap at the end of each row on each side as follows (the new stitches are worked into A.14 as you go so that there are 5 purled stitches between each1 English rib stitch): Cast on 3 stitches 1 time on each side, 2 stitches 3-3-3-4-4-4 times on each side, 1 stitch 5-6-6-7-7-9 times on each side, 2 stitches 3-3-3-3-3-4 times on each side and 3 stitches 1-1-1-2-2-2 times on each side = 69-75-79-85-91-97 stitches. When all the stitches have been cast on, join the piece and work in the round to finished length. Insert 1 marker thread at the beginning of the round (= mid under sleeve). The first round is worked as follows: Start 1 stitch before the marker thread (slip stitch before the marker thread onto left needle), work A.15 over the middle 2 stitches under the sleeve, purl 9-12-14-11-14-17 stitches, work A.16A over the next 48-48-48-60-60-60 stitches (= 8-8-8-10-10-10 repeats of 6 stitches), work A.16B (= 1 stitch) and finish with purl 9-12-14-11-14-17 stitches. Continue this pattern. AT THE SAME TIME when the piece measures 2 cm from where the piece was joined in the round, decrease 2 stitches mid under sleeve – read DECREASE TIP. Decrease like this every 1½-1½-1½-1-1-1 cm a total of 8-9-9-10-10-11 times = 53-57-61-65-71-75 stitches. Continue working until the piece measures 45-45-45-43-43-42 cm from where it was joined (or to desired length; there is 2 cm left to finished length. NOTE: Shorter measurements in larger sizes due to wider shoulders and longer sleeve cap). Change to double pointed needles size 3 mm and work rib in the round as follows: Continue with A.15 mid under sleeve, purl 1-3-2-1-1-3 stitches, * knit 1, purl 2 *, work from *-* until there are 2-4-3-2-2-4 stitches left before A.15, knit 1 and purl 1-3-2-1-1-3. Continue this rib for approx. 1½ til 2 cm. Loosely cast off with knit over knit and purl over purl. The sleeve measures approx. 56-57-57-57-57-58 cm, from the cast-on edge down. Work the other sleeve in the same way. ASSEMBLY: Sew shoulder seams inside the cast-on edge. Sew side seams from the armhole down – sew in outermost loop of outermost stitch so the seam is flat. Sew in sleeves (the sleeve is placed under the garter stitch edge along the armhole so this edge shows and sew in the outermost stitch along the garter stitch edge). Sew buttons onto left band. NECK: Knit up from the right side approx. 104 to 119 stitches around the neck with circular needle size 3 mm (number of stitches must be divisible by 3 + 2). The first row is worked as follows from the wrong side: 5 band stitches in garter stitch, * purl 1, knit 2 *, work from *-* until there are 6 stitches left on row, purl 1 and 5 band stitches in garter stitch. Continue this rib for approx.1½ to 2 cm. Loosely cast off with garter stitch over garter stitch, knit over knit and purl over purl. |
||||||||||||||||||||||||||||||||||||||||
Diagram explanations |
||||||||||||||||||||||||||||||||||||||||
|
||||||||||||||||||||||||||||||||||||||||
 |
||||||||||||||||||||||||||||||||||||||||
 |
||||||||||||||||||||||||||||||||||||||||
 |
||||||||||||||||||||||||||||||||||||||||
 |
||||||||||||||||||||||||||||||||||||||||
 |
||||||||||||||||||||||||||||||||||||||||
 |
||||||||||||||||||||||||||||||||||||||||
 |
||||||||||||||||||||||||||||||||||||||||
Have you finished this pattern?Tag your pictures with #dropspattern #victoriastwirlcardigan or submit them to the #dropsfan gallery. Do you need help with this pattern?You'll find 32 tutorial videos, a Comments/Questions area and more by visiting the pattern on garnstudio.com. © 1982-2026 DROPS Design A/S. We reserve all rights. This document, including all its sub-sections, has copyrights. Read more about what you can do with our patterns at the bottom of each pattern on our site. |
||||||||||||||||||||||||||||||||||||||||


With over 40 years in knitting and crochet design, DROPS Design offers one of the most extensive collections of free patterns on the internet - translated to 17 languages. As of today we count 324 catalogues and 12290 patterns translated into English (UK/cm). 12290
We work hard to bring you the best knitting and crochet have to offer, inspiration and advice as well as great quality yarns at incredible prices! Would you like to use our patterns for other than personal use? You can read what you are allowed to do in the Copyright text at the bottom of all our patterns. Happy crafting!
Post a comment to pattern DROPS 200-8
We would love to hear what you have to say about this pattern!
If you want to leave a question, please make sure you select the correct category in the form below, to speed up the answering process. Required fields are marked *.