
Popular categories
Looking for a yarn?


Comments / Questions (11)
![]() RIGMOR wrote:
RIGMOR wrote:
Hei dere! Jeg synes denne oppskriften er forklart/satt sammen på en veldig forvirrende måte. Med 18 forskjellige diagramdeler, er det etter min mening 17 for mye. Jeg sitter og ser på Setesdal med rundfelling i boka "42 norske kofter", og der er det 1 diagram til hele bærestykket med fellingene skrevet inn ved siden av aktuell rad. Selve mønsterteksten er bare på 1 side. Det går også fram av tidligere spørsmål at en del er uklart. Håper dere kan forenkle mer i framtida. Takk!
30.01.2023 - 20:52
![]() Suzanne Crosier wrote:
Suzanne Crosier wrote:
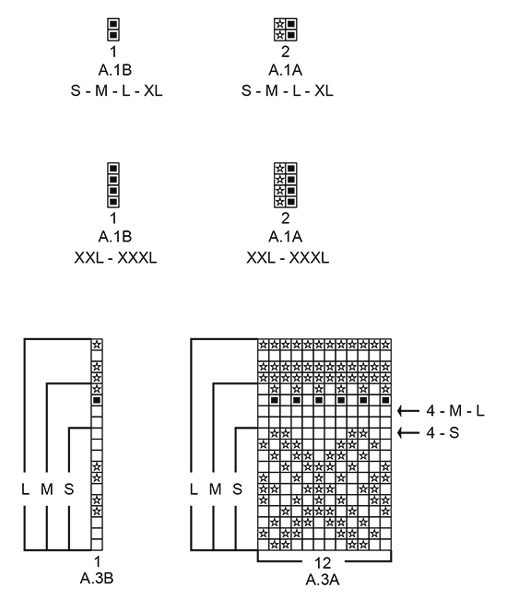
Hi I'm working on size XL and getting to end if row on 4th increase on A3A. And I don't have 12 stitches left to make complete pattern repeat I only have 8 stitches.
21.07.2022 - 17:29DROPS Design answered:
Hi Suzanne, sometimes the stitch count is not divisible with full/whole repeats of the diagram in width. This is usually the case where the diagram is a repetitive pattern, so that regardless of working full repeats, the pattern will still be consistent. Please also see the lesson Drops HERE. Happy knitting!
22.07.2022 - 22:22
![]() Ella wrote:
Ella wrote:
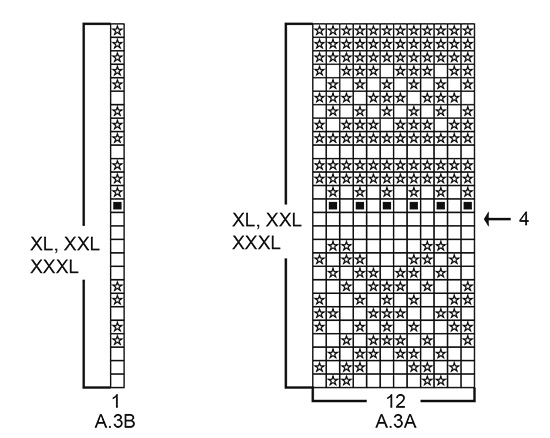
Hello, When knitting a size Small, and looking at the A.3A pattern, I understand that I need to stop after I knit 12 rows, is that correct? So I wouldn’t knit the top 8 rows, those are for larger sizes?
20.03.2022 - 23:05DROPS Design answered:
Dear Ella, yes, that's correct, you don't need to knit the top 8 rows. Happy knitting!
26.03.2022 - 20:01
![]() Anna wrote:
Anna wrote:
So “completed” means two rows: one RS and one WS? I’m just trying to make sure that the next time I see “ work pattern until completed” I know what it means. Thank you for all your help,
11.03.2022 - 04:13DROPS Design answered:
Dear Anna, correct, "completed" means here until the diagrams are done, so 2 rows in your size. Happy knitting!
11.03.2022 - 09:57
![]() Anna wrote:
Anna wrote:
Thank you for being so patient with me, I figured out that the pattern just didn't mention the WS directions and I had to use my own judgement to make the ribbing work. I did exactly how you wrote and it looks great. I have a question regarding the yoke. It says "Continue this patterns until A.1 has been completed." I'm not sure what "completed" means. The directions are for one row. What do I do after I complete one row of A.1? Do I do it again?
10.03.2022 - 17:25DROPS Design answered:
Dear Anna, it means you now just work following diagram A.1 (= 2 rows): ie from RS: 5 sts in garter st, repeat A.1A and end with A.1B (1 st) and 5 sts in garter st. From WS work: 5 sts in garter st, A.1B , repeat A.1A (reading left towards right) and 5 sts in garter stitch. Happy knitting!
10.03.2022 - 18:35
![]() Anna wrote:
Anna wrote:
I don’t know what I am doing wrong but I do 5 stitches in garter (which is all knit) then I knit 2 and purl 2. So stitch 7 and 8 are knits. When I get to the 9th stitch, I purl, but the stitch below is not a purl, it’s a knit so I am not getting a rib.
09.03.2022 - 19:52DROPS Design answered:
Dear Anna, from WS work: 5 sts in garter stitch, *purl 2, knit 2*, repeat from *-* until 7 sts remain, finish with purl 2, 5 sts in garter stitch. Happy knitting!
10.03.2022 - 10:07
![]() Anna wrote:
Anna wrote:
For the small size, do I cast on 108 stitches total, or 118 (108+5+5 for the band stitches?) when I cast on 108 and follow the pattern, my ribbing is totally off, my knit and purl stitches do not line up across rows. When I do the math, 108-5-5=98 and you can’t divide 98 by 4 (2 knit and 2 purl) when I do the math with 118 stitches, it’s 118-5-5=108 then 108 divides into 4 so I’m guessing the 2 knit+2 purl=4 stitches would mean by purls and knits line up
09.03.2022 - 04:16DROPS Design answered:
Dear Anna, cast on 108 sts and work: 5 sts in garter stitch, *knit 2, purl 2* a total of 24 times , 7 sts remain, knit 2 and 5 sts in garter stitch so that = 5+ 4x24 + 2+5= 108 - and the ribbing will look the same on each side (starting and ending with K2). Happy knitting!
09.03.2022 - 19:08
![]() Mia Merethe wrote:
Mia Merethe wrote:
Strikker denne i str s, men så lurer jeg litt på mønster diagrammet; er det så at i denne str ikke skal strikke den øverste delen av diagram A.3A?
30.09.2019 - 09:37DROPS Design answered:
Hej Mia, ja det stemmer, du strikker kun det i rammen for størrelse S. God fornøjelse!
01.10.2019 - 15:18
![]() Tone wrote:
Tone wrote:
Hei. I introen står det at vi trenger 80 cm rundpinne str 4,5, mens i selve oppskriften finner jeg bare 80cm str.3,5. Eneste stedet jeg ser 4,5 er på settpinner/liten rundpinne på ermene. Når skal jeg bytte til 80 cm 4,5 og skal settpinner/liten rundpinne 3,5 brukes nederst på ermene? Annet i forhold til hvilke pinner når?
07.08.2019 - 21:14DROPS Design answered:
Hej Tone, du bytter til pind 4,5 lige efter halskanten. Se her: .... Strikk 1 pinne rett fra retten der det økes 31-33-35-37-37-39 masker jevnt fordelt – les ØKETIPS = 139-145-151-157-161-171 masker. Bytt til rundpinne 4,5. .... God fornøjelse!
09.08.2019 - 10:36
![]() Annelie Saxvold wrote:
Annelie Saxvold wrote:
Stickar i baby palett som har en sträckning på 27 m stickor 3,5
20.07.2019 - 14:18DROPS Design answered:
Hei Annelie. Ønsket du hjelpe med det du skrev og evnt hva? mvh Drops design
02.09.2019 - 11:00
|
||||||||||||||||
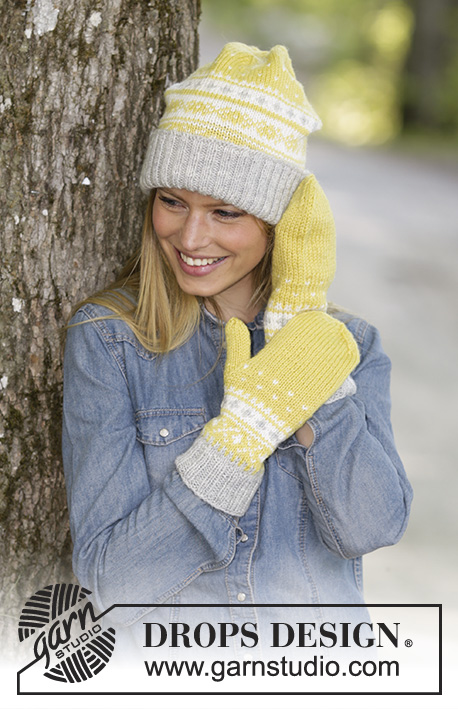
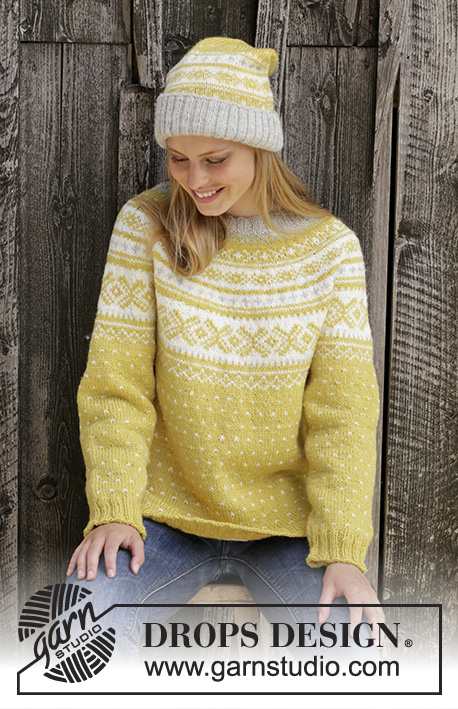
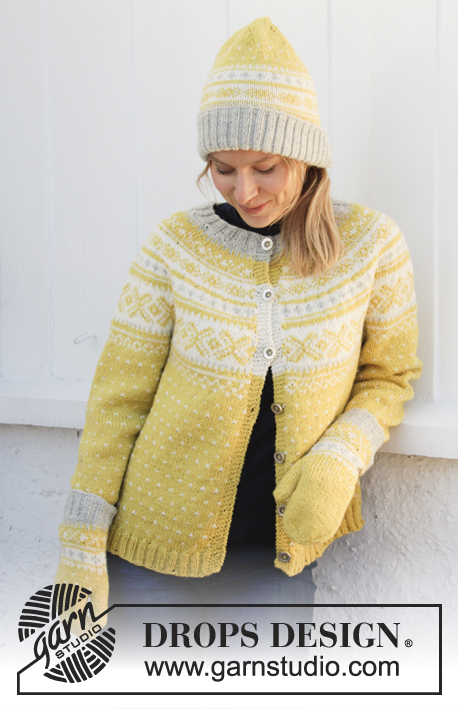
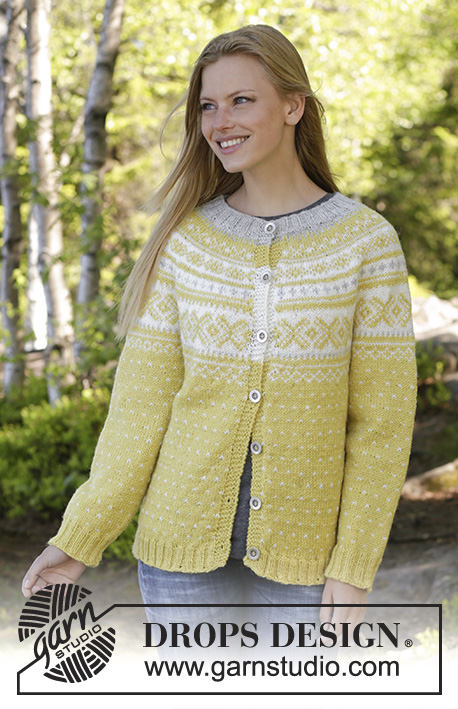
Lemon Pie Cardigan#lemonpiecardigan |
||||||||||||||||
 |
 |
|||||||||||||||
Knitted jacket in DROPS Karisma. The piece is worked top down with round yoke and Nordic pattern. Sizes S - XXXL.
DROPS 195-11 |
||||||||||||||||
|
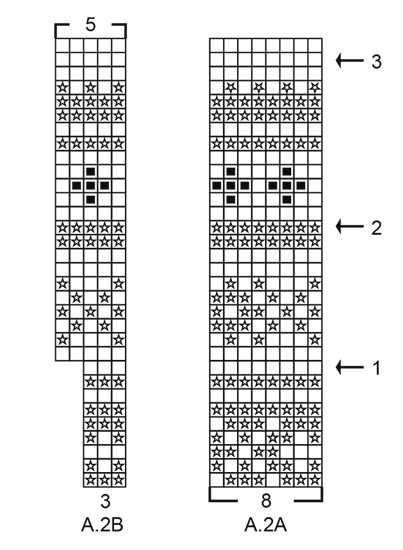
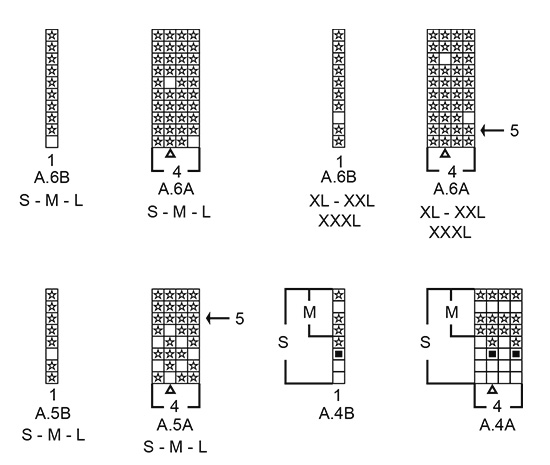
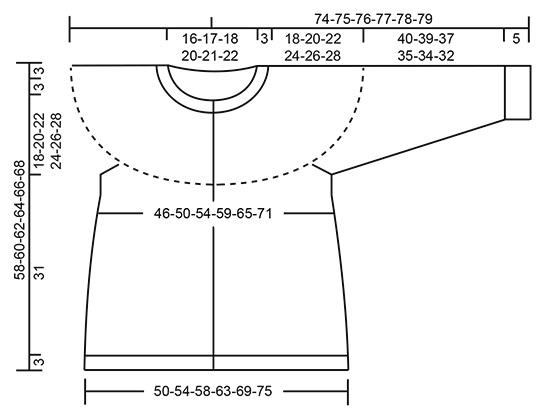
EXPLANATIONS FOR THE PATTERN: ------------------------------------------------------- RIDGE/GARTER STITCH (worked back and forth): 1 ridge = Knit 2 rounds. INCREASE TIP (evenly spaced): All increases are made from the right side! To work out how to increase evenly, count the total number of stitches on the needle (e.g. 108 stitches), minus the bands (e.g. 10 stitches) and divide the remaining stitches by the number of increases to be made (e.g. 31) = 3.2. In this example, increase by making 1 yarn over approx. each 3rd stitch. On the next row purl the yarn overs twisted to avoid holes. Do not increase over the bands. ELEVATION (back of neck): Skip this section if you do not want an elevation. Insert 1 marker in the middle stitch on the row. Start from the right side with light pearl grey and knit 15-16-17-18-19-20 stitches past the stitch with the marker, turn, tighten strand and purl 31-33-35-37-39-41 stitches. Turn, tighten strand and knit 46-49-52-55-58-61 stitches, turn, tighten strand and purl 61-65-69-73-77-81 stitches. Turn, tighten strand and knit 76-81-86-91-96-101 stitches, turn, tighten strand and purl to end of row (the band is worked in garter stitch). Then work YOKE as described in text. PATTERN: See diagrams A.1 to A.6. Choose diagram for your size (applies to A.1, A.3, A.4, A.5 and A.6). The diagrams show all the rows in the pattern seen from the right side. The whole pattern is worked in stocking stitch. KNITTING TIP-1 (for bands): On the rows with pattern and 2 colours, work the 5 band stitches in each side with the background colour in the pattern. KNITTING TIP-2: To avoid the knitting tension becoming tighter when working pattern, it is important that the strands at the back are not tight. Use a larger needle size when working pattern if this is a problem. It is also important to maintain the knitting tension in height, or the yoke will be too short and the armholes too small! DECREASE TIP (for mid under sleeves): Start 2 stitches before the stitch with the marker thread, knit 2 together, knit 1 (= stitch with marker thread), knit 2 twisted together (= 2 stitches decreased). BUTTONHOLES: Work buttonholes on the right band (when the garment is worn). 1 buttonhole = Work from the right side until there are 3 stitches left on the row, make 1 yarn over, knit 2 together and knit the last stitch. On the next row (wrong side) knit the yarn over to leave a hole. The first buttonhole is worked when the neck measures approx. 1½-2 cm. Then work the next 6-6-6-7-7-7 buttonholes with approx. 8-8½-9-8-8½-8½ cm between each one. ------------------------------------------------------- START PIECE HERE: ------------------------------------------------------- JACKET - SHORT OVERVIEW OF THE PIECE: Neck, yoke and body are worked back and forth with circular needle from mid front, top down. After the neck you can work an elevation in back of neck so that the yoke is slightly higher at the back. You can leave out the elevation if you wish; the neck is then the same front and back – read description in the text. The sleeves are worked in the round with short circular needle/double pointed needles, top down. NECK: Cast on 108-112-116-120-124-132 stitches (including 5 band stitches in each side towards mid front) with circular needle size 3.5 mm and light pearl grey. Purl 1 row (= wrong side). The next row is worked as follows from the right side: 5 band stitches in GARTER STITCH – read description above, * knit 2, purl 2 *, work from *-* until there are 7 stitches left on the row, knit 2 and finish with 5 band stitches in garter stitch. Continue the rib like this for 3 cm – remember BUTTONHOLES on right band – read description above. Knit 1 row from the right side where you increase 31-33-35-37-37-39 stitches evenly on row – read INCREASE TIP = 139-145-151-157-161-171 stitches. Change to circular needle size 4.5 mm. Purl 1 row (bands worked in garter stitch). You can now work an ELEVATION in back of neck – read description above, or go straight to YOKE. YOKE: Read KNITTING TIP-1 and KNITTING TIP-2! The first row is worked as follows from the right side: 5 band stitches in garter stitch, work A.1A (= 2 stitches) until there are 6 stitches left on the row, work A.1B (= 1 stitch) and finish with 5 band stitches in garter stitch. Continue this pattern until A.1 has been completed. REMEMBER THE KNITTING TENSION! Work 2-2-2-2-4-8 rows stocking stitch with lemon and 5 band stitches in garter stitch in each side - AT THE SAME TIME on the first row increase 34-36-38-48-52-58 stitches evenly on row – remember INCREASE TIP = 173-181-189-205-213-229 stitches. The next row is worked as follows from the right side: 5 band stitches in garter stitch, work A.2A until there are 8 stitches left on the row (= 20-21-22-24-25-27 repeats of A.2A of 8 stitches), work A.2B (= 3 stitches) and finish with 5 band stitches in garter stitch. Continue this pattern. AT THE SAME TIME on each row marked with an arrow increase evenly on row as described below: On the row marked with arrow-1 increase 34-42-50-50-58-58 stitches evenly on row = 207-223-239-255-271-287 stitches (there is now room for 24-26-28-30-32-34 repeats of A.2A of 8 stitches). On the row with arrow-2 increase 32-40-48-48-56-56 stitches evenly on row = 239-263-287-303-327-343 stitches (there is now room for 28-31-34-36-39-41 repeats of A.2A of 8 stitches and A.2B is now 5 stitches). On the row with arrow-3 increase 24-36-36-44-44-52 stitches evenly on row = 263-299-323-347-371-395 stitches. When A.2 has been completed, work the next row as follows from the right side: 5 band stitches in garter stitch, work A.3A until there are 6 stitches left on the row (= 21-24-26-28-30-32 repeats of A.3A of 12 stitches), work A.3B (= 1 stitch) and finish with 5 band stitches in garter stitch. Continue this pattern. AT THE SAME TIME on the row marked with arrow-4 increase 20-16-16-20-20-20 stitches evenly on row = 283-315-339-367-391-415 stitches. Continue working until you just have the last row in A.3 left. Then work this last row as follows from the right side: Work 47-51-54-59-64-69 stitches as shown on the last row in A.3 (= front piece), place the next 52-60-66-70-72-74 stitches on 1 thread for sleeve, cast on 8-8-10-10-12-14 new stitches on the needle (= in side under sleeve), work 85-93-99-109-119-129 stitches as shown in last row of A.3 (= back piece), place the next 52-60-66-70-72-74 stitches on 1 thread for sleeve, cast on 8-8-10-10-12-14 new stitches on the needle (= in side under sleeve) and work the remaining 47-51-54-59-64-69 stitches as shown in A.3 (= front piece). Body and sleeves are finished separately. THE PIECE IS NOW MEASURED FROM HERE! BODY: = 195-211-227-247-271-295 stitches. In sizes S and M first work A.4 and A.5 as explained below and in size L work A.5 as explained below. In the remaining sizes (XL, XXL and XXXL) A4 and A.5 have already been worked (in A.3), therefore go directly to ALL SIZES in the 3 largest sizes. The first row is worked as follows from the wrong side (diagrams read from left to right when working from wrong side): SIZES S and M: Work 5 band stitches in garter stitch, A.4B (= 1 stitch), A.4A until there are 5 stitches left on the row (= 46-50 repeats of 4 stitches) and finish with 5 band stitches in garter stitch. When A.4 has been completed, work A.5 in the same way. AT THE SAME TIME on the row with arrow-5 in A.5A increase16 stitches evenly on row in both sizes = 211-227 stitches. When A.5 has been completed, continue as described under ALL SIZES! SIZE L: Work 5 band stitches in garter stitch, A.5B (= 1 stitch), A.5A until there are 5 stitches left on the row (= 54 repeats of 4 stitches) and finish with 5 band stitches in garter stitch. Continue this pattern. AT THE SAME TIME on the row marked with arrow-5 increase 16 stitches evenly on row = 243 stitches. When A.5 has been completed, continue working as described under ALL SIZES! ALL SIZES: The next row is worked as follows from the wrong side: 5 band stitches in garter stitch, work A.6B (= 1 stitch), A.6A until there are 5 stitches left on the row (= 50-54-58-59-65-71 repeats of A.6A of 4 stitches). Continue this pattern. AT THE SAME TIME on the row marked with arrow-5 in A.6A increase 16 stitches evenly on row (applies only to sizes XL, XXL and XXXL and only the first time A.6 is worked in height for these sizes) = 211-227-243-263-287-311 stitches on the row. Continue A.6 until the piece measures approx. 31 cm from the division in all sizes, but adjust so that the next row is worked from the wrong side. Purl 1 row from the wrong side with lemon where you increase 53-57-61-65-69-77 stitches evenly on row – remember INCREASE TIP = 264-284-304-328-356-388 stitches. Change to circular needle size 3.5 mm and work rib as follows from the right side (with lemon): 5 band stitches in garter stitch, * knit 2, purl 2 *, work from *-* until there are 7 stitches left on the row, knit 2 and finish with 5 band stitches in garter stitch. Continue rib like this for 3 cm. Then loosely cast off with garter stitch over garter stitch, knit over knit and purl over purl, but to avoid the cast-off edge being tight, you can make 1 yarn over after each 8th stitch at the same time as you cast off (yarn overs cast off as normal stitches). The jacket measures approx. 58-60-62-64-66-68 cm from the shoulder down. SLEEVE: Place the 52-60-66-70-72-74 stitches from the thread on the one side of the piece on double pointed needles/short circular needle size 4.5 mm and knit up 1 stitch in each of the 8-8-10-10-12-14 stitches cast on under the sleeve = 60-68-76-80-84-88 stitches on the needle. Insert 1 stitch in the middle of the 8-8-10-10-12-14 stitches under the sleeve, i.e. insert the marker thread in the first stitch after the middle, count 29-33-37-39-41-43 stitches, insert 1 marker thread in the next stitch (= mid-stitch). There are now 29-33-37-39-41-43 stitches left on the round after the last marker thread. Allow the marker threads to follow your work onwards. The marker thread under the sleeve will be used when decreasing and the marker thread mid to of sleeve will be used to count to where the pattern starts. READ THE REST OF THIS SECTION BEFORE CONTINUING! Work the last row in A.3A so that A.3 finishes in the same way as on the body. SIZES S and M: Work A.4A in the round (= 15-17 repeats of 4 stitches), but count out from the middle – mid-stitch in A.4A should match the mid-stitch mid top of sleeve. When A.4A has been completed work A.5A in the same way. After A.5A continue with A.6A as far as the rib. SIZE L: Work A.5A in the round (= 19 repeats of 4 stitches), but count out from the middle – mid-stitch in A.5A should match the mid-stitch mid top of sleeve. After A.5A continue with A.6A as far as the rib. SIZES XL, XXL and XXXL: Work A.6A in the round (= 20-21-22 repeats of 4 stitches), but count out from the middle – mid-stitch in A.6A should match the mid-stitch mid top of sleeve. Continue with A.6A as far as the rib. DECREASING: AT THE SAME TIME when the piece measures 2-2-2-2-3-3 cm, decrease 2 stitches mid under sleeve – read DECREASE TIP. Decrease like this every 6-4-2½-2½-2-1½ cm a total of 7-10-13-14-15-16 times = 46-48-50-52-54-56 stitches. When the sleeve measures approx. 40-39-37-35-34-32 cm from the division (shorter measurements in larger sizes due to longer yoke) knit 1 round with lemon where you increase 2-0-2-0-2-0 stitches evenly on round = 48-48-52-52-56-56 stitches. Change to double pointed needles size 3.5 mm. Work rib in the round (= knit 2 / purl 2) for 5 cm. Cast off with knit over knit and purl over purl, but to avoid the cast-off edge being tight, you can make 1 yarn over after each 8th stitch at the same time as you cast off (yarn overs cast off as normal stitches).The sleeve measures approx. 45-44-42-40-39-37 cm from the division down. Work the other sleeve in the same way. ASSEMBLY: Sew buttons onto the left band. |
||||||||||||||||
Diagram explanations |
||||||||||||||||
|
||||||||||||||||
 |
||||||||||||||||
 |
||||||||||||||||
 |
||||||||||||||||
 |
||||||||||||||||
 |
||||||||||||||||
Have you finished this pattern?Tag your pictures with #dropspattern #lemonpiecardigan or submit them to the #dropsfan gallery. Do you need help with this pattern?You'll find 32 tutorial videos, a Comments/Questions area and more by visiting the pattern on garnstudio.com. © 1982-2026 DROPS Design A/S. We reserve all rights. This document, including all its sub-sections, has copyrights. Read more about what you can do with our patterns at the bottom of each pattern on our site. |
||||||||||||||||


With over 40 years in knitting and crochet design, DROPS Design offers one of the most extensive collections of free patterns on the internet - translated to 17 languages. As of today we count 324 catalogues and 12290 patterns translated into English (UK/cm). 12290
We work hard to bring you the best knitting and crochet have to offer, inspiration and advice as well as great quality yarns at incredible prices! Would you like to use our patterns for other than personal use? You can read what you are allowed to do in the Copyright text at the bottom of all our patterns. Happy crafting!
Post a comment to pattern DROPS 195-11
We would love to hear what you have to say about this pattern!
If you want to leave a question, please make sure you select the correct category in the form below, to speed up the answering process. Required fields are marked *.