
Popular categories
Looking for a yarn?


Comments / Questions (135)
![]() Franciulla wrote:
Franciulla wrote:
Bonjour.Je souhaite réaliser ce modèle en Jersey sachant que la laine et le N d’aiguilles ne changent pas ,est-ce réalisable.Merci pour la réponse
28.01.2019 - 08:59DROPS Design answered:
Bonjour Mme Franciulla, les diminutions du raglan sont calculées sur le point utilisé dans ce modèle et risqueraient de ne pas correspondre au jersey. Pour un pull jersey, regardez plutôt parmi les modèles enfant ou les modèles bébé en fonction de la taille souhaitée. Bon tricot!
28.01.2019 - 12:15
![]() Françoise ALTMANN wrote:
Françoise ALTMANN wrote:
Bonjour! Il me semble qu'il y a une erreur pour les côtes simples. Si on veut garder la continuité pour les côtes anglaises il faut tricoter des côtes 1/1et non 1/2. C'est ce qu'on voit sur la photo.
27.11.2018 - 16:20DROPS Design answered:
Bonjour Mme Altmann, les côtes du bas du pull commencent par 1 m env, puis on répète 1 m end/2 m env tout le tour pour terminer par 1 m end et 1 m env. Quand on tricote A.1, on va ensuite commencer par 1 m env (=1ère m de A.1) au-dessus de la 1ère m du tour et la maille double au-dessus de la maille endroit des côtes. Les mailles endroit de A.1 seront alignées directement au-dessus des mailles endroit des côtes. Bon tricot!
28.11.2018 - 08:34Soledad Lange wrote:
Hola, me encanta este patrón! Por favor quiero saber cuando se usa el palillo circular de 40 cm y cuando el de 80 cm. Muchas gracias por la ayuda! Saludos
12.10.2018 - 00:53DROPS Design answered:
Hola Soledad. Las agujas de 80 cm se utilizan para trabajar el cuerpo y el canesú. Las agujas de 40 cm se usan para trabajar las mangas y el cuello.
12.10.2018 - 12:51
![]() Ann wrote:
Ann wrote:
När det står "När arbetet mäter 20-23-26-29-32-35 cm stickas nästa varv så här:" innebär det att resåren på 4 cm är inräknad?
09.10.2018 - 21:35DROPS Design answered:
Hei Ann. Ja, med mindre du har fått beskjed om at arbeidet måles videre fra ett spesifikt sted så gjelder det lengden på hele arbeidet - fra oppleggskanten. God fornøyelse.
10.10.2018 - 08:26
![]() Doreen Daniel wrote:
Doreen Daniel wrote:
This is my first time knitting a bottom up jumper. I\'m finding it really difficult to knit the sleeve part of the yoke as it is such a stretch and the cast off stitches underarm are under a lot of strain. Am I doing something wrong?
24.09.2018 - 18:34DROPS Design answered:
Dear Doreen, no, you are not doing anything wrong, the first few rows are a bit tight, but for only for the first couple of rows. When using circular needles, try to pull the cord a couple of stitches before and after the stitches for the underarm. Happy Knitting!
24.09.2018 - 22:59
![]() Margrete Ripa wrote:
Margrete Ripa wrote:
Opskrift bm-010-bn, Strikket bluse m falsk patent: jeg forstår simpelthen ikke forklaringen til mønster A1 (stik højre pind gennem masken fra forrige omgang: det går lige. Strik 1 ret: jo, men hvor og med hvad? Slip maskerne af pinden: hvilke masker kan man her slippe af pinden uden at tabe dem? Svar gerne hurtigt. Mvh
13.09.2018 - 10:27DROPS Design answered:
Hej Margrete, du strikker 1 ret i masken fra forrige omgang og slipper masken (du strikkede i) af pinden. God fornøjelse!
19.09.2018 - 14:09Pho wrote:
I am at the last row of the body and i needed to \"bind off the last 4 stitches on needle for armhole". I have the 4th stitch left on the needle with no other stitch to bind off with. What should i do?
04.07.2018 - 13:22DROPS Design answered:
Dear Pho, make sure you are working the given number of sts for the size, ie you should have 8 sts bound off on each side for armholes: the first 4 + last 4 sts on round and the 8 sts in the middle of other side - there is the same number of sts on each front and back piece between bound off sts. Happy knitting!
04.07.2018 - 16:45Pho wrote:
I am at the last row of the body and i needed to "bind off the last 4 stitches on needle for armhole". I have one stitch left on the needle with no way to bind off. What should i do?
03.07.2018 - 14:22DROPS Design answered:
Dear Pho, make sure to check your number of sts, you should have 8 sts bound off on each side for armhole: first 4 sts on round + last 4 sts on round on one side and 8 sts on the other side. Happy knitting!
03.07.2018 - 15:36
![]() Stephanie wrote:
Stephanie wrote:
De steken worden onnodig gecompliceerd beschreven... en dan dat filmpje... is er ook een filmpje voor mensen die Engels breien?
29.04.2018 - 19:33DROPS Design answered:
Dag Stephanie, De patronen en steken zijn zo geschreven dat het voor iedereen te volgen is. Wat bedoel je met Engels breien? Bij de instructiefimpjes kun je diverse filmpjes vinden voor patentsteek, valse patentsteek, etc.
30.04.2018 - 09:11
![]() Molenberghs Amy wrote:
Molenberghs Amy wrote:
Kan het zijn dat dit gewoon een \"dubbele steek\" is? Mss is het eenvoudiger om dit gewoon zo te vermelden, want het is echt ingewikkeld geformuleerd..
28.04.2018 - 23:08
|
||||||||||
Perkins#perkinssweater |
||||||||||
 |
 |
|||||||||
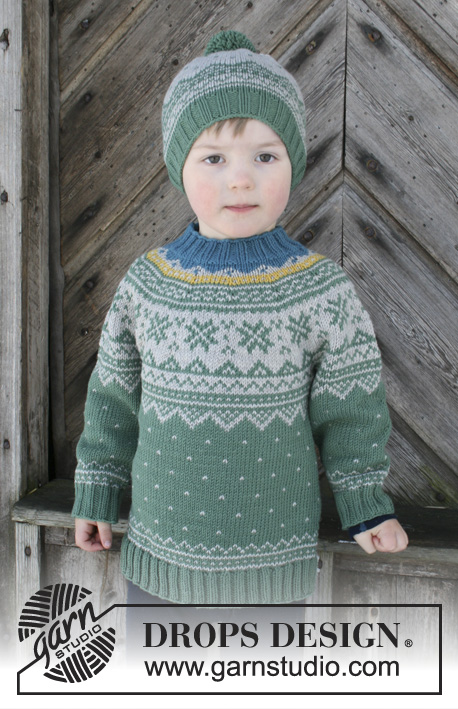
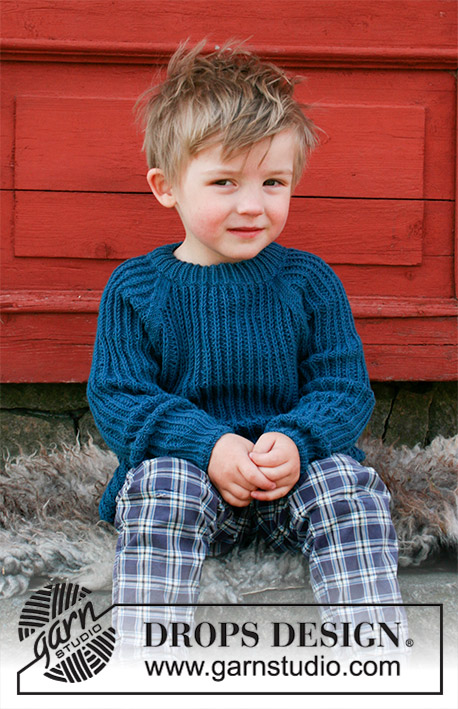
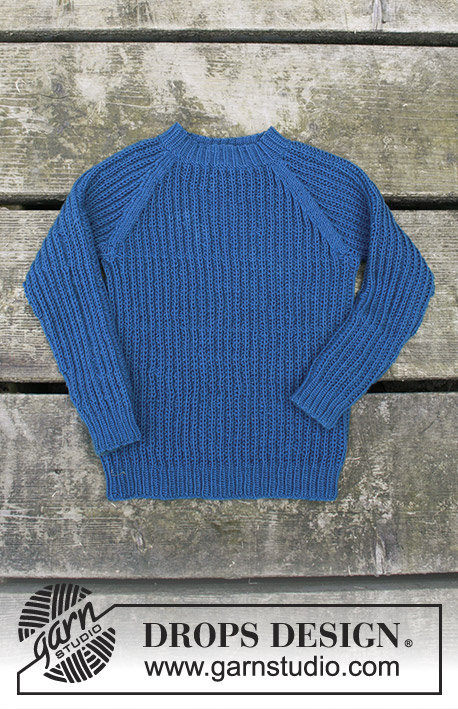
Knitted jumper with false Fisherman’s rib and raglan for kids in DROPS BabyMerino or DROPS Safran. Size 2 - 12 years.
DROPS Children 30-9 |
||||||||||
|
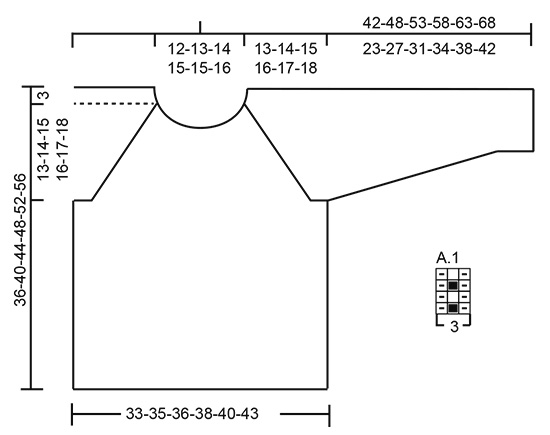
INFORMATION FOR PATTERN: GARTER STITCH (worked in the round): 1 ridge = 2 rounds. Knit 1 round and purl 1 round. PATTERN: See diagram A.1. INCREASE TIP: Work until 1 stitch remains before marker thread. Make 1 yarn over, purl 2 (marker is between these 2 stitches), make 1 yarn over (= 2 stitches increased). On next round work yarn overs twisted to avoid holes. Work the increased stitches in A.1 and purl the 2 stitches at the marker thread. RAGLAN: Decrease for raglan in every transition between sleeves and body. Begin 3 stitches before marker thread and knit 2 together, knit 2 (marker thread is between these 2 stitches), slip 1 stitch knitwise, knit 1, pass slipped stitch over stitch worked (= 2 stitches decreased). DECREASE TIP: To calculate how to decrease evenly, use the total number of stitches on round (e.g. 100 stitches) and divide stitches by number of decreases to be done (e.g. 19) = 5.3. In this example knit approx. every 4th and 5th stitch together. ---------------------------------------------------------- JUMPER: Worked in the round on circular needle. BODY: Cast on 156-168-174-186-192-204 stitches on circular needle size 2.5 mm with Baby Merino or Safran. Knit 1 round, then work rib as follows: purl 1, * knit 1, purl 2 *, repeat from *-* until 2 stitches remain on round, finish with knit 1 and purl 1. Continue rib like this for 4 cm. Switch to circular needle size 3 mm and work A.1 in the round over all stitches. REMEMBER THE KNITTING TENSION! When piece measures 20-23-26-29-32-35 cm, work next round as follows: Cast off 4 stitches for armhole, work 70-76-79-85-88-94 stitches (= front piece), cast off 8 stitches for armhole, work 70-76-79-85-88-94 stitches (= back piece) and cast off the last 4 stitches on needle for armhole. Put piece aside and work the sleeves. SLEEVE: Work in the round on double pointed needles/a short circular needle. Cast on 42-42-42-48-48-48 stitches on double pointed needles size 2.5 mm with Baby Merino or Safran. Knit 1 round, then work rib as follows: purl 1, * knit 1, purl 2 *, repeat from *-* until 2 stitches remain on round, finish with knit 1 and purl 1. Continue rib like this for 4 cm. Switch to double pointed needles size 3 mm and work A.1 in the round over all stitches. Insert 1 marker thread at beginning of round (= mid under sleeve). When piece measures 6 cm, increase 1 stitch on each side of marker thread - read INCREASE TIP! Repeat increase every 2½-2½-2½-3-3-2½ cm 7-9-10-9-11-13 times in total = 56-60-62-66-70-74 stitches. When piece measures approx. 23-28-31-35-39-42 cm (adjust to finish on same round in A.1 as on body), cast off 8 stitches mid under sleeve (cast off 4 stitches on each side of marker thread) = 48-52-54-58-62-66 stitches. Put piece aside and knit another sleeve. YOKE: Slip sleeves on to same circular needle as body where armholes were cast off (without working the stitches first) = 236-256-266-286-300-320 stitches on needle. Insert 1 marker thread in all transitions between sleeves and body piece (= 4 marker threads). RAGLAN: Continue pattern in the round as before. Work in the round over all stitches for 2 cm. On next round decrease for RAGLAN – see explanation above (= 8 stitches decreased). Continue decrease for raglan every other round until decrease has been done 17-19-20-22-24-26 times in total on each side of all marker threads. After all decreases for raglan there are 100-104-106-110-108-112 stitches on needle and piece measures approx. 36-40-44-48-52-56 cm up to shoulder. NECK EDGE: Switch to circular needle size 2.5 mm. Work 1 ridge in GARTER STITCH in the round over all stitches, AT THE SAME TIME on first round in ridge decrease 19-17-13-11-6-7 stitches evenly – read DECREASE TIP = 81-87-93-99-102-105 stitches. Work rib = knit 1/purl 2 for 3 cm, then cast off with knit over knit and purl over purl. ASSEMBLY: Sew the openings under the sleeves. |
||||||||||
Diagram explanations |
||||||||||
|
||||||||||
 |
||||||||||
Have you finished this pattern?Tag your pictures with #dropspattern #perkinssweater or submit them to the #dropsfan gallery. Do you need help with this pattern?You'll find 27 tutorial videos, a Comments/Questions area and more by visiting the pattern on garnstudio.com. © 1982-2026 DROPS Design A/S. We reserve all rights. This document, including all its sub-sections, has copyrights. Read more about what you can do with our patterns at the bottom of each pattern on our site. |
||||||||||


With over 40 years in knitting and crochet design, DROPS Design offers one of the most extensive collections of free patterns on the internet - translated to 17 languages. As of today we count 324 catalogues and 12290 patterns translated into English (UK/cm). 12290
We work hard to bring you the best knitting and crochet have to offer, inspiration and advice as well as great quality yarns at incredible prices! Would you like to use our patterns for other than personal use? You can read what you are allowed to do in the Copyright text at the bottom of all our patterns. Happy crafting!
Post a comment to pattern DROPS Children 30-9
We would love to hear what you have to say about this pattern!
If you want to leave a question, please make sure you select the correct category in the form below, to speed up the answering process. Required fields are marked *.