
Popular categories
Looking for a yarn?


Comments / Questions (15)
![]() Faik wrote:
Faik wrote:
Muy bonito
01.03.2026 - 09:59
![]() Linnéa wrote:
Linnéa wrote:
I made this (the beanie and mittens), but with grey and orange details. They're so easy to make and ended up so cute. And they were very happily surprised when I brought them to a friend who was just having a baby and fit very well.
26.09.2025 - 09:15
![]() Nancy Marks wrote:
Nancy Marks wrote:
Hi, I'm making the Sweet Betty hat, and I don't understand the direction near the end that says "On the next round of knit, knit all the stitches together 2 and 2." Can you please tell me what that means? Thank you!
27.05.2023 - 00:15DROPS Design answered:
Hi Nancy Marks! That means you knit 2 together all round and every second stitch is decreased away, so you'll have fewer stitches left on the round. Hope it helps!
27.05.2023 - 14:01
![]() Britta wrote:
Britta wrote:
Hallo! Ich möchte gern wissen, ob bei der Maschenabnahme nach 12cm der anfängliche Teil (3cm im Rippenmuster) mitgezählt wird, also ab Strickstück Beginn oder wird erst dem Bündchenrand angesetzt die 12cm abgemessen? Danke für die Hilfe! LG Britta
04.04.2022 - 12:48DROPS Design answered:
Liebe Britta, die 12 cm sind von der Anschlagskante gemessen. Viel Spaß beim stricken!
04.04.2022 - 15:07
![]() Ellie Moore wrote:
Ellie Moore wrote:
Thank you for your answer. One more question. What about the part where it says every 4th row to add increase after the edge stitch? What row would that be? Row 41? Then when again?? And do you also increase in the middle of the row so 4 increases? Thank you
23.07.2021 - 15:52DROPS Design answered:
Dear Mrs Moore, you increase now alternately 2 sts (on each side of the 6 middle sts) and 4 sts (= on each side of the 6 middle sts + on each side of piece, inside the edge sts). So that on row 39 you will work as on row 35 and 37 (= inc 4 sts) and on row 41 as on row 35 and 37 and so on until there are 92 sts on needle. Continue like this increasing alternately 2 sts every other row and 4 sts every 4th row. Happy knitting!
23.07.2021 - 16:12
![]() Ellie Moore wrote:
Ellie Moore wrote:
Iam working on the pig pattern. I am having a problem understanding the directions for row 37 and on. Can you explain the next 4 -6 rows in detail, please? I.e. will row 37 be k1, purl 20,etc.? Thanks for your help.
23.07.2021 - 00:24DROPS Design answered:
Hi Ellie, Yes on row 37 you have knit 1, purl 20 etc, knit a row, then knit 1, purl 22 etc and knit the next row. Happy knitting!
23.07.2021 - 08:34
![]() Britt Krogell wrote:
Britt Krogell wrote:
Hej. Undrar om man måste sy en " innerpåse" till Sweet Betty-grisen då man stickat en aning löst (enligt andra helt normalt). Jag har köpt vadd som är mening att fylla dynor med. Hur brukar det vara? Jag är novis vad gäller att sticka eller sy men har nu stickat "griseknoen" ivf till mitt första barnbarn.
19.06.2021 - 12:15DROPS Design answered:
Hej Britt. Det är lite svårt att veta hur löst du har stickat, men tanken är inte att man ska sy en innerpåse utan bara fylla vadd direkt i grisen. Mvh DROPS Design
29.06.2021 - 13:44
![]() Teresa Muto wrote:
Teresa Muto wrote:
Salve, cosa si intende con "1 maglia a ogni lato prima/dopo la maglia di vivagno ogni 4 ferri"? lavoro prima la maglia di vivagno e poi faccio l'aumento o a inizio ferro faccio l'aumento e poi la maglia di vivagno?
03.04.2020 - 18:59DROPS Design answered:
Buonasera Teresa, lavorare l'aumento dopo la maglia di vivagno all'inizio del ferro e prima della maglia di vivagno alla fine del ferro. Buon lavoro!
03.04.2020 - 19:21
![]() Suna wrote:
Suna wrote:
Mit wieviel Maschen muss ich die Mütze beginnen wenn ich es für ein Baby 2 monate stricken will L.g
17.01.2020 - 21:20DROPS Design answered:
Liebe Suna, Sie können die Größe je nach der Größe oder je nach der Kopfumgang wählen, z.B. in der Größe 1/3 Monate (3. Größe) fängt die Mütze mit 92 Maschen an. Viel Spaß beim stricken!
20.01.2020 - 08:09
![]() Rosamaria Cellerino wrote:
Rosamaria Cellerino wrote:
Desidero ringraziarvi per il vostro meraviglioso sito! Per la vostra chiarezza e numerosissimi argomenti! È la mia passione. Spero presto di acquistare Drops baby Merino!Rose.
01.12.2019 - 16:25
|
|
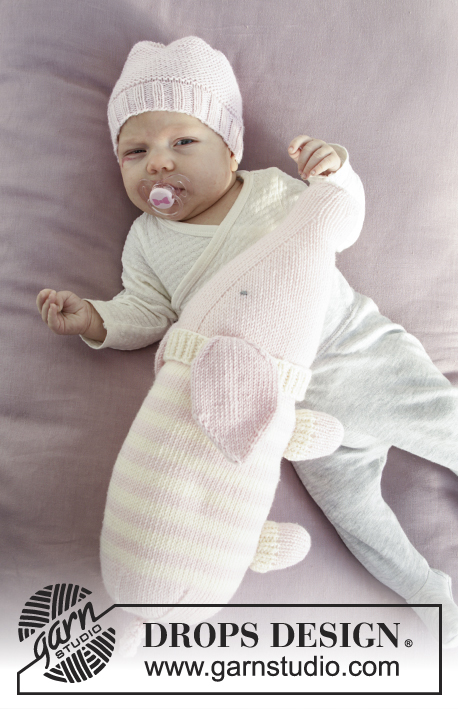
Sweet Betty#dropssweetbetty |
|
 |
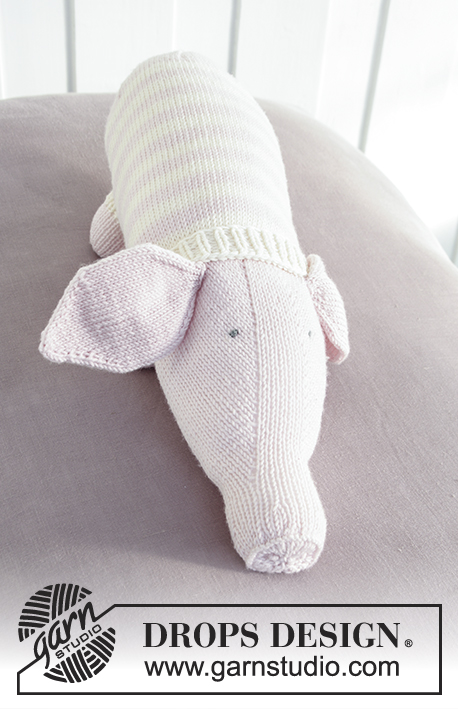 |
Set consists of: Hat for baby with garter stitch and toy pig with stripes. Sizes premature - 4 years. The set is knitted in DROPS BabyMerino.
DROPS Baby 29-10 |
|
|
INFORMATION FOR THE PATTERN: RIDGE/GARTER STITCH (worked in the round): 1 ridge = 2 rounds. Knit 1 round and purl 1 round. INCREASE TIP (for the pig): Increase 1 stitch by making 1 yarn over. On the next row, knit the yarn overs twisted to prevent holes. STRIPES (for the pig): * 4 rows stocking stitch with white, 4 rows stocking stitch with light pink *, repeat from *-*. DECREASE TIP-1 (for the pig): Start 2 stitches before the marker thread and knit 2 stitches together (= 1 stitch decreased). DECREASE TIP-2 (for the pig): Decrease as follows after the marker: Slip 1 stitch as if to knit, knit 1, pass the slipped stitch over. Decrease as follows before the marker: Knit 2 together. ---------------------------------------------------------- HAT: The piece is worked in the round with double pointed needles. Loosely cast on (68) 80-92-96-104 (112-116) stitches with double pointed needles size 2.5 mm and Baby Merino. Work rib (= knit 2/ purl 2) for (2) 3-3-4-4 (5-5) cm. Change to double pointed needles size 3 mm and knit 1 round and decrease 8 stitches evenly on round = (60) 72-84-88-96 (104-108) stitches. Continue with GARTER STITCH – see description above. REMEMBER THE KNITTING TENSION! When the piece measures (11) 11-12-13-14 (14-15) cm – adjust so that the next round is a round of knit, decrease (6) 8-7-8-8 (8-9) stitches evenly on round. Decrease in this way every 2nd round (5) 5-5-5-5 (6-6) more times = (24) 24-42-40-48 (48-45) stitches. On the next round of knit, knit all the stitches together 2 and 2. Purl 1 round and repeat the decreases on the next round of knit in sizes 6/9, 12/18 months and (2 - 3/4) years (do not decrease any more stitches in the other sizes) = (12) 12-11-10-12 (12-12) stitches. Thread a double strand through the remaining stitches and fasten well. ---------------------------------------------------------- PIG: The piece is worked back and forth on the needle from the snout backwards. Legs, ears and tale are worked separately and sewn onto the body at the end. SNOUT AND HEAD: Cast on 6 stitches with needle size 2.5 mm and light pink. NOTE: The outermost stitch in each side is knitted on every row to finished length (= edge stitch). ROW 1 (= wrong side): READ INCREASE TIP! Knit 1, * 1 yarn over, purl 1 *, repeat from *-* 3 more times, 1 yarn over, knit 1 = 11 stitches. ROW 2 (= right side): Knit. ROW 3: Knit 1, * 1 yarn over, purl 1 *, repeat from *-* 8 more times, 1 yarn over, knit 1 = 21 stitches. ROW 4: Knit. ROW 5: Knit 1, * 1 yarn over, purl 1 *, repeat from *-* 18 more times, 1 yarn over, knit 1 = 41 stitches. ROW 6: Knit. ROW 7: Knit. REMEMBER THE KNITTING TENSION! ROWS 8-9: Work stocking stitch. ROW 10: Knit 1, * knit 3, knit 2 together *, repeat from *-* 6 more times, knit 2, knit 2 together, knit 1 = 33 stitches. ROWS 11-13: Work stocking stitch. ROW 14: Knit 1, * knit 4, knit 2 together *, repeat from *-* 4 more times, knit 2 = 28 stitches. ROWS 15-20: Work stocking stitch. ROW 21: Knit 1, purl 10, 1 yarn over, purl 6, 1 yarn over, purl 10, knit 1 = 30 stitches. ROW 22: Knit. ROW 23: Knit 1, purl 11, 1 yarn over, purl 6, 1 yarn over, purl 11, knit 1 = 32 stitches. ROW 24: Knit. ROW 25: Knit 1, purl 12, 1 yarn over, purl 6, 1 yarn over, purl 12, knit 1 = 34 stitches. ROW 26: Knit. Continue the increases in this way until there are 40 stitches on the needle. Continue working as follows: ROW 32: Knit. ROW 33: Knit 1, 1 yarn over, purl 16, 1 yarn over, purl 6, 1 yarn over, purl 16, 1 yarn over, knit 1 = 44 stitches. ROW 34: Knit. ROW 35: Knit 1, purl 18, 1 yarn over, purl 6, 1 yarn over, purl 18, knit 1 = 46 stitches. ROW 36: Knit. Continue the increases in this way, i.e. increase 2 stitches in the middle of the piece every 2nd row and 1 stitch in each side inside 1 edge stitch every 4th row until there are 92 stitches on the needle. Insert 1 marker. BODY: Continue back and forth on the needle. Work 2 cm stocking stitch with light pink (from the marker). Then work STRIPES – see description above, until the piece measures approx. 21 cm from the marker (finish with 1 stripe light pink). Insert 6 marker threads in the piece from the right side (without working the stitches): First marker thread is inserted after the first 16 stitches on the row, then insert the next 5 marker threads with 15 stitches between each one (after the last marker thread, there is 1 stitch left on the row). The piece is now finished in stocking stitch with light pink as follows: On the first row from the right side decrease 1 stitch before all the marker threads – READ DECREASE TIP-1 (= 6 stitches decreased). Decrease in this way every 2nd row 8 more times = 38 stitches. The next row is worked as follows from the right side: knit 1, knit 2 and 2 stitches together until there is 1 stitch left on the row, finish with knit 1 = 20 stitches. Work 3 rows stocking stitch and repeat the decreases 1 more time = 11 stitches. Cut the strand, pull it through the remaining stitches, pull tight and fasten. ASSEMBLY: Embroider eyes onto the pig – see photo. Sew the pig together all the way from the snout backwards – sew in the outermost loop of the outermost stitch, but leave a small opening to fill through. Fill the pig with wadding and sew up the opening. LEG: The piece is worked back and forth on the needle. Cast on 6 stitches with needle size 2.5 mm and light pink. ROW 1 (= wrong side): Knit 1, * 1 yarn over, purl 1 *, repeat from *-* 3 more times, 1 yarn over, knit 1 = 11 stitches. ROW 2 (and each row from the right side): Knit. ROW 3: Knit 1, * 1 yarn over, purl 1 *, repeat from *-* 8 more times, 1 yarn over, knit 1 = 21 stitches. ROWS 4-6: Work stocking stitch. ROW 7: Knit 1, 1 yarn over, purl until there is 1 stitch left on the row, 1 yarn over, knit 1. ROW 8: Knit. Repeat rows 7 and 8 until there are 27 stitches on the row. Knit 1 row from the right side with white. Change to 2 strands of white and work 4 rows of rib (= knit 1/ purl 1) with 1 edge stitch knit in each side, before casting off with knit over knit and purl over purl. Work a total of 4 legs. Sew the leg seams in the outermost loop of the outermost stitch. Fill each leg with wadding and sew the legs to the underside of the pig. The front legs are positioned approx. where the stripes start up by the neck, with approx. 3-4 cm between each leg. The back legs are positioned approx, 3-4 cm before the decreases on the pig start. EAR: The piece is worked in the round with double pointed needles bottom up. Cast on 6 stitches with double pointed needles size 2.5 mm and light pink (divide the stitches between 2 double pointed needles so that there are 3 stitches on each needle and you work with the 3rd needle). ROUND 1: * Knit 1, 1 yarn over, knit 1, 1 yarn over, knit 1 *, repeat from *-* 1 more time = 10 stitches. ROUND 2: Knit. ROUND 3: * Knit 1, 1 yarn over, knit 3, 1 yarn over, knit 1 *, repeat from *-* 1 more time = 14 stitches. ROUND 4: Knit. ROUND 5: * Knit 1, 1 yarn over, knit 5, 1 yarn over, knit 1 *, repeat from *-* 1 more time = 18 stitches. ROUND 6: Knit. Continue the increases in this way every 2nd round until there are 38 stitches on the round. Work stocking stitch in the round until the ear measures 9 cm. Insert 1 marker in each side (i.e. between 2 knitted stitches in each side). Continue by decreasing 1 stitch on each side of both markers – READ DECREASE TIP-2 (= 4 stitches decreased). Decrease in this way every 2nd round 3 more times = 22 stitches. The next round is worked as follows: * Knit together the next 10 stitches 2 and 2, knit 1 *, repeat from *-* 1 more time = 12 stitches. Knit 1 round, then cast off all stitches. Use a needle to baste the opening at the cast-on edge at the bottom of the ear. Work 1 more ear in the same way and sew the ears on to the pink area on top of the head (there should be approx. 7 cm between the ears on top of the head) – see photo if required. TAIL: Cast on 20 stitches with needle size 2.5 mm and 2 strands light pink. Work 2 stitches in each stitch = 40 stitches. Loosely cast off, cut the strand and sew the tail on to the back of the pig. COLLAR: Cast on 65 stitches with needle size 2.5 mm and 2 strands white. The first row is worked as follows from the right side: Knit 1 edge stitch, * knit 1, purl 1 *, repeat from *-* until there are 2 stitches left on the row and finish with knit 1 and knit 1 edge stitch. Continue rib in this way until the collar measures 2 cm, cast off with knit over knit and purl over purl. Place the collar around the pig’s neck right behind the ears, place it with a small overlap on the top of the pig and fasten with a few stitches. Sew a button on to the collar for decoration. |
|
Have you finished this pattern?Tag your pictures with #dropspattern #dropssweetbetty or submit them to the #dropsfan gallery. Do you need help with this pattern?You'll find 26 tutorial videos, a Comments/Questions area and more by visiting the pattern on garnstudio.com. © 1982-2026 DROPS Design A/S. We reserve all rights. This document, including all its sub-sections, has copyrights. Read more about what you can do with our patterns at the bottom of each pattern on our site. |
|


With over 40 years in knitting and crochet design, DROPS Design offers one of the most extensive collections of free patterns on the internet - translated to 17 languages. As of today we count 324 catalogues and 12290 patterns translated into English (UK/cm). 12290
We work hard to bring you the best knitting and crochet have to offer, inspiration and advice as well as great quality yarns at incredible prices! Would you like to use our patterns for other than personal use? You can read what you are allowed to do in the Copyright text at the bottom of all our patterns. Happy crafting!
Post a comment to pattern DROPS Baby 29-10
We would love to hear what you have to say about this pattern!
If you want to leave a question, please make sure you select the correct category in the form below, to speed up the answering process. Required fields are marked *.