
Popular categories
Looking for a yarn?


Comments / Questions (24)
![]() Chantal wrote:
Chantal wrote:
Dans le patron Adrien, on commence par tricoter 2 côtes mousse en aller retour; est-ce que c'est 2 rangs au point mousse en aller/retour ? ou des côtes 2/2 en aller/retour ? Merci
02.04.2026 - 20:42DROPS Design answered:
Bonjour Chantal, 1 côte mousse = 2 rangs endroit, cf. POINT MOUSSE (en allers et retours):, pour tricoter 2 côtes mousse, on va alors tricoter 4 rangs endroit. Bon tricot!
07.04.2026 - 17:25
![]() Kerstin Stenholm wrote:
Kerstin Stenholm wrote:
Hej jag har gjort bakstycket och högerfram ska nu av maska på vänster fram men det görs ju inte lila som på höger fram. Ska det göra på olika sätt
22.04.2025 - 19:45DROPS Design answered:
Hej Kerstin, ja på höger framstycke minskar du från rätsidan efter de 5 kantm och på vänster framstycke minskar du före de 5 kantm :)
30.04.2025 - 13:15
![]() Pirkko wrote:
Pirkko wrote:
I am knitting size 5/6. When you start the 1st button hole and how much there are between them. Where is the last button hole. The instructions say start when piece is 29 cm long.?????
25.09.2023 - 00:04DROPS Design answered:
Dear Pirkko, please see answer below. You don't start when piece is 29cm long. You start in the sentence right before that one, where you continue the pattern + buttonholes. After working the pattern and some buttonholes the piece measures 29cm. Happy knitting!
25.09.2023 - 00:37
![]() Pirkko wrote:
Pirkko wrote:
I was wondering when you start the first button hole and how much apart they are from each other.. The instructions say you have one one ( first) When piece measures29 cm. That cannot be right? I am knitting size5/6 Please tell me when I start the button holes and what is the distance between them and when to make the last one.Thank you
25.09.2023 - 00:00DROPS Design answered:
Dear Pirkko, you can see BUTTONHOLES in the explanations before the pattern instructions. For size 5/6, decrease when the piece measures: 5, 12, 19, 26 and 33 cm. As you can see in the pattern, right after the initial ridges in the right front piece it says: . Continue the pattern in this way – remember BUTTONHOLES on the band – see description above. That means that you will be working the buttonholes as indicated above in the BUTTONHOLES tip, at the lengths indicated for your size. These will continue even as you change the pattern in the next sentence (when the piece measures 29cm). Happy knitting!
25.09.2023 - 00:06
![]() Renette wrote:
Renette wrote:
Guten Tag, bei mir stimmt die Maschenprobe mit der Wolle, die ich verwenden möchte leider in der Höhe nicht (ich erhalte 21x24M). Die Angaben in der Anleitung sind ja aber sowieso in cm für die Höhe also kann ich trotzdem so stricken? Ich möchte die größte Größe stricken. Viele Grüße!
05.03.2023 - 21:47DROPS Design answered:
Liebe Renette, ja genau, nun bei dem V-Halsausschnitt können Sie die Abnahmen umrechnen oder so lassen, die werden bei Ihnen früher fertig. Viel Spaß beim stricken!
06.03.2023 - 10:21
![]() Rita wrote:
Rita wrote:
Udtagning på ærme størrelse 5-6 år synes ikke at passe. Første udtag efter 8 cm. Derefter 9 yderligere med 3 cm imellem er 27 cm. I alt 35 cm, som er hele ærmelængden ved deling. For øvrige størrelser er der 3 cm efter sidste udtagning til deling. Skal udtag starte ved 5 cm eller skal der være 9 udtag i alt?
19.02.2022 - 19:23DROPS Design answered:
Hei Rita. I den største størrelsen øker man siste gang når arbeidet mål ca 35 cm, det samme målet som når man deler arbeidet midt under ermet og strikker 3 pinner glattstrikk frem og tilbake. Om du syns det blir penest å begynne med økningene tidligere kan du fint gjøre det. mvh DROPS Design
21.02.2022 - 12:49
![]() Laura Rocha wrote:
Laura Rocha wrote:
Buenas tardes. 1. Por favor me explica como cerrar los hombros. Las instrucciones para finalizar los hombros indican que se debe realizar una hilera de derecho por el lado revés lo que dificulta el cierre de hombros. 2. Cuál es el objetivo de terminar los hombros con esas instrucciones? Gracias
24.01.2022 - 22:46DROPS Design answered:
Hola Laura, se cierra en la fila después a la de derecho por el lado revés, como siempre. Se remata flojo de derecho por el lado derecho.
31.01.2022 - 00:14
![]() Gisela Stehno wrote:
Gisela Stehno wrote:
Ich finde kein Braun von drops cotton merino mehr. Warum nicht? Liebe Grüße Gisela
02.11.2021 - 10:34DROPS Design answered:
Liebe Frau Stehno, danke für Ihren Vorschlag, schöne Braun finden Sie auch z.B. beim Merino Extra Fine oder Karisma. Viel Spaß beim stricken!
03.11.2021 - 08:02
![]() Laura Rocha wrote:
Laura Rocha wrote:
La respuesta que ustedes me dan sobre mis inquietudes es muy vaga e irrespetuosa, me parece que no le dan la importancia que merece un cliente que ha gastado mucho dinero haciendo traer la lanas desde Noruega. No se tomaron el tiempo para resolver mi inquietud en este modelo, las disminuciones no resultan. También me dieron una respuesta sin importancia cuando pregunte sobre el modelo Autumn Smile Cardigan. Quede muy decepcionada.
17.08.2021 - 18:43DROPS Design answered:
Hola Laura, resulta díficil dar una información más detallada sin poder ver la labor. En principio, no debería de haber problemas según el patrón, lo único que puede influir a que la disminución salga diferente a la imagen es una diferencia en la tensión del tejido o alguna dificultad al realizar las disminuciones, por lo que es lo único que se puede recomendar sin poder ver la labor. En este caso, quizás sería mejor contactar con los grupos de DROPS en Facebook, donde se pueden adjuntar imágenes y obtener ayuda más concreta para el problema comentado. Buena suerte!
20.08.2021 - 20:59
![]() Laura Rocha wrote:
Laura Rocha wrote:
He encontrado las siguientes dificultades: si disminuyo el primer punto después de la puntada musgo se ve fatal pues se pierde el punto derecho que separa el musgo del adorno. Si tomo el segundo punto podría funcional pero el punto que separa el musgo del adorno queda muy disparejo. Cómo lo debería hacer. Gracia Laura Rocha desde Colombia
09.08.2021 - 22:31DROPS Design answered:
Hola Laura. Tienes que trabajar las disminuciones para el escote según el tip para disminuir (para el escote). Es importante controlar la tensión del tejido para que los puntos queden más iguales.
11.08.2021 - 17:47
|
|||||||
Adrien#adriencardigan |
|||||||
 |
 |
||||||
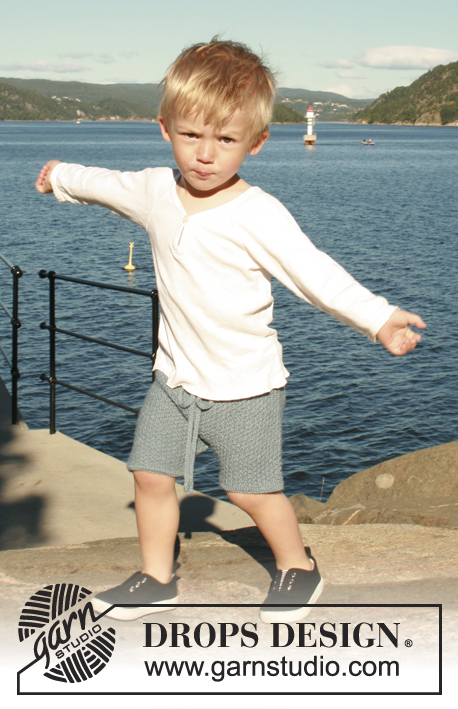
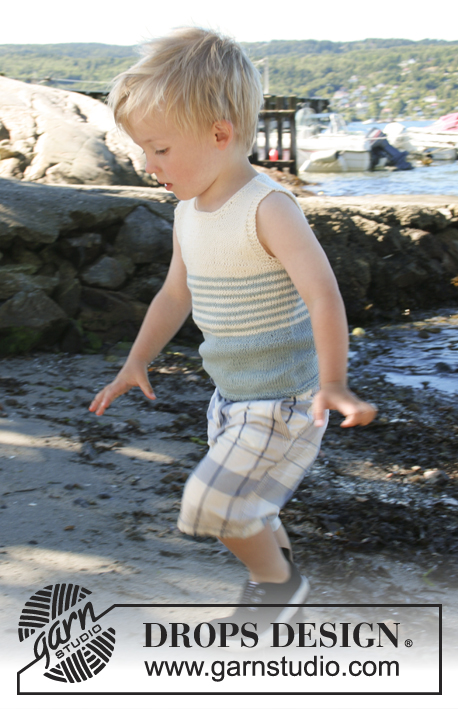
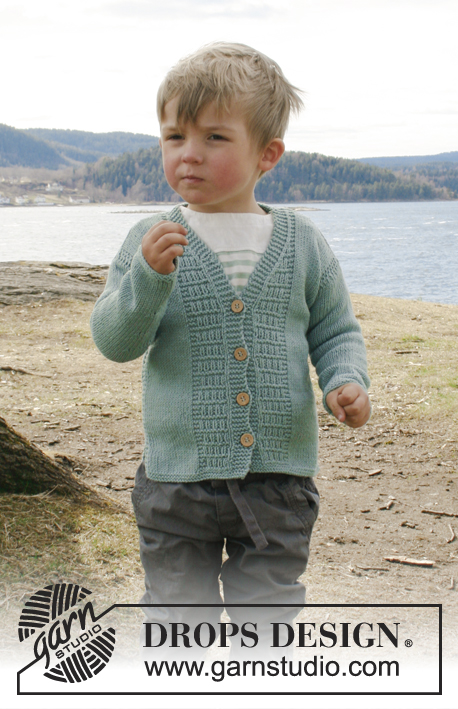
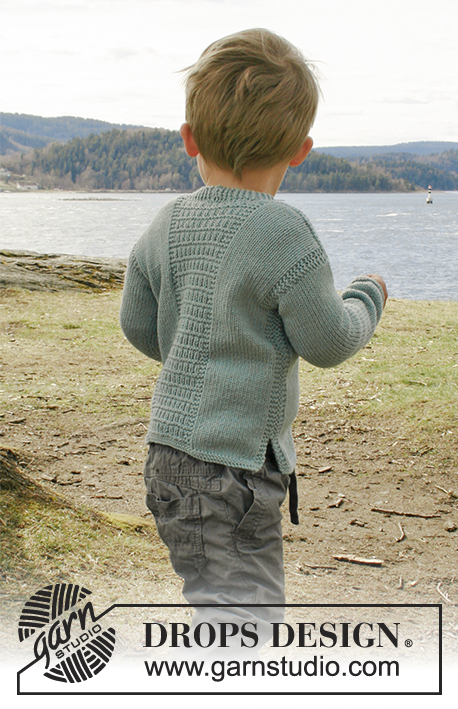
Knitted cardigan with structured pattern, v-neck and split in the sides in DROPS Cotton Merino. For baby and children in sizes 0 - 6 years.
DROPS Children 28-4 |
|||||||
|
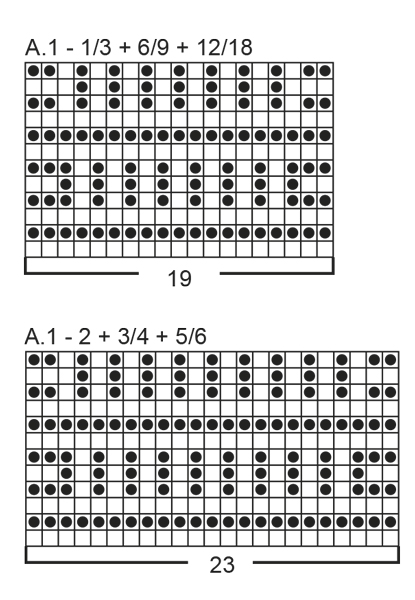
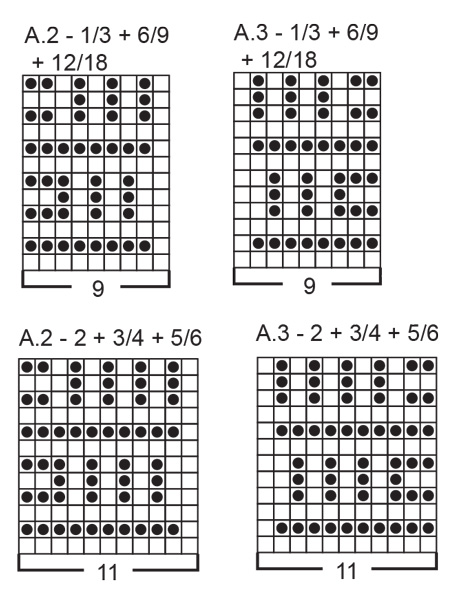
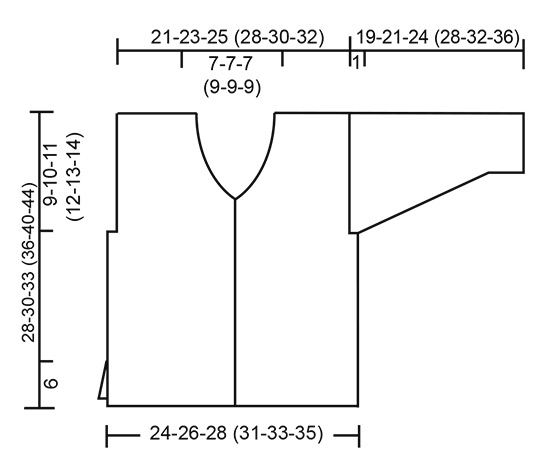
RIDGE/GARTER STITCH (worked back and forth): 1 ridge = Knit 2 rows. RIDGE/GARTER STITCH (worked in the round): 1 ridge = 2 rounds. Knit 1 round and purl 1 round. PATTERN: See diagrams A.1 to A.3 – choose the right diagram for your size. The diagrams show all the rows in the pattern seen from the right side. INCREASE TIP (for mid under the sleeve): Start 1 stitch before the marker thread, make 1 yarn over, knit 2 (the marker thread sits between these 2 stitches), make 1 yarn over (= 2 stitches increased). On the next round knit the yarn overs twisted to prevent holes. BUTTONHOLES: Decrease for the buttonholes on the right band (when the garment is worn). 1 buttonhole = start from the right side, knit 1, knit 2 together and make 1 yarn over. On the next row knit the yarn overs so that there are holes. Decrease for the buttonholes when the piece measures: 1/3 months: 4, 9, 14 and 19 cm. 6/9 months: 5, 10, 15 and 20 cm. 12/18 months: 5, 11, 17 and 23 cm. 2 years: 5, 10, 15, 20 and 25 cm. 3/4 years: 5, 11, 17, 23 and 29 cm. 5/6 years: 5, 12, 19, 26 and 33 cm. DECREASE TIP (for the neckline): Decrease for the v-neck on the inside of the 5 band stitches in garter stitch towards mid front. All decreases are worked from the right side! Decrease as follows after the 5 band stitches: Slip 1 stitch as if to knit, knit 1, pass the slipped stitch over the knitted stitch (= 1 stitch decreased). Decrease as follows before the 5 band stitches: Work until there are 7 stitches left on the needle, knit 2 together and work the 5 band stitches in garter stitches (= 1 stitch decreased). ---------------------------------------------------------- JACKET: Front and back pieces are worked back and forth with circular needle in separate sections. The sleeves are worked in the round with double pointed needles. BACK PIECE: Cast on 51-55-59 (65-69-73) stitches with circular needle size 3 mm and Cotton Merino. Work 2 RIDGES back and forth – see description above. Change to circular needle size 4 mm and work the next row as follows from the right side: 3 edge stitches in garter stitch, 13-15-17 (18-20-22) stitches stocking stitch, A.1 (= 19-19-19 (23-23-23) stitches), 13-15-17 (18-20-22) stitches stocking stitch and 3 edge stitches in garter stitch. Continue the pattern in this way. REMEMBER THE KNITTING TENSION! When the piece measures 18-19-21 (23-26-29) cm work 2 ridges over the outermost 6 stitches in each side (the other stitches are worked as before). When you have worked 2 ridges in each side, cast off 3 stitches at the beginning of the next 2 rows for the armholes = 45-49-53 (59-63-67) stitches on the needle. The next row is worked as follows from the right side: 3 edge stitches in garter stitch towards the armhole, 10-12-14 (15-17-19) stitches stocking stitch, continue with A.1 over the next 19-19-19 (23-23-23) stitches, 10-12-14 (15-17-19) stitches stocking stitch and 3 edge stitches in garter stitch towards the armhole. Continue the pattern in this way. When the piece measures 26-28-31 (34-38-42) cm cast off the middle 13-13-13 (17-17-17) stitches for the neck and each shoulder is finished separately. Continue by casting off 1 stitch on the next row from the neck = 15-17-19 (20-22-24) stitches left on the shoulder. Continue working until there is 1 row left before the piece measures 28-30-33 (36-40-44) cm – adjust so that the next row is worked from the wrong side. Knit 1 row from the wrong side and loosely cast off in knit from the right side! Work the other shoulder in the same way. RIGHT FRONT PIECE: Cast on 30-32-34 (37-39-41) stitches with circular needle size 3 mm (including 5 band stitches towards mid front). Work 2 ridges. Change to circular needle size 4 mm and work the next row as follows from the right side: 5 band stitches in garter stitch, A.2 (= 9-9-9 (11-11-11) stitches), 13-15-17 (18-20-22) stitches stocking stitch and 3 edge stitches in garter stitch towards the side. Continue the pattern in this way – remember BUTTONHOLES on the band – see description above. When the piece measures 18-19-21 (23-26-29) cm, work 2 ridges over the outermost 6 stitches towards the side (the other stitches are worked as before). When you have worked 2 ridges in the side cast off 3 stitches at the beginning of the next row from the side for the armhole = 27-29-31 (34-36-38) stitches. The next row is worked as follows from the right side: 5 band stitches in garter stitch, continue with A.2 over the next 9-9-9 (11-11-11) stitches, 10-12-14 (15-17-19) stitches stocking stitch and 3 edge stitches in garter stitch towards the armhole. Continue the pattern in this way. AT THE SAME TIME when you have worked 1 row from the wrong side after the last buttonhole (the piece measures approx. 20-21-24 (26-30-34) cm), knit the 5 band stitches, turn the piece, tighten the strand and knit back over the 5 band stitches (in other words, the other stitches on the needle are not worked). Then work as before across all the stitches again (this is done to insure that the band lies neatly around the neck). AT THE SAME TIME on the next row from the right side, begin decreasing for the v-neck. Decrease 1 stitch on the inside of the 5 band stitches in garter stitch – READ DECREASE TIP. Decrease in this way every 4th row (i.e. every other row from the right side) a total of 4 times in all sizes, then on every 2nd row (i.e. on every row from the right side) a total of 3-3-3 (5-5-5) times = 20-22-24 (25-27-29) stitches left on the shoulder. Continue working until there is 1 row left before the piece measures 28-30-33 (36-40-44) cm – adjust so that the next row is worked from the wrong side. Knit 1 row from the wrong side, turn the piece, knit the 5 band stitches and cast off the remaining 15-17-19 (20-22-24) stitches on the shoulder. Cut the strand. NECKLINE: Work garter stitch back and forth over the 5 band stitches for the neckline until the it measures approx. 5-5-5 (6-6-6) cm from the shoulder, cast off. LEFT FRONT PIECE: Work as for the right, but reversed. In other words, work A.3 instead of A.2 (do not decrease for buttonholes on the left band). On the first row from the wrong side when the piece measures 20-21-24 (26-30-34) cm) knit the 5 band stitches, turn the piece, tighten the strand and knit back over the 5 band stitches (i.e. the other stitches on the needle are not worked). Then work as before over all the stitches again (this is done to insure that the band will lie neatly around the neck). AT THE SAME TIME on the next row from the right side begin decreasing for the v-neck – READ DECREASE TIP. Continue working until there is one row left before finished length – adjust so that the next row is worked from the wrong side. Knit 1 row from the wrong side, turn the piece, cast off the first 15-17-19(20-22-24) stitches and knit the 5 band stitches. Continue working garter stitch back and forth over the 5 band stitches until the neckline measures 5-5-5 (6-6-6) cm from the shoulder, cast off. SLEEVE: Cast on 32-32-34 (36-38-38) stitches with double pointed needles size 3 mm. Work 2 RIDGES in the round – see description above. Change to double pointed needles size 4 mm and work stocking stitch. When the piece measures 4-4-5 (6-7-8) cm insert 1 marker thread at the beginning of the round (= mid under the sleeve). On the next round increase 2 stitches mid under the sleeve – READ INCREASE TIP. Increase in this way every 5½-3½-3 (3-3-3) cm a total of 3-5-6 (7-8-10) times = 38-42-46 (50-54-58) stitches. When the piece measures 18-20-23 (27-31-35) cm divide the piece mid under the sleeve. Insert 1 marker, work 3 rows stocking stitch back and forth over all the stitches and loosely cast off. ASSEMBLY: Sew the shoulder seams inside the cast-off edge. Sew together the neckline mid back - the seam turns in towards the wrong side. Sew the neckline to the neck edge at the back of the neck. Sew the side seams edge to edge in the outermost loop of the outermost stitch from the armhole and down, but stop when there is still approx. 6 cm at the bottom in each side (= split). Sew in the sleeves – the marker mid under the sleeve should fit to the side of the body. Sew the buttons on to the left band. |
|||||||
Diagram explanations |
|||||||
|
|||||||
 |
|||||||
 |
|||||||
 |
|||||||
Have you finished this pattern?Tag your pictures with #dropspattern #adriencardigan or submit them to the #dropsfan gallery. Do you need help with this pattern?You'll find 27 tutorial videos, a Comments/Questions area and more by visiting the pattern on garnstudio.com. © 1982-2026 DROPS Design A/S. We reserve all rights. This document, including all its sub-sections, has copyrights. Read more about what you can do with our patterns at the bottom of each pattern on our site. |
|||||||


With over 40 years in knitting and crochet design, DROPS Design offers one of the most extensive collections of free patterns on the internet - translated to 17 languages. As of today we count 324 catalogues and 12290 patterns translated into English (UK/cm). 12290
We work hard to bring you the best knitting and crochet have to offer, inspiration and advice as well as great quality yarns at incredible prices! Would you like to use our patterns for other than personal use? You can read what you are allowed to do in the Copyright text at the bottom of all our patterns. Happy crafting!
Post a comment to pattern DROPS Children 28-4
We would love to hear what you have to say about this pattern!
If you want to leave a question, please make sure you select the correct category in the form below, to speed up the answering process. Required fields are marked *.