
Popular categories
Looking for a yarn?


Comments / Questions (13)
![]() Olga wrote:
Olga wrote:
Buonasera, volevo sapere se c è lo stesso modello nella versione cardigan. grazie
21.04.2020 - 19:27DROPS Design answered:
Buongiorno Olga. Purtroppo no, per questo modello non è disponibile la versione cardigan. Provi a guardare altri nostri modelli simili, per i quali è prevista la versione aperta. Buon lavoro!
21.04.2020 - 23:52
![]() Annie Gravgaard wrote:
Annie Gravgaard wrote:
Jeg er lidt forvirret : der er to billeder til opskriften, ser ud til at det er forskellige farver. Hvilken passer med farverne i opskriften ?
29.01.2019 - 12:37DROPS Design answered:
Hei Annie. Det er nok bare lyssettingen som gjør at de ser ut som forkjsellige farger - den ene er tatt i dirkete sollys, mens den andre er tatt i vanlig dagslys. Men det er altså fargene som er oppgitt i oppskriften på begge bildene. God fornøyelse.
29.01.2019 - 13:06
![]() Clara wrote:
Clara wrote:
Bonjour je tricote du S, je crois que cela vient d'un problème au niveau des augmentations (j'ai tricoté 2 fois les mailles au lieu de faire des jetés). Par contre je pense que l'empiècement parait petit pour passer la tête.
10.07.2017 - 10:34DROPS Design answered:
Bonjour Clara, vous avez 56 m après les augmentations juste avant A.1/A.2 et augmentez ainsi: Dos & devant: 5x 1 m + 3x1m au début et à la fin du dos/du devant = + 32 m Manches: 11x1 m au début et à la fin de chaque manche = + 44 m. Vous aviez 56 m + 32 + 44 = 132 m. Votre réflexion va être transmise à nos stylistes, merci d'avance pour votre patience en raison des vacances. Bon tricot!
10.07.2017 - 10:59
![]() Clara wrote:
Clara wrote:
Bonjour, je pense que les explications sont inexactes car à partir des augmentations du raglan il y a un problème de nombre de mailles nécessaires pour effectuer les explications. Pouvez-vous m'aider ou vérifier que les explications sont justes ? Merci d'avance.
08.07.2017 - 18:31DROPS Design answered:
Bonjour Clara, pouvez-vous indiquer quelle taille vous tricotez pour que les vérifications puissent être faites? Merci.
10.07.2017 - 09:37
![]() Svetlana wrote:
Svetlana wrote:
Hi, Probably, I don't understand the instructions. On the diagram, the width of the 1/2 of the yolk is 16 cm for the medium size (32 for the whole?). No way, that it would fit my head. I began to knit and it looks like it's too small for my head (and I believe for any adult head). Please, advise. Thank you, Svetlana
08.07.2017 - 06:24DROPS Design answered:
Hi Svetlana, I think you could be right that the measurements on the diagram are misleading. I think, though, that 38 stitches with size 10 mm needles will be large enogh, looking at the knitting tension. You can try taking the stitches off the needle when you have completed the ridges and see how big the neck is. Send another comment if this is not the case. Kind regards, Deirdre
08.07.2017 - 11:43
![]() Regina wrote:
Regina wrote:
Hallo, Stimmt es wirklich, dass ich für Größe M von Drops Delight jeweils 200g brauche, aber von Drops Brushed Alpaca Silk nur 100g ? Die Lauflänge von letzterem ist doch geringer? Danke
15.06.2017 - 15:52DROPS Design answered:
Liebe Regina, 4 x Brushed Alpaca Silk = 560 m, aber 3 x Delight wären nur 525 m, dann braucht man 4 x Delight. Viel Spaß beim stricken!
15.06.2017 - 18:08
![]() Pia Hansen wrote:
Pia Hansen wrote:
Jeg er netop færdig med denne model i XL, som jeg har lavet noget længere end mønstret, alligevel har jeg lidt over 200g garn tilovers. ca. 75 g brushed alpaca & 150 Deligth... Er der fejl i mængde-angivelsen?
24.03.2017 - 09:55DROPS Design answered:
Hei Pia. Takk for din tilbakemeldig. Vi har ikke fått noen andre henvendelser på for mye garn på dene modellen, men vi vil undersøke nærmere og evnt komme med en garmmengde endring om det trengs.mvh Drops design
17.10.2017 - 08:44
![]() Susan W wrote:
Susan W wrote:
Hello, Instead of 2 strands of Delight could not 1 strand of Big Delight be used? I know the colour effect will not be the same but I have at least 400g of it that has been my stash for years, waiting for the perfect project. Also, would the grams and meterage be the same, or will I need more? Thank you.
22.03.2017 - 00:45DROPS Design answered:
Dear Susan W, you can replace 2 strands yarn group A (= Delight) with 1 strand yarn group C (= Big Delight), read more and calculate new amount here. Happy knitting!
22.03.2017 - 09:25
![]() Mary wrote:
Mary wrote:
Bonjour, juste pour vous remercier de mettre tous ces modèles / aides / conseils / techniques et astuces, gratuitement à notre disposition. Je viens de trouver ce que je cherchais et grâce à vous je n'ai plus qu'à tricoter sans trop me prendre la tête à calculer!! :)
31.01.2017 - 16:00
![]() Angela Biagi wrote:
Angela Biagi wrote:
Magnifici colori. Evergreen. Ho una passione particolare per i colori mèlange. Quando potro' avere il modello ? Buon lavoro.
12.01.2017 - 11:20
|
||||||||||||||||
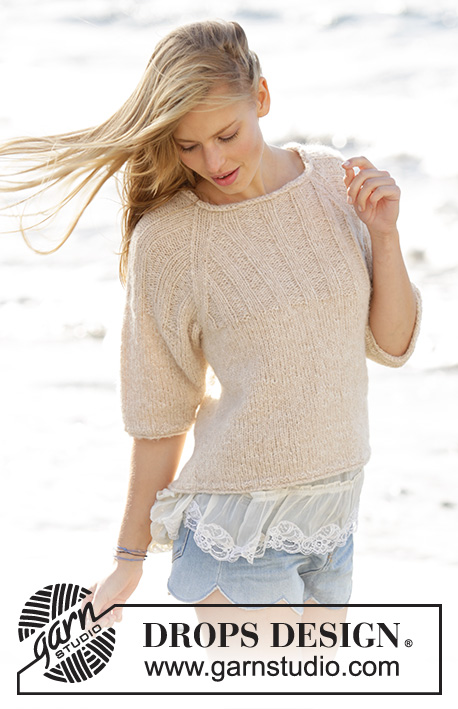
Misty Moor#mistymoorsweater |
||||||||||||||||
 |
 |
|||||||||||||||
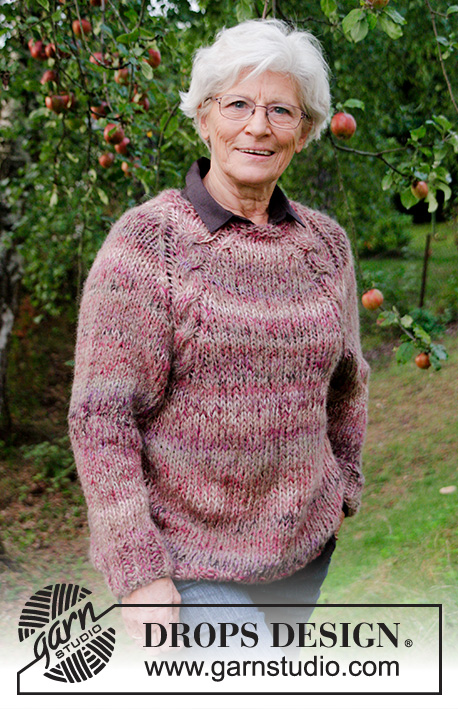
Knitted jumper with raglan, cables and A-shape, worked top down in 2 strands DROPS Delight and 1 strand DROPS Brushed Alpaca Silk. Sizes S - XXXL.
DROPS 176-19 |
||||||||||||||||
|
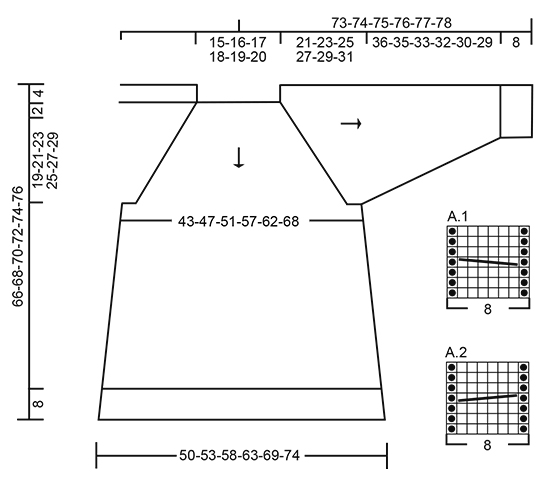
RIDGE/GARTER STITCH (worked in the round): 1 ridge = 2 rounds. Knit 1 round and purl 1 round. INCREASE TIP-1: To work out how to increase evenly, count the total number of stitches on the needle (e.g. 38 stitches) and divide by the number of increases to be made (e.g. 6) = 6.3. In this example increase after approx. every 6th stitch. Increase 1 stitch by making 1 yarn over. On the next round knit the yarn overs twisted to prevent holes. ELEVATION: Start from the right side mid back, insert 1 marker thread before the first stitch and knit 6-6-7-7-7-8 stitches past the marker thread, turn, tighten the strand and purl 12-12-14-14-14-16 stitches from the wrong side, turn the piece, tighten the strand and knit 18-18-21-21-21-24 stitches, turn the piece, tighten the strand and purl 24-24-28-28-28-32 stitches, turn the piece, tighten the strand and knit back to mid back. PATTERN: See diagrams A.1 and A.2. The diagrams show all the rows in the pattern seen from the right side. RAGLAN: Increase to raglan on each side of A.1/A.2 in each transition between body and sleeves. The increases are different on the body and sleeves as explained in the text. Increase 1 stitch by making 1 yarn over, on the next round knit the yarn overs twisted to prevent holes. INCREASE TIP-2 (for the sides on the body): Start 2 stitches before the marker thread, make 1 yarn over, knit 4 (the marker thread sits in the middle of these 4 stitches), make 1 yarn over (= 2 stitches increased). On the next round knit the yarn overs twisted to prevent holes. DECREASE TIP (for mid under the sleeve): Start 4 stitches before the marker thread, knit 2 together, knit 2 (the marker thread sits in between these 2 stitches), slip 1 stitch as if to knit, knit 1, pass the slipped stitch over). ---------------------------------------------------------- JUMPER: The piece is worked in the round with double pointed needles/circular needle from mid back and is worked top down. The sleeves are worked in the round with double pointed needles. YOKE: Cast on 38-38-38-40-42-42 stitches with double pointed needles size 10 mm and 1 strand Delight in each colour + 1 strand Brushed Alpaca Silk (= 3 strands). Change to double pointed needles size 9 mm and work 2 RIDGES – see description above. AT THE SAME TIME on the third round (= a round of knit) increase 6-8-8-8-8-10 stitches evenly along the round – READ INCREASE TIP-1 = 44-46-46-48-50-52 stitches. Change to double pointed needles size 10 mm. For a better shape, you can now work an ELEVATION at the back of the neck – see description above. When the elevation is finished, insert 4 marker threads in the piece AT THE SAME TIME as you work and increase as follows: Knit 6-6-6-7-7-8 (= ½ the back piece), purl 1, knit 2 stitches in each of the next 3 stitches (knit in front and back loop of stitch = 3 stitches increased) and insert 1 marker thread in the middle of these 6 stitches, purl 1, knit 1 (= mid top of right sleeve), purl 1, knit 2 stitches in each of the next 3 stitches and insert 1 marker thread in the middle of these 6 stitches, purl 1, knit 11-12-12-13-14-15 (= front piece), purl 1, knit 2 stitches in each of the next 3 stitches and insert 1 marker thread in the middle of these 6 stitches, purl 1, knit 1 (= mid top of left sleeve), purl 1, knit 2 stitches in each of the next 3 stitches and insert 1 marker thread in the middle of these 6 stitches, purl 1 and knit 5-6-6-6-7-7 (= ½ the back piece) = 56-58-58-60-62-64 stitches on the needle. The next round is worked as follows: knit 6-6-6-7-7-8 (= ½ the back piece), increase 1 stitch for RAGLAN – see description above, work A.1 (= 8 stitches), increase 1 stitch for raglan, knit 1 (= sleeve), increase 1 stitch for raglan, work A.2 (= 8 stitches), increase 1 stitch for raglan, knit 11-12-12-13-14-15 (= front piece), increase 1 stitch for raglan, work A.1 (= 8 stitches), increase 1 stitch for raglan, knit 1 (= sleeve), increase 1 stitch for raglan, work A.2 (= 8 stitches), increase 1 stitch for raglan and knit the remaining 5-6-6-6-7-7 stitches. Continue in this way, with stocking stitch and A.1/A.2 in each transition between body and sleeves. REMEMBER THE KNITTING TENSION! AT THE SAME TIME continue the increases for raglan as follows – NOTE: The increases are different on the front/back pieces and on the sleeves: FRONT/BACK PIECE: Increase 1 stitch before A1 and after A.2 every 2nd round in total 5-5-8-9-12-15 times (including the first increase described above) and then every 4th round 3-4-3-3-2-1 times (= in total 8-9-11-12-14-16 times). SLEEVE: Increase 1 stitch after A.1 and before A.2 every 2nd round in total 11-11-12-11-12-13 times (including the first increase described above) and then every 4th round 0-1-1-2-2-2 times (= in total 11-12-13-13-14-15 times). After the last increase to raglan there are 132-142-154-160-174-188 stitches on the needle and the piece measures approx. 21-23-25-27-29-31 cm from the cast-on edge mid front (approx. 25-27-29-31-33-35 cm from the shoulder). The next round is worked as follows: Knit 18-19-21-23-25-28 stitches (i.e. until the marker thread (= ½ the back piece), place the next 31-33-35-35-37-39 stitches on 1 thread (= right sleeve), cast on 4-4-4-6-6-6 new stitches on the needle (= in the side under the sleeve), knit 35-38-42-45-50-55 stitches (= front piece), place the next 31-33-35-35-37-39 stitches on 1 thread (= left sleeve), cast on 4-4-4-6-6-6 new stitches on the needle (= in the side under the sleeve) and knit the remaining 17-19-21-22-25-27 stitches (= ½ the back piece). Body and sleeves are now worked separately. THE PIECE IS NOW MEASURED FROM HERE! BODY: = 78-84-92-102-112-122 stitches. Insert 1 marker thread in the middle of the 4-4-4-6-6-6 stitches cast on under the sleeves in each side and let the marker threads follow the work upwards. Work stocking stitch in the round. When the piece measures 4 cm increase 2 stitches in each side – READ INCREASE TIP-2 (= 4 stitches increased). Increase in this way every 10 cm in total 3 times in all sizes = 90-96-104-114-124-134 stitches. When the piece measures 33 cm from the separation (approx. 58-60-62-64-66-68 cm from the shoulder) knit 1 round where you increase 14-16-16-22-20-26 stitches evenly along the round = 104-112-120-136-144-160 stitches. Change to circular needle size 9 mm and work rib in the round (= knit 2 / purl 2). When the rib measures 5 cm increase every other purl 2 to purl 3 = 117-126-135-153-162-180 stitches. Continue with knit over knit and purl over purl until the rib measures 8 cm. Cast off loosely with knit over knit and purl over purl. The jumper measures approx. 66-68-70-72-74-76 cm from the shoulder and down. SLEEVE: Place the 31-33-35-35-37-39 stitches from the thread in the one side of the piece on double pointed needles size 10 mm, in addition knit up 1 stitch in each of the 4-4-4-6-6-6 stitches which were cast on under the sleeve and insert 1 marker thread in the middle of these 4-4-4-6-6-6 stitches = 35-37-39-41-43-45 stitches on the needle. Work stocking stitch in the round. When the piece measures 2 cm from the separation in all sizes decrease 2 stitches mid under the sleeve – READ DECREASE TIP. Decrease in this way every 4½-4½-3½-3½-3-2½ cm in total 8-8-9-9-10-10 times = 19-21-21-23-23-25 stitches. Continue working until the sleeve measures 36-35-33-32-30-29 cm from the separation (shorter lengths in the larger sizes due to longer yoke). Knit 1 round where you increase 5-3-3-5-5-7 stitches evenly along the round = 24-24-24-28-28-32 stitches. Change to double pointed needles size 9 mm and work rib in the round (= knit 2 /purl 2). When the rib measures 8 cm (the whole sleeve measures approx. 44-43-41-40-38-37 cm from the separation) cast off loosely with knit over knit and purl over purl – to prevent the cast-off edge becoming tight make a yarn over after every 4th stitch at the same time as you cast off (the yarn overs are cast off as ordinary stitches). Work the other sleeve in the same way. |
||||||||||||||||
Diagram explanations |
||||||||||||||||
|
||||||||||||||||
 |
||||||||||||||||
Have you finished this pattern?Tag your pictures with #dropspattern #mistymoorsweater or submit them to the #dropsfan gallery. Do you need help with this pattern?You'll find 30 tutorial videos, a Comments/Questions area and more by visiting the pattern on garnstudio.com. © 1982-2026 DROPS Design A/S. We reserve all rights. This document, including all its sub-sections, has copyrights. Read more about what you can do with our patterns at the bottom of each pattern on our site. |
||||||||||||||||


With over 40 years in knitting and crochet design, DROPS Design offers one of the most extensive collections of free patterns on the internet - translated to 17 languages. As of today we count 324 catalogues and 12290 patterns translated into English (UK/cm). 12290
We work hard to bring you the best knitting and crochet have to offer, inspiration and advice as well as great quality yarns at incredible prices! Would you like to use our patterns for other than personal use? You can read what you are allowed to do in the Copyright text at the bottom of all our patterns. Happy crafting!
Post a comment to pattern DROPS 176-19
We would love to hear what you have to say about this pattern!
If you want to leave a question, please make sure you select the correct category in the form below, to speed up the answering process. Required fields are marked *.