
Popular categories
Looking for a yarn?


Comments / Questions (99)
![]() Linda wrote:
Linda wrote:
I have 3 skeins of 30% nylon, 27%cotton, 24% acrylic, 10%silk, and 9% linen 3.5 oz. 100 g each, 432 yards each. I would make this in a large. Should I ave enough? and is there a charge for this pattern? Also at a different time, would this be easy to extend the sleeves to 3/4 or just above the elbow? Beautiful pattern. Thanks
10.04.2019 - 23:30DROPS Design answered:
Dear Linda, the pattern is free. For any personal assistance regarding the use of your own yarn, you can contact your favorite DROPS store and there you'll find all the help you need. Happy crafting!
11.04.2019 - 06:43
![]() Margit wrote:
Margit wrote:
Wenn ich in der Lochmusterreihe an beiden Seiten des Ärmels einen Umschlag mache, nehme ich automatisch eine Masche zu. Lasse ich einen Umschlag weg, sieht das Muster asymmetrisch aus. Wie stricke ich diese Reihe richtig?
28.03.2019 - 13:38DROPS Design answered:
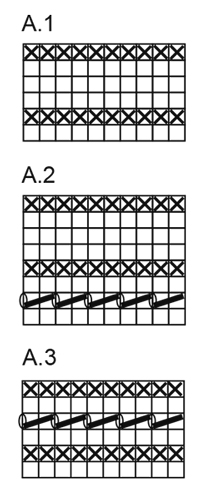
Liebe Margit, wenn Sie A.1 über die Ärmel stricken, nehmen Sie in A.1 keine Masche (= jeder Umschlag wird mit einer Abnahme ausgeglichen). Die Raglanzunahmen stricken Sie bei den Ärmeln nach der ersten Masche am Anfang Ärmel + vor der letzten Maschen am Ende Ärmel - siehe RAGLANZUNAHMEN. Viel Spaß beim stricken!
01.04.2019 - 09:48
![]() Teresa wrote:
Teresa wrote:
Hello, I am making size L and have a question regarding stitch counts. Once the 10 stitches are cast on for each armhole, the pattern states the stitch count should be 200. Then 4 stitches are decreased at 4 cm (one time), and then 4 stitches decreased every 3 cm (four times). Should the new stitch count be 180 for size L rather than 184 as stated in pattern? In other words, 4 stitches decreased a total of 5 times, for 20 stitches decreased?
25.02.2019 - 18:20DROPS Design answered:
Dear Teresa, you decrease the 4 sts on the sides a total of 4 times, so that you get 200 sts =- 16 sts = 184 sts. Happy knitting!
26.02.2019 - 10:27
![]() Bénédicte wrote:
Bénédicte wrote:
Bonjour, D'après les diagrammes et l'échantillon, en montant 84 mailles pour la taille M, on obtient une encolure de 40 cm de large. Concrètement, il est impossible de passer la tête par cette encolure ! (mon tour de tête, par exemple, est de 57 cm). Ai-je manqué une information? Merci de votre réponse.
05.12.2018 - 18:30DROPS Design answered:
Bonjour Bénédicte, les mesures et indications sont justes, l'encolure de ce modèle est assez près du cou, veillez bien à ce que votre rang de montage ne soit pas trop serré (il devrait s'élargir naturellement par la suite), et n'hésitez pas à ajuster le nombre de mailles à monter si vous le souhaitez. Bon tricot!
06.12.2018 - 10:45
![]() Anna W. wrote:
Anna W. wrote:
Wann beginne ich eigentlich mit dem Muster A3? Und wieso wird hier beim Muster von Hin- und Rückrunden gesprochen? Ich stricke doch rund, für mich sind das also alles Hinrunden...
19.09.2018 - 09:51DROPS Design answered:
Liebe Anna, A.3 wird ganz unten am Rumpfteil gestrickt (nach A.3 werden die Maschen abgekettet). Die Diagramme zeigen alle Runden, z.B. A.1 = 6 Reihen, diese 6 Reihen werden Sie genauso stricken, in der Runde = jede Runden rechts nach links lesen (Deutsche Anleitung wird hier angepasst). Viel Spaß beim stricken!
19.09.2018 - 10:16
![]() Carol wrote:
Carol wrote:
Hello, I love this top. Please note that I have only ever knit 1 sweater prior to this and that was in the context of a class, so the instructor was right there to help. I'm a bit confused as to when to switch to 4th row increases for the body (size L). Do I knit a total of 17 rows ( which includes 8 increase rows) or do I knit a total of 34 rows (which includes 17 increase rows) prior to switching to the 4th row increase? Thank you for your time and patience and this beautiful pattern.
19.08.2018 - 23:57DROPS Design answered:
Hi Carol, You are now measuring from the marker thread at the armholes. When the piece measures 19 cm (in size L) you increase 1 stitch on either side of each marker thread in the sides (4 stitches increased) and then do the same every 2 cm a total of 6 times (so 5 more times). I hope this helps and happy knitting!
21.08.2018 - 07:36
![]() Cindy wrote:
Cindy wrote:
Hallo Ik geraak niet wijs uit het patroon. Ik heb 100 steken opgezet en in de laatste rij van de ribbels, dus de averechte rij heb ik 20 steken gemeerderd. En dan zou ik met A1 moeten beginnen, en hier loop ik al vast. Begin ik dan ook al met de raglan? Maar dan kom ik aan teveel steken op mijn mouwen . Graag wat meer uitleg. Alvast bedankt
10.07.2018 - 20:22
![]() Dee wrote:
Dee wrote:
Can you tell me if the Petronella Top has negative or positive ease, and if so, how much? I am trying to determine which size to make.
14.06.2018 - 22:34DROPS Design answered:
Dear Dee, you will find at the bottom of the pattern a measurement chart with all measurements in each size, taken flat from side to side Compare these to a similar garment you have and like the shape to find out the matching size. Read more about sizing here. Happy knitting!
15.06.2018 - 08:24
![]() Francesca wrote:
Francesca wrote:
Je voudrais réaliser ce modèle mais j'aimerais que l'encolure devant soit un peu + basse, moins ras du cou. Pensez-vous que je puisse y parvenir en faisant des rangs raccourcis. Idéalement je voudrais conserver l'aspect "carré" de l'encolure, mais juste que ce soit moins près du cou.
08.03.2018 - 00:35DROPS Design answered:
Bonjour Francesca, vous pouvez vous aider d'un modèle réalisé avec un fil du même groupe et qui a une réhausse pour l'encolure dos. N'hésitez pas à demander de l'aide à votre magasin, on pourra vous y donner quelques astuces, même par mail, téléphone ou via les réseaux sociaux. Bon tricot!
08.03.2018 - 09:20
![]() JoLaine Jones-Pokorney wrote:
JoLaine Jones-Pokorney wrote:
This is the most confusing pattern I've ever tried to make. There are several questions, but let's just start with the one about the first increases. I'm told to increase 20 stitches evenly on the last row of the two ridges - which would be a purl row? Really? Yes, it can be done, but it ain't pretty. Do you mean to complete the four ridge rows and do the increases on the next row?
07.03.2018 - 22:37DROPS Design answered:
Dear Mrs Jones-Pokorney, you will increase on the last row of the 2 ridges, ie on a Purl round, make a YO to increase 1 st and work this YO twisted on next round to avoid a hole. Happy knitting!
08.03.2018 - 09:06
|
|||||||||||||
Petronella Top#petronellatop |
|||||||||||||
|
|
|||||||||||||
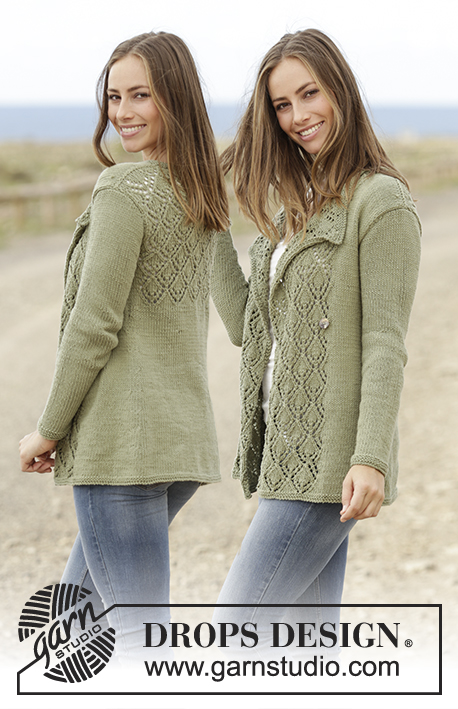
Knitted top with raglan and lace pattern, worked top down in DROPS Muskat. Sizes S - XXXL.
DROPS 175-32 |
|||||||||||||
|
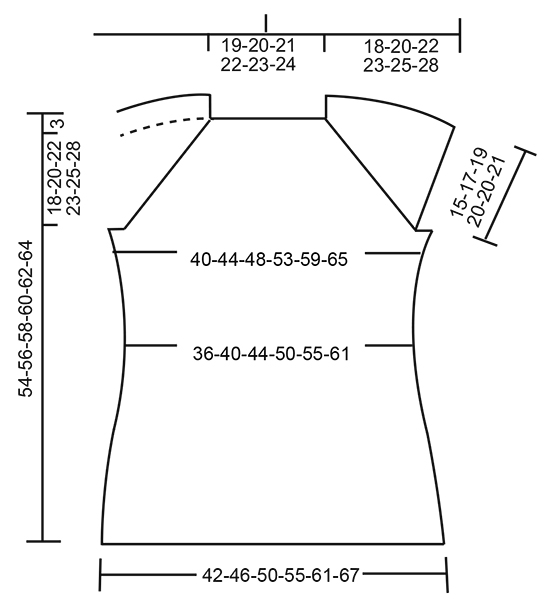
RIDGE/GARTER STITCH (worked in the round): 1 ridge = 2 rounds. Knit 1 round and purl 1 round. PATTERN: See diagrams A.1, A.2 and A.3. The diagrams show all the rows in the pattern from the right side. RAGLAN: Increase every 2nd round as follows: Increase as follows before the marker thread: Start 1 stitch before the marker thread: Make 1 yarn over, knit 1, marker thread. Increase as follows, after the marker thread: Marker thread, knit 1, make 1 yarn over. On the next round work the yarn overs knit, there will be holes. Increase every 4th round as follows: Increase as follows before the marker thread: ROUND 1: Start 1 stitch before the marker thread: Make 1 yarn over, knit1, marker thread. ROUND 2: The yarn overs are worked knit, there will be holes. ROUND 3: Start 3 stitches before the marker thread: Knit 2 together, make 1 yarn over, knit1, marker thread. No increases, but the row of holes continues as before. ROUND 4: The yarn overs are worked knit, there will be holes. Increase as follows, after the marker thread: ROUND 1: Marker thread, knit 1, make 1 yarn over. ROUND 2: The yarn overs are worked knit, there will be holes. ROUND 3: Marker thread, knit 1, make 1 yarn over, slip 1 stitch as if to knit, knit 1, pass the slipped stitch over the knitted stitch. No increases, but the row of holes is continued as before. ROUND 4: Work the yarn overs knit, there will be holes. DECREASE TIP: Start 3 stitches before the marker thread: Knit 2 together, knit 2 (the marker thread sits between these 2 stitches), slip 1 stitch as if to knit, knit 1, pass the slipped stitch over the knitted stitch = 2 stitches decreased. INCREASE TIP: Work until there is 1 stitch left before the marker thread. Make 1 yarn over, knit 2 (the marker thread sits between these 2 stitches) and make 1 yarn over. On the next round work the yarn overs twisted knit to prevent holes (the increased stitches are worked in stocking stitch). --------------------------------------------------------- TOP: The piece is worked in the round with circular needle from mid back, top down. YOKE: Cast on 80-84-88-92-96-100 stitches with circular needle size 4 mm and Muskat. Work 2 RIDGES – see description above, on the last round of the ridges increase 20 stitches evenly along the round = 100-104-108-112-116-120 stitches. Insert 4 marker threads in the piece as follows: first marker thread after 19-20-21-22-23-24 stitches (= half the back piece), second marker thread after 12 new stitches (= sleeve), third marker thread after 38-40-42-44-46-48 new stitches (= front piece), fourth marker thread after 12 new stitches (= sleeve), there are 19-20-21-22-23-24 stitches left on the needle after the last marker thread (= half the back piece). Begin with the increases to RAGLAN as described above and work stocking stitch across the stitches on the back piece and front piece and A.1 across all the sleeve stitches. READ THIS WHOLE SECTION BEFORE WORKING! The increases are different on the front piece/back piece and the sleeves as follows: FRONT PIECE/BACK PIECE: Increase every 2nd round 12-15-17-25-30-35 times, then every 4th round 7-7-7-4-3-2 times. SLEEVES: Increase every 2nd round 18-23-27-29-26-25 times, then every 4th round 4-3-2-2-5-7 times. When A.1 has been completed 1 time in height, repeat A.2 in height. The increased stitches on the sleeves are worked in to the pattern as you go. After the next to last increase on the sleeve (there are 4 rounds left), continue by working garter stitch across the stitches on each sleeve, the stitches on the front piece/back piece are continued in stocking stitch as before. REMEMBER THE KNITTING TENSION! After all the increases to raglan there are 264-296-320-352-372-396 stitches on the needle. The next round is worked as follows: Work 38-42-45-51-56-61 stitches (= half the back piece), cast off the next 56-64-70-74-74-76 stitches, work the next 76-84-90-102-112-122 stitches (= front piece), cast off the next 56-64-70-74-74-76 stitches, work the next 38-42-45-51-56-61 stitches (= half the back piece). BODY: Continue working as follows: work half the back piece, cast on 8-8-10-10-12-14 new stitches, work the front piece, cast on 8-8-10-10-12-14 new stitches, work half the back piece. There are now 168-184-200-224-248-272 stitches on the body. Insert a marker thread in each side, in the middle of the new stitches which were cast on. THE PIECE IS NOW MEASURED FROM HERE. Continue with stocking stitch, but across the 8-8-10-10-12-14 new stitches in each side work 2 ridges, then work stocking stitch across all stitches. When the piece measures 4 cm decrease 1 stitch on each side of the marker threads (= 4 stitches decreased), decrease every 3 cm in total 4 times – READ DECREASE TIP = 152-168-184-208-232-256 stitches. When the piece measures 19-19-19-18-18-19 cm increase 1 stitch on each side of the marker threads (= 4 stitches increased), increase every 2 cm in total 6 times– READ INCREASE TIP = 176-192-208-232-256-280 stitches. When the piece measures 32-32-32-33-33-32 cm work A.3 across all stitches. Then cast off in knit, the piece measures approx. 54-56-58-60-62-64 cm from the shoulder. |
|||||||||||||
Diagram explanations |
|||||||||||||
|
|||||||||||||
 |
|||||||||||||
 |
|||||||||||||
Have you finished this pattern?Tag your pictures with #dropspattern #petronellatop or submit them to the #dropsfan gallery. Do you need help with this pattern?You'll find 24 tutorial videos, a Comments/Questions area and more by visiting the pattern on garnstudio.com. © 1982-2026 DROPS Design A/S. We reserve all rights. This document, including all its sub-sections, has copyrights. Read more about what you can do with our patterns at the bottom of each pattern on our site. |
|||||||||||||


With over 40 years in knitting and crochet design, DROPS Design offers one of the most extensive collections of free patterns on the internet - translated to 17 languages. As of today we count 324 catalogues and 12290 patterns translated into English (UK/cm). 12290
We work hard to bring you the best knitting and crochet have to offer, inspiration and advice as well as great quality yarns at incredible prices! Would you like to use our patterns for other than personal use? You can read what you are allowed to do in the Copyright text at the bottom of all our patterns. Happy crafting!
Post a comment to pattern DROPS 175-32
We would love to hear what you have to say about this pattern!
If you want to leave a question, please make sure you select the correct category in the form below, to speed up the answering process. Required fields are marked *.