
Popular categories
Looking for a yarn?


Comments / Questions (39)
![]() Neupauer wrote:
Neupauer wrote:
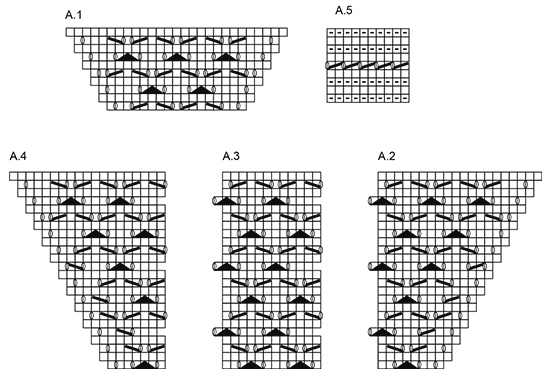
In dem Diagramm sind beim Muster leere Kästchen eingezeichnet, wahrscheinlich ist ein Umschlag gemeint, aber bei „zwei Maschen wie zum Rechtsstricken abheben usw, wird man aus dem leeren Kästchen nicht schlau. Gibt es diesen schönen Pulli in einem Anleitungsheft zum Bestellen?
03.03.2018 - 18:08DROPS Design answered:
Liebe Frau Neupauer, in der 5., 13. und 21. Reihe A.2-A.4 wird die erste Maschen A.3 zusammen mit der letzten Maschen A.2 gestrickt, und die erste Masche der nächste A.3/A.4 zusammen mit den letzten Maschen in A.3 gestrickt, beachten Sie nur, daß die Maschenanzahl in jedem Diagram stimmt. Viel Spaß beim stricken!
05.03.2018 - 08:39
![]() Melanie wrote:
Melanie wrote:
Guten Tag, dies ist mein erster Pullover den ich auf diese Art (von oben nach unten) stricke. Bei den Zunahmen Größe L soll man für das halbe Rückenteil bzw. Vorderteil 21/42 Maschen stricken und dazwischen die Ärmel mit Zunahme. Bedeutet dies dass man in der nächsten Zunahmenrunde dann 22/44 bei Rücken-Vorderteil stricken muss und so immer jeweils 1/2 Maschen dazuzählen muss pro 2. Runde? Vielen Dank
02.03.2018 - 07:43DROPS Design answered:
Liebe Melanie, so stimmt es. Bei den Ärmel haben Sie auch 2 M mehr nach jeder Zunahmerunde. Viel Spaß beim stricken!
02.03.2018 - 08:43Halyna wrote:
Bonjour! Excusez-moi d'avoir écrit ici, mais je n'ai pas trouvé où on peut vous écrire par mail. Je voulais dire merci pour votre site et vous dire que vous avez beaucoup d'admirateurs russes, alors que votre site n'est pas disponible en russe et c'est bien dommage. Est-ce que ça vous intéresseriez, ajouter la langue russe sur le site? J'aimerais entrer dans votre équipe de traducteurs si c'est possible et surtout n'hésitez pas de m'écrir. Cordialement, Halyna.
20.01.2018 - 21:55DROPS Design answered:
Bonjour Halyna, nous vous remercions pour votre proposition mais sommes toutefois au regret de vous informer que nous ne sommes pas en mesure d'y donner suite actuellement. Cordialement.
23.01.2018 - 08:47
![]() Birthe Bjerg wrote:
Birthe Bjerg wrote:
Hej Garnstudio Ved ærmerne står der at der strikkes ret, når maskerne ikke går op i mønsteret. Men udvider mønsteret sig? Jeg har taget ind 12 gange i hver side. men har stort set det samme antal masker på pinden. Hvad sker der, fatter det bare ikke. Jeg har valgt at strikke med en søm, men det burde ikke give nogen forskel.
20.11.2017 - 22:57DROPS Design answered:
Hej, normalt skal du have samme antal udtagninger som indtagninger når du strikker hulmønster. Men når du tager ind og strikker 2 m sammen så skal du sørge for at du ikke kompensere det med et omslag. God fornøjelse!
22.11.2017 - 14:34
![]() Evelina Jonker Mion wrote:
Evelina Jonker Mion wrote:
Goedenavond ik zou graag willen Drop 176-5 willen breien, maat M, voor mijn dochter. Ik moet wel zeggen dat ik geen held bent met breien maar ik red me, Is dat niet TE moeilijk voor mij ? en nog wat... ik brei met een naald onder mijn arm, met naalden zonder kop en rond breien heb ik nooit gedaan. kan ik deze trui ook met gewone naalden breien, of heeft u een alternatieve die erop lijkt.In afwachting vriendelijk groet uit zeeland Evelina
30.10.2017 - 20:41DROPS Design answered:
Hoi Evelina, Dit patroon is helaas allen geschikt om met rondbreinaalden te breien. Het is eerst heel erg wennen als je geen rondbreinaalden gewend bent, maar naar verloop van tijd went het echt. Om te oefenen met rondbreinaalden zou je eerst een eenvoudiger project kunnen doen, zodat je de slag wat te pakken krijgt en de steken ook mooi egaal worden, voordat je aan deze trui begint. Je kunt ook altijd je verkooppunt om tips en hulp vragen. Veel succes!
30.10.2017 - 22:42
![]() Anne wrote:
Anne wrote:
Hallo und danke für die tollen Anleitungen. Meine Frage bezieht sich auf die Stricknadeln: Ihr gebt immer die erforderlichen Längen an. Bitte gebt auch an, wann man am besten mit welcher Länge strickt. Beim letzten Pullover habe ich die Ärmel mit einem Nadelspiel gestrickt, die Maschen sind viel fester geworden als mit der Rubdnadrl (beides glatt rechts). Soldbuch bei diesem Pullover das Spiel lieber in 4,5 nehmen, oder mit einer kürzeren Rundnadel stricken? Danke & liebe Grüße Anne
20.08.2017 - 23:33DROPS Design answered:
Liebe Anne, immer Ihre Maschenprobe zuerst prüfen und dann die Nadelgröße anpassen wenn nötig - wenn Sie mit Nadelspiel etwas zu fest stricken, können Sie auch nur mit Rundnadel stricken - siehe Magic Loop. Viel Spaß beim stricken!
28.08.2017 - 12:23Almudena Avilés Martínez wrote:
Buenas tardes: Tengo ya terminado el cuerpo de Honey Blossom, pero me he atascado en las mangas. No consigo entender cómo debo proceder a hacer el patrón. Estoy tejiendo una talla L, tengo 75 puntos en la aguja más los 10 puntos recién recogidos. Dice que sólo debo tejer el diagrama A.3, pero cuántos puntos debo tejer en punto jersey en el centro de la manga? No consigo hacer que me cuadre con las disminuciones. Muchas gracias por la ayuda.
19.06.2017 - 15:01DROPS Design answered:
Hola Almudena. El diagrama A.3 tiene 12 puntos. En 85 puntos puedes trabajar 12 repeticiones de A.3 (12x7 = 84 pts) y 1 punto de derecho en el centro bajo la manga. Al cada lado de este punto vas a trabajar las disminuciones.
24.06.2017 - 12:54
![]() Libia wrote:
Libia wrote:
Thank you very much, it actually says it in the pattern, I just wasn't interpreting it correctly. Thanks again :0)
02.05.2017 - 14:34
![]() Libia wrote:
Libia wrote:
Hello again, Thank you very much for your quick answer to my previous question. I am after putting the sleeves on holders and knitting the body. The instructions say to increase after 3 cm and then every 7 cm 4 times until the piece measures 27cm, but 7cm 4 times is 28cm plus the first 3 that is 31, I am confused, could you help me understand?
29.04.2017 - 17:32DROPS Design answered:
Dear Libia, you will inc a total of 4 times: when piece measures 3 cm, then 10 cm (= 2nd time), then 17 cm (= 3rd time) and 24 cm (last time). Happy knitting!
02.05.2017 - 09:41
![]() Libia wrote:
Libia wrote:
Hello, I am stuck on the first row of the A.1 lace diagram, it says I should end up with 17 stitches but I get 19. The diagram to me reads as following: 1. Knit, 2. Yo, 3. Knit, 4. Knit, 5. Yo, 6. Skp, 7. Knit, 8. K2tog, 9. Yo, 10. Knit, 11. Yo, 12. Skp , 13. Knit, 14. K2tog, 15. Yo, 16. Knit, 17. Knit, 18. Yo, 19. Knit Which stitches am I reading incorrectly? I would really appreciate your help :0) Libia
19.04.2017 - 13:44DROPS Design answered:
Dear Libia, 1st row in A.1 is worked over 17 sts, but you are inc 2 sts, so that there are 19 sts at the end of row 1. You will inc 2 sts every other row, and will get 27 sts on last row in A.1 (= 17 sts + (5 x 2 sts inc) = 17+10 = 27 sts). Happy knitting!
19.04.2017 - 15:41
|
|||||||||||||||||||
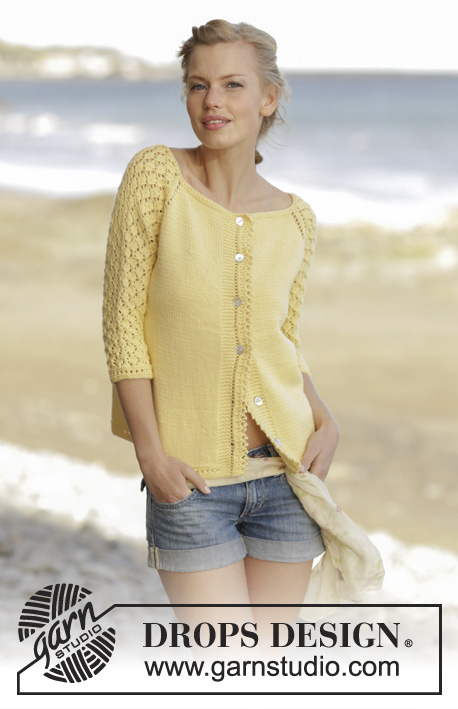
Honey Blossom#honeyblossomsweater |
|||||||||||||||||||
|
|
|||||||||||||||||||
Jumper with lace pattern, worked top down with ¾ length sleeves in DROPS Merino Extra Fine. Sizes S - XXXL.
DROPS 176-5 |
|||||||||||||||||||
|
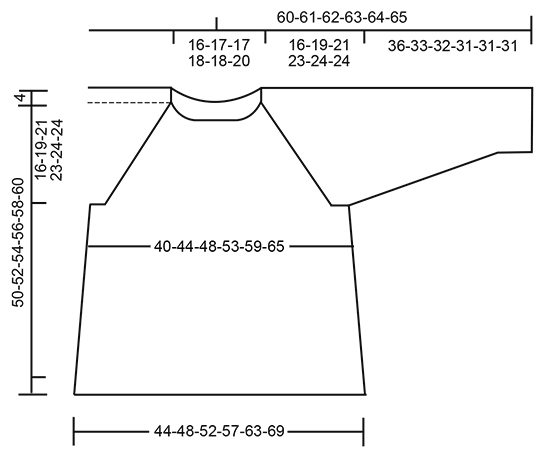
RIDGE/GARTER STITCH(worked in the round): 1 ridge = 2 rounds. Work 1 round knit and 1 round purl. PATTERN: See diagrams A.1 to A.5. RAGLAN: SLEEVE: The increases on the sleeve are a part of diagrams A.1, A.2 and A.4. Increase 1 stitch in each side of each sleeve every 2nd round, knit the yarn overs on next round, there will be holes. BODY: Increase 1 stitch in each side of the front piece and 1 stitch in each side of the back piece as follows (= in total 4 stitches increased): Increase as follows: Start 2 stitches before A.1: Make 1 yarn over, knit 2, work A.1, knit 2, make 1 yarn over. Repeat before and after the next A.1. Knit the yarn overs on next round, there will be holes. When increasing every 4th round, increase as follows: ROUND 1: Start 2 stitches before A.1: Make 1 yarn over, knit 2, work A.1, knit 2, make 1 yarn over. Repeat before and after the next A.1. ROUND 2: Knit the yarn overs, there will be holes. ROUND 3: Start 4 stitches before A.1: Knit 2 together, make 1 yarn over, knit 2, work A.1, knit 2, make 1 yarn over, slip 1 stitch as if to knit, knit 1, pass the slipped stitch over the stitch that was knitted – there are no increases, but the row of holes continues as before. Repeat before and after the next A.1. ROUND 4: Knit the yarn overs, there will be holes. INCREASE TIP: Start 1 stitch before the marker thread, make 1 yarn over, knit 2 (the marker thread sits between these 2 stitches), make 1 yarn over. Knit the yarn overs twisted on the next round. DECREASE TIP: Start 3 stitches before the marker thread, knit 2 together, knit 2 (the marker thread sits between these 2 stitches), slip 1 stitch as if to knit, knit 1, pass the slipped stitch over the knitted stitch. The stitches that do not fit the pattern mid under sleeve are worked in stocking stitch. ---------------------------------------------------------- JUMPER: The piece is worked in the round with circular needle from mid back, top down. Cast on 94-98-102-106-110-114 stitches with circular needle size 4 mm and Merino Extra Fine. Work 2 RIDGES – see description above, on the last round of the ridges increase 20 stitches evenly along the round = 114-118-122-126-130-134 stitches. Continue working as follows: Work 19-20-21-22-23-24 stitches stocking stitch (= half the back piece), 1 yarn over, 1 stitch stocking stitch, A.1 (= 17 stitches) (= right sleeve), 1 stitch stocking stitch, 1 yarn over, 38-40-42-44-46-48 stitches stocking stitch (= front piece), 1 yarn over, 1 stitch stocking stitch, A.1 (= left sleeve), 1 stitch stocking stitch, 1 yarn over, 19-20-21-22-23-24 stitches stocking stitch (= half the back piece). The first increase to RAGLAN is now complete. Continue upwards with this division of pattern and stocking stitch. Increase to raglan as described above. On the sleeve increase every 2nd round 22-26-29-31-32-33 times, on the body increase every round 0-0-0-0-0-6 times, then every 2nd round 14-16-17-25-32-30 times and finally every 4th round 4-5-6-3-0-0 times. NOTE! When A.1 is finished, continue working as follows (across the stitches on the sleeves): A.2 (= 8 stitches), A.3 (= 12 stitches), A.4 (= 7 stitches). When A.2, A.3 and A.4 have been worked 1 time in height work as follows: A.2, A.3 across the next 36 stitches (= 3 repeats), A.4. Every time that A.2 to A.4 are worked one time in height continue with 2 more repeats of A.3 between A.2 and A.4. Finish A.2, A.3 and A.4 when you have increased a total of 22-26-29-31-32-33 times on the sleeves and a total of 18-21-23-28-32-36 times on the front piece and back piece. After all the increases, there are now 61-69-75-79-81-83 stitches on each sleeve, 76-84-90-102-112-122 stitches on the front piece and back piece = 274-306-330-362-386-410 stitches in total. The next round is worked as follows: Work 38-42-45-51-56-61 stitches (= half the back piece), place the next 61-69-75-79-81-83 stitches on a thread (= sleeve), cast on 8-8-10-10-12-14 new stitches, work the next 76-84-90-102-112-122 stitches (= front piece), place the next 61-69-75-79-81-83 stitches on a thread (= sleeve), cast on 8-8-10-10-12-14 new stitches, work the last 38-42-45-51-56-61 stitches (= half the back piece). BODY: There are now 168-184-200-224-248-272 stitches on the body. Continue with stocking stitch. Insert a marker thread in each side, in the middle of the 8-8-10-10-12-14 new stitches which were cast on. THE PIECE IS NOW MEASURED FROM HERE. When the piece measures 3 cm increase 1 stitch on each side of each marker thread (= 4 stitches increased), increase every 7 cm in total 4 times – READ INCREASE TIP! = 184-200-216-240-264-288 stitches. When the piece measures 27-26-26-26-27-29 cm work A.5 across all the stitches, then cast off. The piece measures approx. 50-52-54-56-58-60 cm from the cast-on edge. SLEEVE: Place the stitches from the thread back on double pointed needles size 4 mm and knit up 1 stitch in each of the 8-8-10-10-12-14 stitches that were cast on under the sleeve = 69-77-85-89-93-97 stitches. Insert a marker thread in the middle of the new stitches = mid under sleeve. Continue with A.3, the stitches that do not fit the pattern mid under sleeve are worked in stocking stitch. Continue with this pattern. When the piece measures 3-3-3-5-5-5 cm decrease 1 stitch on each side of the marker thread, decrease every 3-2-1½-1½-1-1 cm in total 9-12-15-16-17-18 times – READ DECREASE TIP = 51-53-55-57-59-61 stitches. When the piece measures 33-30-29-28-28-28 cm work A.5 across all the stitches. Cast off when A.5 has been worked once in height, the sleeve measures approx. 36-33-32-31-31-31 cm. Work the other sleeve the same way. |
|||||||||||||||||||
Diagram explanations |
|||||||||||||||||||
|
|||||||||||||||||||
 |
|||||||||||||||||||
 |
|||||||||||||||||||
Have you finished this pattern?Tag your pictures with #dropspattern #honeyblossomsweater or submit them to the #dropsfan gallery. Do you need help with this pattern?You'll find 28 tutorial videos, a Comments/Questions area and more by visiting the pattern on garnstudio.com. © 1982-2026 DROPS Design A/S. We reserve all rights. This document, including all its sub-sections, has copyrights. Read more about what you can do with our patterns at the bottom of each pattern on our site. |
|||||||||||||||||||


With over 40 years in knitting and crochet design, DROPS Design offers one of the most extensive collections of free patterns on the internet - translated to 17 languages. As of today we count 324 catalogues and 12290 patterns translated into English (UK/cm). 12290
We work hard to bring you the best knitting and crochet have to offer, inspiration and advice as well as great quality yarns at incredible prices! Would you like to use our patterns for other than personal use? You can read what you are allowed to do in the Copyright text at the bottom of all our patterns. Happy crafting!
Post a comment to pattern DROPS 176-5
We would love to hear what you have to say about this pattern!
If you want to leave a question, please make sure you select the correct category in the form below, to speed up the answering process. Required fields are marked *.