
Popular categories
Looking for a yarn?


Comments / Questions (84)
![]() Ulla Steensen wrote:
Ulla Steensen wrote:
Hej med jer. På denne skønne trøje driller den første mønsterpind. Rigtigt antal masker på pinden, men hvor tæller man mønster A1 og A2 fra (på diagrammerne), når de skal være hhv. 4 og 8 masker? De er hhv. 5 og 9 masker på diagrammerne. Kort sagt, hvor mange vrangmasker fra retsiden skal der være mellem snoningerne? Jeg kan ikke få fordelingen på 1. mønsterpind til at passe. Kan I hjælpe? Mange tak. Venlig hilsen Ulla
22.09.2018 - 14:20DROPS Design answered:
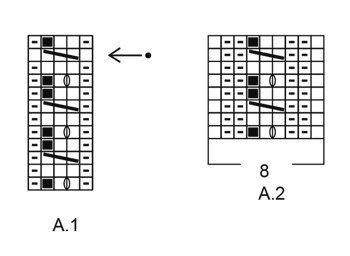
Hej Ulla, Første pind i A.1 består af 4 masker (den sorte rude hopper du bare over), du starter nederst i diagrammet og strikker fra højre mod venstre. For hver gang du strikker disse 4 masker tager du 1 maske ud imellem de 2 masker ret. På 3.pind tages omslaget ind igen ved at strikke ifølge diagramsymbolet som strækker sig over de 3 midterste masker. God fornøjelse!
24.09.2018 - 11:04
![]() Inge wrote:
Inge wrote:
Brei nu een ronding op het achterkant in tricotst als volgt: Brei de eerste 61-63-67-73-77-79 st, keer en brei 16-16-20-20-24-24 st, keer en brei 20-20-24-24-28-28 st, keer en brei 24-24-28-28-32-32 st, keer en brei de rest van de nld. Brei dan 1 nld av met 4 voorbies st in ribbelst aan elke kant. DENK OM DE KNOOPSGATEN! Ik snap hem niet helemaal, moet ik mijn werk in twee delen…?
16.04.2018 - 14:32DROPS Design answered:
Hallo Inge, Nee, je hoeft het werk niet in tweeën te delen. Wat je doet is verkorte toeren breien, waardoor er een verhoging aan de achterkant van het werk ontstaat. Op die manier het achterpand wat hoger dan het voorpand, voor een betere pasvorm.
21.04.2018 - 13:13
![]() Federica wrote:
Federica wrote:
Sto facendo una taglia M, sto finendo lo sprone ma non mi tornano i conti, ho 292 maglie e non 278. Anche il conteggio della manica non torna. Si parte con 14 m, 18 aumenti x 2 m. = 36 aumenti. 36 +14 = 50 e non 58 come indicato. Devo forse aggiungere 2 metà del diagramma A2? Come divido le altre maglie visto che i conti non tornano? Il Diagramma A2 va diviso sia sul davanti e dietro che sulle maniche?. Grazie della cortesia con cui rispondete e cordiali saluti.
30.03.2018 - 15:38DROPS Design answered:
Buongiorno Federica. Il numero delle maglie è corretto. Per la taglia M inizia con 118 maglie. Sul davanti dietro aumenta 8 m 4 volte poi 4 m 14 volte. Sulle maniche aumenta 2 m 18 volte. Quindi 118+32+56+36+36=278. Divide poi le maglie come indicato. Buon lavoro!
01.04.2018 - 11:09
![]() Federica wrote:
Federica wrote:
Buongiorno, sto facendo una enorme confusione per il raglan. Penso non sia ben spiegato, a mio parere. Perché non è stato suggerito di mettere dei segnapunti in modo tale da capire gli aumenti? Le maniche sono le 14 maglie? Sto facendo veramente fatica a capire bene gli aumenti 2 maglie prima7dopo A2 1 maglia prima/dopo A2, sto diventando matta! Aiutoooo
28.03.2018 - 14:06DROPS Design answered:
Buongiorno Federica. Sì le maniche sono le 14 maglie. Se preferisce può inserire dei segnapunti prima e dopo il diag. A2. Quando deve aumentare 1 m prima/dopo il diag A2, aumenterà prima/dopo il segnapunti. Quando deve aumentare 2 m prima di A2, farà la prima gettata 1 m prima del segnapunti, lavora la maglia, 1 maglia gettata (e qui trova il segnapunti); per aumentare 2 m dopo A2, passa il segno, 1 gettata, lavora 1 maglia, 1 gettata. Buon lavoro!
28.03.2018 - 15:32
![]() Monika wrote:
Monika wrote:
Mam pytanie czy te schematy A1 i A2 mam przerabiać według rysunku od góry do dołu? Skoro cały sweter robimy od góry?
20.03.2018 - 14:18DROPS Design answered:
Witaj Moniko! Schemat czytamy jak zwykle od prawego dolnego rogu i dalej w lewo, i w górę. Jak odczytywać schematy znajdziesz TUTAJ . Miłej pracy!
20.03.2018 - 20:31
![]() Anita wrote:
Anita wrote:
Also doch nur 5. Okay, vielen Dank! Gruss Anita
02.03.2018 - 11:07
![]() Anita wrote:
Anita wrote:
Hallo liebes Team, Ich brauche wieder Eure Hilfe. Ich bin schon sehr gut voran gekommen. Nun bin ich bei den Zuhnamen rechts und links vor jedem Zopf. Ich verstehe folgendes nicht: Man muss in jeder 7. Hin-R. 5x zunehmen. Da hat man ja dann nur 7 Maschen zwischen den Zöpfen???? Das sieht auf dem Bild jedoch nach viel mehr aus. Und nachher strickt mann alles gerade weiter? Das wird doch mit nur 5 Maschen nicht so ausgestellt oder? Vielen Dank! Liebe Grüsse Anita
02.03.2018 - 00:22DROPS Design answered:
Liebe Anita, es wird beidseitig jedes Zopfes zugenommen, dh 26 M werden in jeder dieser Reihe zugenommen: z.B. in der letzten Größe: 238 M + (26 Zunahme x 5 in jeder 7. Reihe) = 368 M. Viel Spaß beim stricken!
02.03.2018 - 08:39
![]() Anita wrote:
Anita wrote:
Vielen Dank für eure Hilfe, ich habe verstanden. Liebe Grüsse, Anita
14.02.2018 - 06:32
![]() Anita wrote:
Anita wrote:
Sorry es steht in jedem Linksbereich. Was ist damit gemeint? Liebe Grüsse und vielen Dank, Anita
13.02.2018 - 01:27DROPS Design answered:
Linksbereich bezieht sich auf die links gestrickte Maschen zwischen den Zöpfen. Viel Spaß beim stricken!
13.02.2018 - 09:40
![]() Anitq wrote:
Anitq wrote:
Ist das die Rückseite? Und nuram Rückenteil oder aich an der Vorderseite? Besten Dank für eure Hilfe. Liebe Grüsse Anita
13.02.2018 - 01:23DROPS Design answered:
Am beiden Vorderteile und am Rückenteil werden Sie nach 6 cm im Muster noch abnehmen, dh 2 M li zs stricken zwischen die Zöpfe = 1-2 (siehe Größe) an jedem Vorderteil + 4-6 Abnahmen am Rückenteil = 6-10 M werden insgesamt bei dieser Reihe abgenommen.
13.02.2018 - 09:39
|
|||||||||||||||||||
Lobelia#lobeliacardigan |
|||||||||||||||||||
 |
 |
||||||||||||||||||
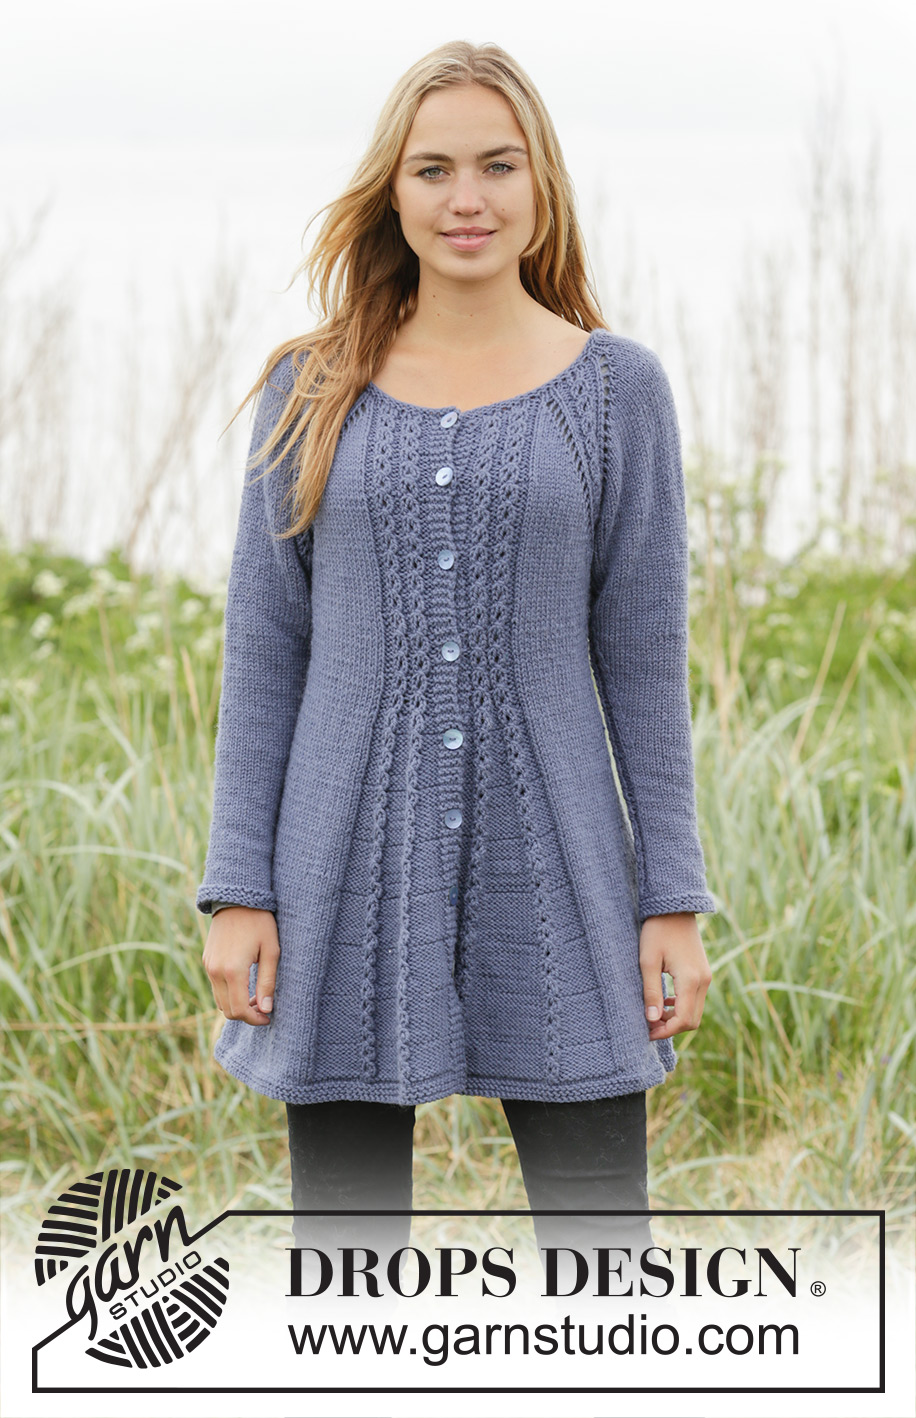
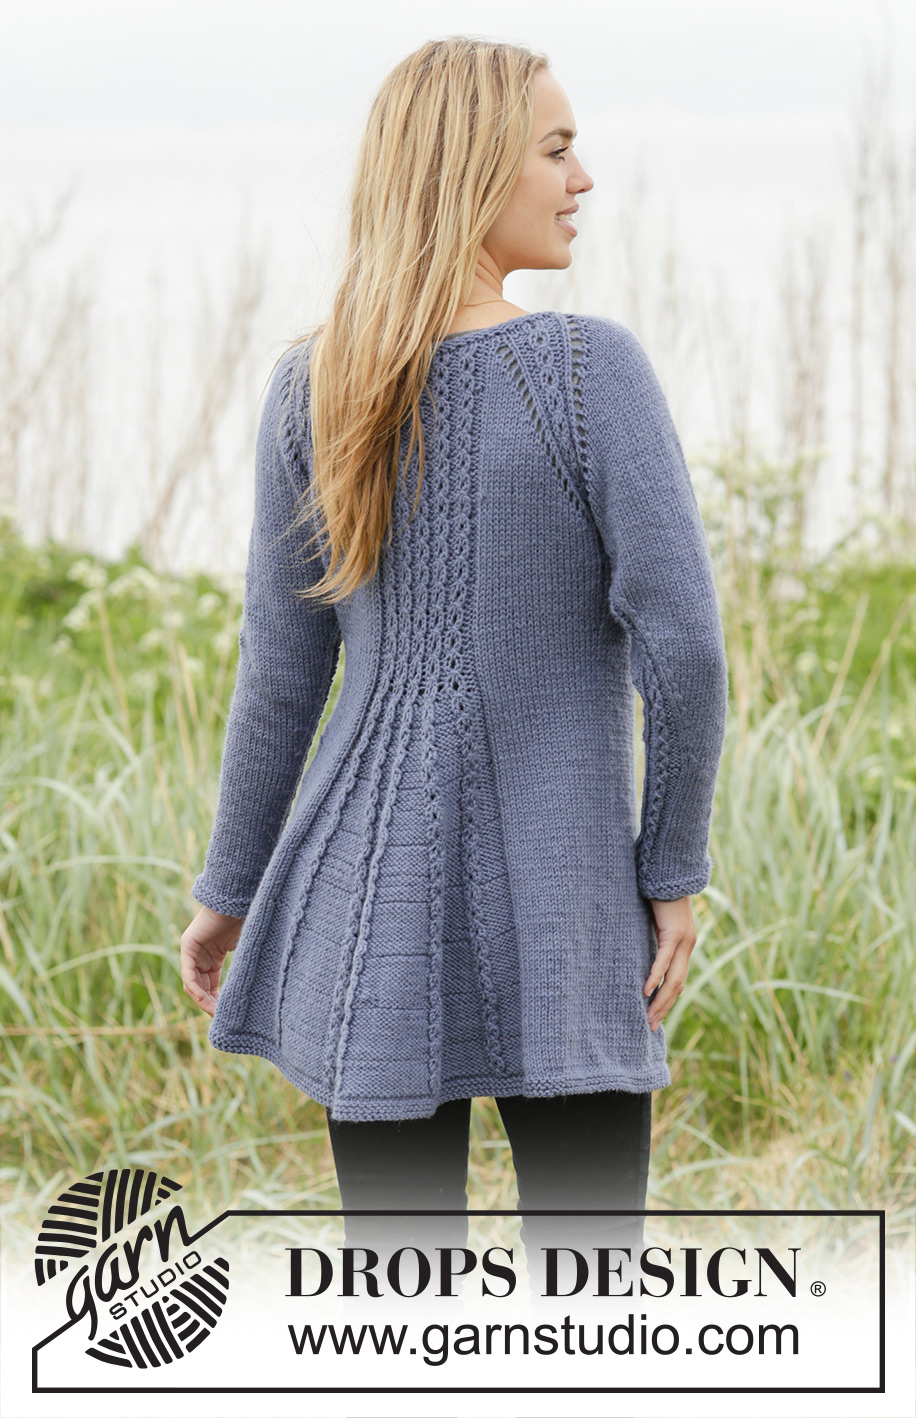
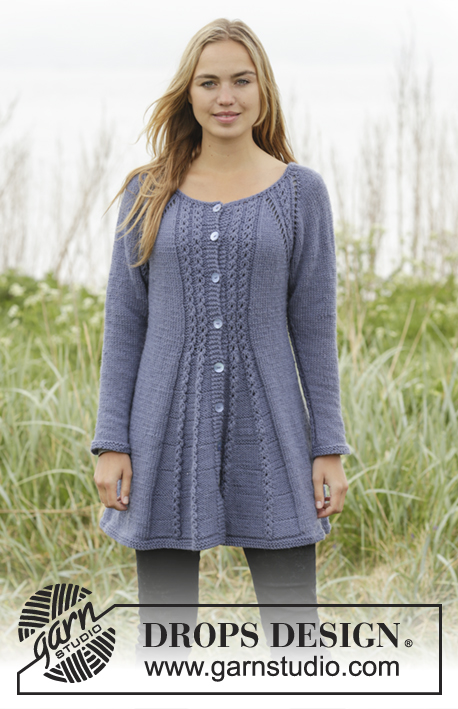
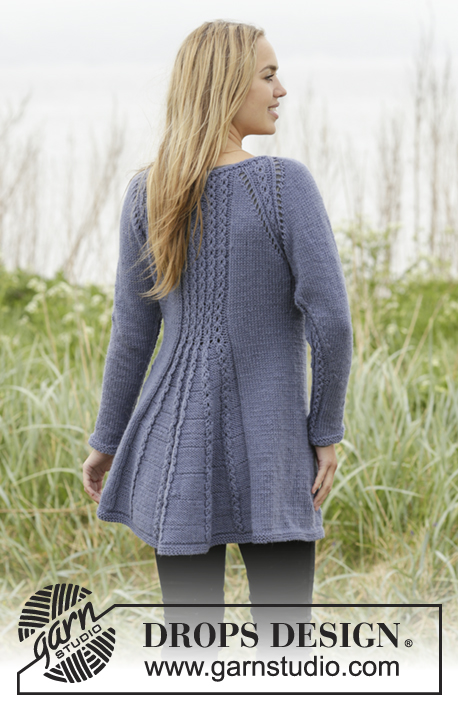
Knitted DROPS jacket with raglan and cables, worked top down in ”Nepal”. Size S-XXXL.
DROPS 171-14 |
|||||||||||||||||||
|
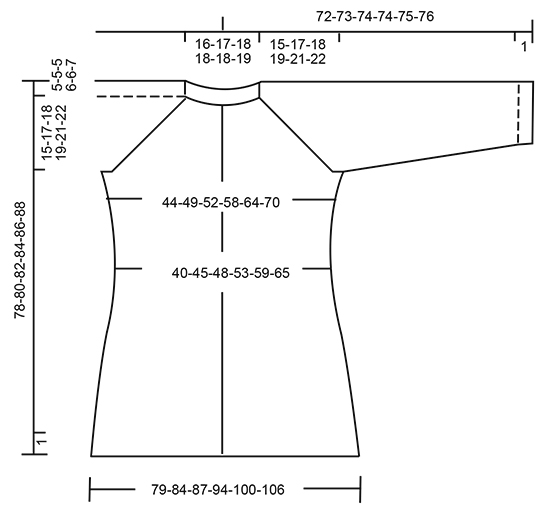
GARTER ST (worked in the round): 1 ridge = 2 rounds. * K 1 round and P 1 round *, repeat from *-*. GARTER ST (back and forth): K all rows. 1 ridge = 2 rows K. PATTERN: See diagrams A.1 and A.2. The diagrams show all rows in pattern seen from RS. INCREASE TIP-1 (evenly spaced): To calculate how often inc should be done, use the total no of sts on row (e.g. 97 sts), minus bands (e.g. 8 sts) and divide the remaining sts by no of inc to be done (e.g. 20) = 4.4. I.e. in this example inc 1 st alternately for every 4th and 5th st (and do not inc over bands). INCREASE TIP-2 (body): All inc are done from RS. Inc 1 st P by making a YO. On next row K YO twisted to avoid holes. RAGLAN SLEEVE: Inc 1 st after/before A.2 on sleeve by making a YO (= 2 sts inc on each sleeve). On next row P YOs to make holes. RAGLAN BODY: Inc first 2 sts before/after A.2 on front and back piece (= 8 sts inc in total), then inc 1 st before/after A.2 on front and back piece (= 4 sts inc in total). Inc 2 sts before A.2 as follows: Work until 1 st remains before A.2, 1 YO, K 1, 1 YO. Inc 2 sts after A.2 as follows: 1 YO, K 1, 1 YO. NOTE: On next row P YOs closest A.2 to make holes. P the other YOs twisted to avoid holes. Inc 1 st before/after A.2 as follows: Inc 1 st by making a YO. On next row P YOs to make holes. DECREASE TIP-1 (body): Work until 4 sts remain before marker, K 2 tog, K 4 (marker is between these sts), slip next st as if to K, K 1, psso. Repeat in the other side (= 4 sts dec). DECREASE TIP-2 (sleeve): Work until 2 sts remain before A.2, K 2 tog, A.2, slip next st as if to K, K 1, psso (= 2 sts dec). BUTTONHOLES: Dec for buttonholes on right band. I.e. band at the end of row seen from RS. 1 buttonhole = K tog third and fourth st from edge and make 1 YO. Dec for buttonholes when piece measures (from cast-on edge and along the band): SIZE S: 2, 11, 20, 29, 38 and 47 cm. SIZE M: 2, 11, 20, 29, 38 and 47 cm. SIZE L: 2, 12, 21, 31, 40 and 50 cm. SIZE XL: 2, 12, 21, 31, 40 and 50 cm. SIZE XXL: 2, 12, 22, 32, 42 and 52 cm. SIZE XXXL: 2, 12, 22, 32, 42 and 52 cm. CAST-OFF TIP: To avoid a tight cast-off edge you may use a needle ½ size larger. ---------------------------------------------------------- JACKET: Worked back and forth on circular needle, top down. YOKE: Cast on 97-99-103-109-111-117 sts (incl 4 band sts in garter st in each side) on circular needle size 4.5 mm. Work 2 ridges in GARTER ST - see explanation above and inc 17-19-19-25-27-25 sts evenly on last row from RS - READ INCREASE TIP-1 = 114-118-122-134-138-142 sts. Switch to circular needle size 5 mm. Now work an elevation in stocking st in the back of neck as follows: Work the first 61-63-67-73-77-79 sts, turn and work 16-16-20-20-24-24 sts, turn and work 20-20-24-24-28-28 sts, turn and work 24-24-28-28-32-32 sts, turn and work the rest of row. Then P 1 row with 4 band sts in garter st in each side. REMEMBER BUTTONHOLES! Now work pattern as follows from RS: 4 band sts in garter st, P 1, A.1 (= 4 sts) 2-2-2-3-3-3 times, P 1, K 1-2-2-1-2-3 (= left front piece), A.2 (= 8 sts on 1st row), K 14-14-16-16-16-16 (= sleeve), A.2, K 1-2-2-1-2-3, P 1, A.1 5-5-5-7-7-7 times, P 1, K 1-2-2-1-2-3, (= back piece) A.2, K 14-14-16-16-16-16 (= sleeve), A.2, K 1-2-2-1-2-3, P 1, A.1 2-2-2-3-3-3 times, P 1, 4 band sts in garter st. Work 1 row from WS the same way. REMEMBER THE KNITTING TENSION On next row from RS, beg inc for RAGLAN BODY and RAGLAN SLEEVE – see explanation above. NOTE: Inc differently on sleeves and body. BODY: Inc 2 sts every other row 4-4-5-6-7-9 times and 1 st every other row 11-14-14-14-15-14 times (= 15-18-19-20-22-23 times in total). SLEEVES: Inc like this every other row 15-18-19-20-22-23 times in total. When all inc are done there are 250-278-294-318-342-362 sts on needle. Now work as follows from WS: Work the first 38-42-44-49-53-57 sts (= right front piece), slip the next 52-58-62-64-68-70 sts on a stitch holder (= sleeve), cast on 6-6-8-8-10-12 sts under sleeve, work the next 70-78-82-92-100-108 sts (= back piece), slip the next 52-58-62-64-68-70 sts on a stitch holder (= sleeve), cast on 6-6-8-8-10-12 sts under sleeve, work the remaining 38-42-44-49-53-57 sts (= left front piece). Piece measures approx. 15-17-18-19-21-22 cm along band. BODY: There are now 158-174-186-206-226-246 sts for body. NOW MEASURE THE PIECE FROM HERE. Continue pattern back and forth as before and insert a marker in the middle of the new sts under sleeve in each side. Then dec in each side and in pattern as follows: DECREASE IN THE SIDES: When piece measures 4 cm, dec 1 st on each side of marker in each side - READ DECREASE TIP-1 (body). Repeat dec every 8th row 2 times in total = 8 sts dec in total. DECREASE IN PATTERN: When piece measures 6 cm, dec 1 st P by P 2 tog in every section with P between 2 cables = 6-6-6-10-10-10 sts dec (i.e. dec 1-1-1-2-2-2 sts on each front piece and 4-4-4-6-6-6 sts on back piece). When all dec are done, there are 144-160-172-188-208-228 sts on needle. When piece measures 15-15-16-16-16-16 cm, inc 1 st P in every section where P sts were dec – READ INCREASE TIP-2 (= 6-6-6-10-10-10 sts inc) = 150-166-178-198-218-238 sts. On next row from RS inc 1 st P on each side of each cable = 18-18-18-26-26-26 sts inc on needle. Inc like this every 10th-10th-10th-14th-14th-14th row (= every 5th-5th-5th-7th-7th-7th row from RS) 7-7-7-5-5-5 times in total = 276-292-304-328-348-368 sts. When all inc are done, continue back and forth in pattern. When piece measures 56-56-57-57-57-57 cm – adjust to finish after 4th or 8th row in pattern, work 2 rows in stocking st inside 4 band sts in garter st in each side. Switch to circular needle size 4.5 mm and work 2 ridges. Cast off - READ CAST-OFF TIP. SLEEVE: Work sleeves in the round on double pointed needles. Slip the 52-58-62-64-68-70 sts from stitch holder on double pointed needles size 5 mm and pick up 1 st in each of the 6-6-8-8-10-12 new sts cast on under sleeves = 58-64-70-72-78-82 sts. Insert a marker in the middle of the new sts. NOW MEASURE THE PIECE FROM HERE. Now work A.2 (= 8 sts on 1st row) mid under sleeve (i.e. there are 4 sts of A.2 on each side of marker), work the remaining sts on round in stocking st. When piece measures 4 cm, dec 1 st on each side of A.2 - READ DECREASE TIP-2 (sleeve). Dec like this every 8th-6th-5th-4th-4th-4th round 11-14-15-19-18-19 times in total = 36-36-40-40-42-44 sts. When sleeve measures 48-47-46-45-44-44 cm, switch to double pointed needles size 4.5 mm. Work 2 ridges. Cast off. Knit another sleeve the same way. ASSEMBLY: Sew the buttons on to left band. |
|||||||||||||||||||
Diagram explanations |
|||||||||||||||||||
|
|||||||||||||||||||
 |
|||||||||||||||||||
 |
|||||||||||||||||||
Have you finished this pattern?Tag your pictures with #dropspattern #lobeliacardigan or submit them to the #dropsfan gallery. Do you need help with this pattern?You'll find 30 tutorial videos, a Comments/Questions area and more by visiting the pattern on garnstudio.com. © 1982-2026 DROPS Design A/S. We reserve all rights. This document, including all its sub-sections, has copyrights. Read more about what you can do with our patterns at the bottom of each pattern on our site. |
|||||||||||||||||||


With over 40 years in knitting and crochet design, DROPS Design offers one of the most extensive collections of free patterns on the internet - translated to 17 languages. As of today we count 324 catalogues and 12290 patterns translated into English (UK/cm). 12290
We work hard to bring you the best knitting and crochet have to offer, inspiration and advice as well as great quality yarns at incredible prices! Would you like to use our patterns for other than personal use? You can read what you are allowed to do in the Copyright text at the bottom of all our patterns. Happy crafting!
Post a comment to pattern DROPS 171-14
We would love to hear what you have to say about this pattern!
If you want to leave a question, please make sure you select the correct category in the form below, to speed up the answering process. Required fields are marked *.