
Popular categories
Looking for a yarn?


Comments / Questions (67)
![]() Fontanaud wrote:
Fontanaud wrote:
Bonjour. Est il possible de tricoter ce pull avec des aiguilles droites? Merci de votre réponse.
07.01.2022 - 08:23DROPS Design answered:
Bonjour Mme Fontanaud, ce pull se tricote plutôt en rond, mais vous trouverez ici quelques pistes pour l'adapter sur aiguilles droites. Bon tricot!
07.01.2022 - 15:53
![]() Anniina wrote:
Anniina wrote:
Minulla on hihan kanssa haasteita. Mikäli lisään 2,5 cm välein 2 silmukkaa, ei a1 kuvio riitä tähän. Pääsen siis kuvion loppuun ilman että olen ehtinyt tehdä kaikkia lisäyksiä. Teen L kokoista paitaa ja tein täysin ohjeen mukaan mutta silti tämä menee väärin! Osaisitteko auttaa?
03.10.2021 - 23:33DROPS Design answered:
Hei, olethan tarkistanut neuletiheytesi? Jos neulot liian löyhää, sinun tulee vaihtaa ohuempiin puikkoihin, ainakin kirjoneuleen aikana. Mikäli neuletiheys on oikea, työn pituus tulisi olla n. 42 cm, kun kuvio on valmis (ja tällöin myös kaikki lisäykset mahtuvat mukaan).
06.10.2021 - 16:58
![]() Maxine wrote:
Maxine wrote:
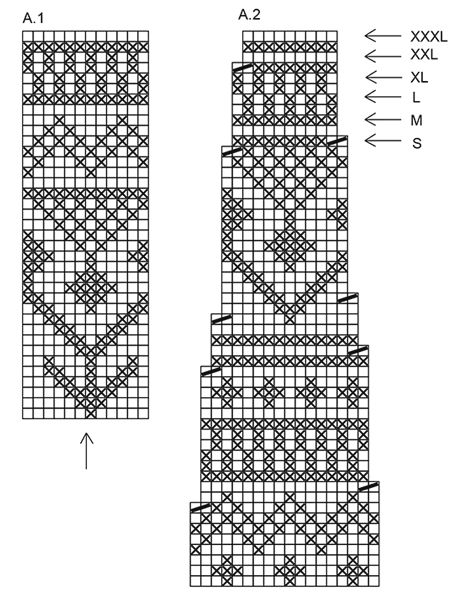
I have a question about the pattern A1 on the sleeves. I am having a hard time trying to figure out how to increase in pattern since the locations of the increases aren’t marked on pattern A1. The pattern says to count back from the arrow as the centre point of the sleeve, but this makes it really difficult for me to figure out how to keep in pattern whilst increasing stitches. Everything I have tried so far has been a total mess. Do you have any further advice on how to do this?
27.03.2021 - 10:03DROPS Design answered:
Dear Maxine, when you cast on the stitches for the sleeves, put a marker where you joined the stitches, this will be the starting of the round. When increasing the stitvjes to shape ths sleeves, yoi increase at both side of this marker. When you start the pattern, count the stitches, divide number to half, and put another (possibly different colored marker to here, this will be the upper middle line of the sleeve, you should start to vount the stitches for the sleeve pattern here, and count outwards to both sides from here, and start the pattern at the appropriate stitch. Happy Knitting!
27.03.2021 - 10:48
![]() Sophie wrote:
Sophie wrote:
Bonjour, est-il possible de démarrer le devant et le dos ensemble pour ne pas avoir l’effet tunique ouvert en bas de chaque côté, mais un vrai pull...et, auquel cas, en supprimant les 12 mailles mousse, et les remplacer par des côtés supplémentaires pour obtenir le même nombre de mailles. Merci pour votre réponse !
16.03.2021 - 15:06DROPS Design answered:
Bonjour Sophie, si vous ne souhaitez pas les fentes côtés, vous pouvez effectivement monter le nombre de mailles total du dos et du devant ensemble et tricoter en côtes, et continuer en jersey après les côtes/fentes côtés. Bon tricot!
16.03.2021 - 15:50
![]() Tuija wrote:
Tuija wrote:
Mihin tästä ohjeesta (Black Ice by DROPS Design) hävisi kaaviokuvat A1 ja A2? Olen saanut työni kaarroke-kohtaan ensimmäisen kavennuksen jälkeen, mutta nyt en pysty jatkamaan, kun ohjeen tärkein osio puuttuu. Eilen se vielä oli kunnossa. Voisitteko korjata tilanteen. Haluaisin todellakin saada tehtyä työni loppuun.
21.01.2021 - 09:42DROPS Design answered:
Hei, nyt piirrokset avautuvat.
29.01.2021 - 14:30
![]() Cornelia Hellermann wrote:
Cornelia Hellermann wrote:
Wo kann ich meine Bestellungen sehen ?
18.01.2021 - 13:42DROPS Design answered:
Liebe Frau Hellermann, hier finden Sie die Liste von den DROPS Händlern, so können Sie sich an dem Laden wenden, wo Sie Ihre Wolle bestellt haben. Viel Spaß beim stricken!
18.01.2021 - 15:24
![]() Susanna wrote:
Susanna wrote:
Hola buenas tardes! Me pregunto si 100 puntos no son muchos para hacer el elástico en la parte delantera + la trasera al inicio, cuando se hacen las dos partes por separado... a mi me sale una prenda enorme!!! En que me equivoco?
09.01.2021 - 17:57DROPS Design answered:
Hola Susanna. El patrón es correcto. Los 100 pts son sólo para la parte elástica del jersey con las aberturas laterales para que la prenda no quede muy tensa en la parte inferior. El cuerpo se trabaja sobre 156 pts. ( con la tensión según el patrón).
10.01.2021 - 11:47
![]() Emmy wrote:
Emmy wrote:
Bij het breien van het patroon met 2 kleuren., sla je de draden dan aan de achterkant om of per figuur een aparte draad?
08.11.2020 - 20:12
![]() Joelle DALEGRE wrote:
Joelle DALEGRE wrote:
Le modèle Black Ice est fait avec naturel et gris foncé mais je ne trouve pas ces couleurs dans les commandes possibles, je fais comment ? le modèle est superbe !!! ou je change pour quelle autre fil ? Merci !
21.10.2020 - 12:01DROPS Design answered:
Bonjour Mme Dalegre, si votre boutique habituelle est en rupture de stock, n'hésitez pas à les contacter pour savoir quand ils auront du réassort - vous trouverez également la liste des magasins DROPS proposant DROPS Nepal ici, vous trouverez peut-être les couleurs que vous cherchez. Vous pouvez également utiliser notre convertisseur pour voir d'autres alternatives. Bon tricot!
21.10.2020 - 12:09
![]() Vivia wrote:
Vivia wrote:
Hej. Jeg har strikket denne trøje i M og den blev ALT for stor og der var et helt ngl. grå garn aom jeg ikke fik brugt. Den blev også meget stor/land under ærmene, og det så lidt mærkeligt ud. Jeg vil gerne strikke en ny en i atørrelse S, men hvordan kan jeg ungå de mærkelige poser under ærmene?
25.09.2020 - 10:01DROPS Design answered:
Hej Vivia, denne model er stor i størrelsen, du kan se i måleskitsen nederst i opskriften at hel længde i en Small = 66 cm og omkredsen er 90 cm. Hvis du overholder strikkefastheden som står i opskriften, så vil du få disse mål. God fornøjelse!
24.11.2020 - 14:43
|
||||||||||
Black Ice#blackicesweater |
||||||||||
|
|
||||||||||
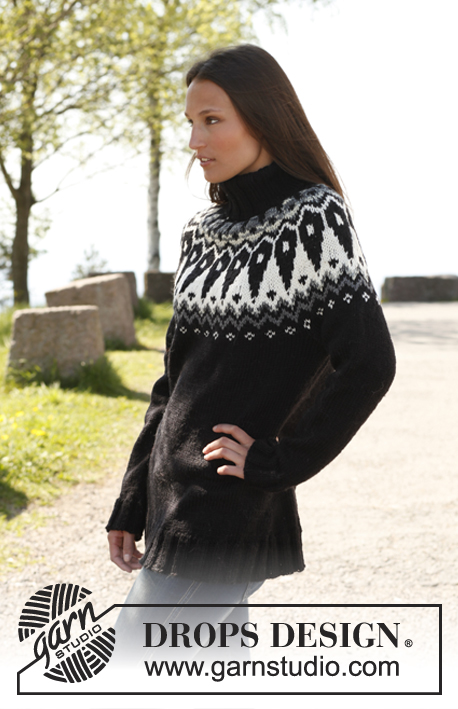
Knitted DROPS jumper with round yoke and Nordic pattern in "Nepal". Size: S - XXXL.
DROPS 173-5 |
||||||||||
|
GARTER ST (back and forth): K all rows. 1 ridge = 2 rows K. GARTER ST (worked in the round): 1 ridge = 2 rounds. * K 1 round and P 1 round *, repeat from *-*. DECREASE TIP: To calculate how often dec should be done, use the total no of sts on row (e.g. 148 sts) and divide by no of dec to be done (e.g. 34) = 4.3. I.e. in this example K approx. every 3rd and 4th st tog. INCREASE TIP (applies to sleeve): Inc on each side of marker as follows: Beg 1 sts before marker and make 1 YO, K 2 sts (marker is in the middle of these 2 sts), make 1 YO (= 2 sts inc). On next round K YOs twisted to avoid holes. PATTERN: See diagrams A.1 to A.2. Work entire pattern in stocking st. KNITTING TIP: To avoid the knitting tension to tighten when working pattern, it is important not to tighten the strands on back side of piece. Switch to a higher needle no when working pattern if the pattern is somewhat tight. ---------------------------------------------------------- BODY: First work back and forth on circular needle in 2 parts, then put piece tog and work in the round on circular needle. BACK PIECE: Cast on 92-100-112-124-132-148 sts on circular needle size 4.5 mm with off white. P 1 row from WS, then work as follows from RS: 3 sts in GARTER ST - see explanation above, K 2, rib (= P 2/K 2) until 3 sts remain, finish with 3 sts in garter st. When rib measures 8 cm, switch to circular needle size 5.5 mm, K 1 row while dec 20-22-28-28-30-34 sts evenly = 72-78-84-96-102-114 sts - READ DECREASE TIP. Continue in stocking st with 3 sts in garter st in each side until piece measures 18 cm. Put piece aside and knit front piece the same way. BODY: Slip the 2 parts tog on to same circular needle size 5,5 then work in the round over all sts = 144-156-168-192-204-228 sts. Continue in stocking st. REMEMBER THE KNITTING TENSION When piece measures 21-22-23-24-25-26 cm, work A.1 over all sts (= 12-13-14-16-17-19 repetitions in width) - READ KNITTING TIP. When 1 round remains in A.1 (piece measures approx. 40-41-42-43-44-45 cm), work next round as follows (= last round in A.1): Cast off 3-3-4-4-5-5 sts for armhole, work 66-72-76-88-92-104 sts (= front piece), cast off 6-6-8-8-10-10 sts for armhole, work 66-72-76-88-92-104 sts (= back piece) and cast off the last 3-3-4-4-5-5 sts for armhole. Put piece aside and knit the sleeves. SLEEVE: Worked in the round on double pointed needles. Switch to a short circular needle when enough sts have been inc. Cast on 52-52-52-56-56-56 sts on double pointed needle size 4.5 mm with off white. K 1 round. Then work rib = K 2/P 2 for 6 cm. K 1 round while dec 12 sts evenly in all sizes = 40-40-40-44-44-44 sts. Insert 1 marker at the beg of round. Switch to double pointed needles size 5.5 mm and work in stocking st with off white. When piece measures 11-11-13-13-10-12 cm, inc 2 sts mid under sleeve - READ INCREASE TIP. Inc like this every 3½-3-2½-2½-2½-2 cm 10-11-12-12-13-15 times in total = 60-62-64-68-70-74 sts. AT THE SAME TIME when piece measures 24-24-23-23-23-22 cm, work A.1, arrow in A.1 shows middle of sleeve, count outwards from arrow and work so that pattern is the same in both sides, work the inc sts in pattern, NOTE: Pattern will not fit one whole repetition. On last round in A.1 (piece measures 43-43-42-42-42-41 cm, NOTE: Shorter measurements in the larger sizes because of wider shoulders), cast off the middle 6-6-8-8-10-10 sts mid under sleeve = 54-56-56-60-60-64 sts remain on needle. Put piece aside and knit another sleeve. YOKE: Slip sleeves on to same circular needle size 5.5 mm as body where armholes were cast off = 240-256-264-296-304-336 sts. Work first round in A.2 AT THE SAME TIME adjust no of sts to 234-252-270-288-306-324. Continue pattern and dec as shown in A.2 (= 13-14-15-16-17-18 repetitions). READ KNITTING TIP! When A.2 has been worked - see arrow for your size, there are 130-140-150-160-153-162 sts on round. K 1 round while at the same time dec 34-44-50-56-49-54 sts evenly = 96-96-100-104-104-108 sts. ELEVATION AT THE BACK: Insert 1 marker mid front. Beg mid back and work an elevation at the back on circular needle size 5.5 mm with off white as follows: K until 10-10-12-12-14-16 sts remain before marker at the front, turn and P until 10-10-12-12-14-16 sts remain before marker in the other side. Turn and K until 20-20-22-22-24-26 sts remain before marker at the front, turn and P until 20-20-22-22-24-26 sts remain before marker in the other side. Turn and K until 30-30-32-32-34-36 sts remain before marker, turn and P until 30-30-32-32-34-36 sts remain before marker in the other side. Turn and K until mid back. Piece measures 66-68-70-73-75-77 cm from bottom edge to shoulder. NECK: = 96-96-100-104-104-108 sts. Work 1 ridge in GARTER ST – see explanation above, switch to a short circular needle size 6 mm, then work rib in the round (K 2/P 2). Continue with rib until piece measures 22-22-22-24-24-24 cm. Cast off sts with K over K and P over P. ASSEMBLY: Sew the openings under the sleeves. |
||||||||||
Diagram explanations |
||||||||||
|
||||||||||
 |
||||||||||
 |
||||||||||
Have you finished this pattern?Tag your pictures with #dropspattern #blackicesweater or submit them to the #dropsfan gallery. Do you need help with this pattern?You'll find 31 tutorial videos, a Comments/Questions area and more by visiting the pattern on garnstudio.com. © 1982-2026 DROPS Design A/S. We reserve all rights. This document, including all its sub-sections, has copyrights. Read more about what you can do with our patterns at the bottom of each pattern on our site. |
||||||||||


With over 40 years in knitting and crochet design, DROPS Design offers one of the most extensive collections of free patterns on the internet - translated to 17 languages. As of today we count 324 catalogues and 12290 patterns translated into English (UK/cm). 12290
We work hard to bring you the best knitting and crochet have to offer, inspiration and advice as well as great quality yarns at incredible prices! Would you like to use our patterns for other than personal use? You can read what you are allowed to do in the Copyright text at the bottom of all our patterns. Happy crafting!
Post a comment to pattern DROPS 173-5
We would love to hear what you have to say about this pattern!
If you want to leave a question, please make sure you select the correct category in the form below, to speed up the answering process. Required fields are marked *.