
Popular categories
Looking for a yarn?


Comments / Questions (87)
![]() Sarah wrote:
Sarah wrote:
What does it mean when it says On next round work A.1 13 repetitions on round? I understand the A.1 part, but I'm not sure about the 13 repetitions
14.05.2019 - 15:21DROPS Design answered:
Dear Sarah, you have now 130 stitches on needle, you work A.1 all the round, ie A.1 will be repeated 13 times in the round = 10 stitches (= round 1 in A.1) x 13 times = 130 stitches. When A.1 is done, there are 18 sts in each A.1 x 13 repeats = you will have 234 stitches on needle. Happy knitting!
14.05.2019 - 16:16
![]() Sarah wrote:
Sarah wrote:
I am slightly confused by what the directions mean when it says to "work 1 round in Stockinette st while inc 4sts evenly. Where do those four stitches get worked?
10.05.2019 - 21:39DROPS Design answered:
Hello Sarah. You increase making sure you have the same number of stitches between the increases. I.e for size S: you have 126 sts and must increase 4 sts. You divide the n of sts by the number of inc to be made: 126 : 4 = 31,5. You then increase first time after 31 sts, 2nd time after 32, third time after 31 sts and so on. Happy knitting!
11.05.2019 - 07:43
![]() Jirina wrote:
Jirina wrote:
Hallo, also ich hab jetzt A1 fertig und habe die erste Runde A2 gestrickt. Ich muss 50 Maschen stilllegen und dann 8 Maschen neu anschlagen. Wie muss ich das machen? Ich hab überhaupt keine Idee. Muss ich nach den 50 Maschen eine neue Wolle dran machen und 8 mal immer wieder in das selbe Loch stechen bis ich 8 Maschen habe?
12.02.2019 - 12:04DROPS Design answered:
Liebe Jirina, dieses Video zeigt, wie man die Maschen für die Ärmel stilllegt, und wie man die neuen Maschen unter den Ärmeln anschlägt ab ca 06:55- es handelt sich um eine Raglanpasse, aber diese Technik wird auch bei Rundpasse benutzt. Viel Spaß beim stricken!
12.02.2019 - 13:36
![]() Jennifer wrote:
Jennifer wrote:
Gleich am Anfang Heißt es ich soll zu Nadel Nr. 4 wechseln. Eine Reihe glatt rechts Stricken und vier Maschen zunehmen. Zitat: „dann weiter 0–0–0–0–2–2 RD glatt re str.“ Was bedeutet 0? Ich verstehe nicht was ich trinken soll.
03.02.2019 - 13:06DROPS Design answered:
Liebe Jennifer, nach der Zunahmerunde mit Nadel Nr 4, stricken Sie in die 4 ersten Grösse A.1 bei der nächsten Runde. Nur in den 2 grösseren Grösse stricken Sie 2 Runde. Viel Spaß beim stricken!
04.02.2019 - 12:23
![]() Agneta wrote:
Agneta wrote:
Jag har gjort oket nu och undrar om ryggen stickas separat på rundstickan, fram o tillbaks, för att sedan stickas ihop med framstycket? Var i mönstret står det beskrivet?
16.01.2019 - 22:38DROPS Design answered:
Hei Agneta. Du strikker rundt på rundpinne, så bakstykket og fremstykket strikkes samtidig, i 1 stykke. Du har satt av masker på en tråd til ermer i hver side, og samtidig lagt opp masker under ermene. Du fortsetter med mønster over bakstykket, mens du strikker glattstrikk over maskene på forstykket. God fornøyelse.
23.01.2019 - 09:29
![]() Suzanne Hein-Hoffmann wrote:
Suzanne Hein-Hoffmann wrote:
Bei der Anleitung habe ich Probleme mit den Diagrammen, wie wende ich diese auf meine Arbeit an?
12.01.2019 - 09:59DROPS Design answered:
Liebe Frau Hein-Hoffmann, das Kleid wird in der Runde gestrickt, dh Sie werden nicht abwechslungsweise hin und Rückreihen stricken sonder nur hinreihen. Diagramme lesen Sie bei alle Runde rechts nach links. Viel Spaß beim stricken!
14.01.2019 - 09:37
![]() Cassie wrote:
Cassie wrote:
There is no dusty pink anymore , is the power pink the same colour as the dusty pink?
11.07.2018 - 07:43DROPS Design answered:
Dear Cassie, yes, always follow the colour number, the colour name can have been adjusted inbetween. Happy knitting!
11.07.2018 - 07:58
![]() Carmen wrote:
Carmen wrote:
Tengo una duda.en el tip para aumentar dice que se haga alternativamente sobre los 4 mp pero hay dos más los correspondientes a los laterales? Esos como se aumentan?Gracias por atenderme
02.06.2018 - 03:12DROPS Design answered:
Hola Carmen. Los aumentos se hacen en los 4 marcapuntos del canesú. Los 2 marcapuntos laterales son necesarios para hacer más tarde las disminuciones para entallar el vestido.
03.06.2018 - 10:23Oksana wrote:
Please explain this parts of the description: ...insert 4 new markers in piece... and then - On next round inc 1 st before all markers (= 6 sts inc). Question: 1st ince before 1st marker, 2-d inc- before 2d marker...4th marker - Fourth inc. Please specify where the other 2 inc are to be done. Thanks!
10.05.2018 - 18:49DROPS Design answered:
Hi Oksana, You have 2 markers from when you worked the yoke and the 4 new markers. So you increase in front of all 6 of these markers, Happy knitting!
11.05.2018 - 07:54
![]() Satu wrote:
Satu wrote:
Kaarroke: Neulo ensimmäiset 12 s ja kiinnitä 1 merkki tähän. Krs:n vaihtumiskohta on jatkossa tässä! Kiinnitä sitten toinen merkki seuraavien 49s:n jälkeen (neulomatta s:t). Jatka neulomalla mallineuletta .... Seuraava krs neulotaan näin: Neulo ensimmäisillä 49s:lla mallineuletta kuten aiemmin....Mutta kun ensin käskettiin ensimmäiset 49 silmukkaa neulomatta ja vasta sen jälkeen neulomaan mallineuletta. Ja tuossa toisessa kohdassa sanotaan, että neulo kuten aiemmin...
08.04.2018 - 19:29
|
||||||||||||||||||||||
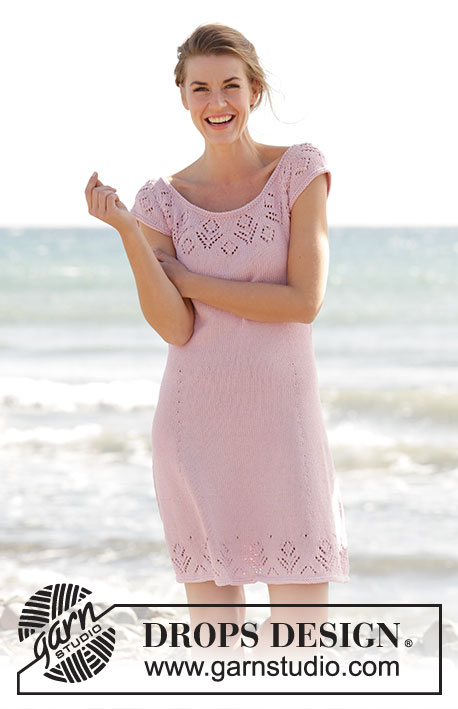
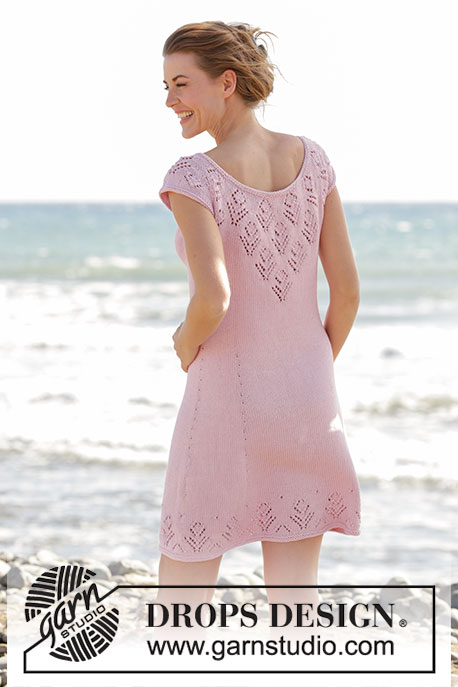
Beach Date#beachdatedress |
||||||||||||||||||||||
 |
 |
|||||||||||||||||||||
Knitted DROPS dress with round yoke and lace pattern, worked top down in ”Muskat”. Size: S - XXXL.
DROPS 167-1 |
||||||||||||||||||||||
|
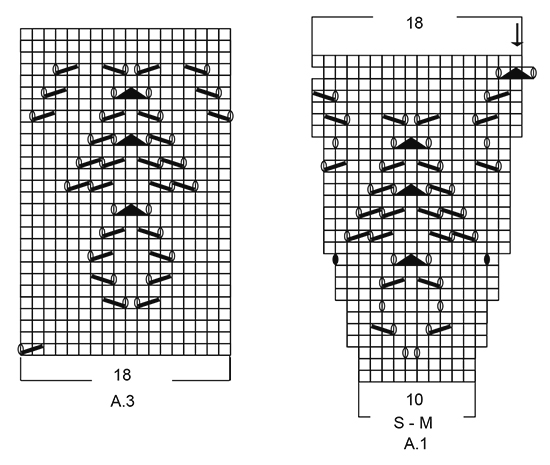
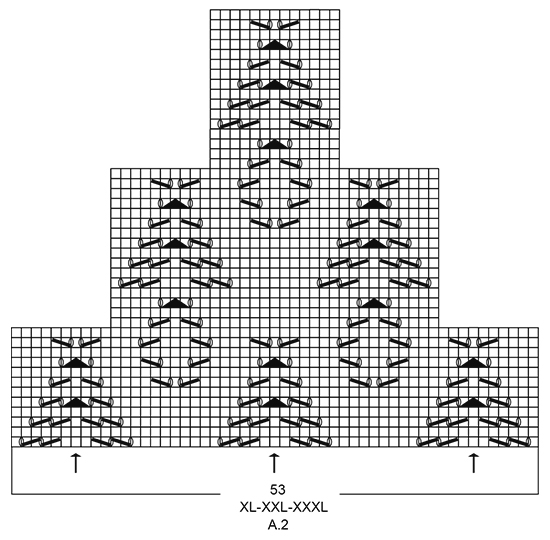
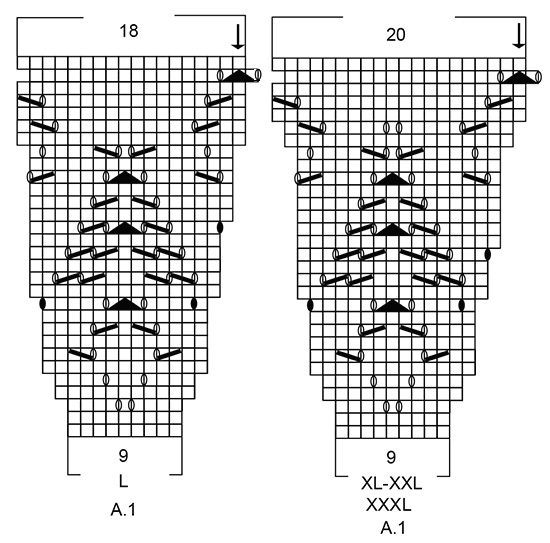
GARTER ST (worked in the round): 1 ridge = 2 rounds. * K 1 round and P 1 round *, repeat from *-*. PATTERN: See diagrams A.1 to A.3. See diagram for correct size. INCREASE TIP: Inc 1 st by making a YO. On next round K YO twisted to avoid holes. Repeat inc alternately on right and left side of the four markers. DECREASE TIP: Work until 4 sts remain before marker and work: Slip 1 st as if to K, K 1, psso, K 4, K 2 tog = 2 sts dec. Repeat in the other side. ---------------------------------------------------------- DRESS: Worked in the round, top down. YOKE: Cast on 126-132-138-140-146-150 sts on circular needle size 3.5 mm with Muskat. Work 2 ridges in GARTER ST - see explanation above. Switch to circular needle size 4 mm. Insert a marker at the beg of the round. Work 1 round in stocking st while inc 4-8-6-4-7-12 sts evenly = 130-140-144-144-153-162 sts. Then work 0-0-0-0-2-2 more rounds in stocking st. On next round work pattern A.1 - see diagram for correct size, 13-14-16-16-17-18 repetitions on round. REMEMBER THE KNITTING TENSION When entire A.1 has been worked vertically, piece measures 11-11-12-12-13-13 cm and there are 234-252-288-320-340-360 sts on round. Now insert 2 markers in piece which marks transition for pattern continued down the back. Work the first 12-12-12-14-14-14 sts and insert a marker here. This is now beg of round. Then insert the second marker after 49-49-49-53-53-53 sts without working them first. Now work pattern - see diagram for correct size, as follows: Work A.2 (= 49-49-49-53-53-53 sts). NOTE: Pattern in A.2 should fit over pattern A.1. I.e. st with arrow in diagram A.2 should fit over st with arrows in diagram A.1. Then work in stocking st over the remaining sts on round AT SAME TIME inc 20-26-14-14-30-42 sts evenly over sts in stocking st = 254-278-302-334-370-402 sts. Work next round as follows: Work pattern as before over the first 49-49-49-53-53-53 sts, 14-17-22-25-32-38 sts in stocking st, slip the next 50-56-58-64-68-72 sts on a stitch holder (= sleeve), cast on 8 new sts under sleeve (insert a marker in the middle of these new sts, i.e. 4 new sts on each side of marker), work the next 77-83-93-103-117-129 sts, slip the next 50-56-58-64-68-72 sts on a stitch holder for sleeve, cast on 8 new sts under sleeve (insert a marker in the middle of these sts, i.e. 4 new sts on each side of marker), work the remaining 14-17-22-25-32-38 sts on round. There are now 85-91-101-111-125-137 sts for front and back piece = 170-182-202-222-250-274 sts in total. BODY: NOW MEASURE THE PIECE FROM HERE. Continue pattern on the back as before, and work in stocking st over the remaining sts on round. NOTE: Continue in stocking st on the back when the pattern has been worked. When piece measures 4 cm, dec 1 st on each side of marker in each side - READ DECREASE TIP. Repeat dec every 5-5½-5½-6-6½-7 cm 3 more times = 154-166-186-206-234-258 sts. When piece measures 24-26-27-29-30-32 cm, insert 4 new markers in piece, beg from marker in the right side: NOTE: Remove the 2 markers on each side of the pattern on the back piece first! Work 16-17-19-21-24-27 sts, insert 1st marker, work 45-49-55-61-69-75 sts, insert 2nd marker, work 16-17-19-21-24-27 sts, marker in left side is here, work 16-17-19-21-24-27 sts, insert 3rd marker, work 45-49-55-61-69-75 sts, insert 4th marker, work the remaining 16-17-19-21-24-27 sts until marker in the right side. Move the markers upwards when working. On next round inc 1 st before all markers (= 6 sts inc) – see INCREASE TIP. Repeat inc every 6th round 1 more time, every 4th round 12-12-12-12-9-8 times, every 6th round 2-2-2-2-4-4 times = 250-262-282-302-324-342 sts. When piece measures 62-64-65-67-68-70 cm, inc 2-8-6-4-0-0 sts evenly = 252-270-288-306-324-342 sts. Then work pattern A.3 (= 18 sts) 14-15-16-17-18-19 repetitions in width. When entire A,3 has been worked vertically, switch to circular needle size 3.5 mm. Work 2 ridges and cast off. SLEEVE EDGE: Slip sts from stitch holder back on double pointed needles size 4 mm (= 50-56-58-64-68-72 sts). Pick up 1 st in each of the 8 new sts cast on under sleeve = 58-64-66-72-76-80 sts. Work 1 round in stocking st while dec 4 sts evenly = 54-60-62-68-72-76 sts. Continue with 2 rounds in stocking st. Switch to double pointed needles size 3.5 mm and work 2 ridges. Cast off. Repeat on the edge of the other sleeve. |
||||||||||||||||||||||
Diagram explanations |
||||||||||||||||||||||
|
||||||||||||||||||||||
 |
||||||||||||||||||||||
 |
||||||||||||||||||||||
 |
||||||||||||||||||||||
 |
||||||||||||||||||||||
 |
||||||||||||||||||||||
Have you finished this pattern?Tag your pictures with #dropspattern #beachdatedress or submit them to the #dropsfan gallery. Do you need help with this pattern?You'll find 27 tutorial videos, a Comments/Questions area and more by visiting the pattern on garnstudio.com. © 1982-2026 DROPS Design A/S. We reserve all rights. This document, including all its sub-sections, has copyrights. Read more about what you can do with our patterns at the bottom of each pattern on our site. |
||||||||||||||||||||||


With over 40 years in knitting and crochet design, DROPS Design offers one of the most extensive collections of free patterns on the internet - translated to 17 languages. As of today we count 324 catalogues and 12290 patterns translated into English (UK/cm). 12290
We work hard to bring you the best knitting and crochet have to offer, inspiration and advice as well as great quality yarns at incredible prices! Would you like to use our patterns for other than personal use? You can read what you are allowed to do in the Copyright text at the bottom of all our patterns. Happy crafting!
Post a comment to pattern DROPS 167-1
We would love to hear what you have to say about this pattern!
If you want to leave a question, please make sure you select the correct category in the form below, to speed up the answering process. Required fields are marked *.