
Popular categories
Looking for a yarn?


Comments / Questions (87)
![]() Birgitte Tapdrup wrote:
Birgitte Tapdrup wrote:
Bliver den ikke meget tung i 100% bomuld?
19.05.2021 - 10:59DROPS Design answered:
Hei Birgitte. Om du ser på størrelsene ser du også hvor mye garn du trenger og da ca hvor tung kjolen vil bli. Om du velger ullgarn som f.eks DROPS Karisma, DROPS Lima vil den ha ca samme vekt. Om du velger f.eks DROPS Sky vil vekten nesten halvveres, men kjolen vil da få noe mindre formstabilitet. mvh DROPS design
19.05.2021 - 11:14
![]() Ana wrote:
Ana wrote:
"Now insert 2 markers in piece which marks transition for pattern continued down the back. Work the first 12-12-12-14-14-14 sts and insert a marker here. This is now beg of round. Then insert the second marker after 49-49-49-53-53-53 sts without working them first." What stitches or pattern do I work on for these "first 12 sts" and "49 sts without working them first"? Stockinette? A.2 first row? Although it states I should start A.2 afterwards? Sorry, I am very confused.
30.10.2020 - 15:40DROPS Design answered:
Dear Ana, knit the first 12 sts of the round and insert the marker to displace the beg of round here, and now count 49 sts = do not work these stitches and insert the marker after these 49 sts. Now work from the new marker for beg of round as explained with A.2. Happy knitting!
30.10.2020 - 16:11
![]() Michelle wrote:
Michelle wrote:
Hi I am on the increase part of the dress and am a little confused as only 4 markers get placed Work 16-17-19-21-24-27 sts, insert 1st marker, work 45-49-55-61-69-75 sts, insert 2nd marker, work 16-17-19-21-24-27 sts, marker in left side is here, work 16-17-19-21-24-27 sts, insert 3rd marker, work 45-49-55-61-69-75 sts, insert 4th marker, work the remaining 16-17-19-21-24-27 sts until marker in the right side. This only places 4 markers? where are the other 2?
17.06.2020 - 15:00DROPS Design answered:
Dear Michelle, the other 2 markers are those you inserted on the sides (where you decerased 1 st on each side to decrease a total of 4 sts on every round). Happy knitting!
18.06.2020 - 09:13
![]() Lise wrote:
Lise wrote:
Noe som har strikket denne kjolen med kort erme, altså ikke bare rillekanten? Evt, ble det bra? Anbefales eller ikke? Ønsker å skjule noen stygge arr :-)
08.06.2020 - 14:08
![]() Juls wrote:
Juls wrote:
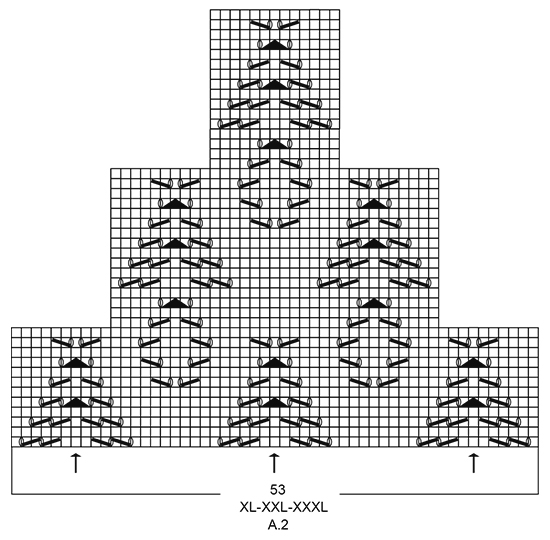
Hello, thank you for you lovely pattern and great customer care. I am working this pattern in XL. I am working the 3rd row of A.2. My question is, the 53 stitches of A. 2 remain 53 even when the pattern decreases and are filled with stockinette sts? Or do we go with the decreases (= the garment is more gathered towards the waist, but then it would not flare out again for hips)? Thanks for your time and attention!
15.05.2020 - 23:13DROPS Design answered:
Dear Mrs Juls, when working A.2 you will decrease the number of sts of the lace pattern as shown in the diagram, but the stitches which are not drawn in the diagrams (the "decreased" lace patterns) are worked now in stocking stitch instead. You can consider that the number of sts of A.2 decreases (work as shown in diagram and remaining stitches in stocking stitch as before), or keep the 53 sts but work lace pattern only over the middle sts as shown in diagram. Happy knitting!
18.05.2020 - 07:14
![]() Lucy wrote:
Lucy wrote:
Buongiorno all inizio della spiegazione del vestito dice lavorare 0 0 0 0 2 2 giri come dovrei proseguire visto che devo lavorare 0 giri?
17.04.2020 - 16:10DROPS Design answered:
Buongiorno Lucy. In questo caso, passa all'istruzione successiva, quindi inizia a lavorare il diagramma A.1. Buon lavoro!
18.04.2020 - 09:00
![]() Annette Zwart wrote:
Annette Zwart wrote:
How do I know what is size small. I mean how many inch or centimeters is the brust and taille for this size ?
01.04.2020 - 19:01DROPS Design answered:
Dear Mrs Zwart, measure a similar garment you have and like the shape and compare these measurements to the chart - read more here about sizing. Happy knitting!
02.04.2020 - 07:51
![]() Raja wrote:
Raja wrote:
I made this dress as a birthday present for my self just delighted with the result
10.03.2020 - 14:54
![]() Galina Arnesen wrote:
Galina Arnesen wrote:
Hei, se bort mitt tidligere notat. Jeg tolket feil selv - det er 6 merker og økningen 1 foran hver merket, da blir det 6 økninger. Beklager.
03.03.2020 - 22:41
![]() Galina Arnesen wrote:
Galina Arnesen wrote:
Hei, se bort mitt tidligere notat. Jeg tolket feil selv - det er 6 merker og økningen 1 foran hver merket, da blir det 6 økninger. Beklager.
03.03.2020 - 20:20
|
||||||||||||||||||||||
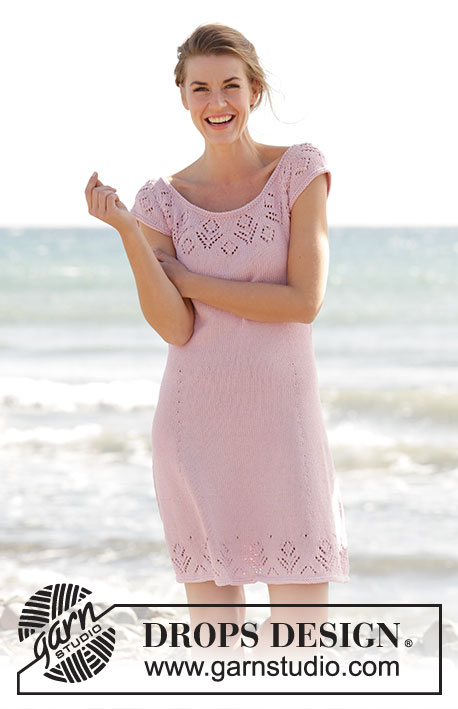
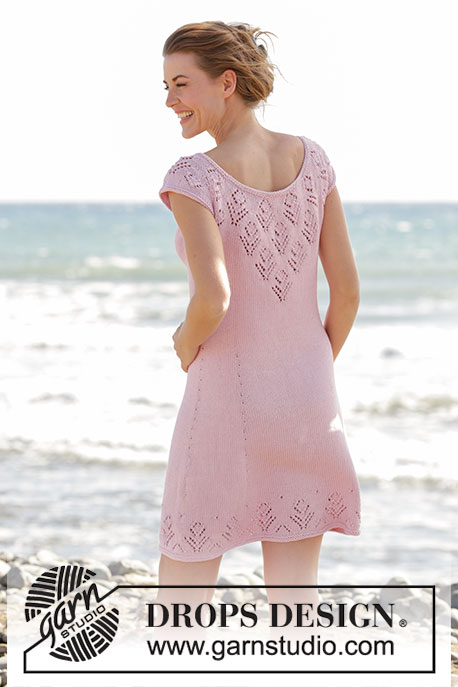
Beach Date#beachdatedress |
||||||||||||||||||||||
 |
 |
|||||||||||||||||||||
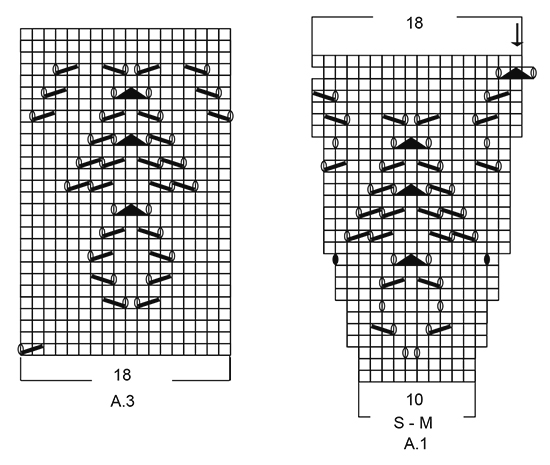
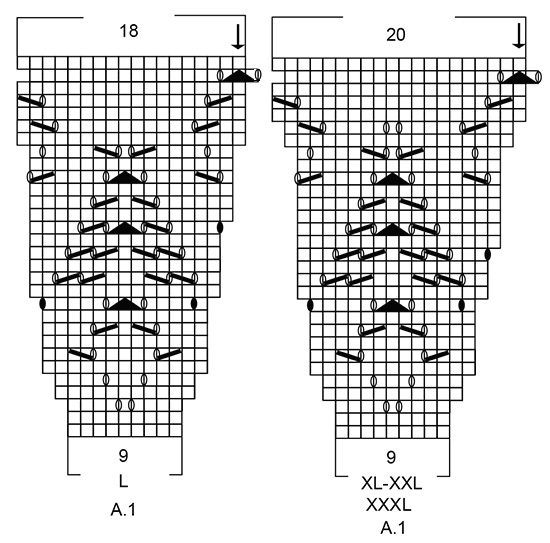
Knitted DROPS dress with round yoke and lace pattern, worked top down in ”Muskat”. Size: S - XXXL.
DROPS 167-1 |
||||||||||||||||||||||
|
GARTER ST (worked in the round): 1 ridge = 2 rounds. * K 1 round and P 1 round *, repeat from *-*. PATTERN: See diagrams A.1 to A.3. See diagram for correct size. INCREASE TIP: Inc 1 st by making a YO. On next round K YO twisted to avoid holes. Repeat inc alternately on right and left side of the four markers. DECREASE TIP: Work until 4 sts remain before marker and work: Slip 1 st as if to K, K 1, psso, K 4, K 2 tog = 2 sts dec. Repeat in the other side. ---------------------------------------------------------- DRESS: Worked in the round, top down. YOKE: Cast on 126-132-138-140-146-150 sts on circular needle size 3.5 mm with Muskat. Work 2 ridges in GARTER ST - see explanation above. Switch to circular needle size 4 mm. Insert a marker at the beg of the round. Work 1 round in stocking st while inc 4-8-6-4-7-12 sts evenly = 130-140-144-144-153-162 sts. Then work 0-0-0-0-2-2 more rounds in stocking st. On next round work pattern A.1 - see diagram for correct size, 13-14-16-16-17-18 repetitions on round. REMEMBER THE KNITTING TENSION When entire A.1 has been worked vertically, piece measures 11-11-12-12-13-13 cm and there are 234-252-288-320-340-360 sts on round. Now insert 2 markers in piece which marks transition for pattern continued down the back. Work the first 12-12-12-14-14-14 sts and insert a marker here. This is now beg of round. Then insert the second marker after 49-49-49-53-53-53 sts without working them first. Now work pattern - see diagram for correct size, as follows: Work A.2 (= 49-49-49-53-53-53 sts). NOTE: Pattern in A.2 should fit over pattern A.1. I.e. st with arrow in diagram A.2 should fit over st with arrows in diagram A.1. Then work in stocking st over the remaining sts on round AT SAME TIME inc 20-26-14-14-30-42 sts evenly over sts in stocking st = 254-278-302-334-370-402 sts. Work next round as follows: Work pattern as before over the first 49-49-49-53-53-53 sts, 14-17-22-25-32-38 sts in stocking st, slip the next 50-56-58-64-68-72 sts on a stitch holder (= sleeve), cast on 8 new sts under sleeve (insert a marker in the middle of these new sts, i.e. 4 new sts on each side of marker), work the next 77-83-93-103-117-129 sts, slip the next 50-56-58-64-68-72 sts on a stitch holder for sleeve, cast on 8 new sts under sleeve (insert a marker in the middle of these sts, i.e. 4 new sts on each side of marker), work the remaining 14-17-22-25-32-38 sts on round. There are now 85-91-101-111-125-137 sts for front and back piece = 170-182-202-222-250-274 sts in total. BODY: NOW MEASURE THE PIECE FROM HERE. Continue pattern on the back as before, and work in stocking st over the remaining sts on round. NOTE: Continue in stocking st on the back when the pattern has been worked. When piece measures 4 cm, dec 1 st on each side of marker in each side - READ DECREASE TIP. Repeat dec every 5-5½-5½-6-6½-7 cm 3 more times = 154-166-186-206-234-258 sts. When piece measures 24-26-27-29-30-32 cm, insert 4 new markers in piece, beg from marker in the right side: NOTE: Remove the 2 markers on each side of the pattern on the back piece first! Work 16-17-19-21-24-27 sts, insert 1st marker, work 45-49-55-61-69-75 sts, insert 2nd marker, work 16-17-19-21-24-27 sts, marker in left side is here, work 16-17-19-21-24-27 sts, insert 3rd marker, work 45-49-55-61-69-75 sts, insert 4th marker, work the remaining 16-17-19-21-24-27 sts until marker in the right side. Move the markers upwards when working. On next round inc 1 st before all markers (= 6 sts inc) – see INCREASE TIP. Repeat inc every 6th round 1 more time, every 4th round 12-12-12-12-9-8 times, every 6th round 2-2-2-2-4-4 times = 250-262-282-302-324-342 sts. When piece measures 62-64-65-67-68-70 cm, inc 2-8-6-4-0-0 sts evenly = 252-270-288-306-324-342 sts. Then work pattern A.3 (= 18 sts) 14-15-16-17-18-19 repetitions in width. When entire A,3 has been worked vertically, switch to circular needle size 3.5 mm. Work 2 ridges and cast off. SLEEVE EDGE: Slip sts from stitch holder back on double pointed needles size 4 mm (= 50-56-58-64-68-72 sts). Pick up 1 st in each of the 8 new sts cast on under sleeve = 58-64-66-72-76-80 sts. Work 1 round in stocking st while dec 4 sts evenly = 54-60-62-68-72-76 sts. Continue with 2 rounds in stocking st. Switch to double pointed needles size 3.5 mm and work 2 ridges. Cast off. Repeat on the edge of the other sleeve. |
||||||||||||||||||||||
Diagram explanations |
||||||||||||||||||||||
|
||||||||||||||||||||||
 |
||||||||||||||||||||||
 |
||||||||||||||||||||||
 |
||||||||||||||||||||||
 |
||||||||||||||||||||||
 |
||||||||||||||||||||||
Have you finished this pattern?Tag your pictures with #dropspattern #beachdatedress or submit them to the #dropsfan gallery. Do you need help with this pattern?You'll find 27 tutorial videos, a Comments/Questions area and more by visiting the pattern on garnstudio.com. © 1982-2026 DROPS Design A/S. We reserve all rights. This document, including all its sub-sections, has copyrights. Read more about what you can do with our patterns at the bottom of each pattern on our site. |
||||||||||||||||||||||


With over 40 years in knitting and crochet design, DROPS Design offers one of the most extensive collections of free patterns on the internet - translated to 17 languages. As of today we count 324 catalogues and 12290 patterns translated into English (UK/cm). 12290
We work hard to bring you the best knitting and crochet have to offer, inspiration and advice as well as great quality yarns at incredible prices! Would you like to use our patterns for other than personal use? You can read what you are allowed to do in the Copyright text at the bottom of all our patterns. Happy crafting!
Post a comment to pattern DROPS 167-1
We would love to hear what you have to say about this pattern!
If you want to leave a question, please make sure you select the correct category in the form below, to speed up the answering process. Required fields are marked *.