
Popular categories
Looking for a yarn?


Comments / Questions (642)
![]() Miriam wrote:
Miriam wrote:
Hallo! Ich stricke gerade das Rückenteil. In der Anleitung steht nach 12 cm beginnen die Auf und Abnahmen an den Seiten, werden diese 12 cm vom Beginn an gerechnet oder erst wenn über M.1B gestrickt hat
19.09.2025 - 21:11
![]() Pam Ashton wrote:
Pam Ashton wrote:
Hi, TQ for your past assistance. I'm struggling to figure out the tops of sleeves. Where it says cast off and Dec from sleeves cap at beginning of each row in each side for 4 st 1 time, 2st 3 times, 1 st 7 times and then 2 st in each side until piece measures 57cm. Continue to cast off 3st 1 time in each side, then cast off remain8ng st. How many st do I cast off at the end. Am I supposed to cast off one side and decrease at the other end?? Or just cast off at the start of the rows.
17.08.2025 - 04:42DROPS Design answered:
Hi Pam, You cast off for the sleeve cap at the beginning of every row, so the sleeve cap is symmetrical. Begin by casting off 4 sts, work to end of row, turn and cast off 4 sts at the beginning of the next row. Then cast off 1 st at the beginning of the next 14 rows (7 sts on each side), then 2 sts on each side until the sleeve measures 57 cm. Finally 3 sts on each side once, before casting off the remaining stitches. Regards, Drops team.
18.08.2025 - 06:40
![]() Pam Ashton wrote:
Pam Ashton wrote:
I am struggling with the instructions at the top of the back and front pieces where it divides. Was wondering if you have some more detailed instructions of how it all works around the neck, or video to show that I can watch, please. I have asked a couple other knitters local to me but none of us can figure it out. Also how to cable as an edge piece . Thank you for your assistance once again.
26.06.2025 - 06:47DROPS Design answered:
Dear Mrs Ashton, in this pattern you work back piece and each front piece separately, you won't divide for armholes, you will just cast off stitches at the beginning of each row on each side (= both from RS and from WS on back piece / at the beg of row from armhole for front pieces), then continue pattern as before. For neck on back piece you will first knit the middle 40 sts (and the remaining sts as before), then cast off the middle 30 sts then continue each shoulder separately. You will then decrease the stitches in the cable to keep correct width just before casting off. Hope it can help. Happy knitting!
26.06.2025 - 16:41
![]() Pam Ashton wrote:
Pam Ashton wrote:
Hi, I'm knitting the Back of #Bluebird design. 3rd size Large I had 146 stitches at 12cm, then did Dec +Inc how ever I ended up with 132 stitches instead of 122 st as the pattern says. Dec 1 St in each side and repeat every 21/2 stitches a total of 10 times. So Decreases = 1+1 = 2. 146 - 2 = 144 10+10 =20 144 - 20= 122 = 122 stitches Increases 1+1=2. 122+2 =124st 4+4= 8. 124+8= 132 st Am I right or am I miscalculating??
02.06.2025 - 11:05DROPS Design answered:
Dear Mrs Ashton, you decrease 10 times 2 sts (1 on each side) = 20 sts decreased, then you increase 2 sts 4 times = 8 sts increased, and, at the same time, when working M.1B you will decrease 12 sts, so that you get 146-20+8-12=122 sts left. Happy knitting!
02.06.2025 - 13:11
![]() Patricia Forrest wrote:
Patricia Forrest wrote:
Just after I sent the question I got it! But thanks for the prompt response
26.05.2025 - 15:04
![]() Patricia Forrest wrote:
Patricia Forrest wrote:
When increase the collar we start with 5 St's the then add 2 then it says increase alternate row 12 times = 19st then every 4th row 6 times = 25 st. But the pattern says only 20 for collar. Please explain. Tks
26.05.2025 - 10:32DROPS Design answered:
Dear Mrs Forrest, on very first row increasing for collar, you increase only 2 stitches one timie (1 yarn over after the 1st stitch + 1 yarn over after the last stitch on right front piece / before the next to last stith + before the last stitch on left front piece), so that you increase 2 sts + 12 times 1 stich on every 2nd row + 6 times on every 4th row = 2+12+6=20 sts are increased in total for collar. Happy knitting!
26.05.2025 - 14:15
![]() Victoria Farhat wrote:
Victoria Farhat wrote:
I'm not familiar with the way you write the increases and decreases, so I plotted out the instructions for the back of pattern 134-1. I'm unsure if the increases are right in the area between 40-50 cm. I could send you the image if possible.
23.02.2025 - 13:59DROPS Design answered:
Dear Victoria, unfortunately we don't admit photos in our questions, but if you have any doubts you can join our DROPS Workshop to share your pictures and receive feedback from other knitters. Happy knitting!
24.02.2025 - 01:30
![]() Valerie wrote:
Valerie wrote:
Bonsoir je voudrais savoir à quoi correspond la partie blanche sur le diagramme des devant il n’y a pas de petit carreaux doit on fait des mailles end sur env ? Merci de votre réponse
14.10.2024 - 19:55DROPS Design answered:
Bonjour Valérie, on va diminuer dans les diagrammes M.1, M.3 et M.4, les cases manquantes correspondent aux mailles qui ont été diminuées au(x) rang(s) précédent(s), mais pour que graphiquement le diagramme continue, il va y avoir des "trous" car il y a moins de mailles envers entre les torsades en raison des diminutions. Bon tricot!
15.10.2024 - 09:37
![]() Michele Twine wrote:
Michele Twine wrote:
Do you have any patterns that don,t use a graph, I am dyslexic and can not phatham graphs, I need stitch by stitch patterns....thankyou ps adore the patterns
16.06.2024 - 05:11DROPS Design answered:
Dear Michele, we use diagrams not only because our patterns are available for free in several languages, but also, because we believe that with diagrams one can see the "bigger picture", in other words see not oly the very next step, but also how stitches and rows relate to each other en large. Happy Knitting!
16.06.2024 - 08:09
![]() Brenda Arthur wrote:
Brenda Arthur wrote:
Can I buy this pattern
27.08.2023 - 10:50
|
||||||||||||||||||||||
Bluebird#bluebirdcardigan |
||||||||||||||||||||||
 |
 |
|||||||||||||||||||||
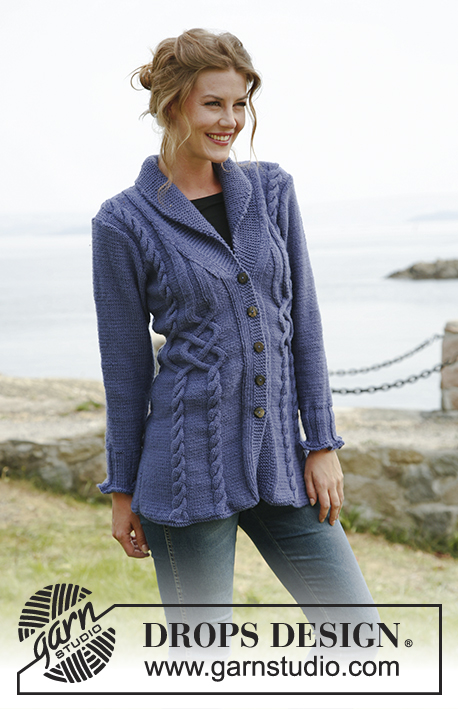
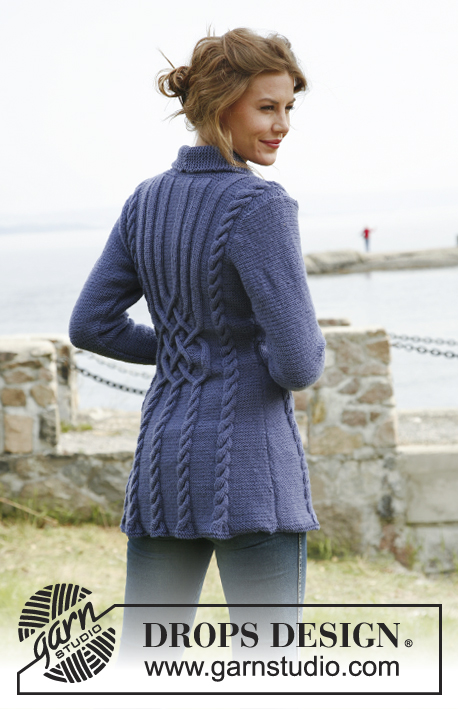
Knitted DROPS jacket with cables in ”Karisma”. Size: S to XXXL.
DROPS 134-1 |
||||||||||||||||||||||
|
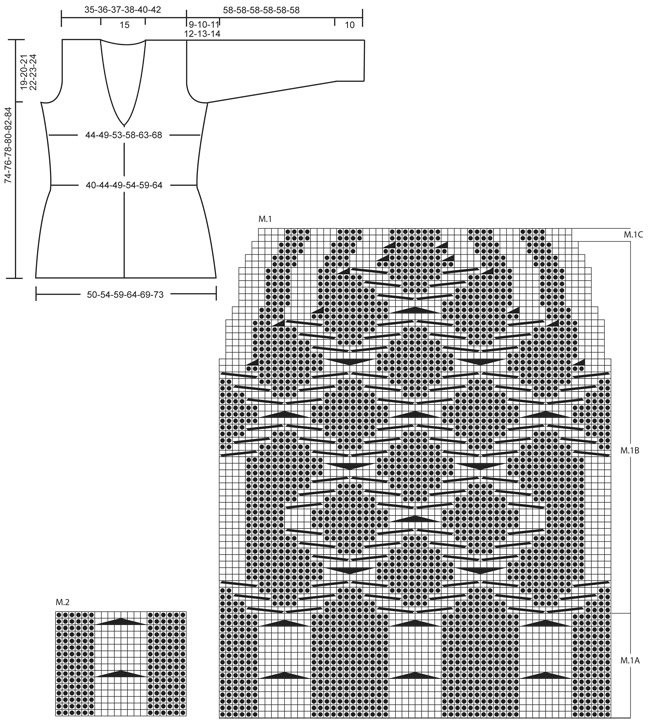
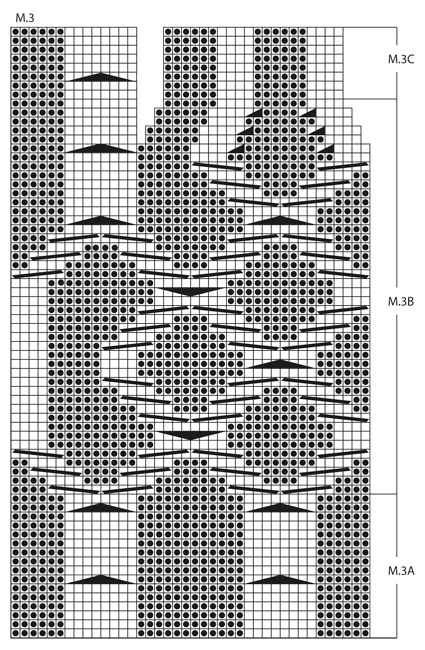
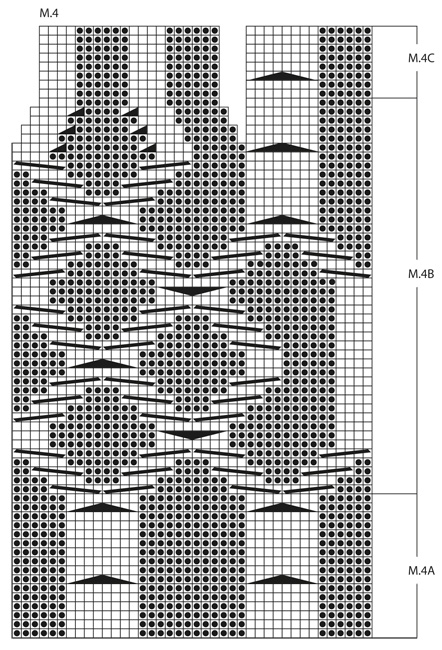
PATTERN: See diagram M.1 to M.4 – diagrams show pattern from RS (1st row = RS). GARTER ST (back and forth on needle): K all rows. KNITTING TIP (applies to band): Work the 5 band sts in garter st with double yarn the entire piece, i.e. have a little ball on the side that is only used on band. When inc for collar, work the inc sts with double yarn. This is done to make the band and the collar nice and firm. BUTTON HOLES: Cast off for button holes on right front band from RS. 1 BUTTON HOLE = cast off 3rd and 4th band st from mid front, on next row cast on 2 new sts over these sts. Cast off for button holes when piece measures: SIZE S: 18, 25, 32, 39 and 46 cm SIZE M: 19, 26, 33, 40 and 47 cm SIZE L: 20, 27, 34, 41 and 48 cm SIZE XL: 21, 28, 35, 42 and 49 cm SIZE XXL: 22, 29, 36, 43 and 50 cm SIZE XXXL: 23, 30, 37, 44 and 51 cm INCREASE TIP (applies to collar): Inc inside outermost band st by making 1 YO, on next row K YO twisted (i.e. work in back loop of st instead of front) to avoid holes. DECREASE TIP (applies to neck): Dec from RS inside the sts inc for collar + the 5 band sts + the first 3 sts in stocking st. Dec as follows AFTER these sts: Slip 1 st as if to K, K 1, psso. Dec as follows BEFORE these sts: K 2 tog. -------------------------------------------------------- -------------------------------------------------------- BACK PIECE: Worked back and forth on needle. Cast on 126-136-146-156-174-184 sts on straight needles size 3.5 mm with Karisma. K 2 rows (1st row = RS), switch to needle size 4 mm. READ ALL OF THE FOLLOWING SECTION BEFORE CONTINUING: PATTERN: Continue as follows (from RS): 1 edge st in GARTER ST – see explanation above, 12-17-22-27-16-21 sts in reverse stocking st, diagram M.2 (= 20 sts) 1-1-1-1-2-2 times, diagram M.1A (= 60 sts), diagram M.2 (= 20 sts) 1-1-1-1-2-2 times, 12-17-22-27-16-21 sts in reverse stocking st and 1 edge st in garter st. When piece measures 29-30-31-32-33-34 cm, work diagram M.1B over diagram M.1A, work the other sts as before (dec 12 sts in diagram M.1B as shown in diagram). After diagram M.1B, continue to work diagram M.1C over diagram M.1B. SIDE DEC AND SIDE INC: When piece measures 12 cm, dec 1 st in each side. Repeat dec every 2½ cm a total of 10 times. When piece measures 40 cm, inc 1 st in each side. Repeat inc every 3 cm a total of 4 times (work inc sts in reverse stocking st). After all dec and inc there are 102-112-122-132-150-160 sts on the needle. ARMHOLES: When piece measures 55-56-57-58-59-60 cm, cast off and dec for armholes at the beg of every row in each side as follows: 5 sts 1 time in all sizes, 3 sts 0-1-1-2-3-4 times, 2 sts 1-2-4-4-5-5 times and 1 st 3-2-2-3-5-5 times = 82-84-86-88-92-96 sts. Continue the pattern as before with 1 edge st in garter st in each side. When piece measures 70-72-74-76-78-80 cm, K 4 rows over the middle 40 sts (work the other sts as before). Then cast off the middle 30 sts for neck. Finish each shoulder (= 26-27-28-29-30-31 sts) separately. Continue the pattern with 5 sts in garter st towards the neck. When piece measures 74-76-78-80-82-84 cm, work the 8 sts over the cable in diagram M.2 tog 2 by 2 = 22-23-24-25-26-27 sts remain on needle. On next row cast off all sts K over K and P over P. RIGHT FRONT PIECE: Worked back and forth on needle. Cast on 68-73-78-83-92-97 sts (incl 5 band sts towards mid front and 1 edge st in the side) on needles size 3.5 mm with Karisma. READ KNITTING TIP! K 2 rows (1st row = RS), switch to needle size 4 mm. READ ALL OF THE FOLLOWING SECTION BEFORE CONTINUING! PATTERN: Continue as follows (= from RS): SIZE S, M, L and XL: 5 band sts in garter st, 4 sts in stocking st, 6 sts in reverse stocking st, diagram M.3A (= 40 sts), 12-17-22-27 sts in reverse stocking st and 1 edge st in garter st. Size XXL and XXXL: 5 band sts in garter st, 4 sts in stocking st, 6 sts in reverse stocking st, diagram M.3A (= 40 sts), M.2 (= 20 sts), 16-21 sts in reverse stocking st and 1 edge st in garter st. When piece measures 29-30-31-32-33-34 cm, work diagram M.3B over diagram M.3A, work the other sts as before (dec 6 sts in diagram M.3B as shown in diagram). After diagram M.3B, continue to work diagram M.3C over these sts. SIDE DEC AND SIDE INC: When piece measures 12 cm, dec 1 st in the side. Repeat dec every 2½ cm a total of 10 times. When piece measures 40 cm, inc 1 st in the side. Repeat inc every 3 cm a total of 4 times (work inc sts in reverse stocking st). BUTTON HOLES: At the same time when piece measures 18-19-20-21-22-23 cm, cast off for button holes - see explanation above. COLLAR: At the same time when piece measures 47-48-49-50-51-52 cm, from RS inc 2 sts for collar as follows: Make 1 YO after first st and 1 YO after second st, on next row K both YOs twisted to avoid holes. Continue to inc 1 st for collar on every other row a total of 12 times and then every 4th row a total of 6 times – SEE INCREASE TIP! After all inc, there are 20 inc collar sts and 25 sts in garter st in total (all these sts are worked with double yarn). NECKLINE: At the same time when piece measures 49-50-51-52-53-54 cm, dec 1 st towards the neck - SEE DECREASE TIP! Repeat dec every other row a total of 12 times and then on every 4th row a total of 8 times. ARMHOLE: At the same time when piece measures 55-56-57-58-59-60 cm, cast off and dec for armhole in the side as on back piece. After all inc and dec, there are 46-47-48-49-51-53 sts on needle. Work until piece measures 74-76-78-80-82-84 cm, adjust so that next row is worked from RS. Continue to work the 8 sts over the cable tog 2 by 2 = 42-43-44-45-47-49 sts on needle. On next row (= WS), cast off the first 22-23-24-25-27-29 sts for shoulder, K the rest of row. Continue like this over the remaining 20 collar sts: * K 2 rows over all sts, K 2 rows over only the outermost 14 sts (towards mid front) *, repeat from *-* until collar measures approx. 7-8 cm at the inside (it will then measure approx. 14-16 cm at the edge). Cast off. LEFT FRONT PIECE: Cast on and work as right front piece but reversed. I.e. after 2 rows K, work pattern as follows (from RS): SIZE S, M, L and XL: 1 edge st in garter st, P 12-17-22-27 sts, diagram M.4A (= 40 sts), P 6 sts, K 4 sts and 5 band sts in garter st. Size XXL and XXXL: 1 edge st in garter st, P 16-21 sts, diagram M.2 (= 20 sts), diagram M.4A, P 6 sts, K 4 sts and 5 band sts in garter st. Then work diagram M.4B and diagram M.4C instead of diagram M.3B and diagram M.3C. Sts over cable on shoulder are cast off from WS and shoulder sts from RS; this is done opposite from right front piece to avoid cutting the thread when working the collar. SLEEVE: Worked back and forth on needle. Cast on 100-100-100-116-116-132 sts (incl 1 edge st in each side) on needle size 3.5 mm with Karisma. K 1 row (1st row = RS) and P 1 row, then K all sts tog 2 by 2 = 50-50-50-58-58-66 sts. K 1 row from WS. Then work rib = K 4/P 4 with 1 edge st in garter st in each side. When piece measures 10 cm, switch to needle size 4 mm and continue in reverse stocking st. AT THE SAME TIME when piece measures 13-13-13-13-11-11 cm, inc 1 st each side, repeat inc every 3-2½-2-2-2-2 cm a total of 12-14-16-15-17-16 times = 74-78-82-88-92-98 sts. When piece measures 49-48-47-46-45-44 cm (shorter measurements in the larger sizes because of longer sleeve cap and broader shoulder width) cast off and dec for sleeve cap at beg of every row in each side: 4 sts 1 time, 2 sts 3 times, 1 st 5-6-7-9-10-12 times and then 2 sts in each side until piece measures 57 cm. Continue to cast off 3 sts 1 time in each side, then cast off the remaining sts. Sleeve measures approx. 58 cm. ASSEMBLY: Sew the shoulder seams. Sew collar tog mid back, edge to edge to avoid a chunky seam. Sew collar to the back of neckline. Sew in sleeves and sew under arm and side seams in one inside 1 edge st. Sew on buttons. |
||||||||||||||||||||||
Diagram explanations |
||||||||||||||||||||||
|
||||||||||||||||||||||
 |
||||||||||||||||||||||
 |
||||||||||||||||||||||
 |
||||||||||||||||||||||
Have you finished this pattern?Tag your pictures with #dropspattern #bluebirdcardigan or submit them to the #dropsfan gallery. Do you need help with this pattern?You'll find 11 tutorial videos, a Comments/Questions area and more by visiting the pattern on garnstudio.com. © 1982-2026 DROPS Design A/S. We reserve all rights. This document, including all its sub-sections, has copyrights. Read more about what you can do with our patterns at the bottom of each pattern on our site. |
||||||||||||||||||||||


With over 40 years in knitting and crochet design, DROPS Design offers one of the most extensive collections of free patterns on the internet - translated to 17 languages. As of today we count 324 catalogues and 12290 patterns translated into English (UK/cm). 12290
We work hard to bring you the best knitting and crochet have to offer, inspiration and advice as well as great quality yarns at incredible prices! Would you like to use our patterns for other than personal use? You can read what you are allowed to do in the Copyright text at the bottom of all our patterns. Happy crafting!
Post a comment to pattern DROPS 134-1
We would love to hear what you have to say about this pattern!
If you want to leave a question, please make sure you select the correct category in the form below, to speed up the answering process. Required fields are marked *.