
Popular categories
Looking for a yarn?


Comments / Questions (106)
![]() Christel wrote:
Christel wrote:
Ich möchte ein Raglan-Babyjäckchen mit Kapuze stricken. Gibt es dafür auch eine Anleitung; bitte OHNE Rundnadel - damit kann ich nicht umgehen. Größe ab 62
20.02.2026 - 20:03DROPS Design answered:
Liebe Christel, ein Raglanjäckchen ohne Rundnadel zu stricken ist am Stück nicht gut möglich, d.h. Sie müssten die Teile einzeln stricken. Heutzutage wird das kaum noch gemacht, weil es an sich praktischer ist, keine Nähte arbeiten zu müssen. In älteren Anleitungen wird aber teilweise noch alles einzeln gestrickt, so z.B. bei DROPS Baby 10-18 (das hat aber keine Kapuze). Sie könnten aber auch versuchen, mit einem vergleichsweise kurzen Seil einer Rundnadel zu stricken (60 cm), das ist besser zu handhaben als längere Seile, die sich manchmal verdrehen. Viel Spaß jedenfalls beim Stricken!
24.02.2026 - 10:03
![]() Claudia wrote:
Claudia wrote:
Ich verstehe die Abnahme bei der Passe nich: in jeder linken Partie a wechselnd auf der linken und der rechten Seite 1 M. abnehmen. Auch auf die Anzahl der Maschen, nach allen Abnahmen komme ich nicht...
26.11.2025 - 21:07DROPS Design answered:
Liebe Claudia, die Abnahmen entstehen in jeder linken Partie aber das 1. Mal nehmen Sie rechts (= am Anfang der linken Partie) ab und das nächste Mal nehmen Sie links (= am Ende der linken Partie) ab, so abwechslungsweise am Anfang/Ende der linken Partie. Viel Spaß beim Stricken!
27.11.2025 - 09:32
![]() Angèle wrote:
Angèle wrote:
Désolée encore une question. Il est dit dans le descriptif empiècement "continuer ainsi vu sur le droit, 5 m mousse, 2 envers, M1 11 m envers...tous les 1 cm on fait les diminution s et en même temps à 1 cm de hauteur totale on tricote M2. Qu'en est-il M1 m'est pas terminé en hauteur ? Merci pour vos explications. Cordialement
09.01.2025 - 13:59DROPS Design answered:
Bonjour Angèle, ajustez le début de M.2 pour commencer après un motif complet de M.1, autrement dit, vous devez bien avoir le même nombre de rangs entre les torsades de M.1 et avant la 1ère torsade de M.2. Bon tricot!
09.01.2025 - 18:08
![]() Angèle wrote:
Angèle wrote:
Bonjour, J'ai un petit souci pour la reprise des manches et la continuité avec l'empiècement. On arrête le corps sur l'endroit. Donc là reprise des manches se fait sur un rang envers. Comment tricoter au rang suivant sur l'envers. Ce n'est pas possible. Où est mon erreur. Merci pour votre aide. Cordialement
09.01.2025 - 10:51DROPS Design answered:
Bonjour Angèle, vous tricotez simplement le 1er rang de l'empiècement sur l'envers, comme vous avez tricoté les mailles auparavant en commençant par le devant gauche, puis la manche gauche, le dos, la manche droite et le devant droit. Sur l'envers, vous tricotez les mailles à l'endroit (jersey envers) et les 21 mailles de chaque côté comme avant (= 5 m point mousse, 2 m env, M.1, 2m env - vu sur l'endroit). Les premiers rangs peuvent être un peu serrés au niveau des manches (cf vidéo), mais après quelques rangs, ce sera plus facile. Bon tricot!
09.01.2025 - 17:55
![]() Angèle wrote:
Angèle wrote:
Bonsoir, Je débute ce modèle et bute sur l'envers du travail : sur l'endroit du travail je tricote 5 m point mousse 2 m envers M1 6 m envers M3... Sur l'envers du travail je reprends 5 m point mousse 2 m endroit M1 6 m endroit M3.... Pour M1 et M2 je suis les diagrammes, là aucun problème. Merci pour votre réponse. Cordialement
16.11.2024 - 20:26DROPS Design answered:
Bonjour Angèle, sur l'envers, tricotez les mailles comme elles se présentent: 5 m point mousse, 2 m end, les mailles de M.1 (= à l'envers sur l'envers) avec 6 mailles endroit entre chaque M.1 et terminez par 2 m end et 5 m point mousse. Bon tricot!
18.11.2024 - 08:06
![]() Nicole wrote:
Nicole wrote:
Bonjour, dans l'empiècement, je ne comprends pas les diminutions. Que signifie "diminuer sur l'endroit alternativement à droite et à gauche dans chaque section envers" ? Sur le même rang, on diminue à droite et à gauche de la section en jersey ? Ou alors sur le rang 1 à droite et sur le rang 3 à gauche, rang 5 à droite, rang 7 à gauche ?
21.10.2024 - 13:35DROPS Design answered:
Bonjour Nicole, vous allez diminuer la première fois à droite de chaque section en mailles envers = au début de chaque section envers (vu sur l'endroit), la fois suivante, vous diminuez à gauche de chaque section en mailles envers = à la fin de ces sections en mailles envers. Autrement dit, vous ne diminuez qu'1 seule maille envers dans chacune de ces sections entre les torsades à chaque rang de diminutions. Bon tricot!
21.10.2024 - 15:50
![]() Hendrikx Karla wrote:
Hendrikx Karla wrote:
Graag de uitleg, voor de middelste 4 steken van M.4
13.10.2024 - 14:37DROPS Design answered:
Dag Karla,
Dit zijn de laatste 2 symbolen in de lijst. Dus eerst 1 steek afhalen, 1 recht en de afgehaalde steek overhalen. Dan 2 steken recht samen.
16.10.2024 - 20:39
![]() Lisa wrote:
Lisa wrote:
Liebes DROPS-Team, ich habe eine Frage zu dem Zopfmuster. Stricke ich M1 und M3 in den Rückreihen auch, also dass das Zopfmuster auch innen ist oder stricke ich dort die Maschen wie sie erscheinen, ohne zu überkreuzen? Viele Grüße
11.08.2024 - 17:00DROPS Design answered:
Liebe Lisa, alle Reihen sind im Diagram gezeichnet, so werden die Rückreihen glatt rechts gestrickt (=links bei den Rückreihen); M.1 = 6 Reihen insgesamt. Viel Spaß beim Stricken!
12.08.2024 - 08:24
![]() Lisa wrote:
Lisa wrote:
Kann man die Strickjacke auch als Raglan, also in einem Stück stricken? Wenn ja, hätten Sie dafür vielleicht eine Anleitung zur Verfügung? Liebe Grüße
03.08.2024 - 17:13DROPS Design answered:
Liebe Lisa, hier strickt man zuerst jedes Teil separat (Rumfpteil und beide Ärmel) dann strickt man alle Teile für die Passe zusammen, so gibt es nur die Naht unter die Ärmel. Viel Spaß beim Stricken!
05.08.2024 - 07:35
![]() Christa wrote:
Christa wrote:
De pas en de mouwen samen is niet te doen ook niet met een rondbreinaald
03.07.2024 - 14:10
|
||||||||||||||||||||||||||||||||||
Little Chestnut#littlechestnutjacket |
||||||||||||||||||||||||||||||||||
 |
 |
|||||||||||||||||||||||||||||||||
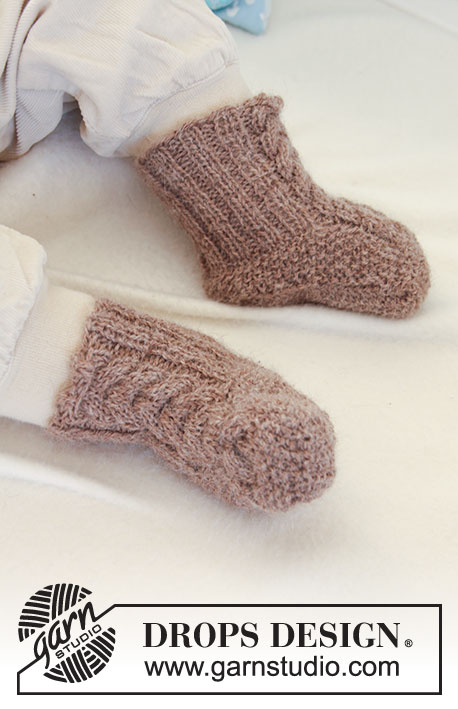
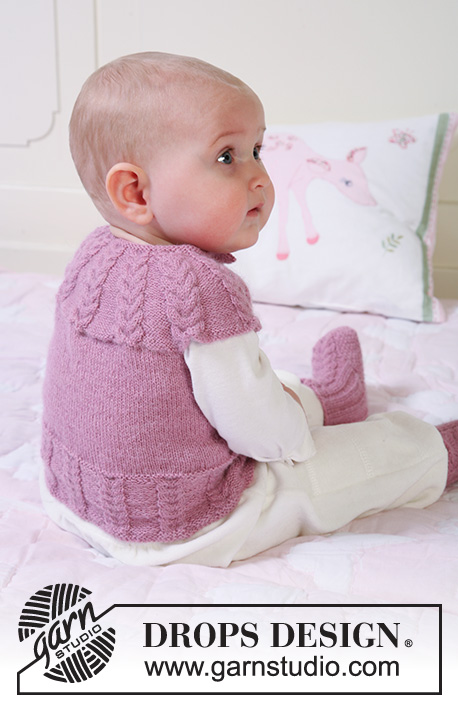
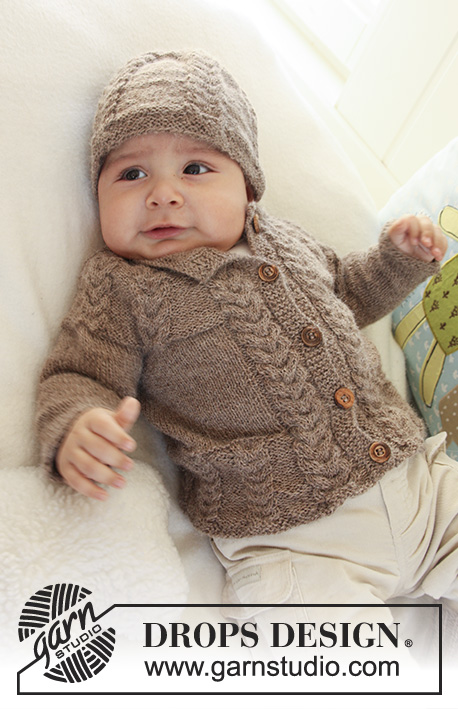
Set of knitted jacket with raglan sleeves, hat and booties with cables, for baby and children in DROPS Alpaca
DROPS Baby 19-17 |
||||||||||||||||||||||||||||||||||
|
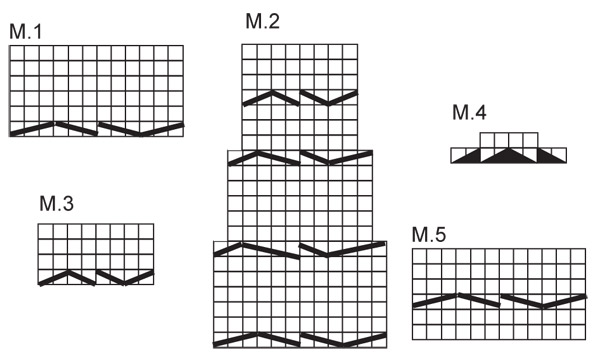
GARTER ST (back and forth on needle): K all rows. GARTER ST (in the round): K 1 round, P 1 round. PATTERN: See diagram M.1 to M.4. Diagrams show the pattern from RS. BUTTONHOLES: Make buttonholes on right front band. 1 buttonhole = cast off 3rd and 4th front band st and cast on 2 new sts on return row. Make buttonholes when piece measures: SIZE 1/3 months: 4, 9, 14, 19 and 24 cm SIZE 6/9 months: 2, 8, 14, 20 and 26 cm SIZE 12/18 months: 3, 8, 14, 19, 25 and 30 cm SIZE 2 years: 4, 10, 16, 22, 28 and 34 cm SIZE 3/4 years: 3, 10, 17, 24, 31 and 38 cm -------------------------------------------------------- -------------------------------------------------------- BODY PIECE: Worked back and forth on circular needle from mid front. Cast on 139-151-170 (183-192) sts on circular needle size 2.5 mm with Alpaca. K 4 rows, AT THE SAME TIME on 4th row inc 17-19-14 (15-20) sts evenly = 156-170-184 (198-212) sts. Work next row as follows (from RS): 5 GARTER STS - see above (= front band), P2, M.1, * P6, M.3 *, repeat from *-* on the next 112-126-140 (154-168) sts, finish with P6, M.1, P2 and 5 GARTER STS (= front band). Continue in pattern like this until piece measures 7-7-7 (8-8) cm. NOTE! Remember BUTTONHOLES - see above. On next row from RS work 21 sts each side as before, K remaining sts, AT THE SAME TIME dec 9-13-8 (9-14) sts evenly on these sts = 147-157-176 (189-198) sts. On next row from WS work 21 sts each side as before, K remaining sts. Continue as follows (from RS): 5 garter sts, P2, M.1, P2, stocking st on the next 105-115-134 (147-156) sts, P2, M.1, P2 and 5 garter sts. Continue in pattern like this until piece measures 17-18-21 (24-27) cm. Work next row as follows (from RS): 21 sts as before, 14-18-24 (26-29) stocking sts (= right front piece), cast off 8 sts for armhole, 61-63-70 (79-82) stocking sts (= back piece), cast off 8 sts for armhole, 14-18-24 (26-29) stocking sts and 21 sts as before (= left front piece) = 131-141-160 (173-182) sts left on needle. Cut the thread, put piece aside and knit the sleeves. SLEEVE: Worked in the round. Cast on 36-38-40 (42-44) sts on double pointed needles size 2.5 mm with Alpaca. Insert a marker at beg of round (= mid under sleeve). Work 4 rounds GARTER ST – see above. Continue in stocking st. AT THE SAME TIME when piece measures 5 cm inc 1 st each side of marker, and repeat the inc on every 6-5-5 (6-6) round a total of 6-7-9 (10-12) times = 48-52-58 (62-68) sts. Continue until piece measures 18-19-21 (25-29) cm. Now cast off 8 sts mid under sleeve (= 4 sts each side of marker) = 40-44-50 (54-60) sts. Put piece aside and knit the other sleeve. YOKE: Slip sleeves on the same circular needle as body piece where cast off for armhole = 211-229-260 (281-302) sts. NOW MEASURE PIECE FROM HERE! On next row from WS work 21 sts each side as before, K remaining sts, AT THE SAME TIME inc 22-27-30 (33-36) sts evenly on these sts = 233-256-290 (314-338) sts. Continue as follows (as seen from RS): 5 garter st, P2, * M.1, P 11-11-12 (12-12) sts *, repeat from *-* a total of 9-10-11 (12-13) times and finish with M.1, P2 and 5 garter sts. AT THE SAME TIME dec from RS on the right and left side alternately of each P-section (dec by P2 tog, NOTE! do not dec in P2 each side) on every 1 cm a total of 6-7-8 (9-9) times. AT THE SAME TIME when piece measures 1-1-2 (3-4) cm work M.2 over all sts in M.1 (work remaining as before). After 1 vertical repeat of M.2 continue with M.3. After all dec are complete there are 139-142-154 (154-165) sts on needle. Continue until piece measures approx 7-8-9 (10-11) cm, adjust to a full vertical repeat. Now work M.4 over M.3 (work remaining sts as before) = 99-98-106 (102-109) sts. After 1 vertical repeat of M.4 K 1 row from RS on all sts, AT THE SAME TIME dec 13-10-14 (6-9) sts evenly = 86-88-92 (96-100) sts. K 1 row from WS, K 1 row from RS, K 1 row from WS and cast off loosely. ASSEMBLY: Sew openings under sleeves. Sew on buttons. -------------------------------------------------------- HAT: GARTER ST (in the round): K 1 round, P 1 round. PATTERN: See diagram M.1 to M.4. Diagrams show the pattern from RS. -------------------------------------------------------- -------------------------------------------------------- HAT: Worked in the round, from bottom up. Cast on 95-100-105 (110-120) sts on circular needle size 2.5 mm with Alpaca. Work 8 rounds GARTER ST- see above. Work next round as follows: * K1, 1 YO, K2, 1 YO, K2, 1 YO, K2, 1 YO, K1, P 11-12-13 (14-16) *, repeat from *-* a total of 5 times = 115-120-125 (130-140) sts. On next round work K over K and P over P - K all YO into back of loop to avoid a hole (= K12, P 11-12-13 (14-16)). Continue as follows: * M.1, P 11-12-13 (14-16) *, repeat from *-* a total of 5 times. REMEMBER THE KNITTING TENSION! When piece measures approx 7-8-9 (10-11) cm (adjust to a full repeat) work M.2 over M.1. NOTE! Change to double pointed needles size 2.5 mm when there are too few sts for circular needle. After 1 vertical repeat of M.2 work M.3 over M.2. AT THE SAME TIME when piece measures 10-11-12 (13-14) cm dec 2 sts in each P-section, dec by P tog the 2 first sts and P tog the 2 last sts in each P-section. Dec on every 1 cm a total of 4 times = 55-60-65 (70-80) sts. Now work M.4 over M.3 = 35-40-45 (50-60) sts. On next round K all sts, AT THE SAME TIME K2 tog across the round = 18-20-23 (25-30) sts. Cut the thread and pull it through remaining sts on needle, tighten and fasten. Hat measures approx 14-15-16 (17-18) cm. -------------------------------------------------------- BOOTIES: PATTERN: See diagram M.5. Diagram shows the pattern from RS. MOSS ST: Round 1: * K1, P1 *, repeat from *-*. Round 2: K over P and P over K. Repeat round 2. -------------------------------------------------------- -------------------------------------------------------- BOOTIE: Piece worked in the round on double pointed needles, from top down. Cast on 50-50-54 (58-62) sts on double pointed needles size 2.5 mm with Alpaca. K 1 round on all sts and continue as follows: SIZE 1/3 months + 6/9 months + 2 years: K1, * P2/K2 *, repeat from *-* on the next 16-16-20 sts, P2, M.5 (= 12 sts), * P2/K2 *, repeat from *-* on the next 16-16-20 sts, P2, K1. SIZE 12/18 months + 3/4 years: P1, * K2/P2 *, repeat from *-* on the next 20-24 sts, M.5 (= 12 sts), * P2/K2 *, repeat from *-* on the next 20-24 sts, P1. Continue like this until piece measures 6-7-7 (8-8) cm. K 1 round on all sts, AT THE SAME TIME dec 4 sts evenly on round - do not dec on the 16 sts on upper foot (= M.5 + P2 each side) = 46-46-50 (54-58) sts. Keep the 16 sts on upper foot on needle and slip remaining 30-30-34 (38-42) sts on a stitch holder. Continue in M.5 with P2 each side back and forth on needle for 3-3.5-4 (5-6) cm. On next row from RS dec 4 sts on M.5 = 12 sts left on upper foot. Now pick up 6-8-8 (10-14) sts on the side of upper foot, slip sts from stitch holder back on needle and pick up 6-8-8 (10-14) sts on the other side of upper foot = 54-58-62 (70-82) sts. Continue in MOSS ST - see above - in the round on all sts for 1.5-2-2.5 (3-3.5) cm, and now P 1 round on all sts. Cast off all sts except the 12 sts on upper foot mid front. Work 9-10-11 (13-14) cm moss st back and forth on needle on these sts for sole. Cast off and sew sole to side pieces, sew edge to edge to avoid a chunky seam. |
||||||||||||||||||||||||||||||||||
Diagram explanations |
||||||||||||||||||||||||||||||||||
|
||||||||||||||||||||||||||||||||||
 |
||||||||||||||||||||||||||||||||||
 |
||||||||||||||||||||||||||||||||||
Have you finished this pattern?Tag your pictures with #dropspattern #littlechestnutjacket or submit them to the #dropsfan gallery. Do you need help with this pattern?You'll find 29 tutorial videos, a Comments/Questions area and more by visiting the pattern on garnstudio.com. © 1982-2026 DROPS Design A/S. We reserve all rights. This document, including all its sub-sections, has copyrights. Read more about what you can do with our patterns at the bottom of each pattern on our site. |
||||||||||||||||||||||||||||||||||


With over 40 years in knitting and crochet design, DROPS Design offers one of the most extensive collections of free patterns on the internet - translated to 17 languages. As of today we count 324 catalogues and 12290 patterns translated into English (UK/cm). 12290
We work hard to bring you the best knitting and crochet have to offer, inspiration and advice as well as great quality yarns at incredible prices! Would you like to use our patterns for other than personal use? You can read what you are allowed to do in the Copyright text at the bottom of all our patterns. Happy crafting!
Post a comment to pattern DROPS Baby 19-17
We would love to hear what you have to say about this pattern!
If you want to leave a question, please make sure you select the correct category in the form below, to speed up the answering process. Required fields are marked *.