
Popular categories
Looking for a yarn?


Comments / Questions (11)
![]() Åsa wrote:
Åsa wrote:
Ska hela byxan stickas med stickor 2,5 och i rätstickning?
25.10.2021 - 11:29DROPS Design answered:
Hei Åsa. Ja, det stemmer. Pinne 2,5 og det strikkes rett på alle pinner (rätstickning). mvh DROPS Design
25.10.2021 - 12:10
![]() Dorrit Evensen wrote:
Dorrit Evensen wrote:
Jeg strikker settet baby 10-12. Jeg skjønner ikke monteringen av lua. Syr baksiden sammen, men hva med resten? Det skal være 3 tupper på toppen. Hvordan blir det gjort. Har jo ikke et bilde som man kan se. Strikker i baby merino. Er egentlig en rutinert strikker, men dette forstår jeg ikke. Med vanlig hilsen Dorrit Evensen
21.08.2020 - 11:16DROPS Design answered:
Hei Dorrit. Vi har dessverre ikke et bedre bildet av luen, men når du har sydd sammen midt bak, mål omkretsen og del den på 3. Sett et merke for hver tredjedel og legg kantene på hver side av merkene mot hverandre = 3 deler (1 merke på "toppen" og 2 sider mot hverandre = 1 del). Sy hver av de 3 delene sammen slik at det blir 3 like deler og at de møtes i midten. God Fornøyelse!
24.08.2020 - 12:59
![]() Monika Funaro wrote:
Monika Funaro wrote:
Samtidigt när ärmen mäter 18-20-22-24-28 cm avm det för ärmkulle i varje sida på vartannat v: 3 m 1-1-1-1-1 gång, sedan 2 m i varje sida till M.2 är färdig. Efter M.2 maskas det av, arb mäter 23-25-27-30-34 cm. Förstår inte instruktionen, vet ej hur man maskar av 3 maskor på slutet av stickan på rätsidan.
04.02.2020 - 22:10DROPS Design answered:
Hej När vi skriver att man ska avmaska 3 m i varje sida så är det lättaste att avmaska 3 m först i början av varvet och sedan sticka varvet ut, vända arbetet och avmaska de första 3 maskorna på varvet. Lycka till!
07.02.2020 - 09:56
![]() Malstig wrote:
Malstig wrote:
Det hade varit bra om det framgick att mönstret stickas både från rätan och avigan. Se till att en rapport kommer mitt fram.....ja, men då jag stickar till en 2-åring så ska mönstret fördelas över 70 maskor! 35 x 2 = 70 och då fattas det en maska för att hitta mitten. Det borde framkomma att man måste öka en maska. Det här är inget arbete för de som inte stickat så mycket. Var finns bild på mössan??
30.08.2016 - 11:49
![]() Vibeke Nielsen wrote:
Vibeke Nielsen wrote:
Der står, at rapporten skal placeres mit på arbejdet på forstykket. Er det midten af rapporten eller en på hver side af midten. Og så står der noget med håndskrift, som jeg har svært ved at tyde/forstå?
14.08.2016 - 21:24DROPS Design answered:
Hej Vibeke. Se her hvordan du placerer et diagram paa midten. Jeg tror det er en fejl med den haandskrift, jeg har bedt om at faa det fjernet.
07.09.2016 - 14:32
![]() Valérie wrote:
Valérie wrote:
Bonjour, Je suis à la partie col : et là je ne comprend pas (relever autour de l'encolure 90 à 100 mailles) faut il compter aussi les 4 cm rajoutés à l'épaule gauche. Je vous remercie de me répondre. Valérie PERIE
26.12.2015 - 23:16DROPS Design answered:
Bonjour Valérie, tout à fait, vous relevez les mailles tout autour de l'encolure, y compris les long des bordures de l'épaule - n'oubliez pas d'ouvrir la boutonnière en double pour l'ourlet. Bon tricot!
02.01.2016 - 13:52
![]() Siri Wilbur wrote:
Siri Wilbur wrote:
Finally I realize that the M.2 for the sleeve does. Not mean make two stitches! But how can the sleeve measure 29cm and then 28cm before instructions to decrease it? Can you change the diagram labels to A and B? Or am I wrong? Thanks! Siri
07.02.2015 - 04:35DROPS Design answered:
Dear Mrs Wilbur, in the 2 largest size, you will start to bind off for sleeve cap before working M.2, ie you bind off each side for sleeve cap when piece measures 28 cm (largest size), and work M.2 when sleeve measures 29 cm. Continue casting off each side and bind off all sts after M2, sleeve should measure 34 cm. Happy knitting!
07.02.2015 - 09:26
![]() Anita wrote:
Anita wrote:
There is an error in the patter M2. On the second row the pattern does not match the second row of M1. Why does the sleeve head come out smaller than the armhole?
15.11.2014 - 07:29DROPS Design answered:
Dear Anita, when working M2, mark the last st you worked on first row, then start from this st on next row and read diagram from left to right (see also here). Sleeve cap is 5-6 cm high and should fit the armholes. Happy knitting!
15.11.2014 - 09:58
![]() Lora Parnell wrote:
Lora Parnell wrote:
Please clarify sleeve decrease. Do you also decrease the 2 st for 1 time or continue to decrease 2 st. every other row throughout the m2 until finished.
06.06.2014 - 05:29DROPS Design answered:
Dear Mrs Parnel, you cast off for sleeve cap 3 sts 1 time at the beg of every row each side, then 2 sts at the beg of every row each side until M2 is finished. Happy knitting!
06.06.2014 - 09:32
![]() Marianne wrote:
Marianne wrote:
Hej! Lite oklart hur man stickar byxan - ska hela byxan vara i rätstickning eller är det slätstickning efter 4 cm? Marianne
04.10.2007 - 17:24
|
||||||||||
Jayden#jaydensweater |
||||||||||
|
|
||||||||||
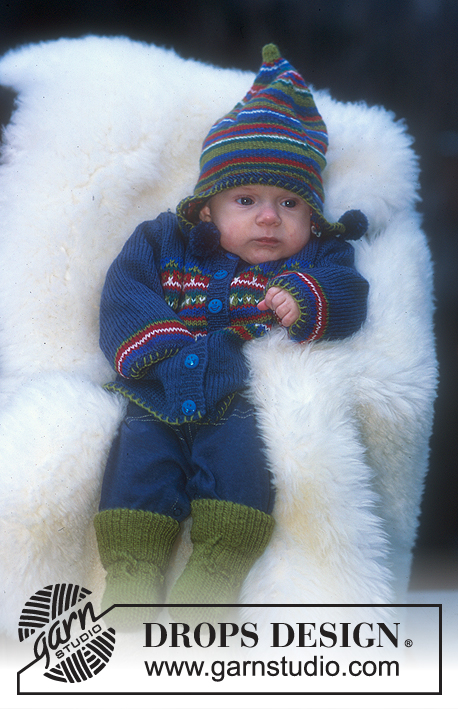
Norwegian style jumper, trousers, hat and socks in BabyMerino
DROPS Baby 10-12 |
||||||||||
|
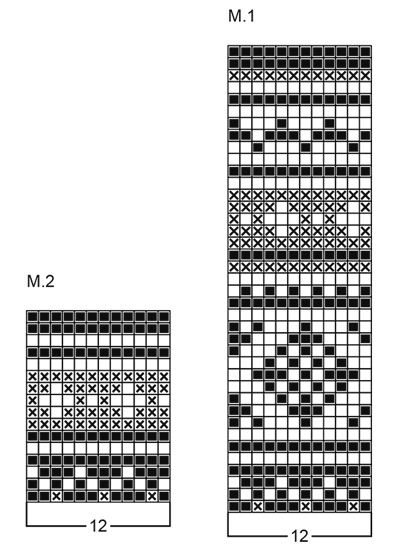
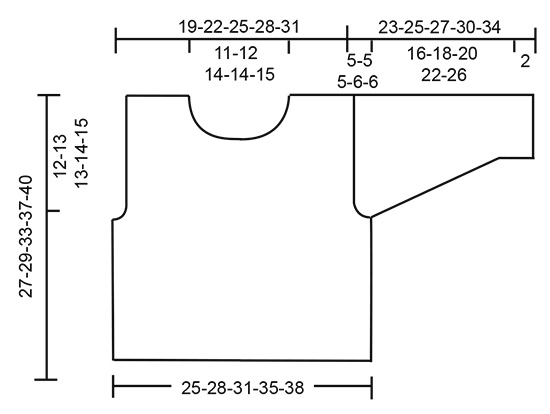
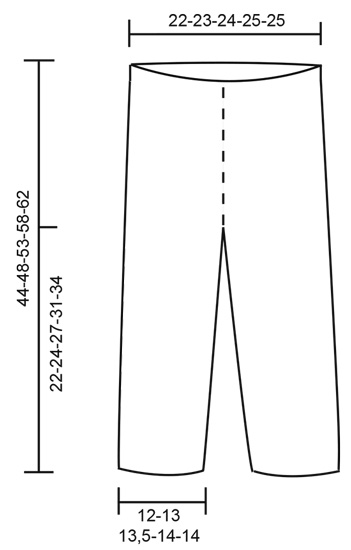
Knitting tension: 25 sts x 33 rows on needle size 3 mm in stocking sts = 10 x 10 cm. Garter sts (back and forth on needle): Knit all rows. Rib: *K1/P1*, repeat from *-*. Pattern: See diagrams M.1 and M.2. The diagram shows the pattern from the right side. JUMPER: Front piece: Cast on 64-72-80-90-98 sts (incl 1 edge st each side) on needle size 2.5 mm with electric blue and knit 2 cm Rib. Change to needle size 3 mm and continue in stocking sts. Remember the knitting tension. When piece measures 15-16-20-23-25 cm cast off for armhole each side on every other row: 3 sts 1 time, 2 sts 1 time and 1 st 3-3-4-5-5 times = 48-56-62-70-78 sts. At the same time when piece measures 15-17-21-25-28 cm knit M.1 – make sure to place a horizontal repeat mid front. When piece measures 23-25-28-32-35 cm cast off the middle 14-16-16-18-20 sts for neck and dec to shape the neckline on every other row: 2 sts 2 times and 1 st 3-3-5-5-5 times = 10-13-14-17-20 sts left on each shoulder. Continue as follows: Right shoulder (when worn): Cast off all sts after M.1, piece measures approx 27-29-33-37-40 cm. Left shoulder: After M.1 change to needle size 2.5 mm and knit 2 cm Rib in electric blue. At the same time after 0.5 cm make 1 buttonhole mid shoulder (cast off 2 sts and cast on 2 new sts on return row). Cast off in Rib after 2 cm. Back piece: Cast on and knit as front piece. Dec for armhole as described for front piece and continue until piece measures 25-27-31-35-38 cm. Cast off the middle 24-26-30-32-34 sts for neck and dec to shape the neckline on every other row: 1 st 2-2-2-2-2 times = 10-13-14-17-20 sts left on each shoulder. Continue as follows: Right shoulder (when worn): Cast off all sts after M.1, piece measures approx 27-29-33-37-40 cm. Left shoulder: After M.1 change to needle size 2.5 mm and knit 2 cm Rib in blue. Cast off in Rib. Sleeve: Cast on 46-48-50-52-52 sts (incl 1 edge st each side) on needle size 2.5 mm with electric blue and knit 2 cm Rib with 1 edge st each side in garter sts. Change to needle size 3 mm and continue in stocking sts. When piece measures 4 cm inc 1 st each side on every 7-7-9-9-7 row a total of 6-7-6-7-10 times = 58-62-62-66-72 sts. When sleeve measures 18-20-22-25-29 cm knit M.2. At the same time when piece measures 18-20-22-24-28 dec for sleeve cap each side on every other row: 3 sts 1 time and 2 sts until M.2 is finished. Cast off after M.2, piece measures 23-25-27-30-34 cm. Assembly: Sew right shoulder seam. Neck: Pick up approx 90 to 100 sts round the neck on needle size 2.5 mm with electric blue and knit Rib. After 0.5 cm make 1 buttonhole in line with the other on shoulder. The neck is to be folded double towards WS so make another buttonhole after 4.5 cm. Cast off when neck measures 5 cm. Set in sleeves. Sew sleeve and side seams. Fold neck double towards WS and attach. Sew on buttons. TROUSERS: Knitting tension: 26 sts x 52 rows on needle size 2.5 mm in garter sts = 10 x 10 cm. The trousers are knitted from bottom up. Right leg: Cast on 64-70-72-74-76 sts (incl 1 edge st each side) on needle size 2.5 mm with turquoise and knit garter sts back and forth on needle. When piece measures 8 cm inc 1 st inside the edge st each side on every 2-4-2-2-2 cm a total of 7-4-8-11-12 times = 78-78-88-96-100 sts. When piece measures 22-24-27-31-34 cm cast off 4 sts each side = 70-70-80-88-92 sts. Now inc on one side of piece (= mid back) inside edge st on every other row: 1 st 7-7-7-7-7 times and dec on the other side (= mid front) inside edge st on every other row: 1 st 4-2-9-12-15 times – dec by K2 tog. When piece measures 42-46-51-56-60 cm dec 13-13-13-15-16 sts evenly from the RS = 60-62-65-68-68 sts. Knit 2 cm in garter sts and then 2 cm in stocking sts. Cast off. Left leg: Like right leg, but mirrored. Assembly: Fold right leg double and sew inner leg seam within 1 edge st – Note! On the lower 4 cm (turn-up) sew with seam on the right side so that it doesn’t show when you turn it. Sew left leg in the same way. Sew together the trousers front and back within 1 edge st and sew the opening between the legs. Fold the top edge double towards the WS and sew – leave a little opening for the elastic band. HAT: To fit head circumference: 42-44-46-48-50 cm Knitting tension: 25 sts x 33 rows on needle size 3 mm in stocking sts = 10 x 10 cm. Garter sts (back and forth on needle): Knit all rows. Rib: *K1/P1*, repeat from *-*. Pattern: See diagram M.2. The diagram shows the pattern from the right side. English Translations for the wording in the diagrams are given at the bottom of this pattern, and they are given in the vertical order in which they appear in the diagram. Cast on 90-98-102-106-110 sts (incl 1 edge st each side) on needle size 2.5 mm with electric blue and knit 2 cm Rib with 1 edge st each side in garter st. Change to needle size 3 mm and knit M.2. After M.2 finish the hat in blue. Cast off when piece measures 16-17-18-19-20 cm. Sew seam mid back. Sew tog at the top and make 3 pompons with a diameter of approx 5 cm in electric blue and turquoise and attach to each corner. SOCKS: To fit foot length: 10-11-12-14-15 cm Knitting tension: 28 sts x 38 rows on needle size 2 mm in stocking sts = 10 x 10 cm. Garter sts (back and forth on needle): Knit all rows. Rib: *K1/P1*, repeat from *-*. Cast on 44-46-48-50-52 sts on double pointed needles size 2 mm and knit 5-5-6-7-7 cm Rib. Continue in stocking sts and knit heel as follows: 3-3.5-4-4-4.5 cm in stocking sts back and forth over 22 sts mid back. Now dec for heel as follows: 1st row (RS): Knit 12 sts, K2 tog into back of st, K1, turn. 2nd row: slip 1 st as if to P, P4, P2 tog, P1, turn. 3rd row: slip 1 st as if to K, K5, K2 tog into back of st, K1, turn. 4th row: slip 1 st as if to P, P6, P2 tog, P1, turn. 5th row: slip 1 st as if to K, K7, K2 tog into back of st, K1, turn. 6th row: slip 1 st as if to P, P8, P2 tog, P1, turn. 7th row: slip 1 st as if to K, K8, K2 tog, P1, turn. 8th row: slip 1 st as if to P, P10, P2 tog, P1, turn. 9th row: K2 tog, K10, K2 tog into back of st = 12 sts on needle (= total 34-36-38-40-42 sts). Now pick up 8 sts on each side of the heel = 50-52-54-56-58 sts and dec 1 st on each side of the upper 20-22-24-26-28 sts on every other row a total of 7 times = 36-38-40-42-44 sts. When foot measures 8-9-11-12-13 cm (from the start of the heel dec) insert a marking thread each side and dec 1 st on each side of both threads on every round (4 dec per round) a total of 8-8-8-9-9 times. Cut the thread and pull through remaining sts. Sew tight. |
||||||||||
Diagram explanations |
||||||||||
|
||||||||||
 |
||||||||||
 |
||||||||||
 |
||||||||||
Have you finished this pattern?Tag your pictures with #dropspattern #jaydensweater or submit them to the #dropsfan gallery. Do you need help with this pattern?You'll find 29 tutorial videos, a Comments/Questions area and more by visiting the pattern on garnstudio.com. © 1982-2026 DROPS Design A/S. We reserve all rights. This document, including all its sub-sections, has copyrights. Read more about what you can do with our patterns at the bottom of each pattern on our site. |
||||||||||


With over 40 years in knitting and crochet design, DROPS Design offers one of the most extensive collections of free patterns on the internet - translated to 17 languages. As of today we count 324 catalogues and 12290 patterns translated into English (UK/cm). 12290
We work hard to bring you the best knitting and crochet have to offer, inspiration and advice as well as great quality yarns at incredible prices! Would you like to use our patterns for other than personal use? You can read what you are allowed to do in the Copyright text at the bottom of all our patterns. Happy crafting!
Post a comment to pattern DROPS Baby 10-12
We would love to hear what you have to say about this pattern!
If you want to leave a question, please make sure you select the correct category in the form below, to speed up the answering process. Required fields are marked *.