
Popular categories
Looking for a yarn?


Comments / Questions (6)
![]() Hélène wrote:
Hélène wrote:
Bonjour, je suis en train de relever les 8 mailles sous la Manche selon le tuto. J’ai mis un marqueur après 4 mailles. Mais mon fil n’est pas après le fil marqueur mais après mes 8 mailles relevées soit 4 mailles après le marqueur. Comment faire pour commencer à tricoter en rond en jersey après le marqueur avec mon fil qui se trouve 4 mailles plus loin? Je ne vois pas comment faire. Le tuto contrarié l’explication du pull.
08.02.2026 - 21:49DROPS Design answered:
Bonjour Hélène, placez bien votre marqueur au milieu des 4 mailles relevées, les tours commencent ici, tricotez simplement jusqu'aux 4 premières mailles, placez votre marqueur et continuez en rond à partir de là. Bon tricot!
09.02.2026 - 09:06
![]() Hélène wrote:
Hélène wrote:
Bonjour, Je suis en train de faire le devant gauche. J’ai bien 49 mailles (augmentation toutes les 2 mailles environ sauf 3x entre une m end et une m env pour répartir les 13 augm) \\r\\nMais comment dois-je faire le retour? (Envers) pour garder les cotes 2-2? Je démarre après mes 6 mailles de bordure par une maille envers, mais ensuite ? Comment tricoter l’augmentation et la maille suivante pour faire apparaître les cotes ?
01.02.2026 - 11:37DROPS Design answered:
Bonjour Hélène, les côtes se tricotent avec 1 maille endroit/1 maille envers; sur l'envers, tricotez les mailles endroit à l'endroit et les mailles envers à l'envers, vu sur l'endroit vous aurez 2 m I-cord, 2 m point mousse, côtes (1m end, 1 m env), répétez de (à) jusqu'à ce qu'il reste 7 m, terminez par 1 m end (ainsi les côtes commencent et se terminent par 1 m end, vu sur l'end) et les 6 m de bordure devant comme avant. Bon tricot!
02.02.2026 - 08:54
![]() Hélène wrote:
Hélène wrote:
Bonjour, je suis en train de de diviser le cardigan entre le dos les manches et le devant. Je dois monter 8 mailles coté, au milieu sous la manche. Dois-monter les mailles sur le fil entre attente ? Je ne vois pas comment faire . Merci pour votre aide.
26.01.2026 - 22:08DROPS Design answered:
Bonjour Hélène, découvrez ici, en photos à partir de la photo 10, comment on divise l'ouvrage; ou bien là, en vidéo à partir du time code 07:00 comment on va mettre les mailles des manches en attente et comment monter les nouvelles mailles sur la manche (7:45 environ). Bon tricot!
27.01.2026 - 09:08
![]() Charlotte wrote:
Charlotte wrote:
Bonjour, ma question est très basique. Faut-il bloquer l'échantillon avant de le mesurer ? car j'arrive a une longueur de 8cn au lieu de 10 avec des aiguilles de 8 avant blocage. Merci d'avance ! Charlotte
21.01.2026 - 12:38DROPS Design answered:
Bonjour Charlotte, certaines sont adeptes du blocage, d'autres non, si vous pensez que bloquer votre échantillon peut vous aider à obtenir les bonnes mesure, vous pouvez alors essayer, sinon, essayez des aiguilles plus grosse mais tâchez de bien conserver la bonne largeur. Bon tricot!
23.01.2026 - 09:04
![]() Yvonne Sand wrote:
Yvonne Sand wrote:
Hej, Hur stickar man A1 mönstret. Litet oklart i förklaringen! Finns det någon video på detta? Verkar litet klurigt! Mvh Yvonne Sand
08.11.2024 - 12:32DROPS Design answered:
Hej Yvonne. Vi har dessvärre ingen video på detta än, men i denna video är det samma princip, bara att man i mönster 255-29 stickar 2 maskor räta tillsammans istället för bara 1 rätmaska som i videon. Mvh DROPS Design
08.11.2024 - 13:41
![]() Yvonne Sand wrote:
Yvonne Sand wrote:
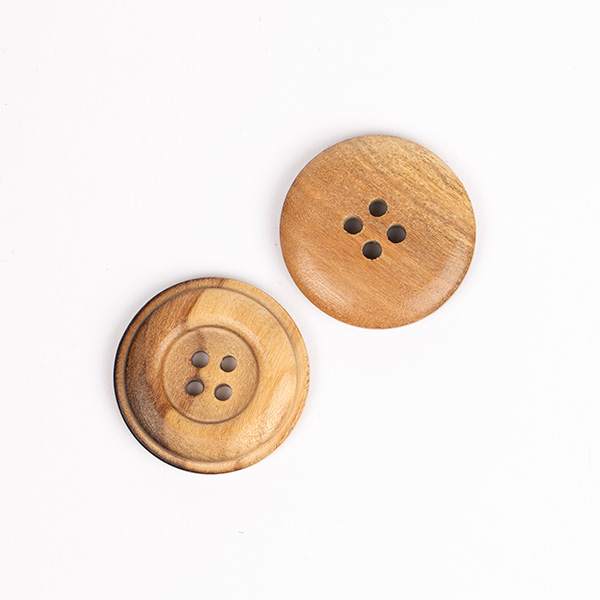
Hej! Hur många mm är knapparna?
03.11.2024 - 12:38DROPS Design answered:
Hei Yvonne. De er 25 mm. Du kan også lese mer om knappene ved å klikke på: Garn & Stickor - Knappar - Olivträ no. 512. mvh DROPS Design
04.11.2024 - 11:20
|
||||||||||
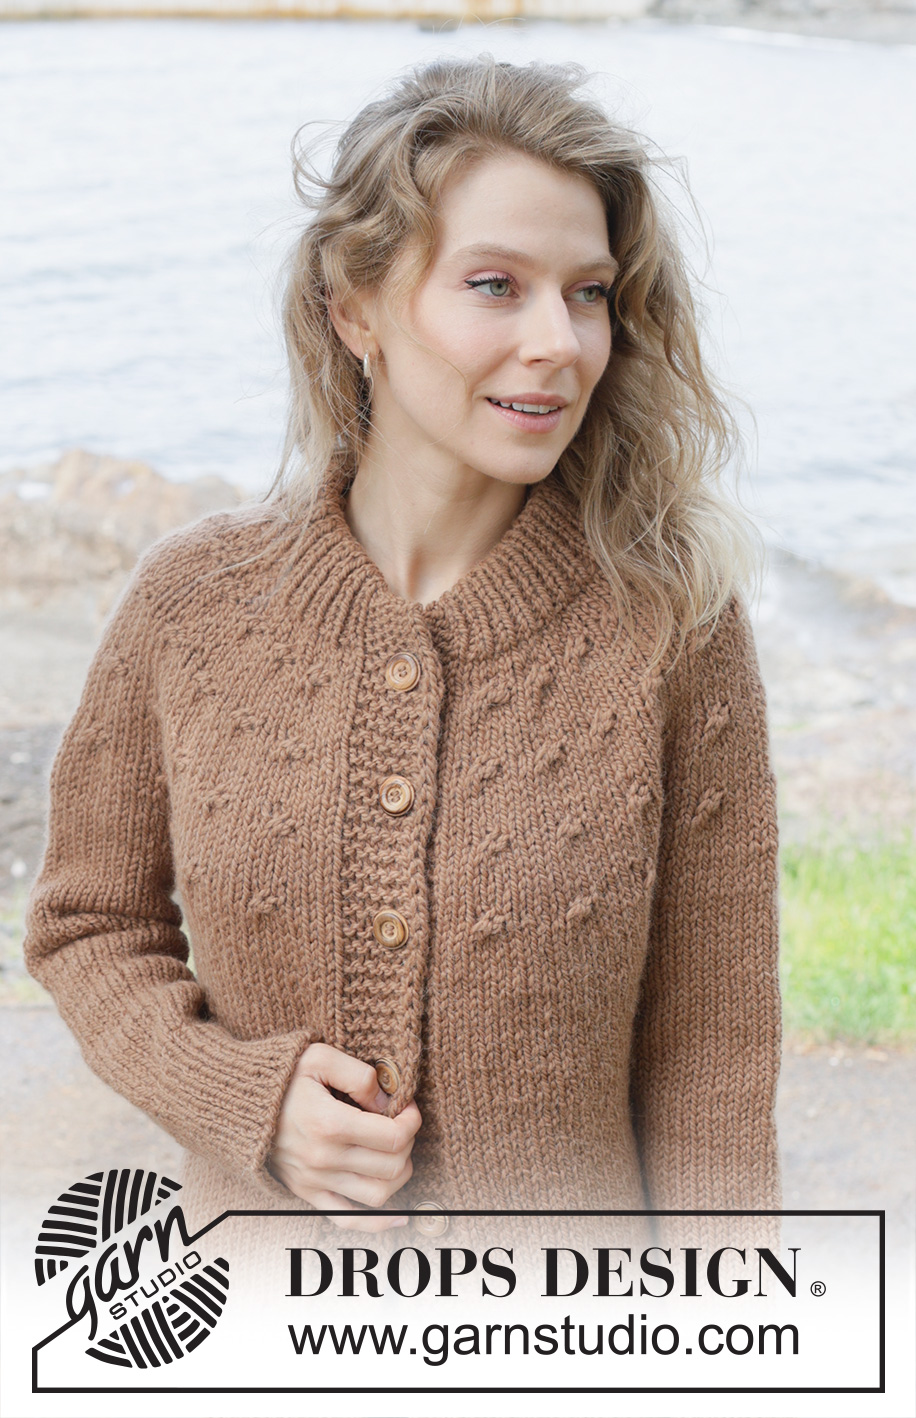
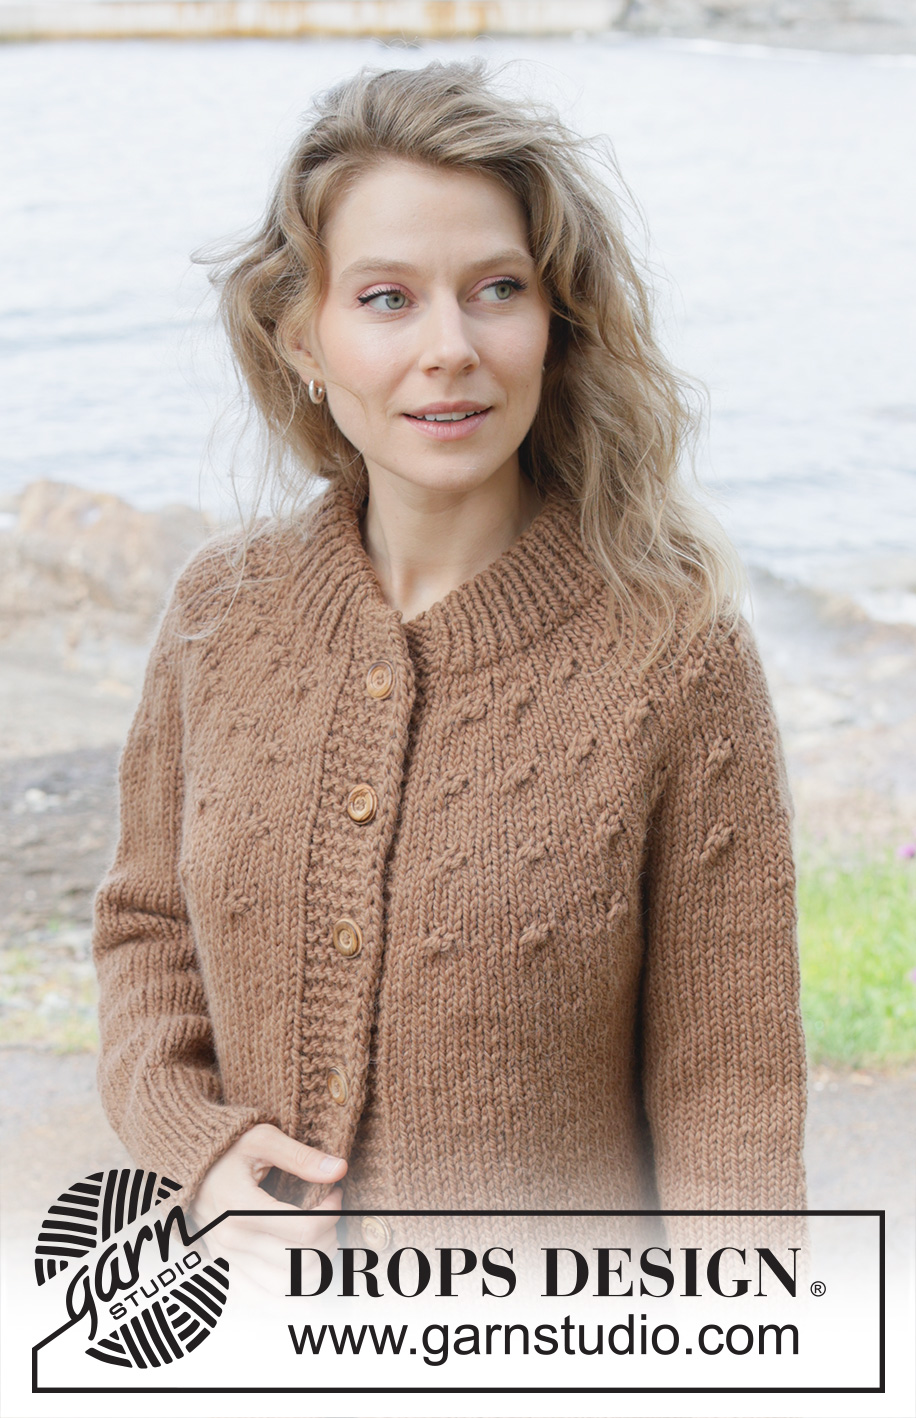
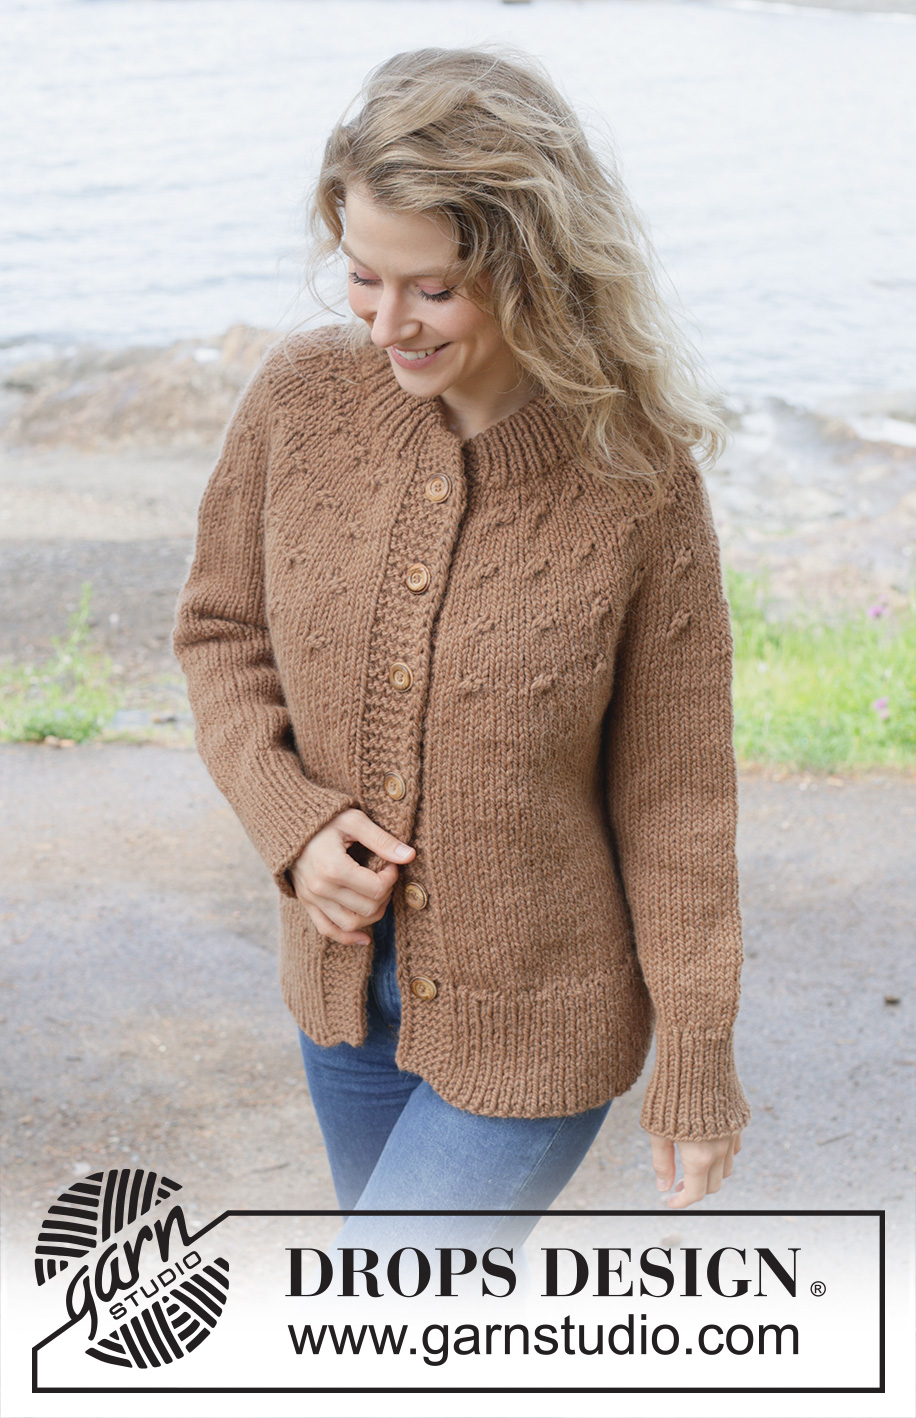
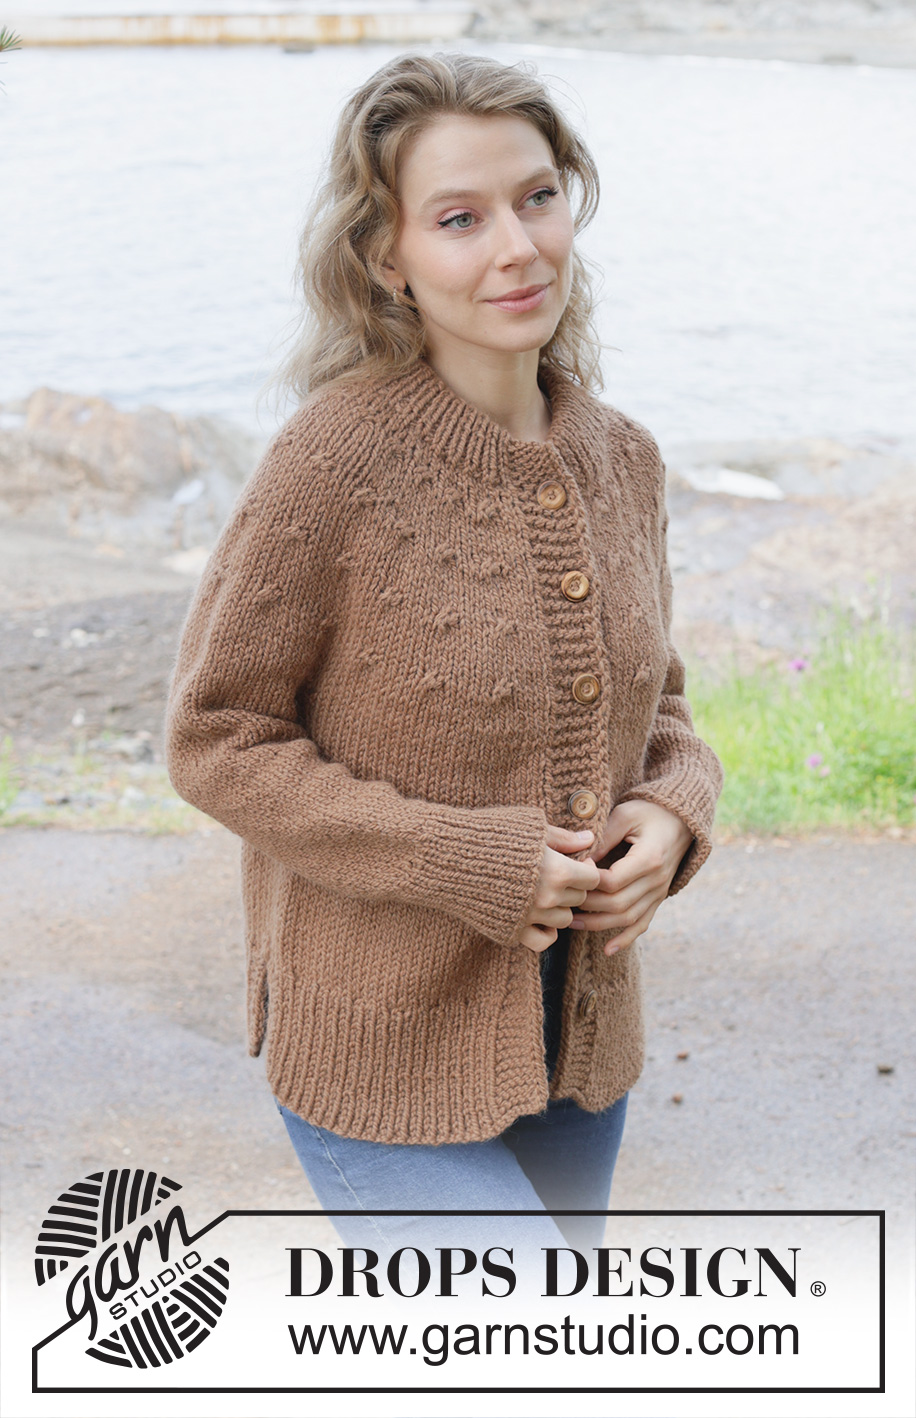
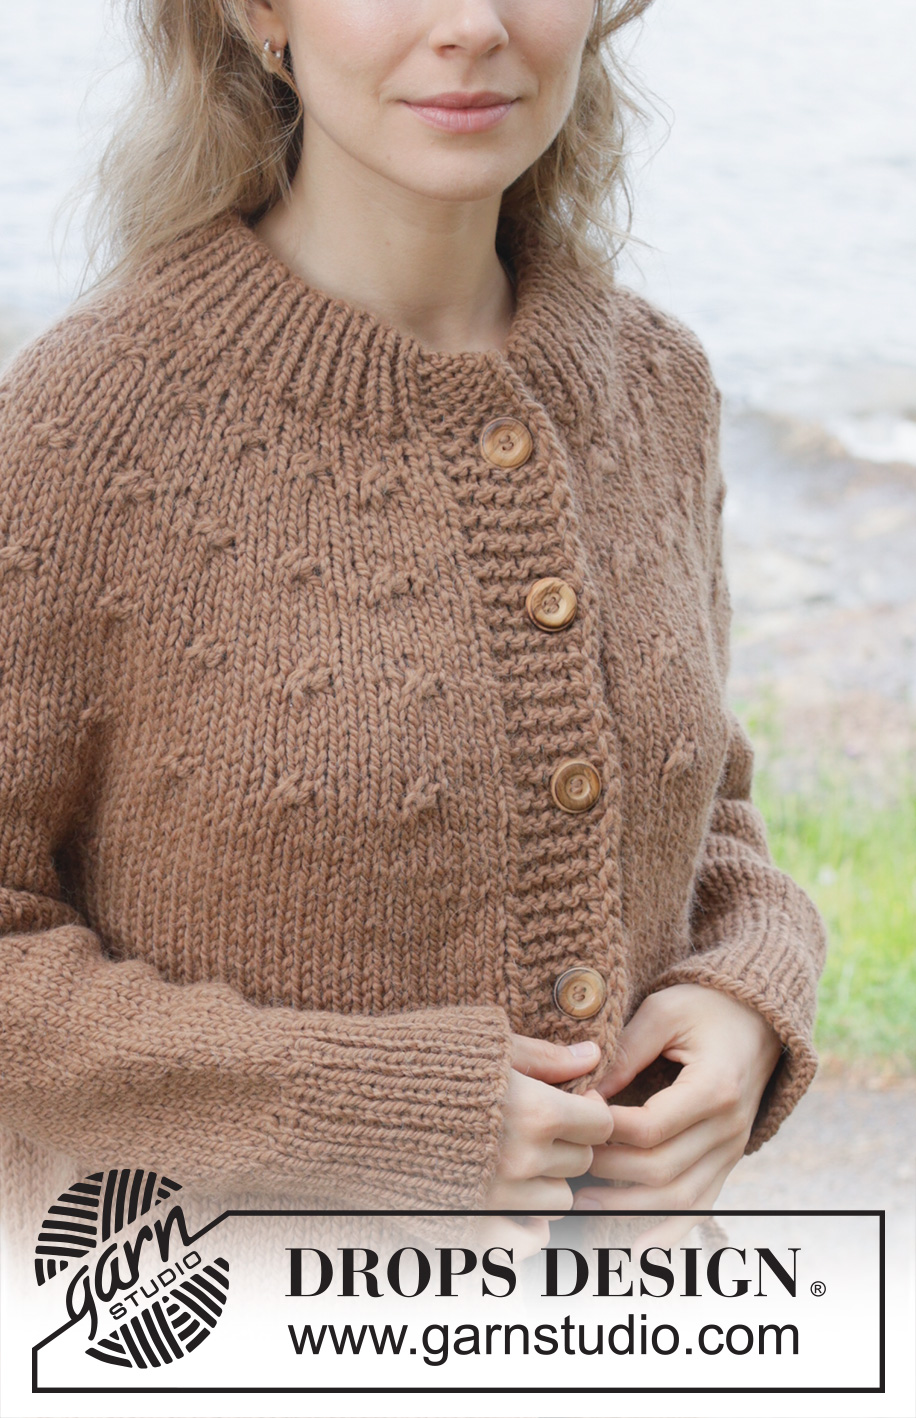
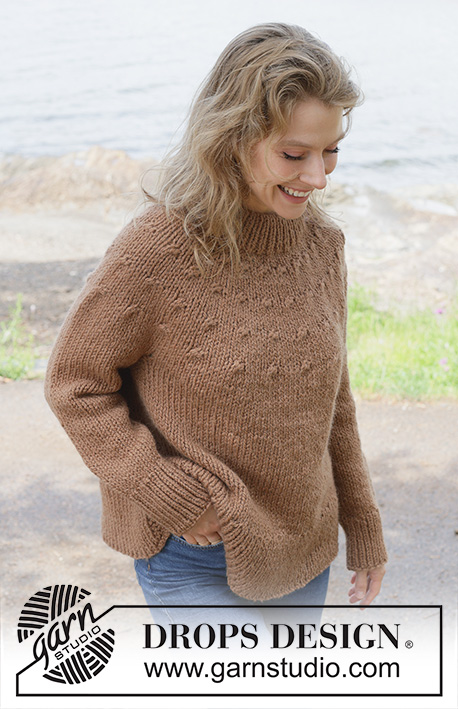
Chestnut Season Cardigan#chestnutseasoncardigan |
||||||||||
 |
 |
|||||||||
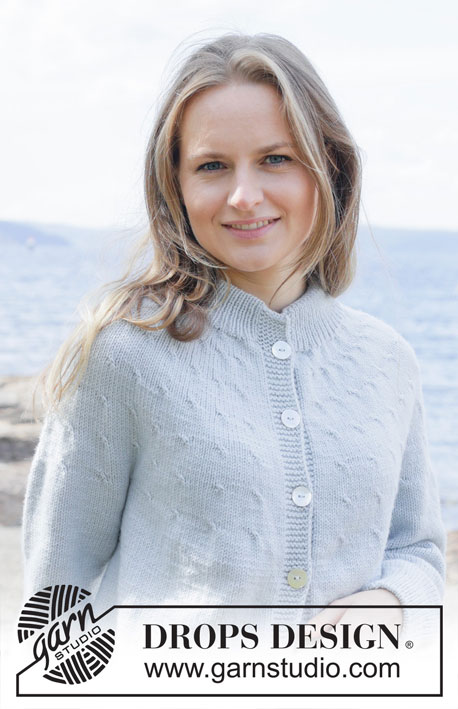
Knitted jacket in DROPS Andes or DROPS Snow. The piece is worked top down with stocking stitch, round yoke, double neck, I-cord and split in sides. Sizes S - XXXL.
DROPS 255-29 |
||||||||||
|
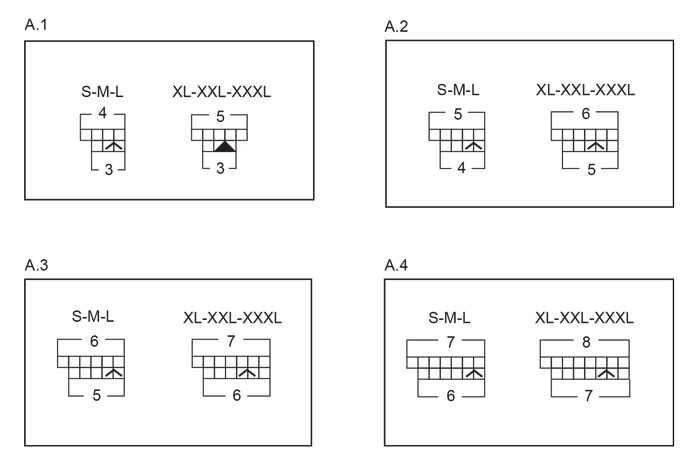
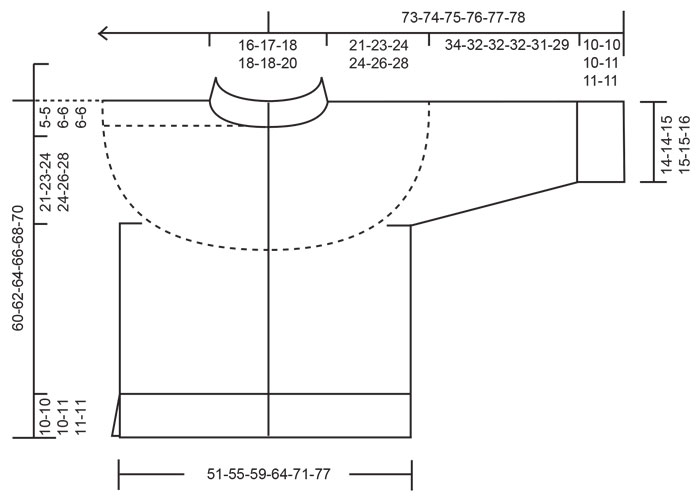
------------------------------------------------------- EXPLANATIONS FOR THE PATTERN: ------------------------------------------------------- GARTER STITCH (worked back and forth): Knit all rows, from both the right and wrong side. 1 ridge in height = knit 2 rows. I-CORD: FIRST 2 STITCHES: Worked on every row: Slip 1 stitch purl-wise with strand in front, knit 1. LAST 2 STITCHES: Worked on every row: Work until there are 2 stitches left on the row, slip 1 stitch purl-wise with strand in front, knit 1. BANDS WITH I-CORD BEGINNING OF ROW: Slip 1 stitch purl-wise with strand in front, knit 1, work 4-4-4-5-5-5 garter stitches. END OF ROW: Work until there are 6-6-6-7-7-7 stitches left on the row, work 4-4-4-5-5-5 garter stitches, slip 1 stitch purl-wise with strand in front, knit 1. Work in the same way from both the right and wrong side. PATTERN: See diagrams A.1 to A.4. The diagrams show all rows in the pattern seen from the right side. Choose diagram for your size. INCREASE TIP-1 (evenly spaced): To work out how to increase evenly, count the total number of stitches on the needle (e.g., 87 stitches) minus bands (e.g., 14 stitches) and divide the remaining stitches by the number of increases to be made (e.g., 8) = 9.1. In this example, increase by making 1 yarn over after approx. each 9th stitch. Do not increase across the bands. On the next row work the yarn overs twisted to avoid holes. DECREASE TIP (for mid-under sleeves): The decreases should be alternately on the right side and on the left side of marker-thread, so decrease alternately before and after the marker-thread on each increase-round as follows: BEFORE MARKER-THREAD: Work until there are 3 stitches left before the marker-thread, knit 2 together, knit 1 (= 1 stitch decreased). AFTER MARKER-THREAD: Knit 1, slip 1 stitch knit-wise, knit 1, pass the slipped stitch over the knitted stitch (= 1 stitch decreased). BUTTONHOLES: Work the buttonholes on the right front band (when garment is worn) from the right side, when there are 5 stitches left on the row. ROW 1 (right side): Make 1 yarn over, knit 2 together, knit 1, slip 1 purl-wise with strand in front, knit 1. ROW 2 (wrong side): Work the band as before, knit the yarn over to leave a hole. The first buttonhole is worked on the first row from the right side after the neck is finished. Then work the other 5-5-5-6-6-6 buttonholes with 8½-9 9½-8-8½-9 cm between each one. The bottom buttonhole is worked in the transition between the stocking stitch and rib. ------------------------------------------------------- START THE PIECE HERE: ------------------------------------------------------- JACKET – SHORT OVERVIEW OF THE PIECE. The pattern uses both long and short needles; start with the length which fits the number of stitches and change when necessary. The neck and yoke are worked back and forth with circular needle, from mid front and top down. When the yoke is finished, it is divided for body and sleeves and the body continued back and forth with circular needle, while the sleeves wait. The body is divided for the split in each side and the front and back pieces finished separately, back and forth. The sleeves are worked in the round, top down. The neck is folded double to the inside and sewn down. If there is a «0» in your chosen size, skip the information and go straight to the next instruction. NECK: Cast on 65-67-73-73-75-79 stitches with circular needle size 8 mm and DROPS Andes or DROPS Snow. Change to circular needle size 6 mm (casting on with a larger needle size makes the cast-on edge elastic). Purl 1 row from the wrong side. Work next row as follows from the right side: Work 1 GARTER STITCH – see description above, work rib (knit 1, purl 1), until there are 2 stitches left, knit 1 and 1 garter stitch. Continue this rib back and forth for 6-6-6-7-7-7 cm (approx. height of neck when folded double). At the end of the next 2 rows, cast on 5-5-5-6-6-6 band-stitches = 75-77-83-85-87-91 stitches. Continue the rib with 6-6-6-7-7-7 band-stitches on each side, worked according to BANDS WITH I-CORD – see description above. Work until the neck measures 13-13-13-15-15-15 cm, finishing after a row from the wrong side. Insert 1 marker inside one band, mid-front; the piece is now measured from here. YOKE: Change to circular needle size 8 mm and work the first row as follows from the right side: Work the band as before, 63-65-71-71-73-77 stocking stitches, AT THE SAME TIME increasing 3-4-4-4-8-10 stitches evenly over these stitches – read INCREASE TIP, work the band as before = 78-81-87-89-95-101 stitches. Continue with stocking stitch and the bands on each side. Remember to maintain the knitting tension. When the yoke measures 3-3-4-4-4-4 cm from the marker, increase stitches while working PATTERN as follows – see description above: A.1: Work the band as before, work 2 stocking stitches, then the first row in A.1 a total of 21-22-24-24-26-28 times round the yoke, 1 stocking stitch and band as before = 99-103-111-137-147-157 stitches. Continue with stocking stitch and bands until the yoke measures 8½-8½-9½-9½-9½-9½ cm from the marker and the next row is from the right side. A.2: Work the band as before, 2 stocking stitches, work the first row in A.2 a total of 21-22-24-24-26-28 times round the yoke, work 1 stocking stitch and band as before = 120-125-135-161-173-185 stitches. Continue with stocking stitch and bands until the yoke measures 14-14-15-15-16-16 cm from the marker and the next row is from the right side. A.3: Work the band as before, 3 stocking stitches, work the first row in A.3 a total of 21-22-24-24-26-28 times round the yoke, work the band as before = 141-147-159-185-199-213 stitches. Continue with stocking stitch and bands until the yoke measures 19½-19½-20½-20½-22½-22½ cm from the marker and the next row is from the right side. A.4: Work the band as before, 3 stocking stitches, work the first row in A.4 a total of 21-22-24-24-26-28 times round the yoke, work the band as before = 162-169-183-209-225-241 stitches. Continue with stocking stitch and bands until the yoke measures 21-23-24-24-26-28 cm from the marker – AT THE SAME TIME, on the first row, increase 3-8-2-2-0-0 stitches evenly spaced (do not increase across the bands) = 165-177-185-211-225-241 stitches. Now divide for the body and sleeves. DIVIDE FOR BODY AND SLEEVES: AT THE SAME TIME as working the next row, divide yoke as follows: Work 30-32-33-37-40-43 stitches as before (= front piece), place the next 28-30-32-38-39-41 stitches on a thread for the sleeve, cast on 8-8-10-10-12-12 stitches (in side mid-under sleeve), work 49-53-55-61-67-73 stitches in stocking stitch (= back piece), place the next 28-30-32-38-39-41 stitches on a thread for the sleeve, cast on 8-8-10-10-12-12 stitches (in side mid-under sleeve), work the last 30-32-33-37-40-43 stitches as before (= front piece). The body and sleeves are finished separately. BODY: = 125-133-141-155-171-183 stitches. Insert 1 marker-thread in each side, in the middle of the 8-8-10-10-12-12 cast-on stitches under each sleeve. Allow the threads to follow your work onwards – they are used when working the split in each side. Continue with stocking stitch and the bands back and forth until the piece measures 44-46-47-48-50-52 cm from the marker mid-front. Work the next row as follows from the right side: Work until there is 1 stitch left before the first marker-thread, place 1 stitch on a cable needle behind the piece, knit 1, place the marker-thread back on the needle, knit 1 from cable needle, work until there is 1 stitch left before the second marker-thread, place 1 stitch on a cable needle behind the piece, knit 1, place the marker-thread back on the needle, knit 1 from cable needle, work to end of row. Purl back from the wrong side with the bands worked as before. The piece measures approx. 45-47-48-49-51-53 cm from the marker mid-front. Now divide at each marker-thread and place the back piece and right front piece stitches on stitch holders. Work the left front piece. LEFT FRONT PIECE: = 34-36-38-42-46-49 stitches. On the next row (right side), begin the rib AT THE SAME TIME increase 11-13-15-14-16-19 stitches evenly on this row (do not increase across the bands) = 45-49-53-56-62-68 stitches, working as follows: Change to needle size 6 mm, work the band as before, work rib (knit 1, purl 1 – remember to increase) until there are 5 stitches left, knit 1, work 2 garter stitches and 2 stitches in I-CORD – read description above. When the rib measures 10-10-10-11-11-11 cm, cast off. The jacket measures approx. 55-57-58-60-62-64 cm from the marker mid-front and 60-62-64-66-68-70 cm from top of shoulder. RIGHT FRONT PIECE: = 34-36-38-42-46-49 stitches. On the next row (right side), begin the rib AT THE SAME TIME increase 11-13-15-14-16-19 stitches evenly on this row = 45-49-53-56-62-68 stitches, working as follows: Change to needle size 6 mm, work 2 stitches in I-cord, 2 garter stitches, work rib (knit 1, purl 1 – remember to increase) until there are 7-7-7-8-8-8 stitches left, knit 1 and work the band as before When the rib measures 10-10-10-11-11-11 cm, cast off. BACK PIECE: = 57-61-65-71-79-85 stitches. On the next row (right side), begin the rib AT THE SAME TIME increase 22-24-28-28-32-36 stitches evenly on this row = 79-85-93-99-111-121 stitches, working as follows: Change to needle size 6 mm, work 2 stitches in I-cord, 2 garter stitches, work rib (knit 1, purl 1 – remember to increase) until there are 5 stitches left, knit 1, 2 garter stitches and work 2 stitches in I-cord. When the rib measures 10-10-10-11-11-11 cm, cast off SLEEVES: Place the 28-30-32-38-39-41 sleeve-stitches from the thread on one side of the piece on circular needle size 8 mm and knit up 1 stitch in each of the 8-10-10-12-12 stitches cast on under the sleeve = 36-38-42-48-51-53 stitches. Insert a marker-thread in the middle of the 8-10-10-12-12 stitches under the sleeve. Start at the marker-thread and work stocking stitch in the round. When the sleeve measures 4-4-3-3-2-2 cm, decrease under the sleeve – read DECREASE TIP. Decrease 1 stitch alternately before and after the marker-thread, every 5-3½-3-1½-1½-1½ cm a total of 6-8-10-16-18-18 times = 30-30-32-32-33-35 stitches. Continue working until the sleeve measures 34-32-32-32-31-29 cm from the division. Change to double pointed needles size 6 mm. Work rib (knit 1, purl 1), AT THE SAME TIME increase 8-8-10-10-11-9 stitches evenly on the first round = 38-38-42-42-44-44 stitches. When the rib measures 10-10-10-11-11-11 cm, cast off. The sleeve measures approx. 44-42-42-43-42-40 cm from the division. ASSEMBLY: Fold the neck double to the inside and sew down. To avoid the neck being tight and rolling outwards, it is important that the seam is elastic. Sew together the openings on the collar mid-front with small stitches. Sew the buttons onto the left band. |
||||||||||
Diagram explanations |
||||||||||
|
||||||||||
 |
||||||||||
 |
||||||||||
Have you finished this pattern?Tag your pictures with #dropspattern #chestnutseasoncardigan or submit them to the #dropsfan gallery. Do you need help with this pattern?You'll find 34 tutorial videos, a Comments/Questions area and more by visiting the pattern on garnstudio.com. © 1982-2026 DROPS Design A/S. We reserve all rights. This document, including all its sub-sections, has copyrights. Read more about what you can do with our patterns at the bottom of each pattern on our site. |
||||||||||


With over 40 years in knitting and crochet design, DROPS Design offers one of the most extensive collections of free patterns on the internet - translated to 17 languages. As of today we count 324 catalogues and 12290 patterns translated into English (UK/cm). 12290
We work hard to bring you the best knitting and crochet have to offer, inspiration and advice as well as great quality yarns at incredible prices! Would you like to use our patterns for other than personal use? You can read what you are allowed to do in the Copyright text at the bottom of all our patterns. Happy crafting!
Post a comment to pattern DROPS 255-29
We would love to hear what you have to say about this pattern!
If you want to leave a question, please make sure you select the correct category in the form below, to speed up the answering process. Required fields are marked *.