
Popular categories
Looking for a yarn?


Comments / Questions (10)
![]() Ingrid Lindkvist wrote:
Ingrid Lindkvist wrote:
Hej! Jag undrar om man kan byta garnet Karisma mot Merino extra fine i detta mönster? Verkar ju vara samma stickfasthet på båda garnera.
05.01.2025 - 11:20DROPS Design answered:
Hei Ingrid. Ja, det kan du. Bare husk å få den oppgitte strikkefastheten. mvh DROPS Design
07.01.2025 - 15:20
![]() Doris Lietz wrote:
Doris Lietz wrote:
In der Anleitung steht, dass die Rückreihen im Diagramm mit eingezeichnet sind. Bei Muster A3 a,b,c müssten die RR aber kraus sein lt Modellfoto. Wie stellt sich das bei A4-A6 da? Oder habe ich das überlesen? Bei welchen werden die RR gestrickt, wie sie erscheinen? LG Doris
29.09.2024 - 10:59DROPS Design answered:
Liebe Doris, die weisse Kästchen werden bein den Rückreihen links gestrickt (siehe 1. Symbol), so werden die Rückreihen in A.3A,B und C sowie bei A.4A und B links gestrickt; in A.1 Z.B. stricken Sie die schwarze Kästchen links bei den Hin-Reihen und rechts bei den Rückreihen. Viel Spaß beim Stricken!
30.09.2024 - 09:14
![]() Anna-Lena Olsson wrote:
Anna-Lena Olsson wrote:
Fråga om bakstycke hö. axel. Jag undrar om jag ska sticka A1 plus en rät maska på varje rätt varv, och en rät maska plus A1 på de aviga varven? Även hur jag ska sticka de maskor som läggs upp mot halsen?
11.04.2024 - 15:49DROPS Design answered:
Hei Anna-Lena. Ytterste maske mot ermhull strikkes alltid rett (både fra retten og fra vrangen). De nye maskene som legges opp, strikkes fortløpende inn i A.1. mvh DROPS Design
15.04.2024 - 11:42
![]() Monique wrote:
Monique wrote:
In de eerste naald van A2 meerder je aan het eind van de naald 4 steken, in de laatste twee steken. Hiermee wordt het achterpand asymmetrisch (aan de andere kant meerder je niet). Klopt dit?
19.11.2023 - 15:10DROPS Design answered:
Dag Monique,
Onder de paragraaf waar A.2 boven staat, staat inderdaad dat je 4 steken meerdert, maar deze steken meerder je gelijkmatig verdeeld over de naald, dus niet op het einde.
21.11.2023 - 23:10
![]() Vivian Eersels wrote:
Vivian Eersels wrote:
A.2: Als A.3 klaar is, brei dan als volgt aan de goede kant: 1 ribbelsteek, brei A.2 tot er 2 steken over zijn op de naald en minder 10-12-12-12-12-10 steken verdeeld over deze steken77 Hoe kan ik 12 steken minder op de 2 overblijvende teken?
30.10.2023 - 18:14DROPS Design answered:
Dag Vivian,
Je mindert steken over het stuk waar je A.2 aan het breien bent. (Je herhaalt A.2 steeds in de breedte tot er 2 steken over zijn, dus geen 2 steken maar over de hele naald steeds A.2 herhalen.)
30.10.2023 - 20:26
![]() Vivian Eersels wrote:
Vivian Eersels wrote:
Opzetten met 1 draad karisma en 1 draad kid-silk. (2draden) is dat 1 bol kid-silk of van 2 bollen samen?
18.10.2023 - 21:04DROPS Design answered:
Dag Vivian,
Je neemt van elke kwaliteit 1 draad en je breit dus steeds met 2 draden samen gehouden, 1 draad Kid-Silk en 1 draad Karisma.
19.10.2023 - 20:00
![]() Carole Perry wrote:
Carole Perry wrote:
Please can someone comment on the number of rows for the tension swatch for the stockinette compared to the pattern A1. The first says 20 rows and the second 27 rows- now given they are created using the same yarn and needles I don’t think this is possible to achieve. I believe the first one is wrong- but can someone check. I am an experienced knitter with a consistent tension to my knitting but am finding it impossible to achieve anything like the required tension for the stockinette!
17.10.2023 - 09:28DROPS Design answered:
Dear Mrs Perry, when working A.1 you will automatically need more rows (because of the purl stitches worked from RS ie moss stitch) as when working stocking stitch, reason why you will need 20 rows in stocking stitch but 27 rows in double moss stitch / A.1. Happy knitting!
17.10.2023 - 09:48
![]() Birgitte Kvetny wrote:
Birgitte Kvetny wrote:
Kan den strikkes uden følgetråd
01.10.2023 - 08:42DROPS Design answered:
Hej Birgitte, ja hvis du vil strikke den i én tråd, så skal du vælge en tråd fra Garngruppe C :)
04.10.2023 - 07:25
![]() Helvédina Corrêa Mendonça wrote:
Helvédina Corrêa Mendonça wrote:
Ocean
04.08.2023 - 02:51
![]() Cristina wrote:
Cristina wrote:
Optical
03.08.2023 - 14:28
|
||||||||||||||||||||||||||||
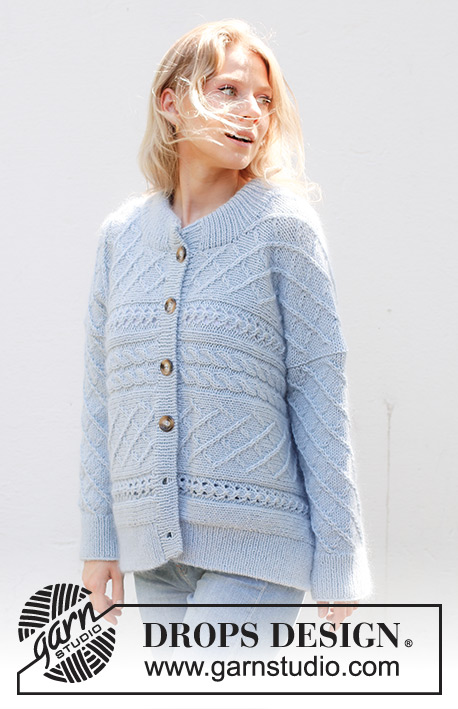
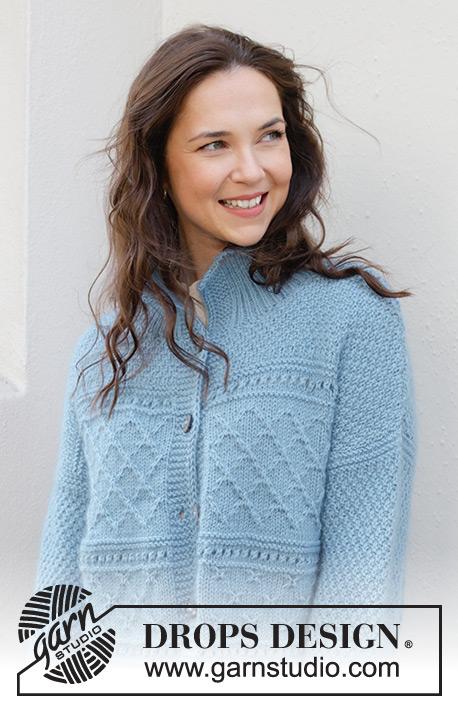
Blue Diamonds Cardigan#bluediamondscardigan |
||||||||||||||||||||||||||||
 |
 |
|||||||||||||||||||||||||||
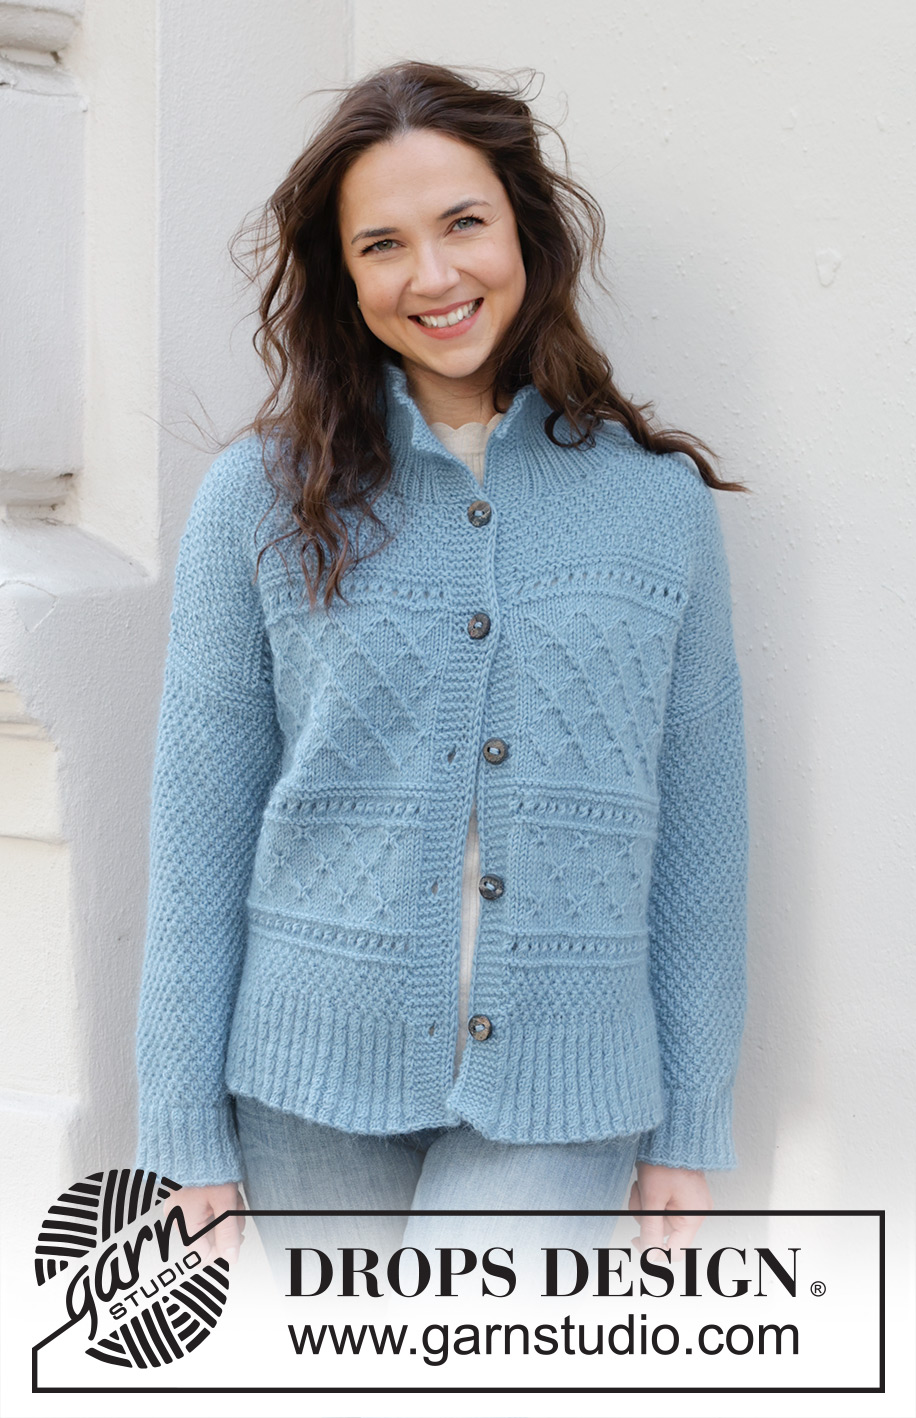
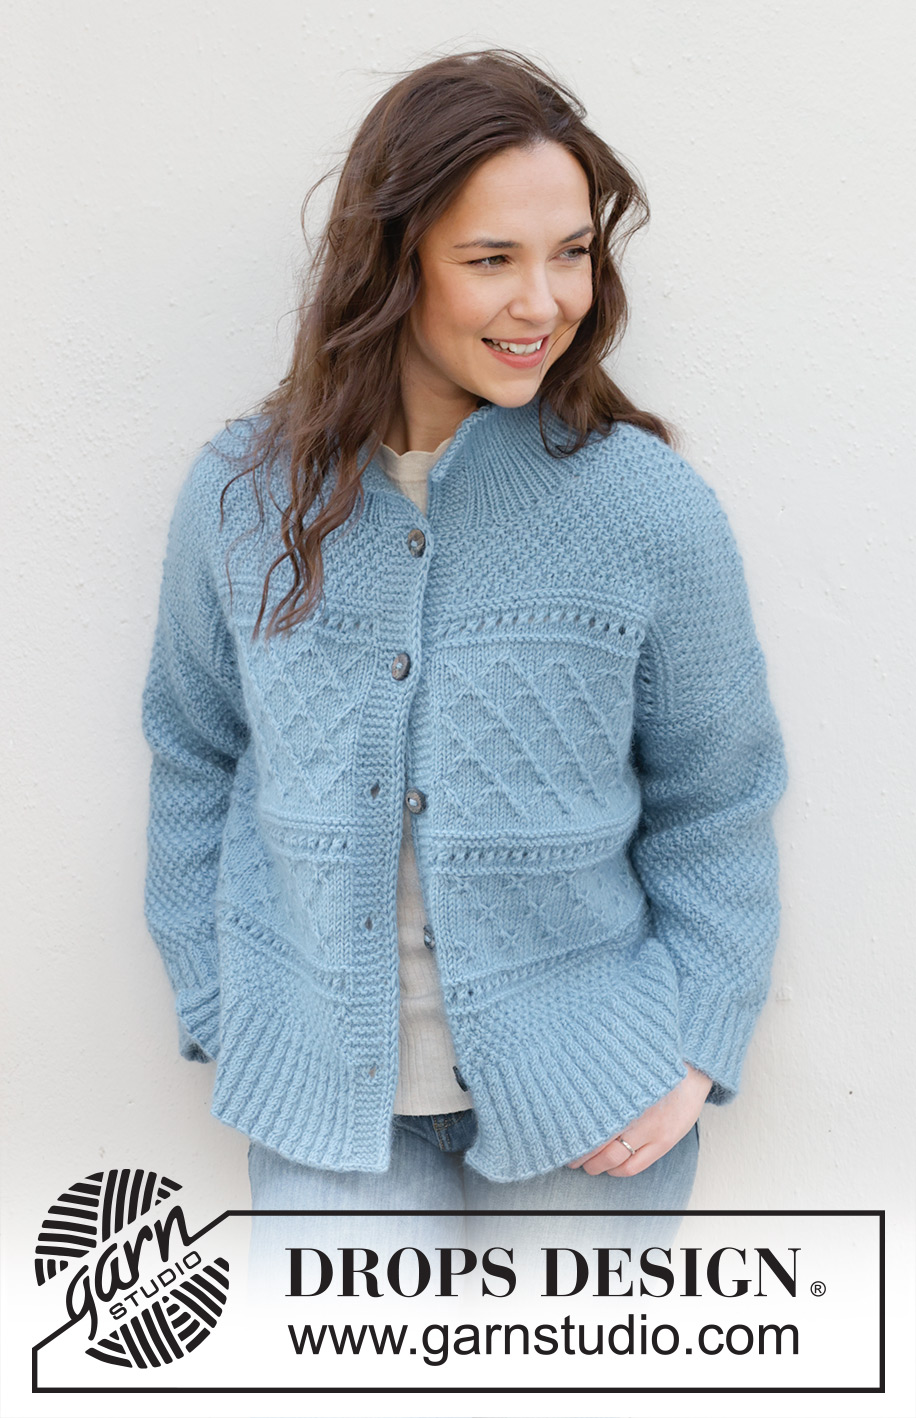
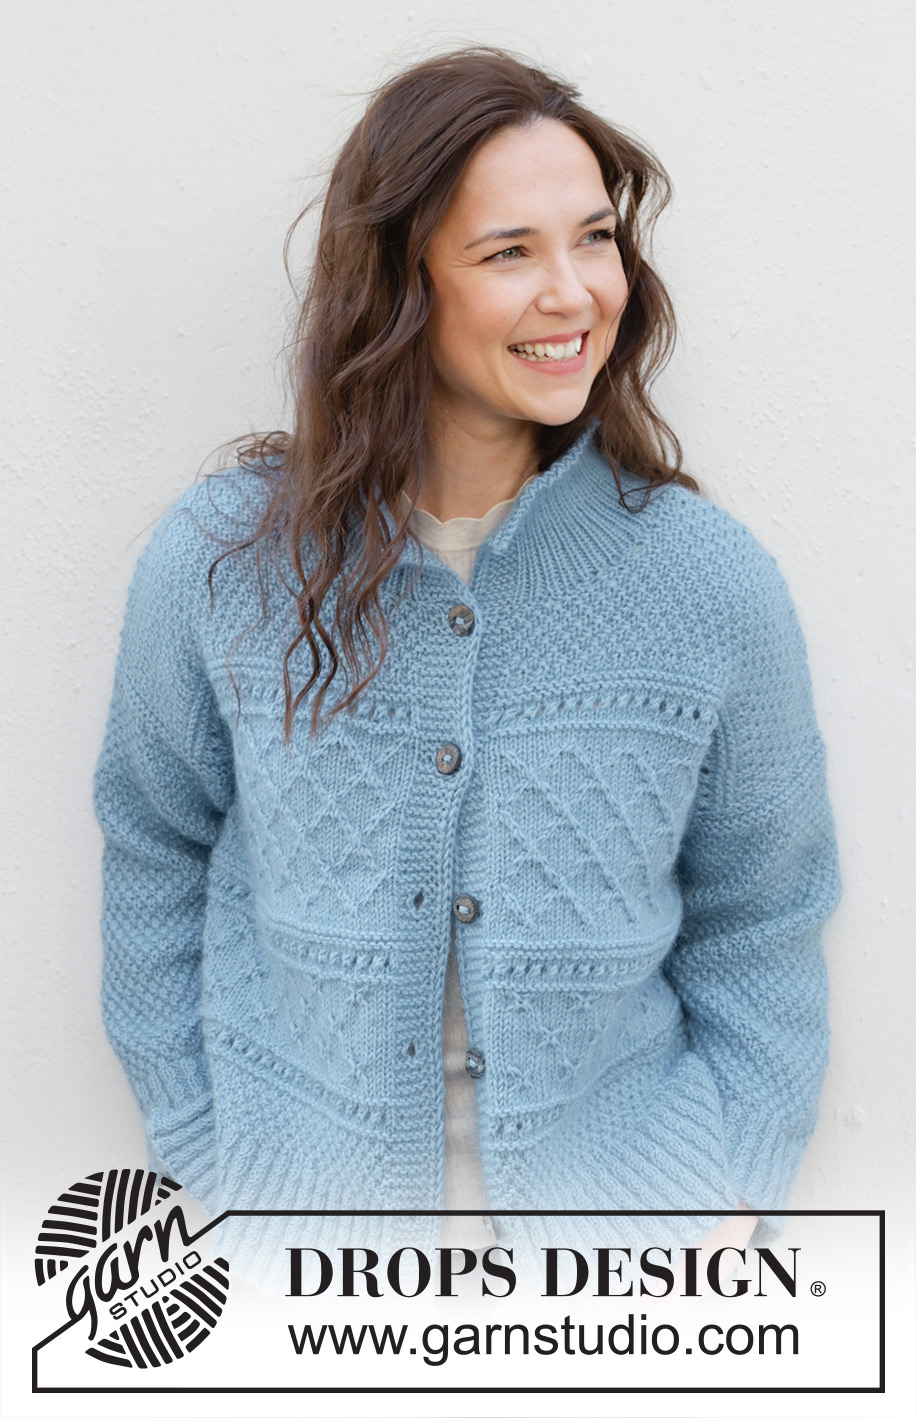
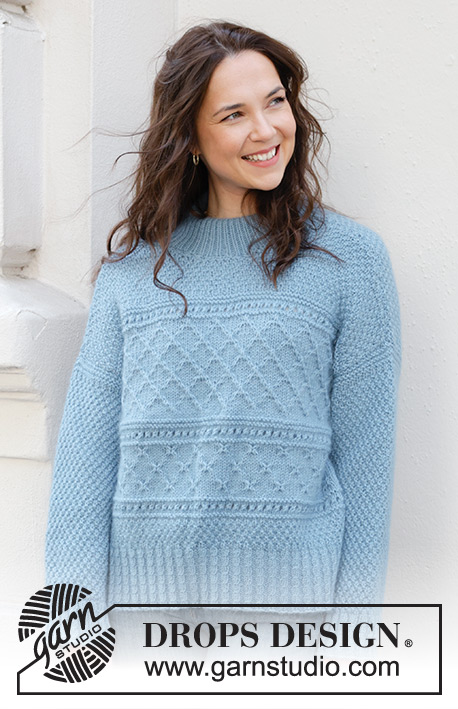
Knitted jacket in DROPS Karisma and DROPS Kid-Silk. The piece is worked top down with diagonal shoulders, relief-pattern, split in sides and high neck. Sizes S - XXXL.
DROPS 245-15 |
||||||||||||||||||||||||||||
|
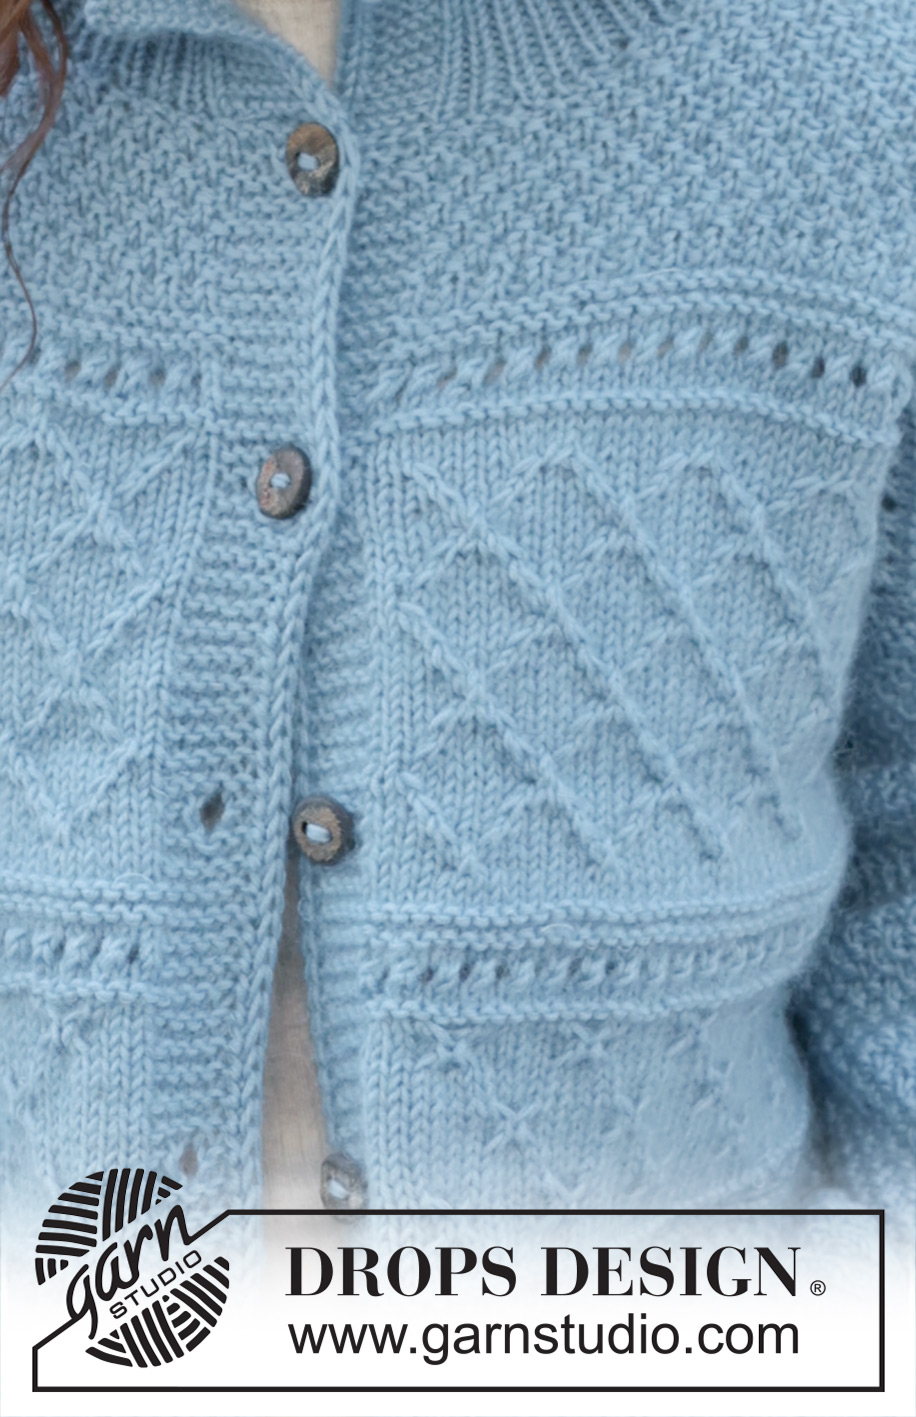
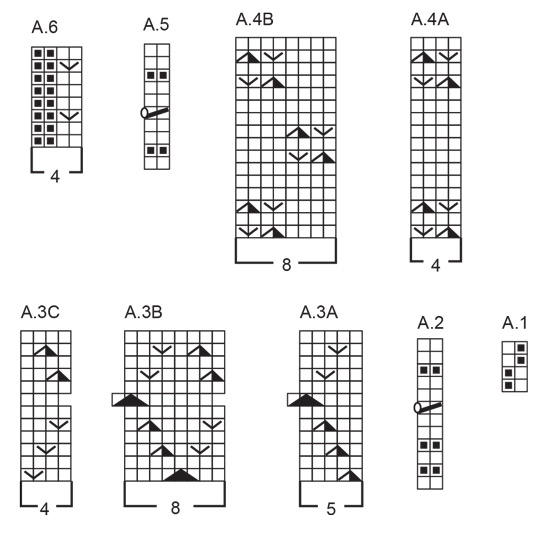
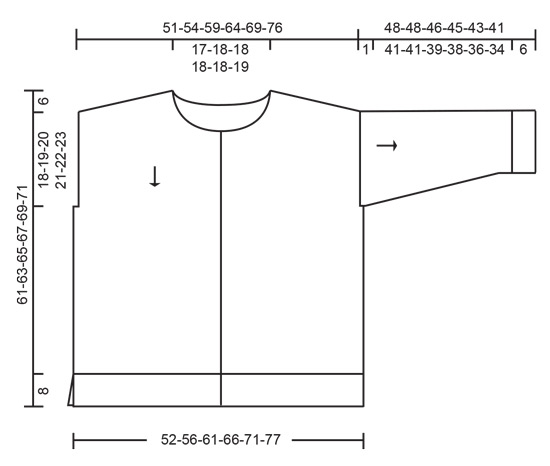
------------------------------------------------------- EXPLANATIONS FOR THE PATTERN: ------------------------------------------------------- GARTER STITCH (worked back and forth): Knit all rows. 1 ridge = knit 2 rows. BANDS: At beginning of row: Slip 1 stitch purl-wise with the strand in front, knit 1, work 5 garter stitches. At end of row: Work until there are 7 stitches left, 5 garter stitches, slip 1 stitch purl-wise with strand in front, knit 1. PATTERN: See diagrams A.1 to A.6. The diagrams show all rows in the pattern from the right side. INCREASE TIP: Increase 1 stitch by making 1 yarn over which is worked twisted on the next row to avoid a hole. DECREASE TIP (for sleeves): Decrease 1 stitch on each side of the marker-thread as follows: Work until there are 3 stitches left before the marker-thread, purl/knit 2 together, depending on the last stitch in A.1, knit 2 (marker-thread sits between these 2 stitches), purl/knit 2 together, depending on the next stitch in A.1). BUTTONHOLES: Work buttonholes on the right band (when the garment is worn). Work from the right side when there are 5 stitches left on the row as follows: Make 1 yarn over, knit 2 together and work the 2 edge stitches as before. On the next row (wrong side), knit the yarn over to leave a hole. The first buttonhole is worked after the last stitches are cast on for the neckline. Then work the other 4-5-6-6-6-6 buttonholes with approx. 11-9-8-8-8½-8½ cm between each one. NOTE: Adjust so the last buttonhole is in the transition between A.1 and the rib at the bottom of the front piece. ------------------------------------------------------- START THE PIECE HERE: ------------------------------------------------------- JACKET – SHORT OVERVIEW OF THE PIECE: The back and front pieces are worked separately back and forth, top down Stitches are cast on for the shoulders and neck before continuing with pattern. The sleeves are worked in the round with short circular needle/ double pointed needles, top down. The piece is sewn together and the neck worked to finish. BACK PIECE: Start with the right shoulder (when the garment is worn). Read the next section before continuing. Cast on 3-5-9-7-5-9 stitches with circular needle size 5 mm, 1 strand DROPS Karisma and 1 strand DROPS Kid-Silk (2 strands). Work A.1 back and forth over all stitches (row 1 = right side) – AT THE SAME TIME cast on stitches at the end of each row from the right side for the diagonal shoulder as follows: Cast on 4-4-4-5-6-6 stitches 6 times (work the new stitches into A.1 but work the outermost stitch by the armhole in GARTER STITCH – read description above). AT THE SAME TIME when the piece measures 2 cm measured from the top of the shoulder, cast on stitches for the neck at the end of each row from the wrong side as follows: 1 stitch 2 times. When all the stitches are cast on there are 29-31-35-39-43-47 stitches, with the last row worked from the wrong side. Cut the strand and work the left shoulder. Left shoulder. Cast on 3-5-9-7-5-9 stitches with circular needle size 5 mm, 1 strand DROPS Karisma and 1 strand DROPS Kid-Silk (2 strands). Work A.1 back and forth over all stitches (row 1 = right side) – AT THE SAME TIME cast on stitches at the end of each row from the wrong side for the diagonal shoulder as follows: Cast on 4-4-4-5-6-6 stitches 6 times (work the new stitches into A.1 but work the outermost stitch by the armhole in garter stitch). AT THE SAME TIME when the piece measures 2 cm measured from the top of the shoulder, cast on stitches for the neck at the end of each row from the right side as follows: 1 stitch 2 times = 29-31-35-39-43-47 stitches. Work back from the wrong side. On the next row (right side) join the pieces as follows: Work 1 garter stitch, continue A.1 over the next 28-30-34-38-42-46 stitches on the left shoulder, cast on 23-25-25-25-25-27 stitches for the neck, continue A.1 over the first 28-30-34-38-42-46 stitches on the right shoulder and 1 garter stitch = 81-87-95-103-111-121 stitches. Continue A.1 back and forth with 1 garter stitch on each side and until the piece measures 12-13-14-14-15-16 cm, from the highest point on the shoulder. Now work pattern as described below. A.2: Work as follows from the right side: 1 garter stitch, work A.2 until there are 2 stitches left on the row and increase 4 stitches evenly over these stitches – read INCREASE TIP, work the first stitch in A.2 (on row 7 in the diagram this stitch is knitted), finish with 1 garter stitch = 85-91-99-107-115-125 stitches. Continue this pattern – AT THE SAME TIME on the next-to-last row in A.2, increase 6-8-8-8-8-6 stitches evenly spaced = 91-99-107-115-123-131 stitches. A.3 (including armhole): When A.2 is finished in height, work as follows from the right side: 1 garter stitch, A.3A, work A.3B 10-11-12-13-14-15 times, A.3C, 1 garter stitch. Continue this pattern – AT THE SAME TIME when the piece measures 18-19-20-21-22-23 cm measured outermost along the armhole (approx. 24-25-26-27-28-29 cm from the top of the shoulder), cast on 2 stitches for the armholes at the end of the next 2 rows = 95-103-111-119-127-135 stitches. Continue A.3, with 2 stocking stitches and 1 garter stitch outermost on each side. Work A.3, 2½-2½-2½-3-3-3 times in height (in sizes S, M and L the pattern finishes after the 8th row in the diagrams and the 3rd repeat in height). The piece measures approx. 33-34-35-37-38-39 cm from the top of the shoulder. A.2: When A.3 is finished, work as follows from the right side: 1 garter stitch, work A.2 until there are 2 stitches left on the row and decrease 10-12-12-12-12-10 stitches evenly over these stitches, work the first stitch in A.2 (on row 7 in the diagram this stitch is knitted), finish with 1 garter stitch = 85-91-99-107-115-125 stitches. Continue this pattern – AT THE SAME TIME on the next-to-last row in A.2, increase 11-13-13-13-13-11 stitches evenly spaced = 96-104-112-120-128-136 stitches. A.4: When A.2 is finished, work as follows from the right side: 1 garter stitch, 1 stocking stitch, A.4A, work A.4B 11-12-13-14-15-16 times, finish with 1 stocking stitch and 1 garter stitch. Continue this pattern until A.4 is finished in height. A.5: Work as follows from the right side: 1 garter stitch, work A.5 until until there are 2 stitches left on the row and decrease 11-13-13-13-13-11 stitches evenly over these stitches, work the first stitch in A.5 (on row 5 in the diagram this stitch is knitted), 1 garter stitch = 85-91-99-107-115-125 stitches. Continue this pattern until A.5 is finished in height. A.1: Work as follows from the right side: 1 garter stitch, work A.1 until there are 2 stitches left, work the first stitch in A.1 so the pattern is symmetrical, 1 garter stitch. Continue this pattern until the piece measures 53-55-57-59-61-63 cm from the top of the shoulder (approx. 3-4-5-4-5-6 cm of A.1). Now work rib with cables. RIB WITH CABLES: Change to circular needle 3.5 mm. Knit from the right side and increase 59-65-73-77-85-91 stitches evenly spaced = 144-156-172-184-200-216 stitches Work as follows from the wrong side: 3 garter stitches, * purl 2, knit 2 *, work from *-* until there are 5 stitches left, purl 2 and 3 garter stitches. Work as follows from the right side: 3 garter stitches, work A.6 until there are 5 stitches left, work the first 2 stitches in A.6 so the pattern is symmetrical and 3 garter stitches. Continue this pattern for 8 cm. Cast off a little loosely. The piece measures approx. 61-63-65-67-69-71 cm, from the top of the shoulder. LEFT FRONT PIECE (when garment is worn): Read the next section before continuing. Cast on 3-5-9-7-5-9 stitches with circular needle size 5 mm and 1 strand of each quality (2 strands). Work A.1 back and forth over all stitches (row 1 = right side) – AT THE SAME TIME cast on stitches at the end of each row from the right side for the diagonal shoulder as follows: Cast on 4-4-4-5-6-6 stitches 6 times (work the new stitches into A.1 but working the outermost stitch by the armhole in garter stitch). AT THE SAME TIME when the piece measures 4-4-4-6-6-6 cm, measured from the top of the shoulder, cast on stitches for the neck at the end of each row from the wrong side as follows: 1 stitch 2 times, 2 stitches 3 times and 12-12-12-12-12-14 stitches 1 time. When all the stitches are cast on there are 47-49-53-57-61-67 stitches and the last row was worked from the wrong side. Continue A.1 back and forth, with 1 garter stitch towards the side and 7 BAND stitches mid-front – read description above, until the piece measures 12-13-14-14-15-16 cm, from the top of the shoulder. Now work pattern. A.2: Work as follows from the right side: 7 band stitches as before, work A.2 until there are 2 stitches left on the row and increase 2 stitches evenly over these stitches, work the first stitch in A.2 (on row 7 in the diagram this stitch is knitted), 1 garter stitch = 49-51-55-59-63-69 stitches. Continue this pattern – AT THE SAME TIME on the next-to-last row in A.2, increase 3-6-4-6-5-4 stitches evenly spaced = 52-57-59-65-68-73 stitches. A.3 (including armhole): When A.2 is finished in height work as follows from the right side: 7 band stitches as before, 3-0-2-0-3-0 stocking stitches, A.3A, work A.3B 4-5-5-6-6-7 times, A.3C, 1 garter stitch. Continue this pattern – AT THE SAME TIME when the piece measures 18-19-20-21-22-23 cm measured outermost along the armhole (approx. 24-25-26-27-28-29 cm from the top of the shoulder), cast on 2 stitches for the armhole at the end of the next row from the right side = 54-59-61-67-70-75 stitches. Continue A.3 with 7 front band stitches towards mid front and 2 stocking stitches and 1 garter stitch outermost on the side. Work A.3 2½-2½-2½-3-3-3 times in height (finishing on the same row as the back piece). The piece measures approx. 33-34-35-37-38-39 cm from the top of the shoulder. A.2: When A.3 is finished work as follows from the right side: 7 band stitches as before, work A.2 until there are 2 stitches left on the row and decrease 5-8-6-8-7-6 stitches evenly over these stitches, work the first stitch in A.2 (on row 7 in the diagram this stitch is knitted), finish with 1 garter stitch = 49-51-55-59-63-69 stitches. Continue this pattern – AT THE SAME TIME on the next-to-last row in A.2, increase 6-6-8-6-8-4 stitches evenly spaced = 55-57-63-65-71-73 stitches. A.4: When A.2 is finished in height, work as follows from the right side: 7 band stitches as before, 2-4-2-4-2-4 stocking stitches, A.4A, work A.4B 5-5-6-6-7-7 times, finish with 1 stocking stitch and 1 garter stitch. Continue this pattern until A.4 is finished in height. A.5: Work as follows from the right side: 7 band stitches as before, work A.5 until there are 2 stitches left on the row and decrease 6-4-6-4-6-4 stitches evenly over these stitches, work the first stitch in A.5 (on row 5 in the diagram this stitch is knitted), 1 garter stitch = 49-53-57-61-65-69 stitches. Continue this pattern until A.5 is finished in height. A.1: Work as follows from the right side: 7 band stitches as before, work A.1 until there are 2 stitches left, work the first stitch in A.1 so the pattern is symmetrical, 1 garter stitch. Continue this pattern until the piece measures 53-55-57-59-61-63 cm – adjust to match the back piece. Now work rib with cables as follows: RIB WITH CABLES: Change to circular needle 3.5 mm. Knit from the right side and increase 31-31-35-39-43-47 stitches evenly spaced (do not increase over the band) = 80-84-92-100-108-116 stitches Work as follows from the wrong side: 3 garter stitches, * purl 2, knit 2 *, work from *-* until there are 9 stitches left, purl 2 and 7 band stitches as before. Work as follows from the right side: 7 band stitches as before, work A.6 until there are 5 stitches left, work the first 2 stitches in A.6 so the pattern is symmetrical and 3 garter stitches. Continue this pattern for 8 cm. Cast off a little loosely. The piece measures approx. 61-63-65-67-69-71 cm, from the top of the shoulder. RIGHT FRONT PIECE: Read the next section before continuing. Cast on 3-5-9-7-5-9 stitches with circular needle size 5 mm and 1 strand of each quality (2 strands). Work A.1 back and forth over all stitches (row 1 = right side) – AT THE SAME TIME cast on stitches at the end of each row from the wrong side for the diagonal shoulder as follows: Cast on 4-4-4-5-6-6 stitches 6 times (work the new stitches into A.1 but working the outermost stitch by the armhole in garter stitch). AT THE SAME TIME when the piece measures 4-4-4-6-6-6 cm measured from the top of the shoulder, cast on stitches for the neck at the end of each row from the right side as follows: 1 stitch 2 times, 2 stitches 3 times and 12-12-12-12-12-14 stitches 1 time. When all the stitches are cast on there are 47-49-53-57-61-67 stitches with the last row worked from the right side. Continue A.1 back and forth with 1 garter stitch towards the side and 7 BAND stitches mid-front – remember the BUTTONHOLES on the band - read description above. Work until the piece measures 12-13-14-14-15-16 cm from the top of the shoulder. Now work pattern. A.2: Work as follows from the right side: 1 garter stitch, work A.2 until there are 8 stitches left on the row and increase 2 stitches evenly over these stitches, work the first stitch in A.2 (on row 7 in the diagram this stitch is knitted), 7 band stitches as before = 49-51-55-59-63-69 stitches. Continue this pattern – AT THE SAME TIME on the next-to-last row in A.2, increase 3-6-4-6-5-4 stitches evenly spaced = 52-57-59-65-68-73 stitches. A.3 (including armhole): When A.2 is finished in height, work as follows from the right side: 1 garter stitch, A.3A, work A.3B 4-5-5-6-6-7 times, A.3C, 3-0-2-0-3-0 stocking stitches and 7 band stitches as before. Continue this pattern – AT THE SAME TIME when the piece measures 18-19-20-21-22-23 cm measured outermost along the armhole (approx. 24-25-26-27-28-29 cm from the top of the shoulder), cast on 2 stitches for the armhole at the end of the next row from the wrong side = 54-59-61-67-70-75 stitches. Continue A.3 with 2 stocking stitches and 1 garter stitch outermost on the side and 7 front band stitches towards mid front as before. Work A.3 2½-2½-2½-3-3-3 times in height (finishing on the same row as the left front piece). The piece measures approx. 33-34-35-37-38-39 cm from the top of the shoulder. . A.2: When A.3 is finished work as follows from the right side: 1 garter stitch, work A.2 until there are 8 stitches left on the row and decrease 5-8-6-8-7-6 stitches evenly over these stitches, work the first stitch in A.2 (on row 7 in the diagram this stitch is knitted), finish with 7 band stitches as before = 49-51-55-59-63-69 stitches. Continue this pattern – AT THE SAME TIME on the next-to-last row in A.2, increase 6-6-8-6-8-4 stitches evenly spaced = 55-57-63-65-71-73 stitches. A.4: When A.2 is finished in height, work as follows from the right side: 1 garter stitch, 1 stocking stitch, A.4A, work A.4B 5-5-6-6-7-7 times, 2-4-2-4-2-4 stocking stitches and finish with 7 band stitches as before. Continue this pattern until A.4 is finished in height. A.5: Work as follows from the right side: 1 garter stitch, work A.5 until there are 8 stitches left on the row and decrease 6-4-6-4-6-4 stitches evenly over these stitches, work the first stitch in A.5 (on row 5 in the diagram this stitch is knitted), 7 band stitches as before = 49-53-57-61-65-69 stitches. Continue this pattern until A.5 is finished in height. A.1: Work as follows from the right side: 1 garter stitch, work A.1 until there are 8 stitches left, work the first stitch in A.1 so the pattern is symmetrical and 7 band stitches as before. Continue this pattern until the piece measures 53-55-57-59-61-63 cm – adjust to match the left front piece. Now work rib with cables. RIB WITH CABLES: Change to circular needle 3.5 mm. Knit from the right side and increase 31-31-35-39-43-47 stitches evenly spaced (do not increase over the band) = 80-84-92-100-108-116 stitches Work as follows from the wrong side: 7 band stitches as before, * purl 2, knit 2 *, work from *-* until there are 5 stitches left, purl 2 and 3 garter stitches. Work as follows from the right side: 3 garter stitches, work A.6 until there are 9 stitches left, work the first 2 stitches in A.6 so the pattern is symmetrical and 7 band stitches as before. Continue this pattern for 8 cm. Cast off a little loosely. SLEEVES: The sleeves are worked top down, first back and forth for the sleeve cap then finished in the round. Change to double pointed needles as you decrease. Cast on 57-61-63-67-71-73 stitches with short circular needle size 5 mm and 1 strand of each quality (2 strands). Work 3 ridges (see GARTER STITCH above) back and forth over all stitches. Now join the piece and knit 1 round. Insert 1 marker-thread at the beginning of the round and allow it to follow your work onwards – it is used when decreasing under the sleeve. Work as follows: Knit 1, work A.1 until there are 2 stitches left on the round, work the first stitch in A.1 so the pattern is symmetrical and knit 1. Continue this pattern. When the sleeve measures 3-3-3-3-4-4 cm, decrease 2 stitches under the sleeve – read DECREASE TIP. Decrease like this every 6-4½-4-3½-2½-2½ cm a total of 7-9-9-10-12-12 times = 43-43-45-47-47-49 stitches. Work until the sleeve measures 42-42-40-39-37-35 cm (6 cm left to finished length). Change to double pointed needles size 3.5 mm. Knit 1 round and increase 25-25-27-25-29-27 stitches evenly spaced – do not increase over the 2 knitted stitches under the sleeve = 68-68-72-72-76-76 stitches. Start the round 1 stitch before the marker-thread and work A.6 17-17-18-18-19-19 times on the round – NOTE: The first 2 stitches in A.6 are worked over the 2 knitted stitches mid under sleeve. Work until the rib measures 6 cm. Cast off a little loosely. The sleeve measures approx. 48-48-46-45-43-41 cm from the cast-on edge. Work the other sleeve in the same way. ASSEMBLY: Sew the shoulder seams. Sew the side seams from the armholes down to the rib at the bottom, inside the 1 edge stitch. Sew the sleeve cap to the armhole, inside the 1 edge stitch on the body and the cast-on edge on the sleeve. Sew the openings under each sleeve – see sketch. HIGH NECK: Start from the right side with circular needle size 3.5 mm and 1 strand of each quality (2 strands). Knit up (inside the cast-on edge) 115-119-119-123-123-129 stitches around the neck and over the bands. Work rib as follows from the wrong side: 7 band stitches as before (right band), * purl 1, knit 1 *, work from *-* until there are 8 stitches left on the row, purl 1 and 7 band stitches as before. Continue this rib for 10-10-11-11-12-12 cm. Cast off a little loosely – you can use Italian cast-off if you wish. Sew the buttons onto the left band. |
||||||||||||||||||||||||||||
Diagram explanations |
||||||||||||||||||||||||||||
|
||||||||||||||||||||||||||||
 |
||||||||||||||||||||||||||||
 |
||||||||||||||||||||||||||||
 |
||||||||||||||||||||||||||||
Have you finished this pattern?Tag your pictures with #dropspattern #bluediamondscardigan or submit them to the #dropsfan gallery. Do you need help with this pattern?You'll find 39 tutorial videos, a Comments/Questions area and more by visiting the pattern on garnstudio.com. © 1982-2026 DROPS Design A/S. We reserve all rights. This document, including all its sub-sections, has copyrights. Read more about what you can do with our patterns at the bottom of each pattern on our site. |
||||||||||||||||||||||||||||


With over 40 years in knitting and crochet design, DROPS Design offers one of the most extensive collections of free patterns on the internet - translated to 17 languages. As of today we count 324 catalogues and 12290 patterns translated into English (UK/cm). 12290
We work hard to bring you the best knitting and crochet have to offer, inspiration and advice as well as great quality yarns at incredible prices! Would you like to use our patterns for other than personal use? You can read what you are allowed to do in the Copyright text at the bottom of all our patterns. Happy crafting!
Post a comment to pattern DROPS 245-15
We would love to hear what you have to say about this pattern!
If you want to leave a question, please make sure you select the correct category in the form below, to speed up the answering process. Required fields are marked *.