
Popular categories
Looking for a yarn?


Comments / Questions (5)
![]() Patricia wrote:
Patricia wrote:
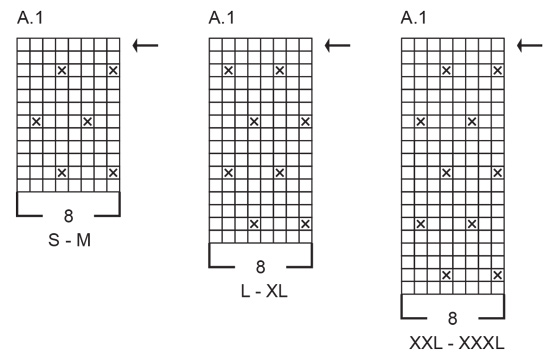
Ich habe gerade ein Verständnisproblem.... Muster A1 stricke ich zunächst 27x (Größe XXL) und dann mache ich erst die Zunahme von 64 Maschen. Sehe ich das so richtig?
19.10.2024 - 12:00DROPS Design answered:
Liebe Patricia, also ja die Zunahmen werden bei der letzten Reihe vom Diagram gestrickt, so zuerst wird man A.1 27 Mal stricken, dann 64 M bei der letzten Reihe zunehmen, so sind es danach genügend Maschen für 35 Mal A.2 . Viel Spaß beim Stricken!
21.10.2024 - 07:55
![]() Cat wrote:
Cat wrote:
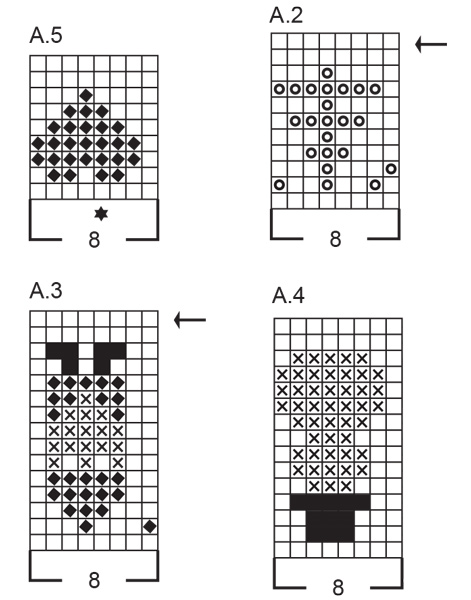
Why has my tree worked the wrong way . I.e. upside down
06.11.2023 - 15:31DROPS Design answered:
Dear Cat, read all diagrams from bottom up, starting on the corner on the right side, as the jacket is worked top down, the tree will then look properly when wearing garment. Happy knitting!
07.11.2023 - 07:52
![]() Francine Tyminski wrote:
Francine Tyminski wrote:
An der Blende ist eine Reihe gehäkelte Muschel. Die Anleitung dafür fehlt leider! Kann ich sie irgendwie bekommen
12.10.2023 - 09:49
![]() Trine Hemmingsen wrote:
Trine Hemmingsen wrote:
Den sidste sætning i afsnittet men halskanten, står der at jeg skal sætte et mærke efter kantmaskerne, midt for. Midt for, er det midt i ribben? Altså halvejs i højden som jeg har strikket, eller er det der hvor jeg er kommet til, altså i den sidste pind i den afsnit? Er meget ny i strikning så blev lidt forvirret af det "midt for" Håber det giver mening det jeg har skrevet Vh Trine
17.08.2023 - 00:34DROPS Design answered:
Hej Trine, mærket skal bruges til at måle fra og det er fra efter ribben. Modsvarende bluse havde vi som KnitAlong sidste Jul og vi har rigtig gode billeder og forklaringer, som du sikkert kan have glæde af. Julebluse nederst på siden klikker du på NÆSTE for at komme videre - god fornøjelse :)
18.08.2023 - 11:50
![]() Rosellen Russell wrote:
Rosellen Russell wrote:
Loved this pattern , I did the cardigan with 3/4 sleeves , since I live in Fl. Lucky me we had a cold wave at Christmas, I wore it everyday. I saved yarn to lengthen sleeves if I move back north. Thanks so much for this pattern .
03.01.2023 - 14:36
|
||||||||||||||||||||||
Christmas Time Cardigan#christmastimecardigan |
||||||||||||||||||||||
 |
 |
|||||||||||||||||||||
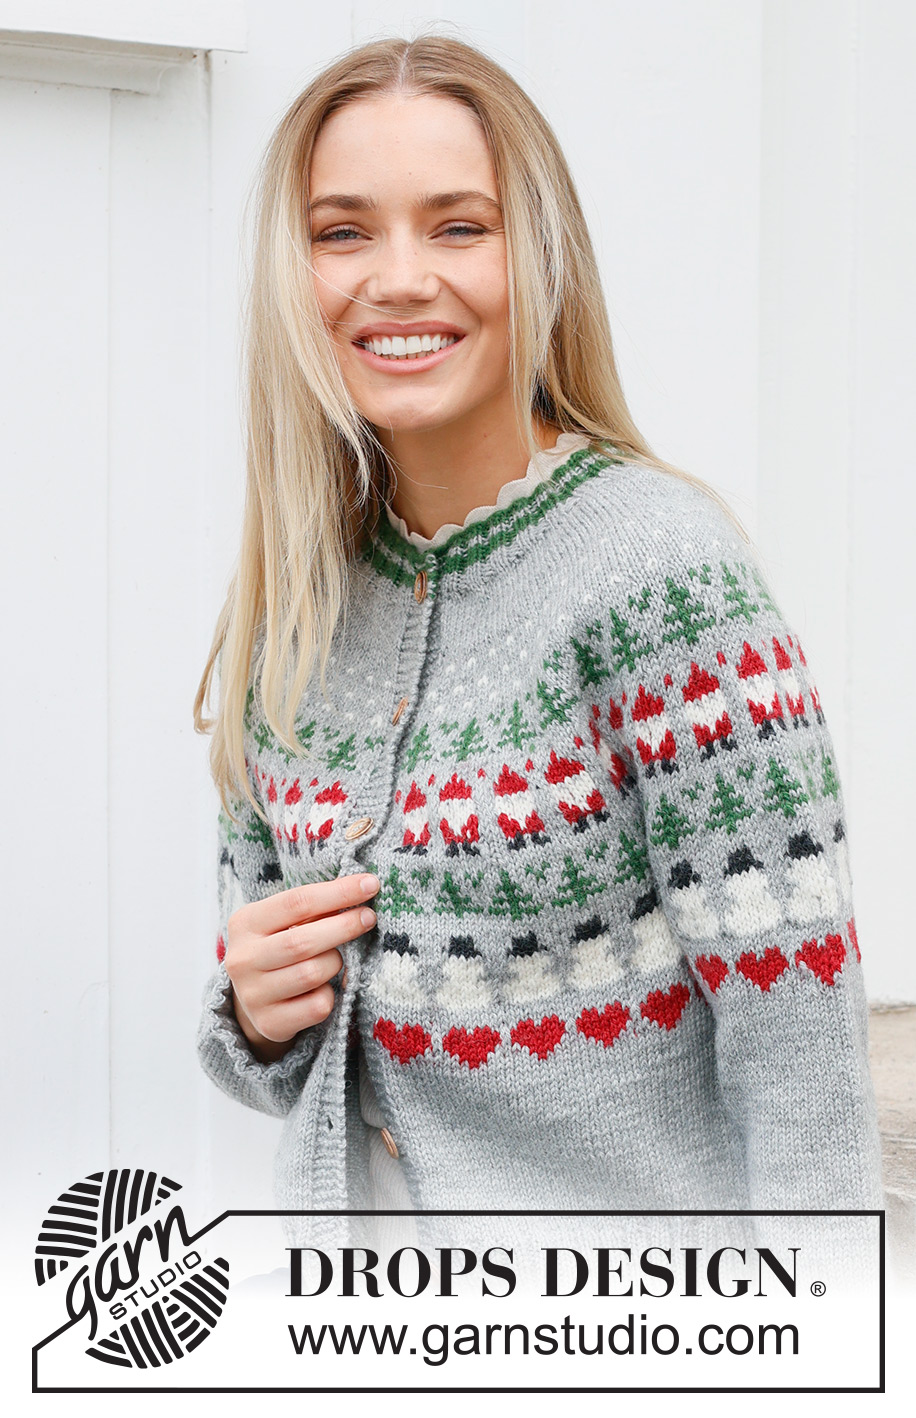
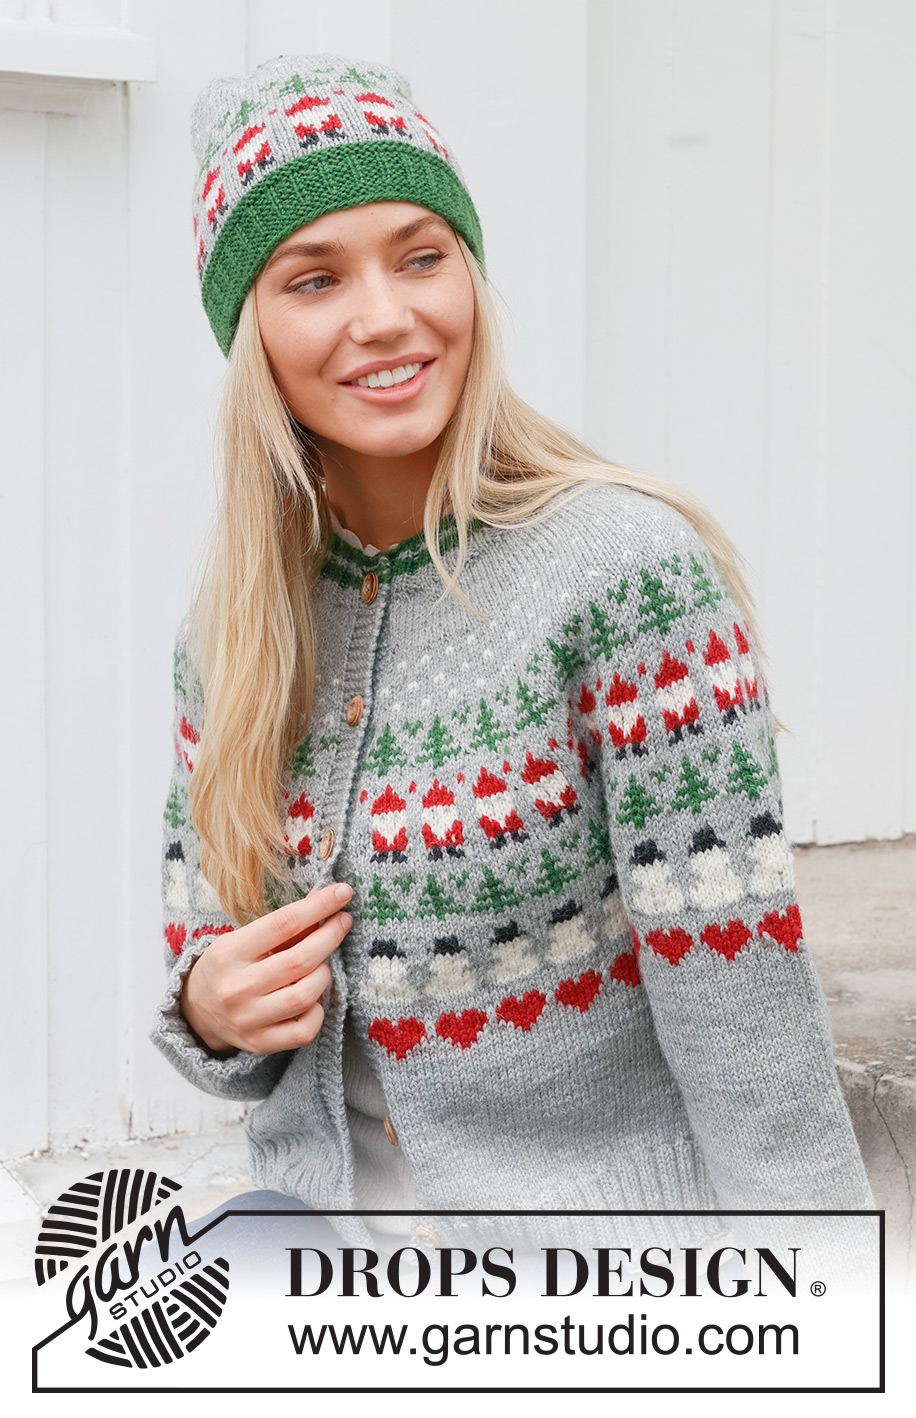
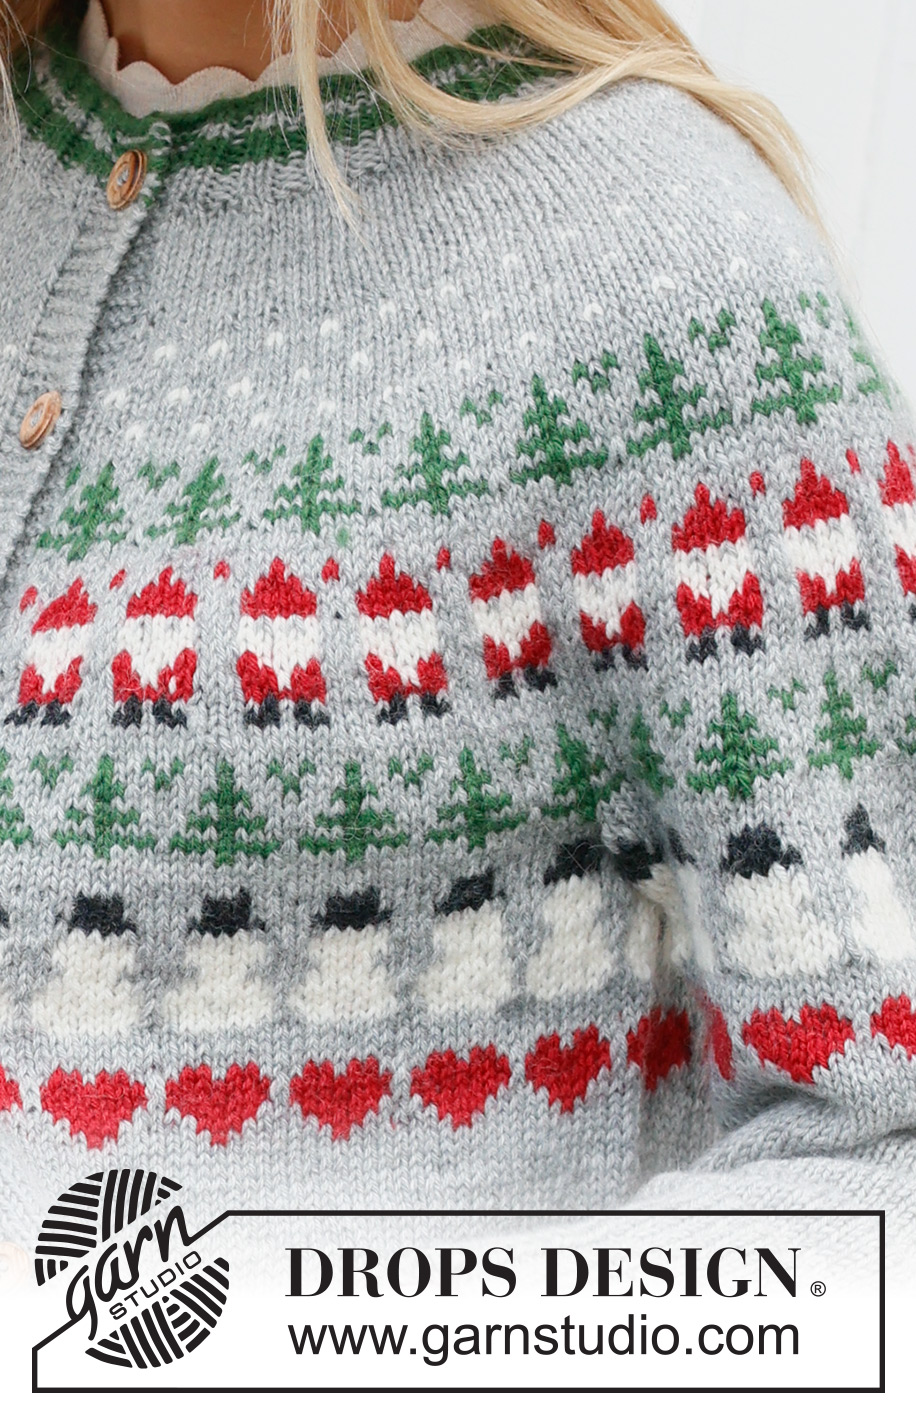
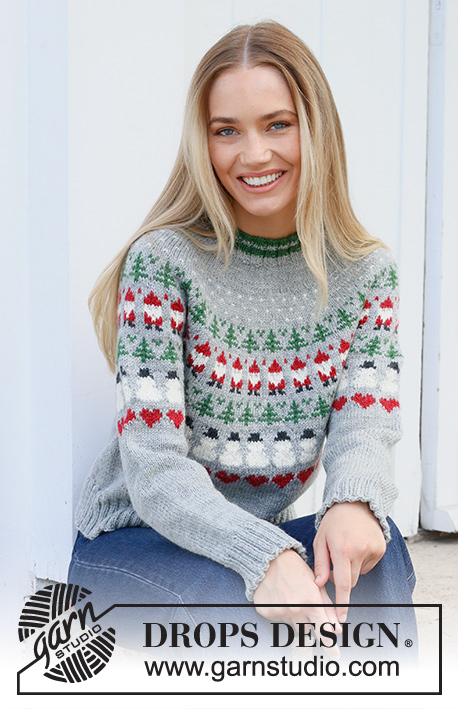
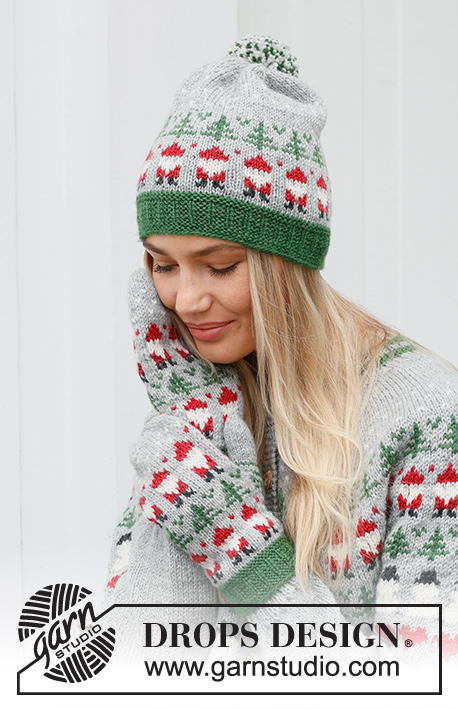
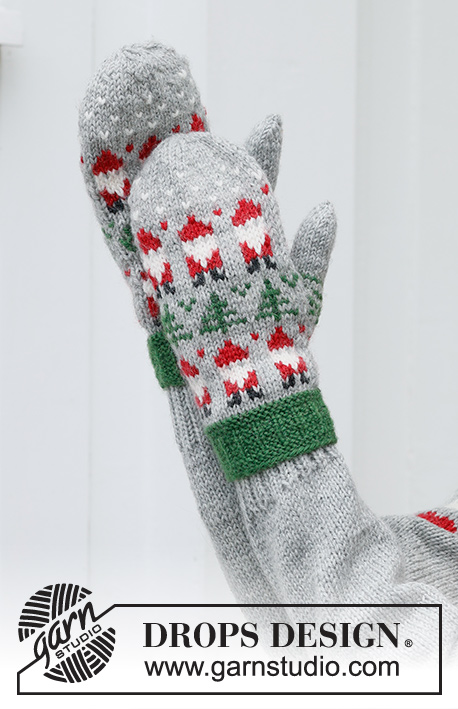
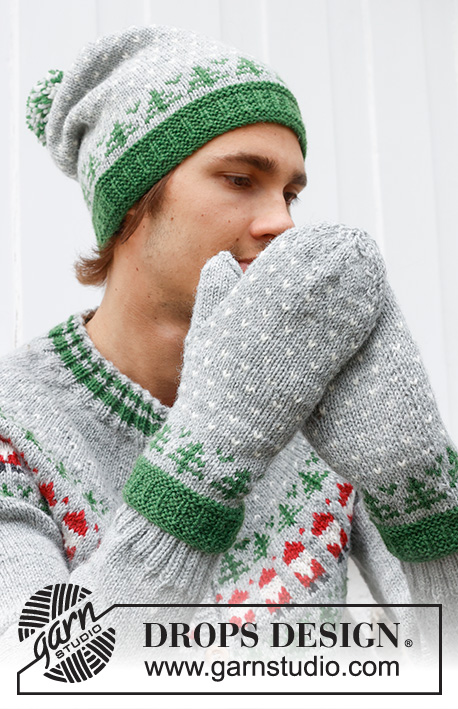
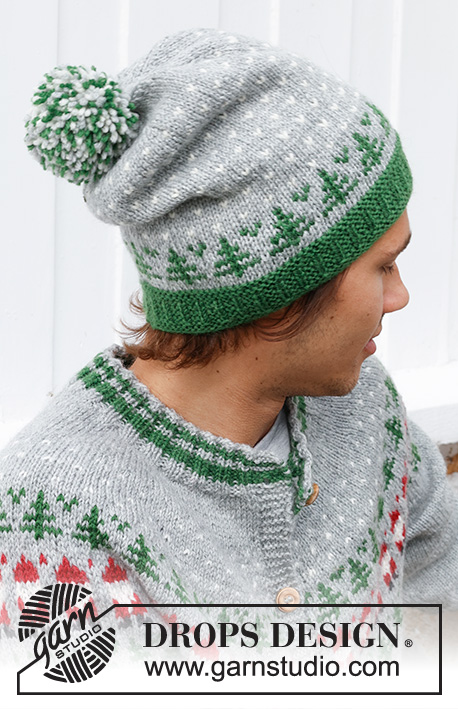
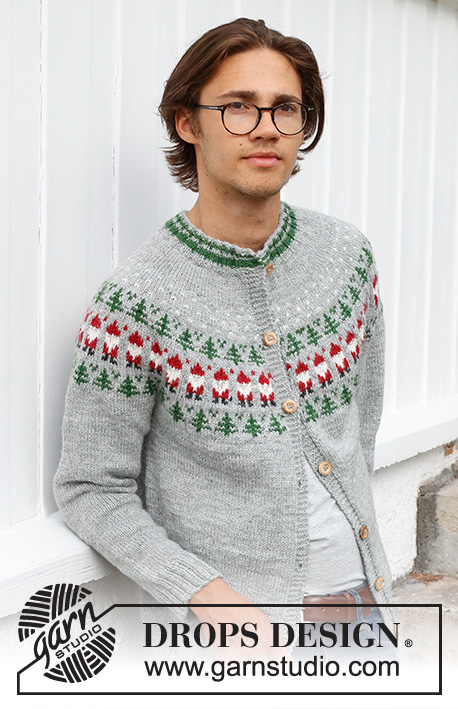
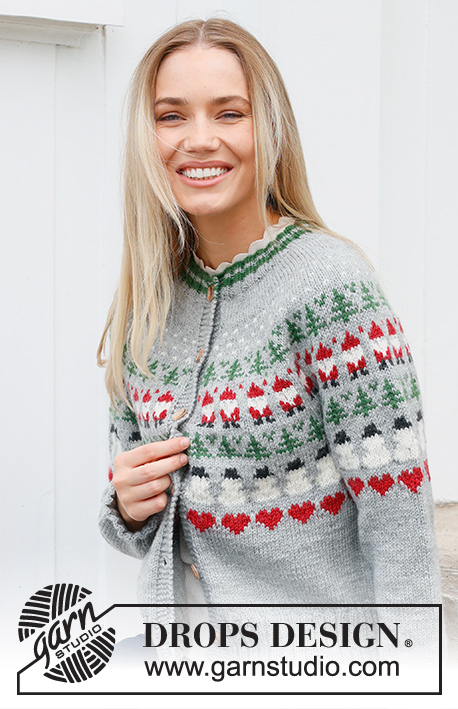
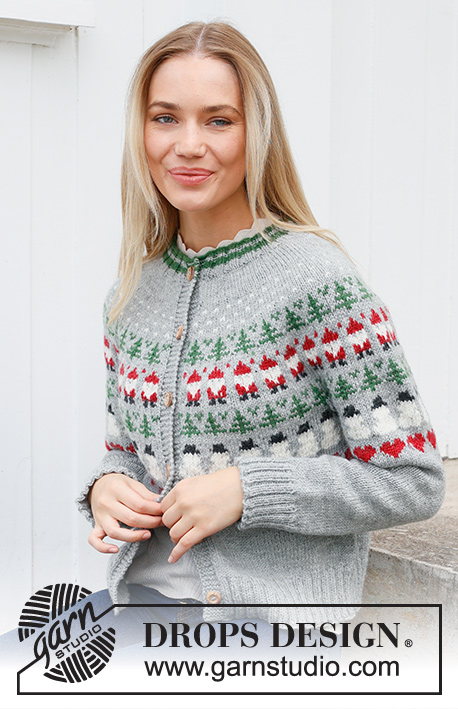
Knitted jacket in DROPS Karisma. The piece is worked top down, with round yoke and coloured pattern of Santa, Christmas tree, snowman and heart. Sizes S - XXXL. Theme: Christmas.
DROPS 235-40 |
||||||||||||||||||||||
|
------------------------------------------------------- EXPLANATIONS FOR THE PATTERN: ------------------------------------------------------- RIDGE/GARTER STITCH (worked back and forth): Knit all rows. 1 ridge = knit 2 rows. PATTERN: See diagrams A.1 to A.5. Choose diagram for your size (applies to A.1). The diagrams show all rows in the pattern from the right side and are worked in stocking stitch. KNITTING TIP-1: To avoid the knitting tension losing its elasticity when working pattern it is important that the strands at the back are not tight. Use a size larger needle when working pattern if the piece becomes tight. KNITTING TIP-2: If you want more pattern on body and sleeves continue with the diagrams in your desired order but remember this will affect the yarn amounts. On the sleeves, position the motif mid-top of the sleeve and count out from there where to start the diagram under the sleeve. INCREASE TIP (evenly spaced): Increase 1 stitch by making 1 yarn over, which is worked twisted on the next row/round to avoid a hole. DECREASE TIP (for sleeves): Decrease 1 stitch on either side of the marker-stitch as follows: Work until there are 2 stitches left before the marker, knit 2 together with colour light grey, knit the stitch with the marker with colour light grey and knit 2 twisted together with colour light grey (2 stitches decreased). BUTTONHOLES: Work buttonholes on the right band (when the garment is worn). Work from the right side when there are 4 stitches left on the row as follows: Make 1 yarn over, knit 2 together and knit 2. On the next row (wrong side), knit the yarn over to leave a hole. The first buttonhole is worked when the rib on the neck measures 3 cm. Then work the other 5-5-6-6-6-6 buttonholes with approx. 9-9½-8½-9-9-9½ cm between each one. ------------------------------------------------------- START THE PIECE HERE: ------------------------------------------------------- JACKET – SHORT OVERVIEW OF THE PIECE. The neck and yoke are worked back and forth with circular needle, from mid front and top down. The yoke is divided for body and sleeves and the body continued back and forth with circular needle. The sleeves are worked in the round with double pointed needles/short circular needle. NECK: Cast on 118-122-126-134-138-142 stitches with circular needle size 3 mm and colour forest green DROPS Karisma. Purl 1 row from the wrong side. Work the next row from the right side as follows: 6 band stitches in GARTER STITCH – read description above, * knit 2, purl 2 *, work from *-* until there are 8 stitches left, knit 2 and 6 band stitches in garter stitch. Continue this rib back and forth, at the same time as you work stripes as follows: 1 more row with colour forest green, 2 rows with colour light grey, 4 rows with colour forest green, then continue with colour light grey until the neck measures 4 cm – remember the BUTTONHOLE on the right band – read description above. When the rib is finished knit 1 row from the right side with colour light grey and increase 25-26-27-33-39-41 stitches evenly spaced – read INCREASE TIP (do not increase over the bands) = 143-148-153-167-177-183 stitches. Purl 1 row from the wrong side (bands knitted and yarn overs purled twisted). Insert 1 marker after the band at the beginning of the row. The yoke is measured from this marker! YOKE: Change to circular needle size 4 mm and work stocking stitch with light grey and 6 band stitches in garter stitch on each side. REMEMBER THE KNITTING TENSION! When the yoke measures 4-4-5-5-6-7 cm from the marker, increase 38-41-44-46-52-54 stitches evenly spaced – remember INCREASE TIP (do not increase over the bands) = 181-189-197-213-229-237 stitches. Adjust so that the next row will be worked from the wrong side. begin the pattern and increase as described below – read KNITTING TIP-1 and PATTERN in explanations above. The bands are continued in colour light grey. A.1: Work 6 band stitches in garter stitch, the first stitch in A.1 (seen from the right side), then work A.1, 21-22-23-25-27-28 times (read the diagram from left to right when working from the wrong side), 6 band stitches in garter stitch. Continue this pattern. NOTE: When working from the right side, repeat A.1 after the band until there are 7 stitches left, work the first stitch in A.1 so the pattern is symmetrical and finish with 6 band stitches in garter stitch. Continue this pattern. AT THE SAME TIME on the row marked with an arrow increase 48-48-56-56-64-72 stitches evenly spaced (do not increase over the bands) = 229-237-253-269-293-309 stitches. A.2: When A.1 is finished in your size, work A.2 as follows from the wrong side: 6 band stitches in garter stitch, work the first stitch in A.2 (seen from the right side), work A.2 27-28-30-32-35-37 times, 6 band stitches in garter stitch. Continue this pattern. AT THE SAME TIME on the row marked with an arrow increase 40-48-48-56-64-64 stitches evenly spaced (do not increase over the bands) = 269-285-301-325-357-373 stitches. A.3: When A.2 is finished, work A.3 as follows from the right side: 6 band stitches in garter stitch, work A.3, 32-34-36-39-43-45 times, work the first stitch in A.3 so the pattern is symmetrical and 6 band stitches in garter stitch. Continue this pattern. AT THE SAME TIME on the row marked with an arrow increase 32-40-48-48-48-56 stitches evenly spaced (do not increase over the bands) = 301-325-349-373-405-429 stitches. A.2: When A.3 is finished, work A.2 again as follows from the wrong side: 6 band stitches in garter stitch, work the first stitch in A.2 (seen from the right side), work A.2, 36-39-42-45-49-52 times, 6 band stitches in garter stitch. Continue this pattern. AT THE SAME TIME on the row marked with an arrow increase 16-16-24-40-40-48 stitches evenly spaced (do not increase over the bands) = 317-341-373-413-445-477 stitches. A.4: When A.2 is finished, work A.4 as follows from the right side: 6 band stitches in garter stitch, work A.4, 38-41-45-50-54-58 times, work the first stitch in A.4 so the pattern is symmetrical and 6 band stitches in garter stitch. Continue this pattern – at the same time divide for the body and sleeves as described below. DIVIDE FOR THE BODY AND SLEEVES: Work until the yoke measures 22-24-25-27-29-31 cm from the marker. The increases are finished, but not the pattern which is continued on the body and sleeves. On the next row divide as follows: Work 52-56-60-66-72-78 stitches as before (front piece), place the next 60-64-72-80-84-88 stitches on a thread for the sleeve, cast on 8 stitches with colour light grey (in side under sleeve), work 93-101-109-121-133-145 stitches as before (back piece), place the next 60-64-72-80-84-88 stitches on a thread for the sleeve, cast on 8 stitches with colour light grey (in side under sleeve), work the last 52-56-60-66-72-78 stitches as before (front piece). Body and sleeves are finished separately. The piece is now measured from here! BODY: = 213-229-245-269-293-317 stitches. Continue the pattern from the yoke, with 6 band stitches in garter stitch on each side until the body measures 32-32-33-33-33-33 cm from the division - repeats (A.4) will not fit under the sleeves so work them as far as they fit then work the remaining stitches with colour light grey under each sleeve. When A.4 is finished, work A.5 as follows from the wrong side: 6 band stitches in garter stitch, work the first stitch in A.5 (seen from the right side), work A.5, 25-27-29-32-35-38 times (remember that the diagram is read from the left to right when working from the wrong side) and 6 band stitches in garter stitch. When A.5 is finished, continue with stocking stitch, light grey and 6 band stitches in garter stitch on each side – read KNITTING TIP-2 until the body measures 21-21-22-22-22-22 cm from the division. Knit 1 row from the right side and increase 41-41-45-53-57-61 stitches evenly spaced (do not increase over the bands) = 254-270-290-322-350-378 stitches. Change to circular needle size 3 mm and work as follows from the wrong side: 6 band stitches in garter stitch, * purl 2, knit 2 *, work from *-* until there are 8 stitches left, purl 2 and 6 band stitches in garter stitch. Continue this rib for 7 cm. Cast off a little loosely. The jacket measures approx. 54-56-58-60-62-64 cm from the shoulder down. SLEEVES: Place the 60-64-72-80-84-88 stitches from the thread on the one side of the piece on short circular needle/double pointed needles size 4 mm and knit up 1 stitch in each of the new stitches cast on under the sleeve using colour light grey = 68-72-80-88-92-96 stitches. Insert a marker in the 5th of the 8 new stitches under the sleeve (mid-under sleeve) and 1 marker in the 35th-37th-41st-45th-47th-49th stitch (mid-top of sleeve). Start at the first marker and continue the pattern from the yoke - repeats (A.4) will not fit under the sleeves so work them as far as they fit and work the remaining stitches mid under sleeve with light grey. When A.4 is finished, work A.5 – count out from the second marker where to start the pattern under the sleeve; the marker-stitch should match the mid-stitch in the diagram. When A.5 is finished, continue with stocking stitch and light grey – read KNITTING TIP-2. AT THE SAME TIME, when the sleeve measures 3-3-3-2-2-2 cm, decrease 2 stitches under the sleeve – read DECREASE TIP. Decrease like this every 4½-4-2½-2-1½-1½ cm a total of 7-8-11-14-15-16 times = 54-56-58-60-62-64 stitches. Continue working until the sleeve measures 34-33-32-30-29-27 cm from the division (or to desired length. There is approx. 7 cm left). Knit 1 round and increase 10-8-10-12-10-12 stitches evenly spaced = 64-64-68-72-72-76 stitches. Change to double pointed needles size 3 mm and work rib (knit 2, purl 2) for 7 cm. Loosely cast off. The sleeve measures approx. 41-40-39-37-36-34 cm from the division. Work the other sleeve in the same way. ASSEMBLY: Sew the buttons onto the left band. |
||||||||||||||||||||||
Diagram explanations |
||||||||||||||||||||||
|
||||||||||||||||||||||
 |
||||||||||||||||||||||
 |
||||||||||||||||||||||
 |
||||||||||||||||||||||
Have you finished this pattern?Tag your pictures with #dropspattern #christmastimecardigan or submit them to the #dropsfan gallery. Do you need help with this pattern?You'll find 33 tutorial videos, a Comments/Questions area and more by visiting the pattern on garnstudio.com. © 1982-2026 DROPS Design A/S. We reserve all rights. This document, including all its sub-sections, has copyrights. Read more about what you can do with our patterns at the bottom of each pattern on our site. |
||||||||||||||||||||||


With over 40 years in knitting and crochet design, DROPS Design offers one of the most extensive collections of free patterns on the internet - translated to 17 languages. As of today we count 324 catalogues and 12290 patterns translated into English (UK/cm). 12290
We work hard to bring you the best knitting and crochet have to offer, inspiration and advice as well as great quality yarns at incredible prices! Would you like to use our patterns for other than personal use? You can read what you are allowed to do in the Copyright text at the bottom of all our patterns. Happy crafting!
Post a comment to pattern DROPS 235-40
We would love to hear what you have to say about this pattern!
If you want to leave a question, please make sure you select the correct category in the form below, to speed up the answering process. Required fields are marked *.