
Popular categories
Looking for a yarn?


Comments / Questions (41)
![]() Silvia Bellati wrote:
Silvia Bellati wrote:
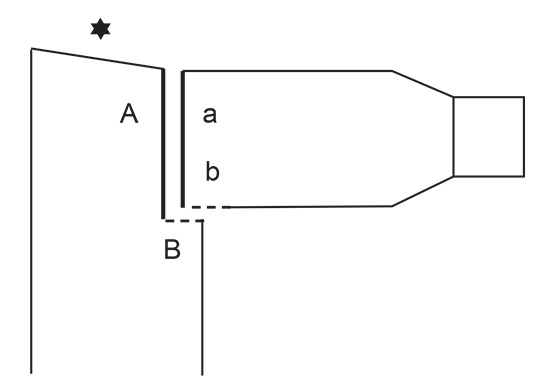
Salve, sono arrivata a 3 cm d3l bordo. Non riesco a capire cosa significa: Quando il bordo misura 3 cm, aumentare 1 maglia in ogni sezione a rovescio (visto dal diritto del lavoro) tra le cuciture delle spalle sul dietro del collo. Potete aiutarmi , magari con uno schema disegnato? Vi rinfrazio per la vostra cortesia. Silvia
21.04.2026 - 22:55DROPS Design answered:
Buonasera Silvia, deve aumentare 1 maglia nelle sezioni a rovescio delle coste, tra le 2 spalle. Buon lavoro!
26.04.2026 - 21:42
![]() Silvia wrote:
Silvia wrote:
Buongiorno, c'è mica un tutorial su come si deve fare il bordo (sono una principiante) Grazie
09.03.2026 - 09:35DROPS Design answered:
Buongiorno Silvia, provi a vedere se questo video le può essere di aiuto. Buon lavoro!
14.03.2026 - 11:03
![]() Gusta wrote:
Gusta wrote:
Hallo, Het lukt mij niet om gaatjes te voorkomen. Is er soms een video over? Brei 1 naald recht op de verkeerde kant, maar om te voorkomen dat er een gaatje ontstaat bij het keren van het werk, neem het garen tussen 2 steken op en brei deze gedraaid recht samen met de eerste steek op de linker naald. Kant dan losjes alle steken af met recht aan de goede kant. Dank u
06.02.2026 - 15:51
![]() Rosien wrote:
Rosien wrote:
Can you confirm for the neck decreasing (size M)? Am i knitting 37, cast off 20, knit the remaining 37? how do the aditional 6 dec come in? am i doing them befrore the 20 cast off or before? I'm asuming the neck cast off happens before the dec, so am i knitting across the 37 and each time i get back to the neck cast offdec2, then next time dec 1? then after that am i slipping the 34 st?
22.11.2025 - 21:12DROPS Design answered:
Dear Rosien, yes correct the first row on neck will be worked like that: work 37, cast off 20, work 37, then you will finish each shoulder separately casting off for neck at the beginning of each row beginning from neck towards armhole (ie from WS for right shoulder / from RS for left shoulder back piece). Happy knitting!
24.11.2025 - 13:23
![]() Rosine wrote:
Rosine wrote:
Hello. could you clarify, I'm doing a size medium and for the increases on the back, are the 4 increases every 4cm staying on the sides of the work? e.g after one inc it'll be 1 garter 2 stokinet, 1 garter 3 stokinet, 1 garter 4 stokinet, 1 garter 5 stokinete etc... or is it staying 1 garter 2 stokinete and the cable is moving?
21.11.2025 - 23:01DROPS Design answered:
Dear Rosine you will increase inside the 2 sts in stocking stitch on each side, see INCREASE TIP-1 so that the number of sts after the edge stitch at the beg of row and before the edge stitch at the end of the row will increase with 1 st every 4 cm, you will have then 1 edge stitch, 6 sts stocking stitch, A.1 x 8 times, A.2, 6 sts stocking st, 1 edge stitch when all increases are done. Happy knitting!
24.11.2025 - 08:18
![]() Anette Månsson wrote:
Anette Månsson wrote:
Ökningen i armarna, jag får det till två maskors ökning, men det står fyra, står det fel? Kan någon förklara om jag har fel. Tusen tack Anette
06.04.2025 - 21:41DROPS Design answered:
Hej Anette, du sätter 2 markörer (1 under och 1 mitt på ärmen) och ökar på varje sida om de 2 markörerna = 4 maskor ökade :)
09.04.2025 - 14:20
![]() Lea wrote:
Lea wrote:
Bonjour, Je suis sur la fin du dos et je ne comprend pas une étape. Il est écrit : rabattre les mailles sur le début des rangs suivant pour l'emmanchure. mais il y aura bien une manche de chaque côté. Pourquoi ne pas rabattre au début et à la fin des rangs suivant ?
23.10.2024 - 09:40DROPS Design answered:
Bonjour Léa, on rabat en général les mailles en début de rang pour éviter d'avoir à couper le fil, donc pour rabattre le même nombre de mailles de chaque côté sans avoir à couper le fil, on va rabattre ces mailles en début de rang sur l'endroit puis au début du rang suivant sur l'envers (= au début des 2 rangs suivants = de chaque côté). Bon tricot!
23.10.2024 - 13:06
![]() Dommangeau wrote:
Dommangeau wrote:
J’ai compris C’est la taille Vous ne faites pas de mailles glissées alors ?
19.08.2024 - 07:49DROPS Design answered:
Bonjour Mme Dommangeau, effectivement le nombre de mailles 8 -13 correspond à la taille, il est différent et adapté au nombre de mailles de l'épaule. Vous pensez aux mailles à glisser en début de rang? Vous pouvez utiliser votre technique de rangs raccourcis préférés, celle avec laquelle vous êtes le plus à l'aise. Bon tricot!
20.08.2024 - 07:52
![]() Dommangeau wrote:
Dommangeau wrote:
Merci beaucoup pour vos explications. Pouvez-vous préciser, « tricotez les 8-13 premières mailles » ? Je ne comprends pas, il y en a 33 sur l’épaule droite. Merci pour votre réponse. Bonne journée
19.08.2024 - 07:46DROPS Design answered:
Bonjour Mme Dommangeau, tout à fait, on tricote des rangs raccourcis autrement dit, vous tricotez les 8-13 premières mailles (cf taille) et vous mettez ces mailles en attente, et vous terminez votre rang (les mailles restantes) comme avant. Dans cette vidéo nous montrons comment on tricote ce type de rangs raccourcis (la méthode pour rabattre les mailles est différente dans la vidéo, à la fin), cette vidéo pourra peut-être vous aider. Bon tricot!
20.08.2024 - 07:48
![]() DOMMANGEAU wrote:
DOMMANGEAU wrote:
Bonjour, J'ai besoin de votre aide, j'ai du mal à comprendre la partie encolure et biais des épaules. J'ai visionner vos tutos et d'autres sur internet, mais ça ne m'a pas aidé. Pouvez-vous m'aider à comprendre ce qu'il faut faire ? Je vous en remercie par avance. Bien cordialement
18.08.2024 - 19:35DROPS Design answered:
Bonjour Mme Dommangeau, tricotez le dos ainsi sur l'endroit: tricotez les 8-13 premières m et mettez les en attente, tricotez comme avant (épaule droite) et rabattez les m centrales (encolure), terminez le rang (épaule gauche), tournez, tricotez les 8-13 premières m et mettez-les en attente, terminez le rang, tournez et rabattez 2 m (encolure), terminez le rang, tournez, tricotez les 8-13 premières m et mettez-les en attente, terminez le rang; tournez, rabattez 1 m (encolure) et terminez le rang; tournez, tricotez les dernières m, tournez, tricotez toutes les m de l'épaule comme indiqué. Répétez pour l'autre épaule. Bon tricot!
19.08.2024 - 08:39
|
|||||||||||||
Midsummer's Night#midsummersnightcardigan |
|||||||||||||
 |
 |
||||||||||||
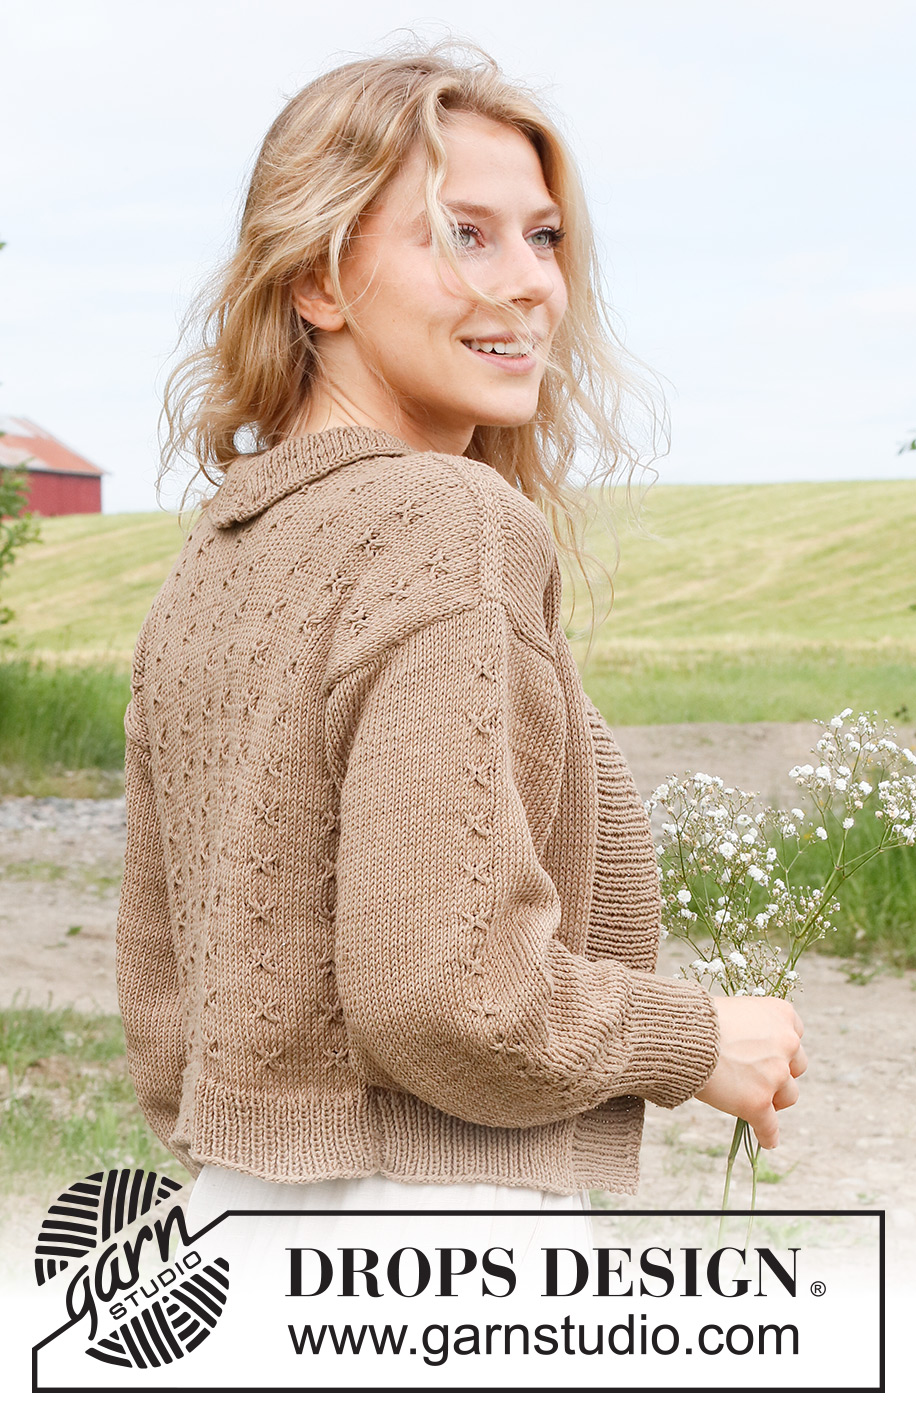
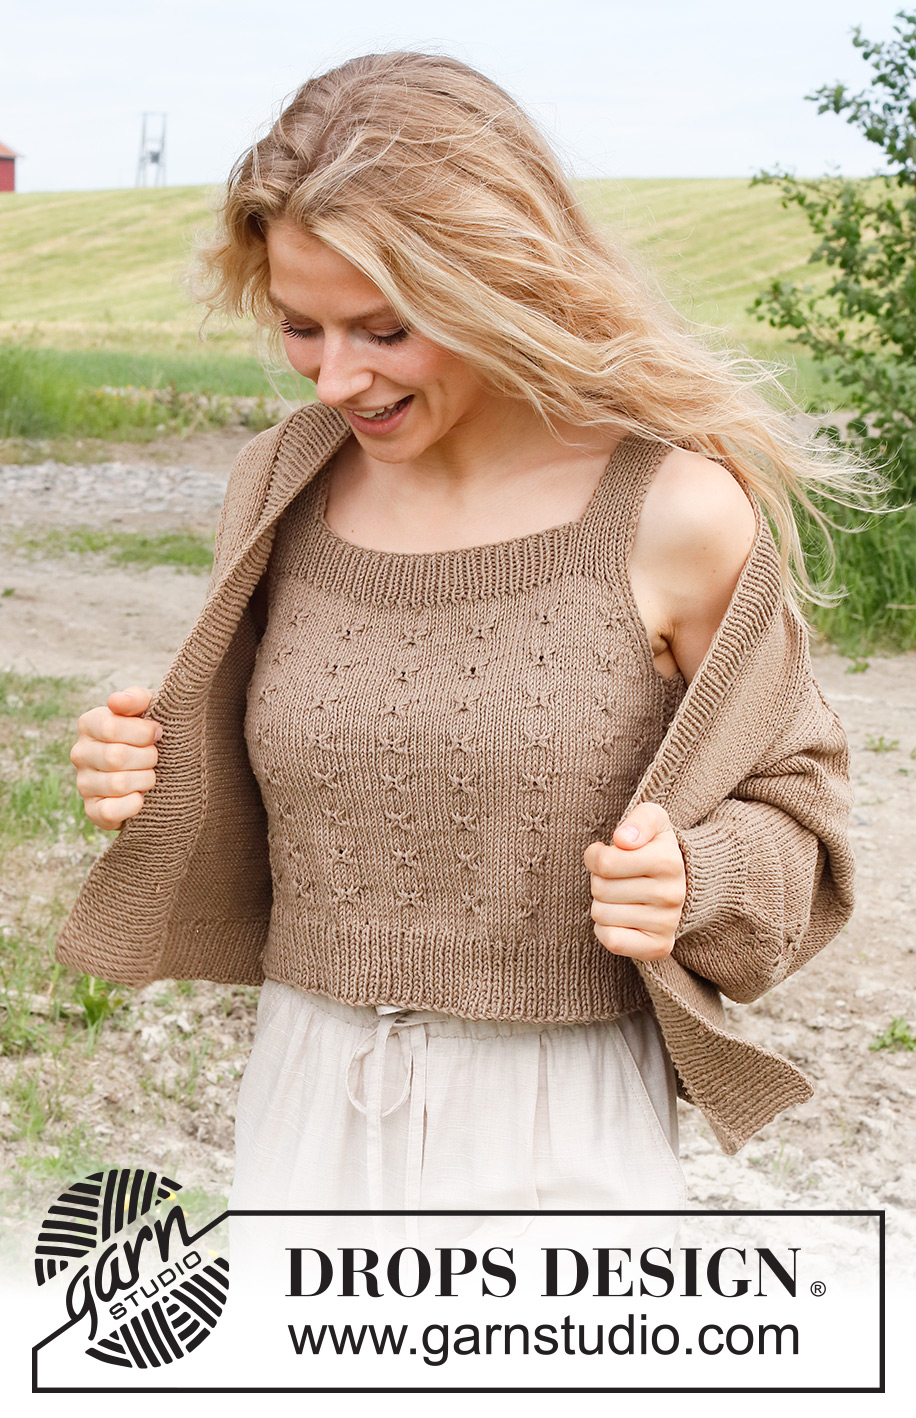
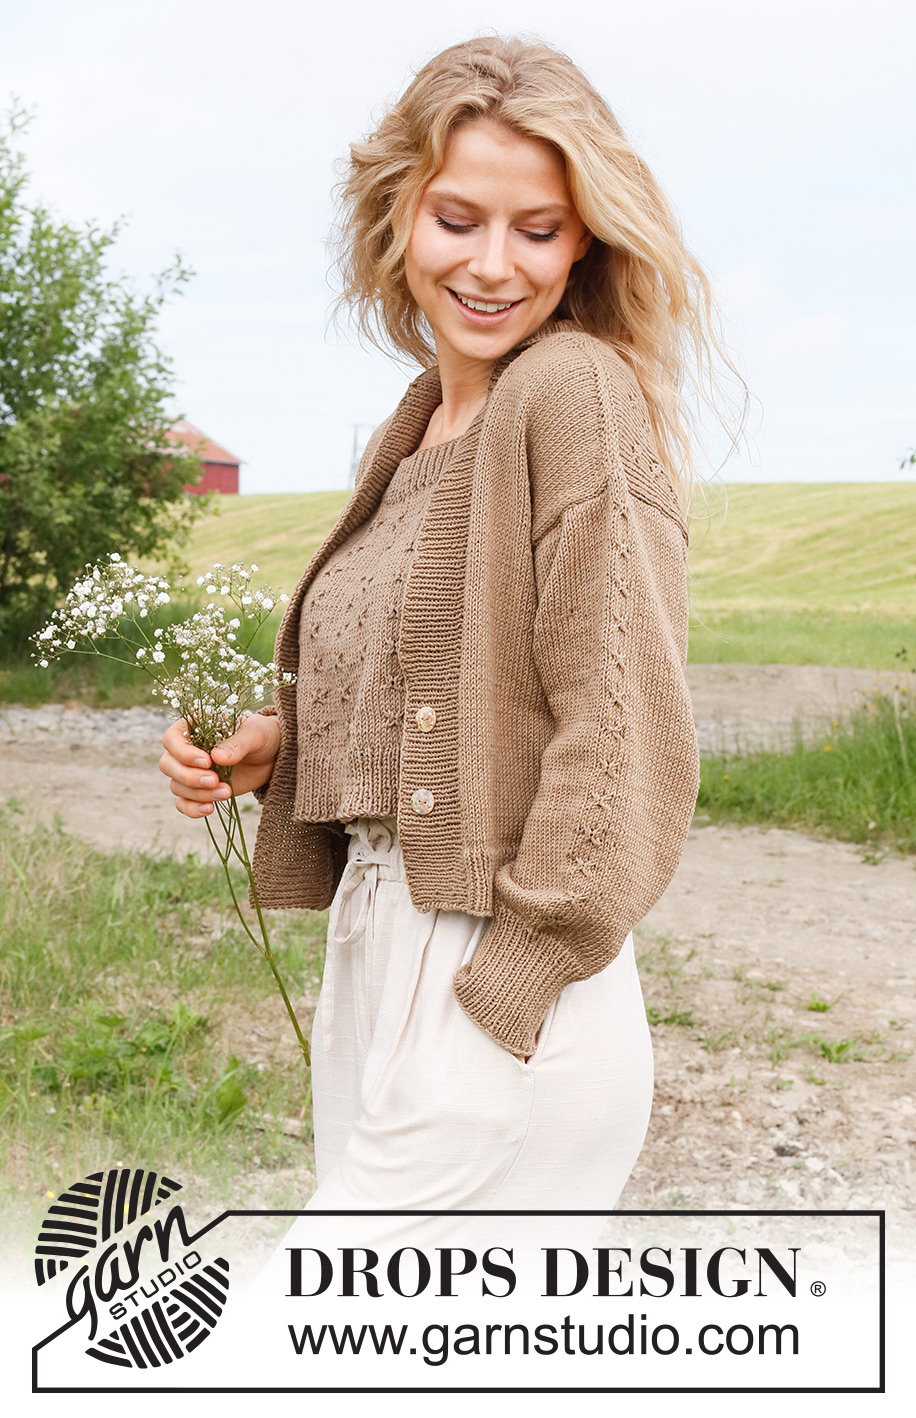
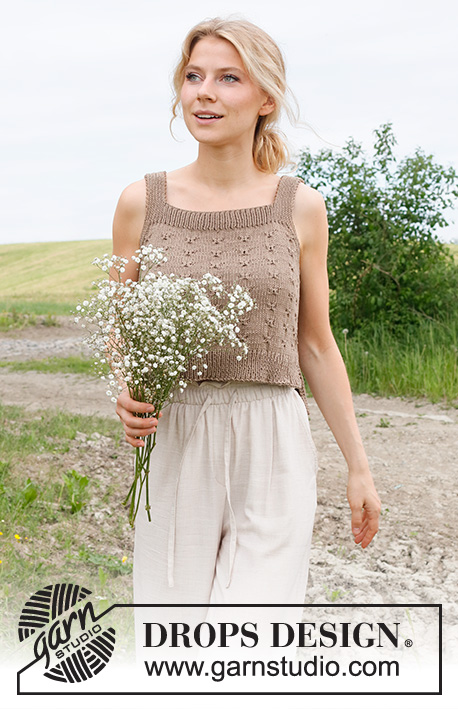
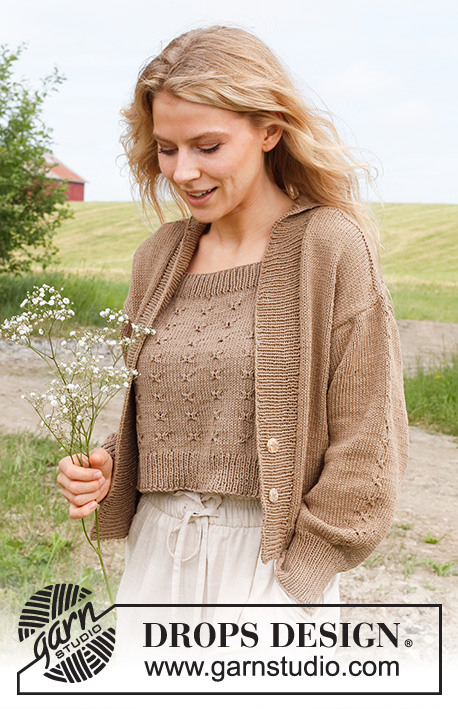
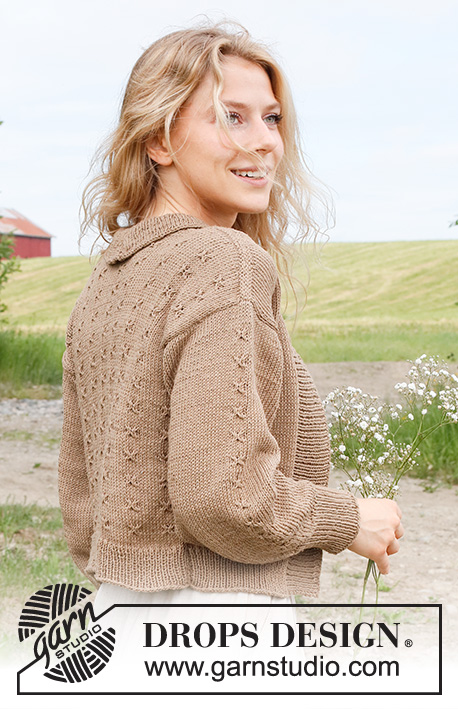
Knitted jacket in DROPS Cotton Light. Piece is knitted bottom up with relief pattern. Size: S - XXXL
DROPS 232-23 |
|||||||||||||
|
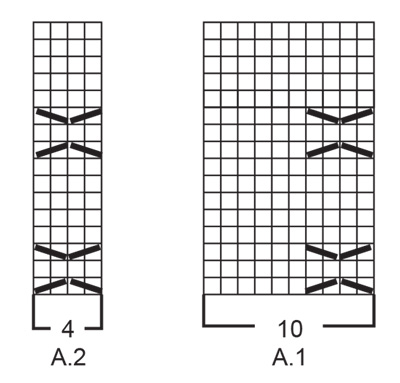
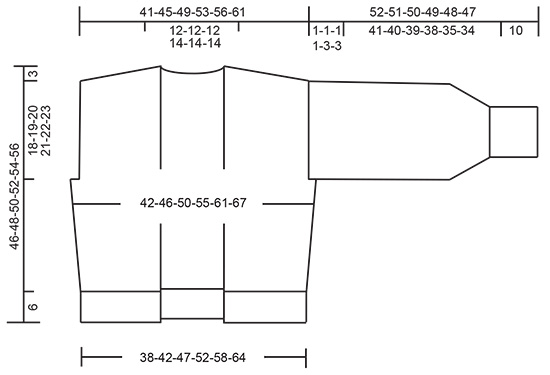
---------------------------------------------------------- EXPLANATION FOR THE PATTERN: ---------------------------------------------------------- GARTER STITCH (back and forth): Knit all rows. 1 ridge vertically = knit 2 rows. PATTERN: See diagrams A.1 and A.2. Diagrams show all rows in pattern seen from the right side. INCREASE TIP-1(applies to sides on back piece and front pieces): Increase 1 stitch inside the outermost 2 stitches from the edge by making 1 yarn over. On next row work yarn over twisted to avoid holes Then work the new stitches in stocking stitch. INCREASE TIP-2 (applies to sleeves): INCREASE AS FOLLOWS AFTER MARKER THREAD: Work the first 4 stitches after marker thread as before, make 1 yarn over. INCREASE AS FOLLOWS BEFORE MARKER THREAD: Work until 4 stitches remain before marker thread, make 1 yarn over. On next round knit yarns over twisted to avoid holes. Then work the new stitches in stocking stitch. ---------------------------------------------------------- START THE PIECE HERE: ---------------------------------------------------------- JACKET - SHORT OVERVIEW OF THE PIECE: Work back piece and front pieces back and forth on circular needle, bottom up, separately. Work sleeves in the round on double pointed needles/short circular needle, from the bottom and up to sleeve cap, then work back and forth on circular needle. Sew the piece together as explained in pattern. Finish by working a band in rib. BACK PIECE: Cast on 93-101-113-127-141-153 stitches on circular needle size 3.5 mm with DROPS Cotton Light. Purl 1 row from wrong side. Work next row as follows from right side: 1 stitch in GARTER STITCH - read explanation above - * knit 1, purl 1 *, repeat from *-* until 2 stitches remain, knit 1, 1 stitch in garter stitch. Continue rib back and forth like this for 6 cm. When rib is finished, knit 1 row from right side while decreasing 11-11-13-15-17-17 stitches evenly = 82-90-100-112-124-136 stitches. Purl 1 row from wrong side with 1 stitch in garter stitch in each side. Switch to circular needle size 4 mm. Work in stocking stitch with 1 stitch in garter stitch in each side. REMEMBER THE KNITTING TENSION! When piece measures 8 cm, begin relief pattern. Work next row as follows from right side: 1 stitch in garter stitch, 3-2-2-3-4-5 stitches in stocking stitch, work A.1 7-8-9-10-11-12 times, A.2, 3-2-2-3-4-5 stitches in stocking stitch, 1 stitch in garter stitch. Continue this pattern. AT THE SAME TIME when piece measures 9 cm, increase 1 stitch in each side - READ INCREASE TIP-1! Increase like this every 4-4-4-6-6-6 cm 4-4-4-3-3-3 times in total = 90-98-108-118-130-142 stitches. When piece measures 25-26-27-28-29-30 cm, cast off 2-2-3-3-6-7 stitches for armholes at the beginning of the next 2 rows = 86-94-102-112-118-128 stitches. Continue the pattern as before with 5-4-3-3-1-1 stitches in stocking stitch and 1 stitch in garter stitch in each side. When piece measures 43-45-47-49-51-53 cm, cast off for neck on mid back. AT THE SAME TIME slip stitches on a thread for diagonal shoulder in each side. Read NECK DECREASE and DIAGONAL SHOULDER before continuing. NECK DECREASE: Cast off the middle 20-20-20-24-24-24 stitches for neck and finish each shoulder separately. AT THE SAME TIME cast off for neck at the beginning of every row from neck as follows: Cast off 2 stitches 1 time and 1 stitch 1 time. DIAGONAL SHOULDER: Slip the outermost stitches towards armholes on a thread for diagonal shoulder but to avoid cutting the yarn work them before slipping them on the thread. Slip 8-9-10-10-11-12 stitches on a thread 3 times, and then the last 6-7-8-11-11-13 stitches on a thread. All stitches have now been cast off or slipped on a thread. Slip the 30-34-38-41-44-49 stitches from thread back on circular needle size 4 mm. Knit 1 row from wrong side but to avoid a hole where turning mid piece, pick up the yarn between 2 stitches and knit twisted together with first stitch on left needle. Then loosely cast off all stitches by knitting from right side. Piece measures approx. 46-48-50-52-54-56 cm from cast-on edge to the top of shoulder. Work the other shoulder the same way. RIGHT FRONT PIECE: Cast on 32-36-42-46-54-60 stitches on circular needle size 3.5 mm with DROPS Cotton Light. Purl 1 row from wrong side. Work next row as follows from right side: 1 stitch in garter stitch, * knit 1, purl 1 *, work from*-* until 1 stitch remains on needle, work 1 stitch in garter stitch. Continue rib back and forth like this for 6 cm. When rib is finished, knit 1 row from right side while decreasing 4-4-5-5-7-7 stitches evenly = 28-32-37-41-47-53 stitches. Purl 1 row from wrong side with 1 stitch in garter stitch in each side. Switch to circular needle size 4 mm. Work in stocking stitch with 1 stitch in garter stitch in each side. When piece measures 9 cm, increase 1 stitch in the side - remember INCREASE TIP-1! Increase like this every 4-4-4-6-6-6 cm 4-4-4-3-3-3 times in total = 32-36-41-44-50-56 stitches. When piece measures 25-26-27-28-29-30 cm, cast off 2-2-3-3-6-7 stitches for armhole at the beginning of next row from wrong side = 30-34-38-41-44-49 stitches. When piece measures 43-45-47-49-51-53 cm, slip stitches on a thread for diagonal shoulder the same way as on back piece, i.e. begin from wrong side and slip 8-9-10-10-11-12 stitches on a thread 3 times, then slip the last 6-7-8-11-11-13 stitches on a thread. All stitches have now been slipped on a thread (there is no neck decrease on front piece). Slip the 30-34-38-41-44-49 stitches from thread back on circular needle size 4 mm. Knit 1 row from wrong side but to avoid a hole where turning mid piece, pick up the yarn between 2 stitches and knit twisted together with first stitch on left needle. Then loosely cast off all stitches by knitting from right side. Piece measures approx. 46-48-50-52-54-56 cm from cast-on edge to the top of shoulder. LEFT FRONT PIECE: Cast on 32-36-42-46-54-60 stitches on circular needle size 3.5 mm with DROPS Cotton Light. Purl 1 row from wrong side. Work next row as follows from right side: 1 stitch in garter stitch, * purl 1, knit 1 *, work from*-* until 1 stitch remains on needle, work 1 stitch in garter stitch. Continue rib back and forth like this for 6 cm. When rib is finished, knit 1 row from right side while decreasing 4-4-5-5-7-7 stitches evenly = 28-32-37-41-47-53 stitches. Purl 1 row from wrong side with 1 stitch in garter stitch in each side. Switch to circular needle size 4 mm. Work in stocking stitch with 1 stitch in garter stitch in each side. When piece measures 9 cm, increase 1 stitch in the side - remember INCREASE TIP-1! Increase like this every 4-4-4-6-6-6 cm 4-4-4-3-3-3 times in total = 32-36-41-44-50-56 stitches. When piece measures 25-26-27-28-29-30 cm, cast off 2-2-3-3-6-7 stitches for armhole at the beginning of next row from right side = 30-34-38-41-44-49 stitches. When piece measures 43-45-47-49-51-53 cm, slip stitches on a thread for diagonal shoulder the same way as on right front piece, i.e. begin from right side and slip 8-9-10-10-11-12 stitches on a thread 3 times, then slip the last 6-7-8-11-11-13 stitches on a thread. All stitches have now been slipped on a thread (there is no neck decrease on front piece). Slip the 30-34-38-41-44-49 stitches from thread back on circular needle size 4 mm. Knit 1 row from wrong side the same way as on right front piece. Then loosely cast off all stitches by knitting from right side. SLEEVES: Cast on 54-56-58-60-62-64 stitches on double pointed needles size 3.5 mm with DROPS Cotton Light. Knit 1 round. Then work rib (= knit 1/purl 1) for 10 cm. Knit 1 round while increasing 2-0-2-0-2-0 stitches evenly = 56-56-60-60-64-64 stitches. Switch to double pointed needles size 4 mm. Insert 1 marker thread at beginning of round (mid under sleeve), and 1 marker thread after 28-28-30-30-32-32 stitches (mid on top of sleeve). Work in stocking stitch in the round. When 5 rounds in stocking stitch have been worked, increase 1 stitch on each side of both marker threads - read INCREASE TIP-2 (= 4 stitches increased). Increase like this every 6th round 5-6-6-7-7-8 times in total = 76-80-84-88-92-96 stitches. AT THE SAME TIME when sleeve measures 12 cm, work A.2 mid on top of sleeve (marker thread is in the middle of A.2). Repeat A.2 vertically. Work until sleeve measures 51-50-49-48-45-44 cm from cast-on edge. Now divide the piece mid under sleeve. Work in stocking stitch back and forth until sleeve measures 52-51-50-49-48-47 cm, i.e. there is a vent of approx. 1-1-1-1-3-3 cm at the top of sleeve. Cast off. Work the other sleeve the same way. ASSEMBLY: Sew shoulder seams inside cast-off edge. Sew side seams inside 1 edge stitch. Sew sleeve cap to armhole. Then sew vent at the top of sleeve to bottom of armhole - see chart. BAND: Insert 1 marker mid back of neck. Begin from right side at the bottom of right front piece, use circular needle size 3.5 mm and Cotton Light, and knit up approx. 123-129-133-141-145-149 stitches along front piece and the neck at the back until marker in the neck (number of stitches must be divisible by 2 + 1), knit up 1 stitch mid back, then knit up the same number of stitches as along right front piece, inside 1 edge stitch along the neck at the back and down along left front piece = approx. 247-259-267-283-291-299 stitches. Begin from wrong side and work as follows: 1 stitch in garter stitch, * purl 1, knit 1 *, work from*-* until 2 stitches remain on needle, purl 1, 1 stitch in garter stitch. Continue rib back and forth like this. When band measures 3 cm, increase 1 stitch in every purl section (seen from right side) between shoulder seams at the back of neck. This is done to avoid a tight edge in the back of neck. Repeat increase when band measures approx. 6 cm. AT THE SAME TIME when band measures 5-5-5-6-6-6 cm, decrease for 2 buttonholes on right band. 1 buttonhole = work 2 together, make 1 yarn over. Bottom buttonhole should be placed approx. 12 cm from bottom edge and top approx. 7-7-7-8-8-8 cm from bottom buttonhole. Continue to work until band measures approx. 8-8-8-9-9-9 cm. Loosely cast off. Sew the buttons on to the left band. |
|||||||||||||
Diagram explanations |
|||||||||||||
|
|||||||||||||
 |
|||||||||||||
 |
|||||||||||||
 |
|||||||||||||
Have you finished this pattern?Tag your pictures with #dropspattern #midsummersnightcardigan or submit them to the #dropsfan gallery. Do you need help with this pattern?You'll find 35 tutorial videos, a Comments/Questions area and more by visiting the pattern on garnstudio.com. © 1982-2026 DROPS Design A/S. We reserve all rights. This document, including all its sub-sections, has copyrights. Read more about what you can do with our patterns at the bottom of each pattern on our site. |
|||||||||||||


With over 40 years in knitting and crochet design, DROPS Design offers one of the most extensive collections of free patterns on the internet - translated to 17 languages. As of today we count 324 catalogues and 12290 patterns translated into English (UK/cm). 12290
We work hard to bring you the best knitting and crochet have to offer, inspiration and advice as well as great quality yarns at incredible prices! Would you like to use our patterns for other than personal use? You can read what you are allowed to do in the Copyright text at the bottom of all our patterns. Happy crafting!
Post a comment to pattern DROPS 232-23
We would love to hear what you have to say about this pattern!
If you want to leave a question, please make sure you select the correct category in the form below, to speed up the answering process. Required fields are marked *.