
Popular categories
Looking for a yarn?


Comments / Questions (48)
![]() Rica wrote:
Rica wrote:
Ich komme bei der passe nicht klar 1 markierer nach der blende? stricke ich da die 5 maschen danach steht.die Arbeit wird nun ab hier gemessen zusätzlich 4 neue markieren anbringen-ohne die maschen dabei zu stricken?
25.05.2025 - 22:33DROPS Design answered:
Liebe Rica, die Markierer werden so (zwischen Maschen) eingesetzt: 23-24-23-23-24-25 M für das linke Vorderteil (ide 5 Blendenmaschen gehören zu diesen Maschen), 16-16-22-22-22-22 M für den linken Ärmel, 37-39-37-37-39-41 M für das Rückenteil, 16-16-22-22-22-22 M für den rechten Ärmel, und 23-24-23-23-24-25 M übrig für das rechte Vorderteil (die 5 Blendenmaschen gehören zu diesen Maschen). Kann das Ihnen helfen? Viel Spaß beim Stricken!
26.05.2025 - 10:03
![]() Halina wrote:
Halina wrote:
Dzień dobry. Mam pytanie: dlaczego sweterek o rozmiarze 7/8 tak bardzo się rozciągnął po praniu, że musiałam go spruć. Teraz usiłuję wykonać sweter od nowa z dodatkiem nitki stabilizującej Lana Gatto Harmony. Rozpoczęłam pracę od wykonania trzech próbek drutami nr 2 mm o różnym naprężeniu nitki, niestety nie mogę uzyskać 24 oczek i 32 rzędów dżersejem 10x10. Co powinnam zrobić, aby wykonać sweterek według wzoru podanego w powyższym opisie?
03.02.2025 - 18:06DROPS Design answered:
Witaj Halino, koniecznie zobacz zasady prania i konserwacji w karcie kolorów tej włóczki TUTAJ. Kilka uwag: 1. przerabiamy tą włóczkę bardzo ścisło, napinając dobrze nitkę. Jak to robię przerabianie przestaje być nawet przyjemne, tak więc chyba lepiej jest użyć mniejszych drutów. 2. Próbkę zmoczyć i wysuszyć, sprawdzić czy jest zgodna. 3. prać ubranie wyłącznie ręcznie, krótko, nie namaczać. 4. nie używać środków zmiękczających. 5. odcisnąć wodę, dobrze zblokować i wysuszyć. Powodzenia!
04.02.2025 - 08:16
![]() Veronique wrote:
Veronique wrote:
Suite à votre réponse si je comprends bien sur le rang endroit l\'augmentation pour l\'épaule se fait entre les deux mailles avant le marqueur et donc sur l\'envers entre deux après le marqueur en fait au même endroit sur la même maille que sur le rang envers c\'est assez confus pour moi merci de m\'éclairer
03.02.2025 - 11:27DROPS Design answered:
Bonjour Véronique, j'ai pensé augmentations empiècement, pour les épaules, vous devez augmenter de part et d'autre des 16-22 m (cf taille) de l'épaule, autrement dit, sur l'endroit avant le 1er marqueur et après le 2ème marqueur et avant le 3ème marqueur + après le 4ème marqueur; sur l'envers, même chose (= de part et d'autres des épaules): avant le 4ème marqueur + après le 3ème marqueur et avant le 2ème marqueur + après le 1er marqueur. Retrouvez cette façon de faire dans cette vidéo. Bon tricot!
03.02.2025 - 13:55
![]() Veronique Vigot wrote:
Veronique Vigot wrote:
Bonjour les augmentations avant et après les marqueurs se font ils avec une maille entre les deux augmentations je n\'arrive pas à comprendre comment procéder avant et après ce marqueur situé entre deux mailles merci de votre réponse
02.02.2025 - 21:20DROPS Design answered:
Bonjour Mem Vigot, lorsque vous augmentez pour l'empiècement, vous augmentez 1 maille avant le marqueur, vous tricotez 1 maille et augmentez 1 maille après le marqueur = 2 mailles à chaque marqueur. Augmentez comme vous l'avez fait auparavant en relevant le fil avant la maille pour augmenter avant le fil marqueur, et augmentez après la maille avec la marqueur. Bon tricot!
03.02.2025 - 10:13
![]() Kay Ack wrote:
Kay Ack wrote:
Hello. Is there an adult version of this cardigan? Thanks
13.08.2024 - 07:56DROPS Design answered:
Dear Mrs Ack, yes we do, you will find it here. Happy knitting!
13.08.2024 - 09:01
![]() Dorothy Neufeld wrote:
Dorothy Neufeld wrote:
Hi i am knitting the 4th size and want to make a longer sleeve. Could I get some directions when to decrease stiches to make it into a long sleeve??
16.06.2024 - 04:12DROPS Design answered:
Dear Dorothy, please understand, that with many thousands of patterns on our site, we cannot modify them to each individual request. Havng said that, since the slee is knitted on the round, without decreases until the ribbing, I would just knit them longer, and maybe decrease a stitch at the middle of the undersleeve (on bot sides) every 4th or sixth row a couple of times, to bring it closer to the wrist. Happy Knitting!
16.06.2024 - 07:58
![]() Jacqueline wrote:
Jacqueline wrote:
Est-ce que je dois faire les augmentations épaules manches empiècement dos et devant tous en même temps sur le même rang
15.06.2024 - 00:10DROPS Design answered:
Bonjour Jacqueline, vous augmentez d'abord pour les épaules (le nombre de mailles des devants et du dos seulement), puis vous augmentez pour les manches (le nombre de mailles des manches seulement) puis pour l'empiècement (le nombre de mailles des manches + des devants + du dos). Bon tricot!
17.06.2024 - 09:05
![]() Halina wrote:
Halina wrote:
Wykonuję sweter o rozmiarze 7/8. Po dodaniu 23 oczek i rozmieszczeniu 4 markerów przystępuję do wykonania na prawej stronie robótki ściegu fantazyjnego według schematu A2 w następujący sposób: 7 oczek prawych , 2 oczka razem, narzut, 3 oczka prawe, narzut, 2 oczka razem , 7 oczek prawych, dodaję 1 oczko przed markerem 1, 1 oczko prawe. kończąc sekwencję, na prawym drucie mam 19 oczek a nie 18 oczek. Dlaczego
05.06.2024 - 12:02DROPS Design answered:
Witaj Halino, gdzieś musiało zagubić się 1 oczko. W okrążeniu z dodawaniem oczek na reglan, nie licząc tych oczek, powinnaś mieć 127 oczek: 5 o. (obszycie przodu) + A.2 (18 o.) + dżersej (22 o.) + A.3 (37 o.) + dżersej (22 o.) + A.4 (18 o.) +5 o.. Razem z dodanymi oczkami na reglan będzie 135 o. Pozdrawiamy!
05.06.2024 - 15:23
![]() Halina wrote:
Halina wrote:
Wykonuję sweter o rozmiarze 7/8. Po dodaniu na prawej stronie robótki 23 oczek, pozostaje na drucie 127 oczek. Po umieszczeniu markera za obszyciem przodu oraz umieszczeniem 4 markerów między oczkami , na drucie , za czwartym markerem pozostaje mi 22 oczka , a nie 23 oczka. Z góry dziękuję za wyjaśnienie, gdzie popełniam błąd. Halina
04.06.2024 - 08:27DROPS Design answered:
Witaj Halino, 1-szy marker, który znajduje się za pierwszym oczkiem nie jest tu liczony, on jest tylko do pomiarów długości. Traktuj jakby go nie było. I teraz odliczamy od początku robótki: 23+22+37+22+23=127. Pozdrawiamy!
04.06.2024 - 18:28
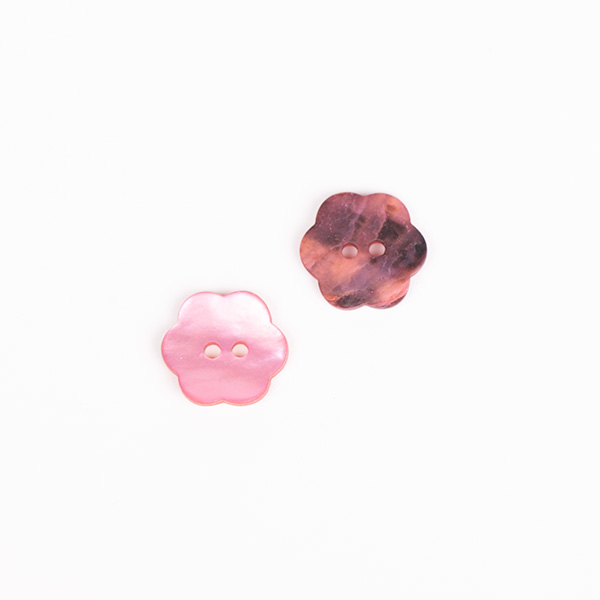
![]() Susanna Päivinen wrote:
Susanna Päivinen wrote:
Hej, Jag undrar hur stora knappar är det tänkt att använda till mönster Pink Peony Cardigan?
28.05.2024 - 18:43DROPS Design answered:
Hei Susanna. Til denne jakken er det brukt DROPS perlemorsknapp nr. 616. Under GARN & PINNER og KNAPPER finner du oversikt over størrelsen knappene har. DROPS perlemorsknapp nr. 616 har en diameter på 15 mm. mvh DROPS Design
03.06.2024 - 08:33
|
|||||||||||||||||||||||||
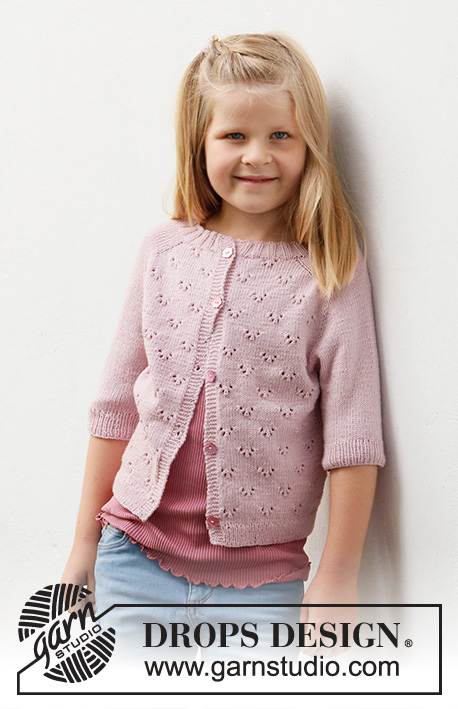
Pink Peony Cardigan#pinkpeonycardigan |
|||||||||||||||||||||||||
 |
 |
||||||||||||||||||||||||
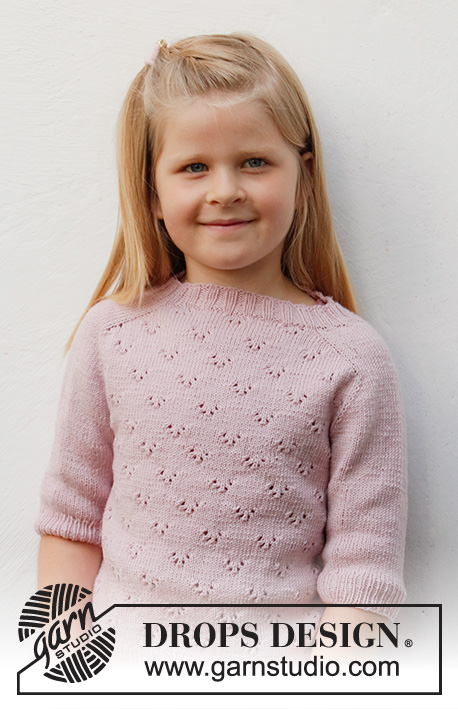
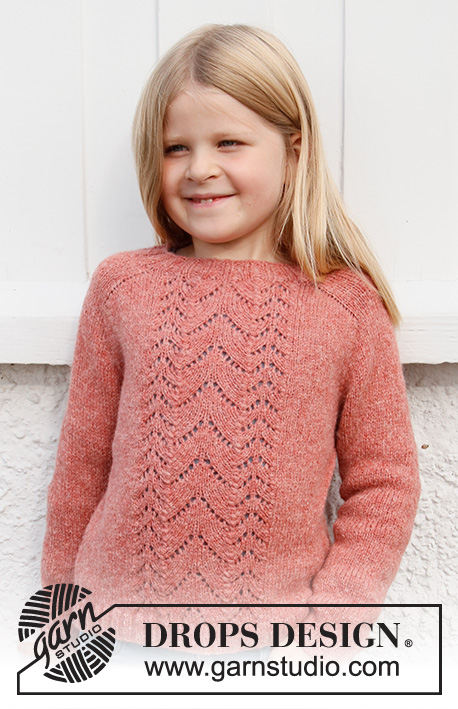
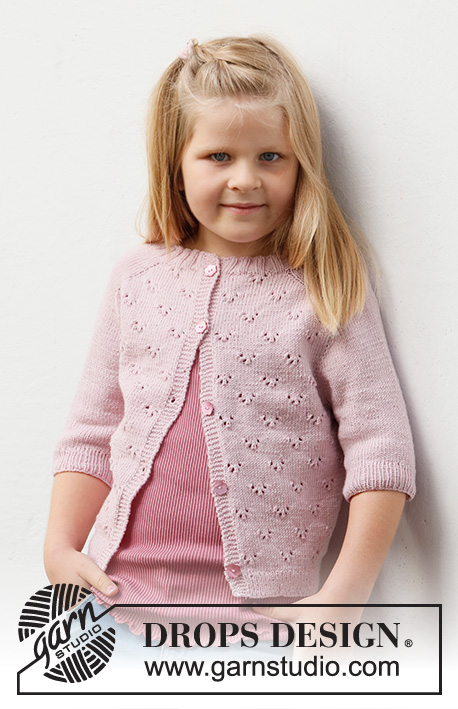
Knitted jacket for children in DROPS BabyMerino. The piece is worked top down with saddle-shoulders, lace pattern and short sleeves. Sizes 3-14 years.
DROPS Baby & Children 38-22 |
|||||||||||||||||||||||||
|
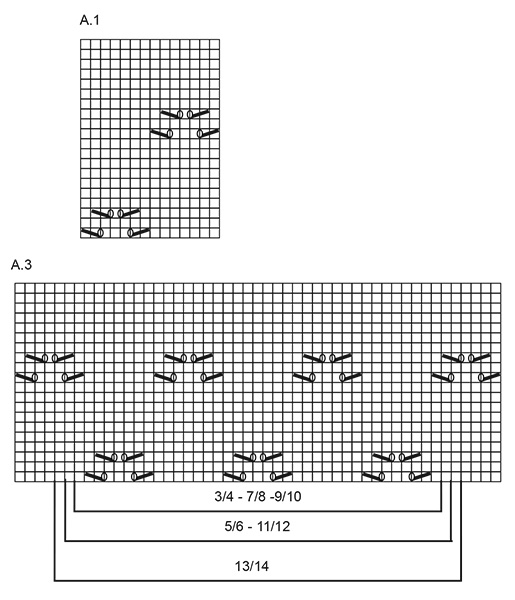
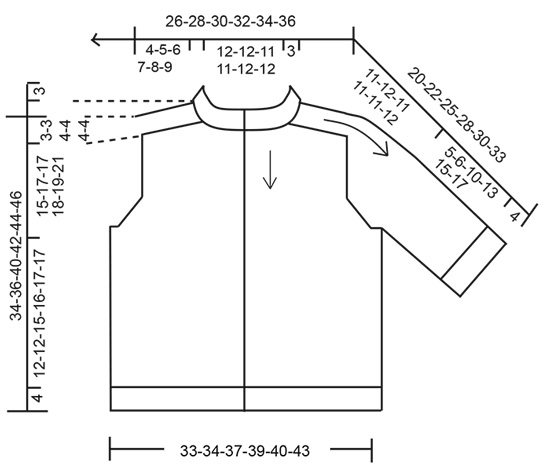
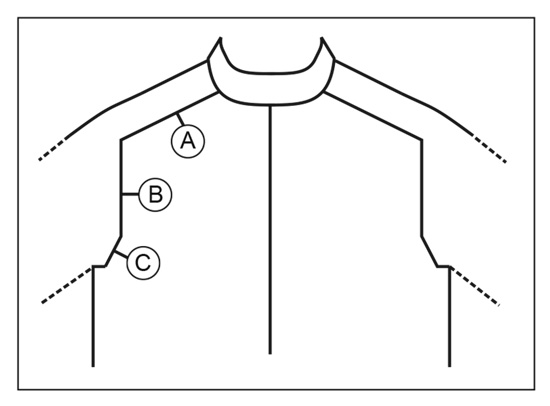
------------------------------------------------------- EXPLANATIONS FOR THE PATTERN: ------------------------------------------------------- RIDGE/GARTER STITCH (worked back and forth): Knit all rows. 1 ridge in height = Knit 2 rows. PATTERN: See diagrams A.1 to A.4. Find your size in the diagrams. The diagrams show all rows in the pattern from the right side. INCREASE TIP-1 (evenly spaced): To work out how to increase evenly, count the total number of stitches on the needle (e.g. 96 stitches), minus the bands (e.g. 10 stitches) and divide the remaining stitches by the number of increases to be made (e.g. 19) = 4.5. In this example, increase by making 1 yarn over after alternately each 4th and 5th stitch. Do not increase on the bands. On the next row work the yarn overs twisted to avoid holes. INCREASE TIP-2 (for saddle shoulders, sleeves and yoke from the RIGHT SIDE): BEFORE MARKER: The new stitch twists to the right. Use the left needle to pick up the strand between 2 stitches from the previous round, pick up the back strand and knit in the front loop. AFTER MARKER: The new stitch twists to the left. Use the left needle to pick up the strand between 2 stitches from the previous round, pick up the front strand and knit in the back loop. INCREASE TIP-3 (for saddle shoulders, sleeves and yoke from the WRONG SIDE): BEFORE MARKER: The new stitch twists to the right. Use the left needle to pick up the strand between 2 stitches from the previous round, pick up the front strand and purl in the back loop. AFTER MARKER: The new stitch twists to the left. Use the left needle to pick up the strand between 2 stitches from the previous round, pick up the back strand and purl in the front loop. BUTTONHOLES: Work buttonholes on the right band (when the garment is worn). Work from the right side when there are 3 stitches left on the row as follows: Make 1 yarn over, knit 2 together and knit 1. On the next row (wrong side), knit the yarn over to leave a hole. The first buttonhole is worked when the neck is finished (transition between neck and yoke). Then work the other 4-5-5-6-6-6 buttonholes with approx. 7-6-6½-6-6-6½ cm between each one. CASTING-OFF TIP: To avoid the cast-off edge being tight you can cast off with a larger size needle. If the edge is still tight, make 1 yarn over after approx. each 6th stitch at the same time as casting off; the yarn overs are cast off as normal stitches. ------------------------------------------------------- START THE PIECE HERE: ------------------------------------------------------- JACKET – SHORT OVERVIEW OF THE PIECE: The neck and yoke are worked back and forth with circular needle, from mid-front and top down. Stitches are increased for the shoulders, then for the sleeves and finally for the yoke. The yoke is divided for the body and sleeves and the body continued back and forth. The sleeves are worked in the round with double pointed needles/short circular needle, top down. NECK: Cast on 96-100-104-104-108-112 stitches (including 5 band stitches on each side towards mid-front) with circular needle size 2.5 mm and Baby Merino. Purl 1 row (= wrong side). The next row is worked as follows from the right side: 5 band stitches in GARTER STITCH – read description above, * knit 2, purl 2 *, work from *-* until there are 7 stitches left, knit 2 and 5 band stitches in garter stitch. Continue this rib for 3 cm. When the rib is finished, knit 1 row from the right side where you increase 19-19-23-23-23-23 stitches evenly spaced – read INCREASE TIP-1 = 115-119-127-127-131-135 stitches. Purl 1 row from the wrong side (yarn overs purled twisted and the bands worked in garter stitch). Change to circular needle size 3 mm. YOKE: Insert a marker after the band at the beginning of the row – THE PIECE IS MEASURED FROM HERE! In addition, insert 4 other markers as described below – without working the stitches and each marker inserted between 2 stitches. The markers should be of a different colour to the marker on the neck and are used when increasing. Marker 1: Count 23-24-23-23-24-25 stitches (= front piece), insert the marker before the next stitch. Marker 2: Count 16-16-22-22-22-22 stitches from marker 1 (= shoulder), insert the marker before the next stitch. Marker 3: Count 37-39-37-37-39-41 stitches from marker 2 (= back piece), insert the marker before the next stitch. Marker 4: Count 16-16-22-22-22-22 stitches from marker 3 (= shoulder), insert the marker before the next stitch. There are 23-24-23-23-24-25 stitches left on the front piece after marker 4. Allow the 4 markers to follow your work onwards. INCREASES FOR SADDLE SHOULDERS: Read the whole of the next section before continuing! Continue working 5 band stitches on each side, A.2 over the next 18-19-18-18-19-20 stitches, stocking stitch over the next 16-16-22-22-22-22 stitches, A.3 over the next 37-39-37-37-39-41 stitches, stocking stitch over the next 16-16-22-22-22-22 stitches, A.4 over the next 18-19-18-18-19-20 stitches. A.1 shows 1 repeat of the pattern. AT THE SAME TIME on the first row from the right side increase 4 stitches for the shoulders as follows: Increase 1 stitch BEFORE markers 1 and 3 and increase 1 stitch AFTER markers 2 and 4 – read INCREASE TIP-2. You are only increasing on the front and back pieces, the number of sleeve stitches remains the same. On the next row from the wrong side increase for the shoulders as follows: Increase 1 stitch BEFORE markers 4 and 2 and increase 1 stitch AFTER markers 3 and 1 – read INCREASE TIP-3. The increases are different on the right and wrong sides, so the stitches lie neatly. Continue the pattern and increase like this every row (i.e. both from the right and wrong side) a total of 12-16-20-22-24-26 times = 163-183-207-215-227-239 stitches. REMEMBER THE KNITTING TENSION! The increased stitches are worked into A.1, make sure that A.1 fits over the stitches from A.2, A.3 and A.4. After the last increase, the piece measures approx. 4-5-6-7-8-9 cm from the marker on the neck. Now increase for the sleeves as described below. INCREASES FOR SLEEVES: Continue with stocking stitch, pattern as before and 5 band stitches in garter stitch on each side. AT THE SAME TIME on the next row from the right side, increase 4 stitches as follows: Increase 1 stitch AFTER markers 1 and 3 and increase 1 stitch BEFORE markers 2 and 4. You are only increasing on the sleeves and the number of stitches on the front and back pieces remains the same. The increased stitches are worked in stocking stitch. Increase like this every 2nd row (i.e. every row from the right side) a total of 13-17-15-16-18-19 times = 215-251-267-279-299-315 stitches. The piece measures approx. 12-16-15-17-19-21 cm from the marker on the neck. INCREASES FOR YOKE: Now increase 1 stitch on each side of all 4 markers as follows: Work until there is 1 stitch left before markers 1 and 3, increase 1 stitch before the marker, work 1 stitch, move the marker to the right needle and increase 1 stitch after the marker. Work to markers 2 and 4, increase 1 stitch before the marker, move the marker to the right needle, work 1 stitch and increase 1 stitch after the marker (= 8 stitches increased). You are now increasing on both the front and back pieces and on the sleeves. The increased stitches are worked into A.1 on the back/front pieces and in stocking stitch on the sleeves. Increase like this every 2nd row a total of 5-2-2-1-0-0 times = 255-267-283-287-299-315 stitches. When all the increases are finished, the piece measures approx. 15-17-17-18-19-21 cm from the marker on the neck. If the piece is shorter than this, continue working without further increases to the correct length. Now divide the piece for body and sleeves on the next row as follows: Work the first 40-42-45-46-48-51 stitches (front piece), place the next 52-54-56-56-58-60 stitches on a thread for the sleeve, cast on 8-8-8-10-10-10 stitches, work 71-75-81-83-87-93 stitches (= back piece), place the next 52-54-56-56-58-60 stitches on a thread for the sleeve, cast on 8-8-8-10-10-10 stitches, work the last 40-42-45-46-48-51 stitches (= front piece). Body and sleeves are finished separately. THE PIECE IS NOW MEASURED FROM HERE. BODY: = 167-175-187-195-203-215 stitches. Work A.1 back and forth with 5 band stitches in garter stitch on each side; the stitches which do not fit into A.1 in the sides are worked in stocking stitch. Continue working until the piece measures 12-12-15-16-17-17 cm from the division. There is approx. 4 cm left to finished length; try the jacket on and continue to desired length. Knit 1 row from the right side, where you increase 36-36-36-40-44-44 stitches evenly spaced = 203-211-223-235-247-259 stitches. NOTE: You increase stitches here to prevent the rib being tight. Change to circular needle size 2.5 mm and work the next row from the wrong side as follows: 5 band stitches in garter stitch, * purl 1, knit 1 *, work from *-* until there are 6 stitches left, purl 1 and 5 band stitches in garter stitch. Continue this rib for 4 cm. Cast off with garter stitch over garter stitch, knit over knit and purl over purl – read CASTING-OFF TIP! The jacket measures approx. 34-36-40-42-44-46 cm from the shoulder down. SLEEVES: Place the 52-54-56-56-58-60 stitches from the thread on the one side of the piece on short circular needle/double pointed needles size 3 mm and knit up 1 stitch in each of the 8-8-8-10-10-10 stitches cast on under the sleeve = 60-62-64-66-68-70 stitches. Insert a marker thread in the middle of the new stitches under the sleeve. Start at the marker thread and work stocking stitch in the round. Continue working until the sleeve measures 5-6-10-13-15-17 cm from the division, There is approx. 4 cm left to finished length; try the jacket on and continue to desired length. Knit 1 round where you decrease 4 stitches evenly spaced = 56-58-60-62-64-66 stitches. Change to double pointed needles size 2.5 mm and work rib (knit 1, purl 1) for 4 cm. Cast off with knit over knit and purl over purl – remember CASTING-OFF TIP! The sleeve measures approx. 9-10-14-17-19-21 cm from the division. Work the other sleeve in the same way. ASSEMBLY: Sew the buttons onto the left band. |
|||||||||||||||||||||||||
Diagram explanations |
|||||||||||||||||||||||||
|
|||||||||||||||||||||||||
 |
|||||||||||||||||||||||||
 |
|||||||||||||||||||||||||
 |
|||||||||||||||||||||||||
 |
|||||||||||||||||||||||||
Have you finished this pattern?Tag your pictures with #dropspattern #pinkpeonycardigan or submit them to the #dropsfan gallery. Do you need help with this pattern?You'll find 29 tutorial videos, a Comments/Questions area and more by visiting the pattern on garnstudio.com. © 1982-2026 DROPS Design A/S. We reserve all rights. This document, including all its sub-sections, has copyrights. Read more about what you can do with our patterns at the bottom of each pattern on our site. |
|||||||||||||||||||||||||


With over 40 years in knitting and crochet design, DROPS Design offers one of the most extensive collections of free patterns on the internet - translated to 17 languages. As of today we count 324 catalogues and 12290 patterns translated into English (UK/cm). 12290
We work hard to bring you the best knitting and crochet have to offer, inspiration and advice as well as great quality yarns at incredible prices! Would you like to use our patterns for other than personal use? You can read what you are allowed to do in the Copyright text at the bottom of all our patterns. Happy crafting!
Post a comment to pattern DROPS Baby & Children 38-22
We would love to hear what you have to say about this pattern!
If you want to leave a question, please make sure you select the correct category in the form below, to speed up the answering process. Required fields are marked *.