
Popular categories
Looking for a yarn?


Comments / Questions (260)
![]() Manuela wrote:
Manuela wrote:
Hola! El patrón es muy bonito, pero no tengo muy claro como continuar el dibujo de las mangas. Si sigo A1 al hacer el renglan y termino con A3, al ir aumentando los puntos A2 queda desplazado... No sé como continuar! Cuando. Si empiezo con A1 A2 A3 (pasada 1) entra bien el esquema pero en la pasada tres tengo dos puntos más. Como voy trabajando esos puntos? Gracias.
27.04.2026 - 22:59
![]() Margarita wrote:
Margarita wrote:
Un patrón precioso
19.04.2026 - 21:02
![]() Hanne wrote:
Hanne wrote:
Diagrammet Starter man i v. side eller h. side ??
17.04.2026 - 17:33DROPS Design answered:
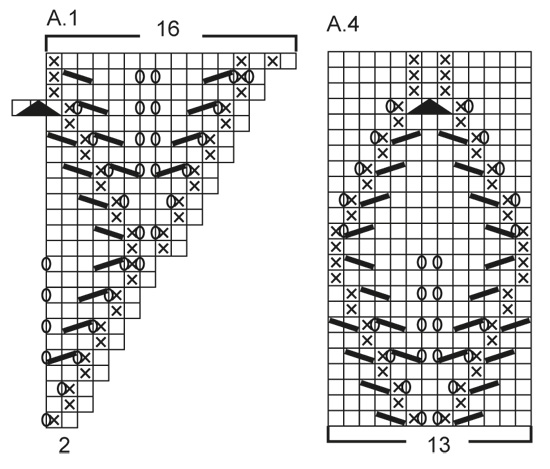
Hei Hanne. Man leser et strikkediagram motsatt av slik man normalt leser: Fra høyre mot venstre, nedenfra og opp. Du begynner altså nederst i det høyre hjørnet, og jobber deg mot venstre og oppover. Les gjerne mer under Tips & Hjelp - DROPS Leksjoner - Les en Oppskrift - Hvordan lese strikkediagrammer. mvh DROPS Design
20.04.2026 - 09:40
![]() Vibeke wrote:
Vibeke wrote:
Når der står man skal strikke en rapport a2 mere mellem a1 og a3, hvordan gør man det?
16.04.2026 - 08:48DROPS Design answered:
Hej Vibeke, jo da starter du forfra i diagrammerne og strikker: A.1, A.2, A.2, A.2, A.3 - du vil se at diagram A.2 stemmer over maskerne du har taget ud ifølge A.1 og A.3 i hver side :)
16.04.2026 - 13:38
![]() Chouffane wrote:
Chouffane wrote:
Comment faire pour rallonger les manches Svp
12.04.2026 - 10:52DROPS Design answered:
Bonjour Mme Chouffane, vous pouvez vous inspirer d'un modèle de tension similaire pour adapter la longueur des manches à celles que vous souhaitez. Bon tricot!
13.04.2026 - 10:08
![]() Klaudia wrote:
Klaudia wrote:
Könnte ich vielleicht auch eine provisorische Blende mit ausreichend Maschen in Reihen stricken und dann mit der Passe beginnen, verkürzte Reihen bis zur gewünschten Ausschnitttiefe arbeiten und dann zur Runde schließen. Zum Schluss dann die offenen Maschen von der provisorischen Blende auffassen und die Halsblende nach oben anstricken?
28.03.2026 - 09:42DROPS Design answered:
Liebe Klaudia, sowas können Sie auch mal stricken - je nach Wunsch. Viel Spaß beim Stricken!
07.04.2026 - 08:40
![]() Klaudia wrote:
Klaudia wrote:
Servus, bis auf den vorderen Halsausschnitt gefällt mir das Top sehr gut. Mit Raglan von oben gestrickt hab ich noch keine Erfahrungen. Hab mir aber gedacht, mit verkürzten Reihen über die Ärmel und den Rücken zu stricken. Aber was mach ich mit der Halsblende? Da müsste ich doch wohl mehr Maschen anschlagen um den tieferen Ausschnitt vorne abzudecken...?
28.03.2026 - 09:33DROPS Design answered:
Liebe Klaudia, gerne können Sie dazu verkürzten Reihen stricken, damit den Halsausschnitt vorne tiefer als hinten wird; in diesem Video zeigen wir so ein Beispiel (das wird nach der Halsblende gestrickt). Viel Spaß beim Stricken!
07.04.2026 - 08:39
![]() Hildegard wrote:
Hildegard wrote:
Hallo, wenn ich die Maschen der Diagramme A1: 3M, A2: 14M, A3: 4M unter Beachtung aller Umschläge und zusammen gestrickten Maschen zusammen zähle komme ich auf 21 M und nicht wie angegeben auf 19M. Wo ist mein Denkfehler?
19.03.2026 - 17:40DROPS Design answered:
Liebe Hildegard, die Umschläge bei der 1. Reihe in A.1 und in A.3 sind die Raglanzunahmen, die bei jeder 2 Runde gestrickt sind; aber A.1 wird über 2 Maschen gestrickt (dazu 1 Masche wird zugenommen): 1 M re, 1 M li (+ 1 Zunahme), und A.3 über 3 M (= 1 M re, (1 Umschlag), 1 M li, 1 M re) = 3 M auf 4 zugenommen. Viel Spaß beim Stricken!
20.03.2026 - 07:21
![]() Manu wrote:
Manu wrote:
Hallo, guten Morgen Warum wird der Faden beim Rumpfteil nach dem Stilllegen der Ärmel abgeschnitten? Kann man nicht einfach in der Runde weiterstricken?
16.02.2026 - 06:21
![]() Alina wrote:
Alina wrote:
Hello, Can you kindly explain what I have to do next once I completed two A1-A3 twice in height? I what the sleeves to be a little bit longer. Thank you! 😊
15.02.2026 - 16:32DROPS Design answered:
Hi Alina, Once you have placed the sleeve stitches back on the needles (after finishing the body) you can continue the pattern to your desired length before working the ridges for the sleeve edge. Regards, Drops Team.
17.02.2026 - 07:39
|
|||||||||||||||||||
Catch the Wind#catchthewindtop |
|||||||||||||||||||
 |
 |
||||||||||||||||||
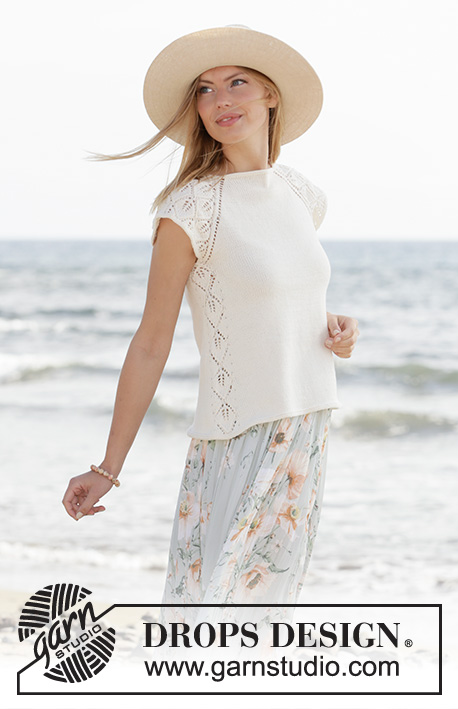
Knitted top with raglan and short sleeves in DROPS Safran. The piece is worked top down with lace pattern. Sizes XS - XXL.
DROPS 211-5 |
|||||||||||||||||||
|
------------------------------------------------------- EXPLANATIONS FOR THE PATTERN: ------------------------------------------------------- RIDGE/GARTER STITCH (worked in the round): 1 ridge in height = 2 rounds; Knit 1 round and purl 1 round. PATTERN: See diagrams A.1 to A.4. RAGLAN: Increase to raglan on each side of the back piece and each side of the front piece (towards the sleeves). Increase by making 1 yarn over before/after the stitch with the marker thread; on the next round knit the yarn overs to leave holes. The increases on the sleeves are drawn into patterns A.1 and A.3. ------------------------------------------------------- START THE PIECE HERE: ------------------------------------------------------- TOP – SHORT OVERVIEW OF THE PIECE: The neck and yoke are worked in the round with circular needle, top down. The yoke is divided for body and sleeves and the body continued in the round. A small edge is worked around the armholes. NECK: Cast on 106-110-116-120-124-132 stitches with circular needle size 3 mm and Safran. Work 2 RIDGES – read description above. Then work the yoke as described below. YOKE: Insert 4 marker threads in the piece as described below (without working the stitches). The threads will be used when increasing to raglan. Count 16-17-18-19-20-22 stitches (= half back piece), insert 1 marker thread in the next stitch, count 19 stitches (= sleeve), insert 1 marker thread in the next stitch, count 32-34-37-39-41-45 stitches (= front piece), insert 1 marker thread in the next stitch, count 19 stitches (= sleeve), insert 1 marker thread in the next stitch. There are 16-17-19-20-21-23 stitches after the last marker thread (half back piece). The first round is worked as follows: Work stocking stitch as far as the first marker-stitch, make 1 yarn over (first increase to RAGLAN – see description above), work the marker-stitch in stocking stitch, A.1 (= 2 stitches), A.2 (= 14 stitches) and A.3 ( = 3 stitches) (= 19 stitches on the sleeve), work the marker-stitch in stocking stitch, 1 yarn over, work stocking stitch as far as the next marker-stitch (= front piece), 1 yarn over, work the marker-stitch in stocking stitch, A.1 (= 2 stitches), A.2 (= 14 stitches) and A.3 (= 3 stitches) (= 19 stitches on the sleeve), work the marker-stitch in stocking stitch, 1 yarn over, work stocking stitch over the remaining stitches (= half back piece). Continue this pattern with stocking stitch on the front and back pieces and A.1, A.2 and A.3 on the sleeves. Each time A.1, A.2 and A.3 are worked 1 time in height, you work 2 more repeats of A.2 between A.1 and A.3. REMEMBER THE KNITTING TENSION! AT THE SAME TIME continue to increase to raglan every 2nd round a total of 22-26-28-31-35-39 times at each marker thread (including the first increase described above). The new stitches are worked in stocking stitch on the front and back pieces and in lace pattern as shown in the diagrams on the sleeves. When the increases to raglan are finished there are 294-334-356-388-424-468 stitches on the needle. The next round is worked as follows: Work 39-44-47-51-56-62 stitches (= half the back piece), place the next 69-79-83-91-99-109 stitches on 1 thread for the sleeve, cast on 9-9-9-11-13-15 new stitches on the needle (= in side under sleeve), work 78-88-95-103-113-125 stitches (= front piece), place the next 69-79-83-91-99-109 stitches on 1 thread for the sleeve, cast on 9-9-9-11-13-15 new stitches on the needle (= in side under sleeve), work the last 39-44-48-52-57-63 stitches (= half back piece). Body and sleeves are finished separately. THE PIECE IS NOW MEASURED FROM HERE! BODY: = 174-194-208-228-252-280 stitches. Insert 1 marker thread in the middle of the 9-9-9-11-13-15 stitches cast on under each sleeve. Cut the strand and begin the round 6 stitches before 1 of the stitches with marker thread. Work A.4 (= 13 stitches), work 74-84-91-101-113-127 stitches in stocking stitch, work A.4 and then stocking stitch over the last 74-84-91-101-113-127 stitches. Continue this pattern, AT THE SAME TIME, when the piece measures 2 cm, increase by making 1 yarn over on each side of A.4, on the next round knit the yarn overs twisted to avoid holes (= 4 increased stitches). Repeat the increase every 1 ½ cm a total of 18 times; the increased stitches are worked in stocking stitch = 246-266-280-300-324-352 stitches. When the piece measures 28-29-29-30-29-29 cm from the division work 2 ridges over all stitches, then cast off. SLEEVE-EDGE: Place the 69-79-83-91-99-109 stitches on one of the threads on short circular needle size 3 mm and knit up 1 stitch in each of the 9-9-9-11-13-15 new stitches under the sleeve = 78-88-92-102-112-124 stitches. Work 2 ridges over all stitches, then cast off. Work the other sleeve-edge in the same way. |
|||||||||||||||||||
Diagram explanations |
|||||||||||||||||||
|
|||||||||||||||||||
 |
|||||||||||||||||||
 |
|||||||||||||||||||
 |
|||||||||||||||||||
Have you finished this pattern?Tag your pictures with #dropspattern #catchthewindtop or submit them to the #dropsfan gallery. Do you need help with this pattern?You'll find 20 tutorial videos, a Comments/Questions area and more by visiting the pattern on garnstudio.com. © 1982-2026 DROPS Design A/S. We reserve all rights. This document, including all its sub-sections, has copyrights. Read more about what you can do with our patterns at the bottom of each pattern on our site. |
|||||||||||||||||||


With over 40 years in knitting and crochet design, DROPS Design offers one of the most extensive collections of free patterns on the internet - translated to 17 languages. As of today we count 324 catalogues and 12290 patterns translated into English (UK/cm). 12290
We work hard to bring you the best knitting and crochet have to offer, inspiration and advice as well as great quality yarns at incredible prices! Would you like to use our patterns for other than personal use? You can read what you are allowed to do in the Copyright text at the bottom of all our patterns. Happy crafting!
Post a comment to pattern DROPS 211-5
We would love to hear what you have to say about this pattern!
If you want to leave a question, please make sure you select the correct category in the form below, to speed up the answering process. Required fields are marked *.