
Popular categories
Looking for a yarn?


Comments / Questions (50)
![]() Valérie wrote:
Valérie wrote:
Bonjour, Pour le pull Mint tea Sweater : le point A2 : faut-il tricoter 2 mailles ensemble + 1 jeté ? Le rang suivant, faut-il tricoter le jeté par devant pour faire un "trou" ? Merci d'avance
07.03.2023 - 14:21DROPS Design answered:
Bonjour Valérie, tout à fait, les jetés de A.1 et de A.2 doivent former des trous, on va donc bien les tricoter dans le brin avant. Attention, A.2 se tricote sur 4 mailles et ainsi au 1er rang : 1 m end, 2 m ens à l 'end, 1 jeté, 1 m end. Bon tricot!
08.03.2023 - 09:37
![]() Valérie wrote:
Valérie wrote:
Bonjour, Pour le pull Mint tea Sweater : le point A2 : faut-il tricoter 2 mailles ensemble + 1 jeté ? Le rang suivant, faut-il tricoter le jeté par devant pour faire un "trou" ? Merci d'avance
07.03.2023 - 14:20DROPS Design answered:
Bonjour Valérie, tout à fait, les jetés de A.1 (et de A.2) se tricotent à l'endroit et doivent former des trous pour le point ajouré. Bon tricot!
07.03.2023 - 14:45
![]() Dolors Rovira wrote:
Dolors Rovira wrote:
Moltíssimes gràcies per un servei tan bo!
06.03.2023 - 19:42
![]() Dolors Rovira wrote:
Dolors Rovira wrote:
Bones Voldria fer les mànigues del DROPS 210-19 més llargues. Com hauria de repartir les disminucions? Moltes gràcies i salutacions des de Catalunya
03.03.2023 - 01:56DROPS Design answered:
Hola Dolors, comienza por medir tu puño y multiplicarlo por la tensión del tejido, para calcular los pts finales a tener en la manga. Ahora, resta los pts iniciales (en la parte superior de la manga) menos los del puño; estos son los pts a disminuir. Divide estos pts entre 2 (se disminuye a cada lado) y divide el largo deseado (en cm) entre los pts a disminuir (en cada lado), para calcular cada cuántos cm disminuyes.
05.03.2023 - 19:14
![]() Valérie wrote:
Valérie wrote:
Bonsoir, pour le modèle Mint Tea Sweater, après l’empiètement : les 6 mailles à rajouter sous la manche , sont elles à mettre en attente sur le fil de la manche ? Ou faut il mettre un fil marqueur comme indiqué ensuite à la première ligne dos et devant ? Merci d’avance
02.03.2023 - 19:14DROPS Design answered:
Bonjour Valérie, cette leçon montre comment tricoter un pull de haut en bas, et, à partir de la photo 9) comment on va mettre les mailles des manches en attente et monter les mailles (6 dans ce modèle) sous la manche; les marqueurs vont être mis au milieu de ces 6 mailles (nous n'en avons pas mis dans la leçon) pour bien repérer les côtes pour les augmentations du bas du pull. Bon tricot!
03.03.2023 - 08:58
![]() Valérie wrote:
Valérie wrote:
Bonjour, Pour le modèle Mint tea Sweater, pour l'empiècement en taille M : le premier rang après les côtes il n'y a donc pas d'augmentation. Quand est-ce que je les commence et comment ? Merci pour votre réponse,
16.02.2023 - 17:20DROPS Design answered:
Bonjour Valérie, tricotez les mailles endroit à l'endroit et tricotez le 1er rang de A.1 quand indiqué - vous augmentez en même temps 2 mailles dans chaque A.1 (8 mailles au total) (ne vous fiez pas au nombre de mailles indiqué à la fin du 1er tour, il doit s'agir d'une erreur que je transfère de suite à nos stylistes). Bon tricot!
17.02.2023 - 11:34
![]() Irmeli wrote:
Irmeli wrote:
Lisäkysymys aiempaan kysymykseeni lisäys vinkki 2: siis joka 6. kerros lisäyksiä tuleekin kerrokselle 12 , 6 mallineule A1 :een ja lisäksi etu- ja takakappaleen reunoihin yht 4?
24.01.2023 - 18:04DROPS Design answered:
Hei, piirroksen A.1 jokaiseen mallikertaan lisätään kuuden kerroksen aikana 6 silmukkaa. Etu-/takakappaleessa lisätään 4 cm välein aina 4 silmukkaa (merkkilankojen molemmin puolin lisätään 1 silmukka).
28.01.2023 - 14:13
![]() Irmeli Andersson wrote:
Irmeli Andersson wrote:
Hei, en täysin ymmärtänyt lisäysvinkki kahta, tuleeko A1 mallineuleen mukainen kuvio vain etupuolelle ja takakappaleessa neulotaan langan kierto niin ettei tule pitsikuviota?
22.01.2023 - 18:03DROPS Design answered:
Hei, kerrokselle tulee 4 piirroksen A.1 mallikertaa: 2 mallikertaa takana ja 2 mallikertaa edessä. Kaikki mallineuleen langankierrot neulotaan piirroksen mukaisesti, eli näiden langankiertojen kohdalla muodostuu reikiä. Mallineuleen ensimmäisellä kerroksella lisätään silmukoita, ja nämä silmukat neulotaan kiertäen (eli lisäyksien kohdalle ei muodostu reikiä).
23.01.2023 - 18:22
![]() Alice wrote:
Alice wrote:
Hej! Där det står, ” När A.1 har repeterats totalt 6-6-7-7-8-9 gånger på höjden är det 224-232-256-276-304-332 maskor på varvet. Sticka rätmaskor runt till arbetet mäter 19-19-22-23-25-28 cm från markören.” Menar ni att jag ska sticka 23 (19-28) cm från och med nu då jag stickat sista A.1 och har 276 maskor, eller att jag ska sticka tills hela arbetet mäter 23 cm? Tacksam för svar!
14.06.2022 - 20:38DROPS Design answered:
Hei Alice. Merket du skal måle fra ble satt etter at halskanten ble strikket. Om du f.eks strikker str. L har du strikket A.1 7 ganger i høyden. A.1 = 6 pinner i høyden x 7 ganger = 42 pinner = ca 21 cm (sjekk den oppgitte strikkefastheten). Du skal da strikke rett til arbeidet måler 23 cm fra merket du satt etter halskanten. mvh DROPS Design
20.06.2022 - 11:57
![]() Sylvia Savolainen wrote:
Sylvia Savolainen wrote:
Hej. Jag förstår inte hur jag ska sticka enligt A1 skissen: (Maskorna med markör i A.1 ska följa med i arbetet för att enklare kunna repetera A.1 på höjden. På vartannat varv ökas det totalt 8 maskor i A.1.) Behöver en tydligare förklaring hur jag stickar detta.
17.04.2022 - 09:49DROPS Design answered:
Hej Sylvia, diagram A.1 består af udtagningerne til raglan. Når du har strikket de første 6 varv i A.1, starter du forfra fra første varv i diagrammet igen, mærket viser hvor du har midten af diagrammet :)
22.04.2022 - 14:17
|
|||||||||||||
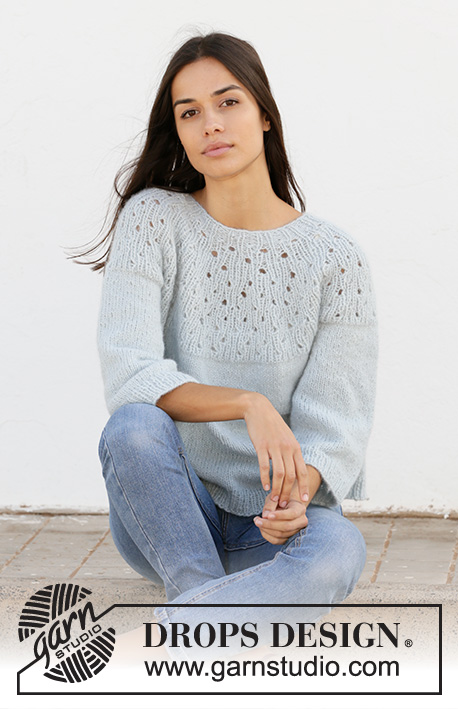
Mint Tea Sweater#mintteasweater |
|||||||||||||
 |
 |
||||||||||||
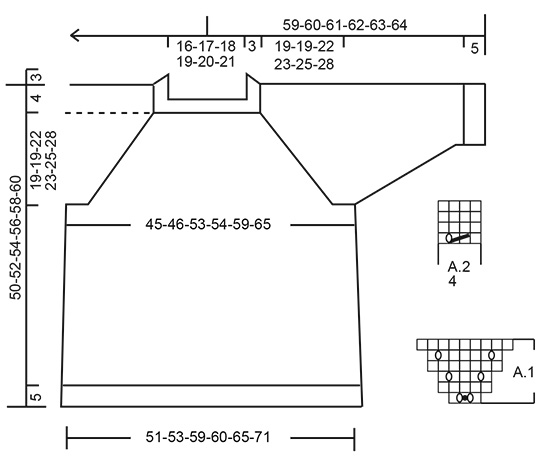
Knitted jumper with raglan in DROPS Paris. The piece is worked top down with lace pattern. Sizes XS - XXL.
DROPS 210-19 |
|||||||||||||
|
------------------------------------------------------- EXPLANATIONS FOR THE PATTERN: ------------------------------------------------------- PATTERN TIP: See diagrams A.1 and A.2. INCREASE TIP-1 (evenly spaced): To work out how to increase evenly, count the total number of stitches on the needle (e.g. 16 stitches) and divide by the number of increases to be made (e.g. 4) = 4. In this example, increase by making 1 yarn over after each 4th stitch. On the next round work the yarn overs twisted to avoid holes. INCREASE TIP-2 (for sides of body): Work until there are 2 stitches left before the marker thread, make 1 yarn over, knit 4 (marker thread sits between these 4 stitches), 1 yarn over. On the next round knit the yarn overs twisted to avoid holes. Then work the new stitches in stocking stitch. DECREASE TIP (for sleeves): Decrease 1 stitch on each side of the marker thread as follows: Work until there are 3 stitches left before the marker thread, knit 2 together, knit 2 (marker thread sits between these 2 stitches), slip 1 stitch as if to knit, knit 1 and pass the slipped stitch over the knitted stitch (= 2 stitches decreased). CASTING-OFF TIP: To avoid the cast-off edge being tight you can cast off with a larger size needle. If the edge is still tight, make 1 yarn over after approx. each 4th stitch at the same time as casting off and the yarn overs are cast off as normal stitches. ------------------------------------------------------- START THE PIECE HERE: ------------------------------------------------------- JUMPER – SHORT OVERVIEW OF THE PIECE: The neck and yoke are worked in the round with circular needle, top down from mid back. The yoke is divided for body and sleeves and the body continued in the round with circular needle. The sleeves are worked in the round with double pointed needles, top down. NECK: Cast on 80-84-88-92-96-104 stitches with circular needle size 4.5 mm and Paris. Knit 1 round. Work rib (= purl 2, knit 2) for 3 cm, then change to circular needle size 5.5 mm. Insert 1 marker at the beginning of the round (= mid back); the yoke will be measured from this marker! YOKE: The next round is worked as follows: Knit 12-12-16-16-16-20 and increase 0-2-0-4-4-3 stitches evenly spaced over these stitches – read INCREASE TIP-1 (= half back piece), work A.1 (= 3 stitches), knit 8, work A.1 over 3 stitches (= right sleeve), knit 26-30-30-34-34-38 and increase 0-0-0-8-8-6 stitches evenly spaced over these stitches (= front piece), A.1 over 3 stitches, knit 8, work A.1 over 3 stitches (= left sleeve), knit 14-14-14-14-18-18 stitches and increase 0-2-0-4-4-3 stitches evenly spaced over these stitches (= half back piece) = 88-96-96-116-120-124 stitches. The markers in A.1 follow your work onwards, to make repeating A.1 in height easier. On round 2 a total of 8 stitches are increased in A.1. REMEMBER THE KNITTING TENSION! When A.1 has been completed 1 time, repeat A.1 in height (the markers mark the middle of A.1 in each repeat). When A.1 has been repeated a total of 6-6-7-7-8-9 times in height there are 224-232-256-276-304-332 stitches on the needle. Continue knitting in the round until the piece measures 19-19-22-23-25-28 cm from the marker. Now divide the piece for body and sleeves as follows: Knit 33-34-39-40-44-49, place the next 46-48-50-58-64-68 stitches on a thread for the sleeve, cast on 6 stitches under the sleeve, knit 66-68-78-80-88-98, place the next 46-48-50-58-64-68 stitches on a thread for the sleeve, cast on 6 stitches under the sleeve and finally knit 33-34-39-40-44-49. BODY: = 144-148-168-172-188-208 stitches. Insert 1 marker thread in the middle of the 6 stitches on each side of the piece (= in sides of body). There are 72-74-84-86-94-104 stitches between the threads on both the front and the back pieces. Allow the threads to follow your work onwards; they will be used when increasing in the sides. Knit. When the piece measures 2 cm from the division, increase 1 stitch on each side of both marker threads – read INCREASE TIP-2 (= 4 stitches increased). Increase like this every 4 cm a total of 5 times = 164-168-188-192-208-228 stitches. When the piece measures 20-22-21-22-22-21 cm work A.2 (= 4 stitches) over all stitches. When A.2 has been worked 1 time in height, change to circular needle size 4.5 ,mm and work rib (= knit 2, purl 2). Cast off when the piece measures 27-29-28-29-29-28 cm from the division – read CASTING-OFF TIP! The jumper measures approx. 50-52-54-56-58-60 cm from the shoulder down. SLEEVE: Place the 46-48-50-58-64-68 stitches from the thread on the one side of the piece on double pointed needles size 5.5 mm and knit up 1 stitch in each of the 6 stitches cast on under the sleeve = 52-54-56-64-70-74 stitches. Insert a marker thread in the middle of the 6 stitches under the sleeve. Allow the thread to follow your work onwards; it will be used when decreasing under the sleeve. Work stocking stitch in the round. When the piece measures 2 cm from the division, decrease 1 stitch on each side of the marker thread – read DECREASE TIP. Decrease like this every 5-7-5-3-1½-1½ cm a total of 4-3-4-6-9-9 times = 44-48-48-52-52-56 stitches. When the piece measures 22-22-20-20-18-16 cm from the division, work A.2 over all stitches. When A.2 has been worked 1 time in height change to double pointed needles size 4.5 mm. Work rib (= knit 2, purl 2). Cast off with knit when the sleeve measures 29-29-27-27-25-23 cm from the division. Work the other sleeve in the same way. |
|||||||||||||
Diagram explanations |
|||||||||||||
|
|||||||||||||
 |
|||||||||||||
Have you finished this pattern?Tag your pictures with #dropspattern #mintteasweater or submit them to the #dropsfan gallery. Do you need help with this pattern?You'll find 25 tutorial videos, a Comments/Questions area and more by visiting the pattern on garnstudio.com. © 1982-2026 DROPS Design A/S. We reserve all rights. This document, including all its sub-sections, has copyrights. Read more about what you can do with our patterns at the bottom of each pattern on our site. |
|||||||||||||


With over 40 years in knitting and crochet design, DROPS Design offers one of the most extensive collections of free patterns on the internet - translated to 17 languages. As of today we count 324 catalogues and 12290 patterns translated into English (UK/cm). 12290
We work hard to bring you the best knitting and crochet have to offer, inspiration and advice as well as great quality yarns at incredible prices! Would you like to use our patterns for other than personal use? You can read what you are allowed to do in the Copyright text at the bottom of all our patterns. Happy crafting!
Post a comment to pattern DROPS 210-19
We would love to hear what you have to say about this pattern!
If you want to leave a question, please make sure you select the correct category in the form below, to speed up the answering process. Required fields are marked *.