
Popular categories
Looking for a yarn?


Comments / Questions (151)
![]() Ariane wrote:
Ariane wrote:
Bonjour, Vous mentionnez le point mousse mais sur les photos le pull n'est-il pas en jersey ?
11.04.2026 - 10:33DROPS Design answered:
Bonjour Ariane, il est juste expliqué au tout début comment tricoter du point mousse (pour les mailles lisières), mais vous tricotez ensuite bien en jersey après les côtes, cf. explications DOS, DEVANT et MANCHES. Bon tricot!
13.04.2026 - 08:47
![]() Frida wrote:
Frida wrote:
Hej! Jag skulle vilja sticka den här tröjan på rundsticka med magic loop istället för fram och tillbaka, vad behöver jag tänka på då? Ska jag till exempel minska antalet maskor något då det står ”kantmaskor”? Känner mig pepp, så fin tröja! MVH Frida
07.03.2026 - 21:09DROPS Design answered:
Hei Frida. Denne genseren har splitt i siden, da må det være kantmasker. Men om du deretter vil strikke rundt, må kantmaskene felles, slik ta du får riktig maskeantall. mvh DROPS Design
23.03.2026 - 12:03
![]() Weingartner wrote:
Weingartner wrote:
Bonjour Avez-vous des modèles de pull femme à tricoter avec des aiguilles droites et non circulaires si oui lequels?
03.02.2026 - 14:08DROPS Design answered:
Bonjour Mme Weingartner, on tricote ici le dos et le devant séparément, en allers et retours sur aiguille circulaire, vous pouvez donc utiliser des aiguilles droites, vos mailles seront juste plus serrées. Pour les manches, vous trouverez ici comme les adapter pour des aiguilles droites - et comment faire les ajustements nécessaires pour d'autres modèles. Bon tricot!
03.02.2026 - 17:57
![]() Anna wrote:
Anna wrote:
Salve, non capisco se le maniche si lavorano in piano o in tondo. Grazie
27.01.2026 - 23:44DROPS Design answered:
Buonasera Anna, le maniche sono lavorate in tondo. Buon lavoro!
29.01.2026 - 23:09
![]() Paola wrote:
Paola wrote:
Non capisco. Si usano i ferri circolari usandoli come ferri normali? Non mi pare il lavoro sia circolare. Si parte dal basso? Inoltre non trovo la spiegazione della maglia vivagno a Legaccio. Grazie.
23.01.2026 - 17:27DROPS Design answered:
Buonasera Paola, i ferri circolari possono essere utilizzati per lavorare qualsiasi modello e sono anche molto comodi e pratici da utilizzare! Il lavoro parte dal basso e la maglie di vivagno sono lavorate a legaccio, cioè a diritto. Buon lavoro!
27.01.2026 - 20:31
![]() Sandra wrote:
Sandra wrote:
Hallo, mich würde interessieren, welche Größe das Modell trägt auf Ihren Bildern, um einen Vergleich für mich zu haben. So lässt sich für mich besser nachvollziehen, welche Größe ich Stricken sollte und welche Menge ich bestellen muss. Vielen Dank
19.01.2026 - 11:05DROPS Design answered:
Liebe Sandra, die Modellen tragen meistens entweder S oder M, aber hier lesen Sie, wie man seine Größe wählt. Viel Spaß beim Stricken!
20.01.2026 - 08:42
![]() Tiril wrote:
Tiril wrote:
Ved avfelling til hals midt på bakstykket, er det meningen at man setter den ene siden på ventepinne, strikker først en skulder, bryter av tråden, og så plukker opp maskene og strikker den andre skulderen? Jeg klarer ikke helt å se for meg hvordan dette gjøres, og jeg finner ingen videoer
11.01.2026 - 14:25DROPS Design answered:
Hei Tiril, Ja, hver skulder er strikket ferdig for seg, slik at du må felle til halsen og strikke ferdig 1 skulder, klippe tråden og deretter gjør det samme på den andre skulderen. Hilsen Drops Team.
12.01.2026 - 06:44
![]() Ivonne wrote:
Ivonne wrote:
Ik begrijp het misschien verkeerd. Maar als ik met het achterpand begin op een rondbreinaald, dan brei ik meteen rond, dus heb ik ook meteen de voorkant toch? Of wordt een rondbreinaald geadviseerd ivm de hoeveelheid steken?
08.01.2026 - 14:30DROPS Design answered:
Dag Ivonne,
Je zou dit patroon ook met rechte naalden kunnen breien, behalve de halsboord moet met een rondbreinaald gebreid worden.
10.01.2026 - 17:18
![]() AYIZA wrote:
AYIZA wrote:
IS THIS BEGINNER FRIENDLY, SAY SOMEONE WHO HAS NEVER DONE KNITTING IN THEIR LIFE
30.12.2025 - 18:17
![]() Anna wrote:
Anna wrote:
Sul dietro come si intrecciano per gli scalfi le 12 maglie? Non riesco a capire la spiegazione. Chiedo scusa
12.12.2025 - 16:57DROPS Design answered:
Buonasera Anna, deve intrecciare all'inizio di ogni lato il numero di maglie indicato per la sua taglia. Buon lavoro!
12.12.2025 - 22:22
|
|
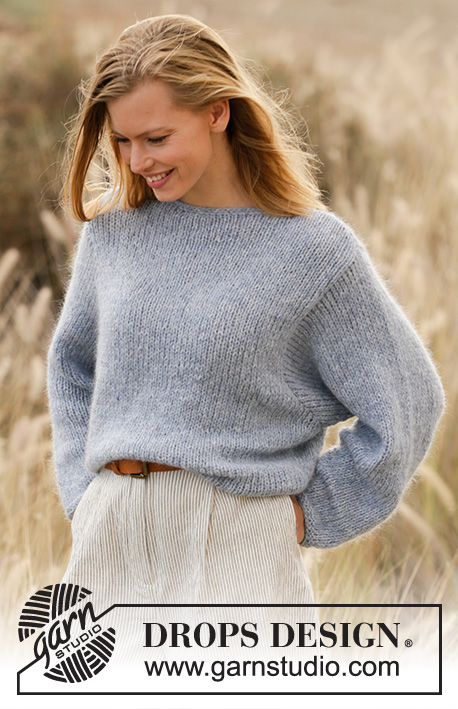
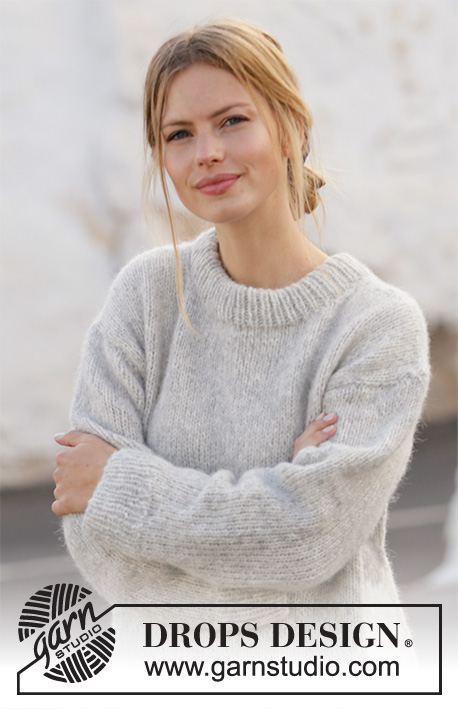
Grey Pearl#greypearlsweater |
|
 |
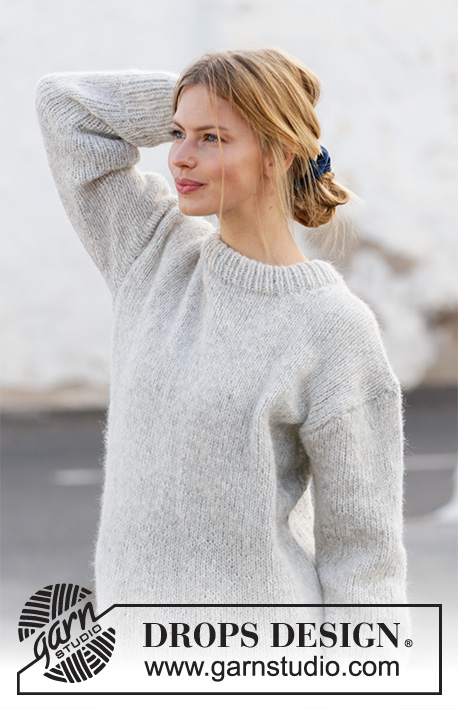 |
Knitted jumper in DROPS Air. Sizes S - XXXL.
DROPS 210-36 |
|
|
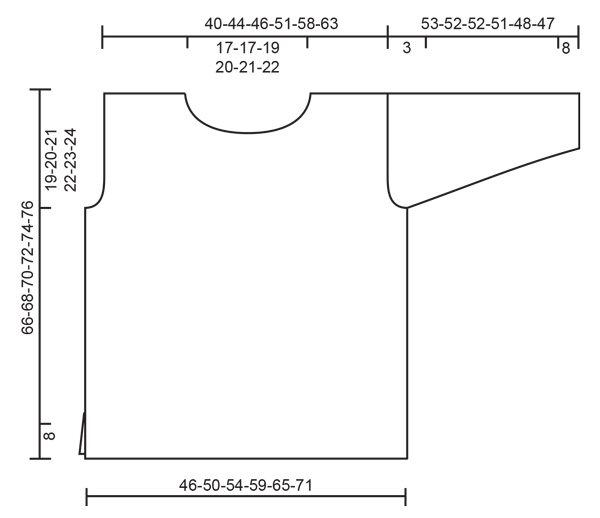
------------------------------------------------------- EXPLANATIONS FOR THE PATTERN: ------------------------------------------------------- RIDGE/GARTER STITCH (worked back and forth): Knit all rows. 1 ridge in height = Knit 2 rows. DECREASE TIP (evenly spaced): To work out how to decrease evenly, count the total number of stitches on needle (e.g. 89 stitches) and divide by number of decreases to be made (e.g. 13) = 6.8. In this example decrease by knitting together alternately each 5th and 6th stitch and each 6th and 7th stitch (approx.). INCREASE TIP (for sleeves): Start 1 stitch before the marker thread, 1 yarn over, work 2 stitches (marker thread sits between these 2 stitches), 1 yarn over. On the next round knit the yarn overs twisted to avoid holes. ------------------------------------------------------- START THE PIECE HERE: ------------------------------------------------------- JUMPER – SHORT OVERVIEW OF THE PIECE: The jumper is worked back and forth in 2 parts which are sewn together to finish. The sleeves are worked in the round with double pointed needles/short circular needle. BACK PIECE: Cast on 89-97-103-113-125-137 stitches with circular needle size 4.5 mm and Air. Purl 1 row from the wrong side then work as follows – from the right side: 2 edge stitches in GARTER STITCH – see description above, *knit 1, purl 1 *, work from *-* until there are 3 stitches left, knit 1 and 2 edge stitches in garter stitch. Continue like this until the piece measures 8 cm. Change to circular needle size 5.5 mm and knit 1 row from the right side where you decrease 13-15-15-17-19-21 stitches evenly spaced – read DECREASE TIP = 76-82-88-96-106-116 stitches. Continue with stocking stitch and 1 edge stitch in garter stitch on each side. When the piece measures 47-48-49-50-51-52 cm, cast off for the armholes on both sides at the beginning of each row as follows: Cast off 3 stitches 1-1-1-1-1-1 time, 2 stitches 1-1-1-1-1-1 time and 1 stitch 1-1-2-2-2-3 times = 64-70-74-82-92-100 stitches. Continue with stocking stitch until the piece measures 64-66-68-70-72-74 cm. Now cast off the middle 26-26-28-30-32-34 stitches for the neck and each shoulder is finished separately. Then cast off at the beginning of next row from the neck as follows: 1 stitch 1 time = 18-21-22-25-29-32 stitches on the shoulder. Continue working until the piece measures 66-68-70-72-74-76 cm and cast off. Work the other shoulder in the same way. FRONT PIECE: Cast on and work as for the back piece until the piece measures 60-62-64-66-68-70 cm. Now place the middle 20-20-22-24-26-28 stitches on 1 thread for the neck and finish each shoulder separately. Then cast off at the beginning of each row from the neck as follows: 2 stitches 1 time and 1 stitch 2 times = 18-21-22-25-29-32 stitches left on the shoulder. Continue working until the piece measures 66-68-70-72-74-76 cm, then cast off. Work the other shoulder in the same way. SLEEVE: The sleeves are worked bottom up, in the round, with double pointed needles/short circular needle. The piece is then divided and worked back and forth for the sleeve cap. Cast on 46-48-50-52-52-56 stitches with double pointed needles size 4.5 mm and Air. Knit 1 round, then work rib (knit 1 / purl 1) for 8 cm. Change to double pointed needles size 5.5 mm and continue with stocking stitch. On the first round decrease 8-8-8-8-8-10 stitches evenly spaced = 38-40-42-44-44-46 stitches. Insert a marker thread at the beginning of the round = mid under sleeve. Continue with stocking stitch, AT THE SAME TIME when the piece measures 10-10-10-10-12-12 cm, increase 1 stitch on each side of the marker thread – read INCREASE TIP. The yarn overs are worked twisted on the next round to avoid holes. Increase like this 3½-3½-3-3-2-2 cm a total of 11-12-13-13-15-15 times = 60-64-68-70-74-76 stitches. When the sleeve measures 50-49-49-48-45-44 cm, cast off 3 stitches on each side of the marker thread (= 6 stitches cast off mid under the sleeve), then continue working back and forth. Cast off for the sleeve cap at the beginning of each row on both sides as follows: 2 stitches 1 time, 3 stitches 1 time, then cast off the remaining stitches. Work the other sleeve in the same way. ASSEMBLY: Sew the shoulder seams. Sew in the sleeves and sew the side seams, inside the 1 edge stitch and until there is 8 cm left at the bottom = split. NECK: Knit up approx. 92-106 stitches with circular needle size 4,5 mm around the neck (including the stitches on the thread and the number divisible by 2). Work rib (knit 1 / purl 1) for 9 cm. Then cast off. Fold the rib at the top to the wrong side and fasten down. To avoid the neck being tight and turning outwards, make sure the seam is elastic. |
|
 |
|
Have you finished this pattern?Tag your pictures with #dropspattern #greypearlsweater or submit them to the #dropsfan gallery. Do you need help with this pattern?You'll find 30 tutorial videos, a Comments/Questions area and more by visiting the pattern on garnstudio.com. © 1982-2026 DROPS Design A/S. We reserve all rights. This document, including all its sub-sections, has copyrights. Read more about what you can do with our patterns at the bottom of each pattern on our site. |
|


With over 40 years in knitting and crochet design, DROPS Design offers one of the most extensive collections of free patterns on the internet - translated to 17 languages. As of today we count 324 catalogues and 12290 patterns translated into English (UK/cm). 12290
We work hard to bring you the best knitting and crochet have to offer, inspiration and advice as well as great quality yarns at incredible prices! Would you like to use our patterns for other than personal use? You can read what you are allowed to do in the Copyright text at the bottom of all our patterns. Happy crafting!
Post a comment to pattern DROPS 210-36
We would love to hear what you have to say about this pattern!
If you want to leave a question, please make sure you select the correct category in the form below, to speed up the answering process. Required fields are marked *.