
Popular categories
Looking for a yarn?


Comments / Questions (37)
![]() Denise wrote:
Denise wrote:
Le modèle Ést 206-33. Je veux savoir comment on tricote un T penche. Il y a qui sont proches d'un T ordinaire mais il y a pen qui en sont éloigné Merci
06.11.2019 - 20:57DROPS Design answered:
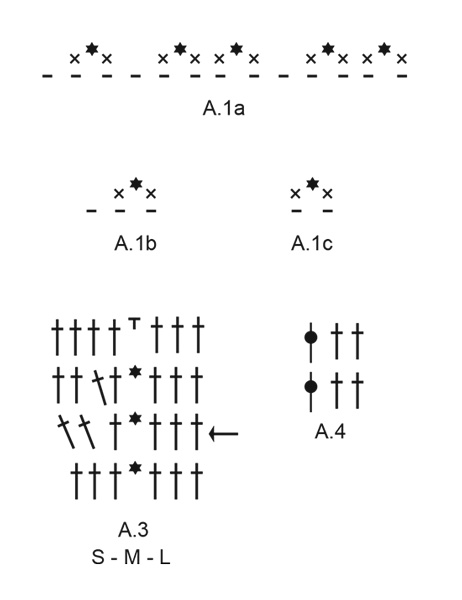
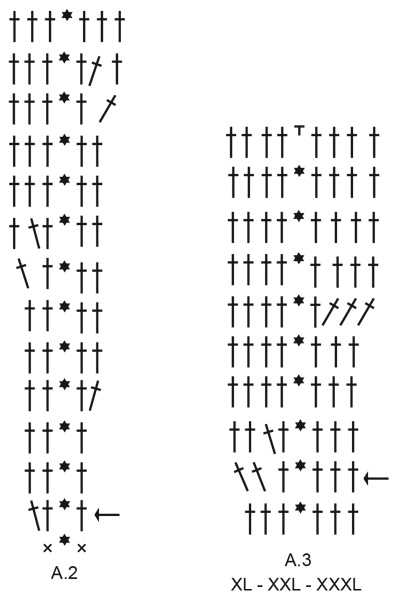
Bonjour Denise, pensez-vous au 3ème symbole de la légende qui, dans A.2 et A.3 est légèrement incliné sur la droite ou sur la gauche? Il s'agit d'une bride qui est simplement penchée pour que celle du rang suivant arrive au bon endroit. Bon crochet!
07.11.2019 - 08:56
![]() Van Den Briele Vera wrote:
Van Den Briele Vera wrote:
En Neerlandais svp
10.10.2019 - 17:12DROPS Design answered:
Bonjour Mme Van Den Briele Vera, pour obtenir les explications en néerlandais, cliquez sur le menu déroulant sous la photo et choisissez "Nederlands". Bon crochet!
11.10.2019 - 09:43
![]() Aida wrote:
Aida wrote:
Me parece extrardinario ! quiero hacerlo pues aprendi a utilizar las agujas circuclares
10.10.2019 - 05:47
![]() Aida wrote:
Aida wrote:
Quisiera saber como hacer para obtener un patron gratuito en español y en pdf muchas gracias!
10.10.2019 - 05:45DROPS Design answered:
Hola Aida. Todos los patrones de Drops son gratuitos. Para imprimir un patrón o guardarlo como pdf pulsa el botón IMPRIMIR que está bajo los materiales y sigue las instrucciones.
10.10.2019 - 23:37
![]() Florencia wrote:
Florencia wrote:
Hola! Gracias por publicar tantos patrones, y por dar explicaciones tan claras. Los vídeos y los links facilitan tejer. Aún no pude iniciar el proyecto, pero lo haré apenas pueda. Saludos desde Buenos Aires!
07.10.2019 - 03:40
![]() Charlene wrote:
Charlene wrote:
Is this in British or American crochet terms?
03.10.2019 - 19:12DROPS Design answered:
Hi Charlene, You can access both British and American patterns if you choose your language under the photograph. Happy knitting!
04.10.2019 - 07:15
![]() Tammy wrote:
Tammy wrote:
How long will it take to recieve my pattern A
25.09.2019 - 06:12
![]() Tammy wrote:
Tammy wrote:
Love all of your patterns your work is wonderful. Anytime you have patterns to be tested. Iwould love to test it for you. I sit home all day.
25.09.2019 - 06:10
![]() Doris wrote:
Doris wrote:
Kraftvoll.
29.06.2019 - 22:09
![]() Sandra☆ wrote:
Sandra☆ wrote:
Echt een prachtig gehaakte trui in een mooie kleur. Dit model/patroon zou ik graag willen haken.
26.06.2019 - 23:38
|
||||||||||||||||||||||
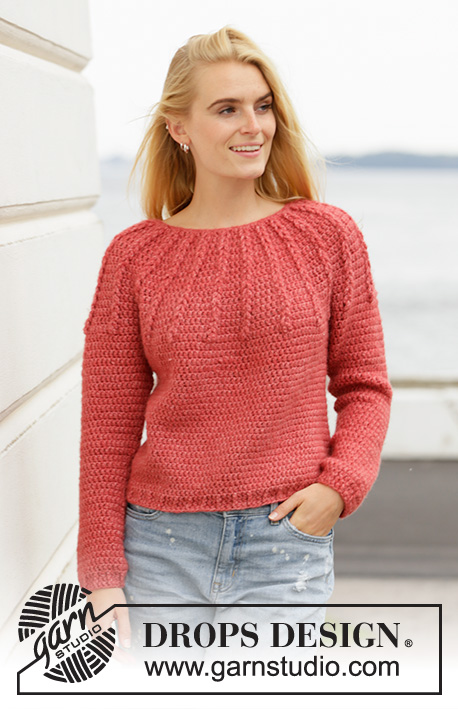
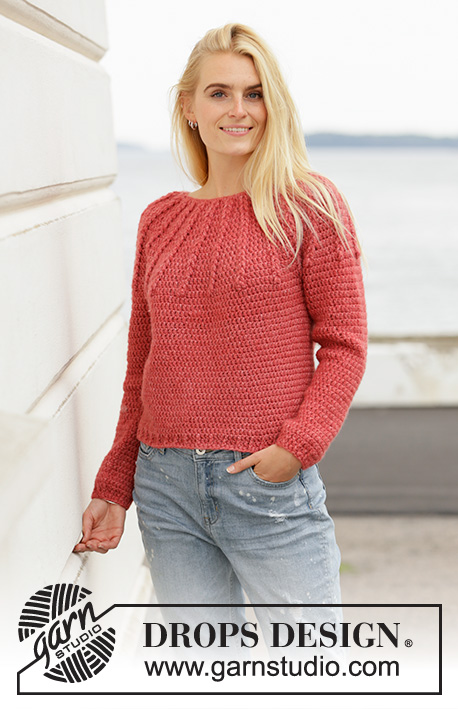
Blushing Embers#blushingemberssweater |
||||||||||||||||||||||
 |
 |
|||||||||||||||||||||
Crocheted jumper with round yoke in DROPS Air. The piece is worked top down with cable loops. Sizes S - XXXL.
DROPS 206-33 |
||||||||||||||||||||||
|
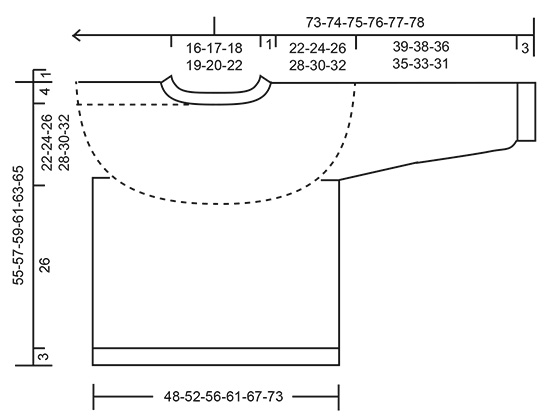
------------------------------------------------------- EXPLANATIONS FOR THE PATTERN: ------------------------------------------------------- CHAIN STITCH: If you work outermost on the hook the chain stitch will often be too tight; 1 chain stitch should be as long as 1 double crochet crochet is wide. CROCHET INFORMATION: At the beginning of each round of double crochets work 1 chain stitch (does not replace the first double crochet). The round ends with 1 slip stitch in the first double crochet of the round. At the beginning of each round of treble crochets replace the first treble crochet with 3 chain stitches. Finish the round with 1 slip stitch in the third chain stitch. PATTERN: See diagrams A.1 to A.4. Choose diagram for your size. CROCHET TIP (for chain-stitch rings): When working 8 chain stitches in A.1, A.2 and A.3, it is important to maintain the crochet tension, otherwise the pattern will be too tight in height. 8 chain stitches should measure 6 cm in length (without stretching the piece). If you do not get this measurement, work as many chain stitches as is necessary to get 6 cm in length. INCREASE TIP (evenly spaced): To work out how to increase evenly, count the total number of stitches (e.g. 200 stitches – the chain-stitch ring count as 1 stitch) and divide by the number of increases to be made (e.g. 14) = 14.3. In this example, increase by working 2 treble crochets in approx. every 14th treble crochet, but work 2 double crochet in one double crochet over the chain-stitch ring if required. DECREASE TIP (for sleeves): Decrease 1 treble crochet by working 2 treble crochets together as follows: * Make 1 yarn over, insert the hook through the next stitch, pick up the strand, make 1 yarn over and pull the strand through the first 2 loops on the hook *, work from *-* 1 more time, make 1 yarn over and pull the strand through all 3 loops on the hook (= 1 treble crochet decreased). ------------------------------------------------------- START THE PIECE HERE: ------------------------------------------------------- JUMPER – SHORT OVERVIEW OF THE PIECE: The piece is worked in the round, top down. The cable loops (texture)on the yoke is made of chain-stitch rings which are then worked together when the yoke is nearly finished. YOKE: Work 63-66-69-71-73-78 chain stitches with Air and hook size 5.5 mm and form them into a ring with 1 slip stitch in the first chain stitch – read CHAIN STITCH! The first round is worked as follows in the different sizes: Sizes S, M, L, XXL: Work 1 chain stitch – read CROCHET INFORMATION, work A.1a over the first 52-52-52-65 stitches (= 4-4-4-5 times in width), A.1b over the next 6-6-6-6 stitches (= 2-2-2-2 times in width), A.1c over the next 2-2-2-2 stitches (= 1-1-1-1 time in width), and then A.1b over the next 3-6-9-0 stitches (= 1-2-3-0 times in width). Sizes XL and XXXL: Work 1 chain stitch – read CROCHET INFORMATION, work A.1a over the first 65-78 stitches (= 5-6 times in width), and then A.1b over the next 6-0 stitches (= 2-0 times in width). There are 48-50-52-54-56-60 double crochets (+ 24-25-26-27-28-30 chain-stitch rings) on the round. Now work pattern A.2 a total of 24-25-26-27-28-30 times on the round. REMEMBER THE CROCHET TENSION! When A.2 has been completed there are 168-175-182-189-196-210 stitches on the round (chain-stitch rings count as 1 stitch). The piece measures approx. 16 cm. Continue with A.3 over each repeat of A.2 – choose diagram for your size. When the next to last round in A.3 has been completed there are 192-200-208-243-252-270 stitches on the round (chain-stitch rings count as 1 stitch). The piece measures approx. 19-19-19-27-27-27 cm. If the piece is shorter than this continue working without further increases to the correct length. Now work together (vertically) the chain-stitch rings on the yoke as follows: Insert the hook from the right side through the first chain-stitch ring at the neck, pull the 2nd chain-stitch ring through the first chain-stitch ring, insert the hook through the 2nd chain-stitch ring and pull the 3rd chain-stitch ring through the 2nd chain-stitch ring. Continue like this until all the chain-stitch rings have been worked together. Work the last round in A.3, at the same time increase 0-14-20-1-6-8 stitches evenly spaced on the round – read INCREASE TIP = 192-214-228-244-258-278 stitches. Now all the chain-space rings have been fastened so they will not come undone. Continue with 1 treble crochet in each stitch until the yoke measures 22-24-26-28-30-32 cm. The next round is worked as follows: Work 1 treble crochet in each of the first 28-31-33-36-39-43 treble crochets (= half back piece), skip the next 39-44-48-50-51-53 treble crochets for the sleeve, work 5-5-7-7-9-9 chain stitches (= in side under sleeve), work 1 treble crochet in each of the next 57-63-66-72-78-86 treble crochets (= front piece), skip the next 39-44-48-50-51-53 treble crochets for the sleeve, work 5-5-7-7-9-9 chain stitches (= in side under sleeve), work 1 treble crochet in each of the remaining 29-32-33-36-39-43 treble crochets (= half back piece). Body and sleeves are finished separately. THE PIECE IS NOW MEASURED FROM HERE. BODY: Work 1 treble crochet in each treble crochet and 1 treble crochet in each of the 5-5-7-7-9-9 chain stitches under the sleeves = 124-136-146-158-174-190 treble crochets on the round. Continue with 1 treble crochet in each treble crochet until the piece measures 25 cm from division in all sizes. Work 1 round where you decrease 1-1-2-2-0-1 treble crochet = 123-135-144-156-174-189 treble crochets. Now work an edge as follows: Work A.4 on the whole round – read CROCHET INFORMATION. When the edge measures 3 cm cut and fasten the strand. The jumper measures approx. 55-57-59-61-63-65 cm from the shoulder down. SLEEVE: Start mid under sleeve and fasten the strand with 1 slip stitch in the 3rd-3rd-4th-4th-5th-5th chain stitch under the sleeve, work 3 chain stitches – remember CROCHET TIP, continue with 1 treble crochet in each chain stitch and 1 treble crochet in each treble crochet = 44-49-55-57-60-62 treble crochets. Insert a marker thread at the beginning of the round (= mid under sleeve); allow it to follow your work onwards. When the sleeve measures 4 cm, decrease 1 treble crochet on each side of the marker thread – read DECREASE TIP. Decrease like this every 3rd-2nd-2nd-2nd-1st-1st round a total of 6-8-10-10-11-11 times = 32-33-35-37-38-40 stitches. Continue with treble crochets until the sleeve measures 39-38-36-35-33-31 cm from division. Work 1 round where you decrease 5-6-5-7-5-7 treble crochets evenly spaced = 27-27-30-30-33-33 treble crochets. Now work an edge as follows: Work A.4 on the whole round – read CROCHET INFORMATION. When the edge measures 3 cm cut and fasten the strand. The sleeve measures approx 42-41-39-38-36-34 cm from the division. Work the other sleeve in the same way. NECK: Work 1 double crochet in each chain stitch worked at the beginning of the piece. Cut and fasten the strand. |
||||||||||||||||||||||
Diagram explanations |
||||||||||||||||||||||
|
||||||||||||||||||||||
 |
||||||||||||||||||||||
 |
||||||||||||||||||||||
 |
||||||||||||||||||||||
Have you finished this pattern?Tag your pictures with #dropspattern #blushingemberssweater or submit them to the #dropsfan gallery. Do you need help with this pattern?You'll find 14 tutorial videos, a Comments/Questions area and more by visiting the pattern on garnstudio.com. © 1982-2026 DROPS Design A/S. We reserve all rights. This document, including all its sub-sections, has copyrights. Read more about what you can do with our patterns at the bottom of each pattern on our site. |
||||||||||||||||||||||


With over 40 years in knitting and crochet design, DROPS Design offers one of the most extensive collections of free patterns on the internet - translated to 17 languages. As of today we count 324 catalogues and 12291 patterns translated into English (UK/cm). 12291
We work hard to bring you the best knitting and crochet have to offer, inspiration and advice as well as great quality yarns at incredible prices! Would you like to use our patterns for other than personal use? You can read what you are allowed to do in the Copyright text at the bottom of all our patterns. Happy crafting!
Post a comment to pattern DROPS 206-33
We would love to hear what you have to say about this pattern!
If you want to leave a question, please make sure you select the correct category in the form below, to speed up the answering process. Required fields are marked *.