
Popular categories
Looking for a yarn?


Comments / Questions (113)
![]() Ingrid wrote:
Ingrid wrote:
Nachdem ich mit dem Rumpf fast fertig war und den Pullover anprobiert habe, musste ich feststellen das der Pullover vorne toll gesessen hat die Form hinten hat mir aber gar nicht gefallen. Er sass nicht gut. Das Muster und die Idee gefällt mir. Wie kann ich den Pullover stricken ohne diese Poncho Form? Für einen Tipp wäre ich dankbar.
25.01.2026 - 16:24DROPS Design answered:
Liebe Ingrid, schade, dass der Pullover bei Ihnen nicht gut sitzt. Den Pullover ohne die "spitze" Form zu stricken ist allerdings nicht so einfach möglich, da die Form schon am Anfang der Passe durch die Zunahmen beidseitig des Musters festgelegt wird. Sie müssten sich vielleicht einen anderen Ponchopullover mit gerader Form heraussuchen. Viel Spaß beim Stöbern!
06.02.2026 - 11:03
![]() Ingrid wrote:
Ingrid wrote:
Vielen lieben Dank.
20.01.2026 - 09:30
![]() Ingrid wrote:
Ingrid wrote:
Hallo und einen schönen Tag, werden wirklich alle Umschläge (Zunahmen) rechts verschränkt gestrickt? Liebe Grüße Ingrid
19.01.2026 - 14:36DROPS Design answered:
Liebe Ingrid, ja genau, diese Maschen werden glattrechts gestrickt, so immer verschränkt, damit kein Loch entsteht und rechts fürs Glattrechts in der Runde. Viel Spaß beim Stricken!
20.01.2026 - 09:20
![]() Aline wrote:
Aline wrote:
Bonjour, Mon pull terminé godille sur le devant mais aussi à l'arrière. Qu’est ce que j’ai loupé ? Aline.
09.06.2025 - 12:28DROPS Design answered:
Bonjour Aline, voulez-vous dire que la pointe du devant et du dos ne tombe pas bien au milieu? Vous pouvez essayer un blocage (humidifiez votre pull et faites-le sécher bien à plat). En espérant que ceci puisse vous aider.
09.06.2025 - 13:49
![]() Davina Williams wrote:
Davina Williams wrote:
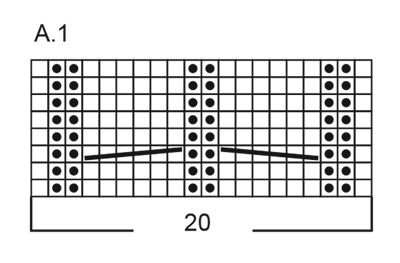
Northern exposure. I am now working on the body the instructions are increase every second row 17 times. 17 x 4 is 68 stitches in total to increase by plus 224 for size large = 292 Stitches When the work measures 4 cm start to decrease yet the diagram shows the pattern as though it is still appears to be increasing I am confused.
06.04.2025 - 10:39DROPS Design answered:
Dear Davina, A.1 is centered in the front and back pieces. You will increase on each side of the charts, so the increases will be in the middle of the front and back pieces. However, so that we get a V-shape, we need to retract or decrease a little on the sides, which we do by decreasing 4 stitches 5 times, evenly, as you continue increasing in A.1. So by the time you finish the increases you will also have decreased 20 stitches: 17x4 + 224 =292, which minus 20 = 272 stitches. Both the increases and the decreases are worked at the same time. Happy knitting!
06.04.2025 - 23:19
![]() Manuela wrote:
Manuela wrote:
Buongiorno, non mi è chiarissimo il passaggio sugli ultimi aumenti dello sprone. Sto lavorando una taglia S e sono arrivata a 292 punti. Gli aumenti successivi si intendono gli 8 del raglan + i 4 ai lati dell' A1 o solo 4 ai lati dell' A1? Io propendo per la seconda ipotesi leggendo perché mi parla lo schema di arrivare a 312 maglie. Ma vorrei un chiarimento. Grazie
15.03.2025 - 17:33DROPS Design answered:
Buonasera Manuela, in quel punto deve aumentare 4 maglie ad ogni giro. Buon lavoro!
12.04.2025 - 18:14
![]() Monique Schweizer wrote:
Monique Schweizer wrote:
Hola. Mi pregunta es si puedo alargar el cuerpo del tejido un poco porque lo siento corto. En ese caso, tengo que seguir aumentando puntos a los lados del patrón A1? Para no deformar el diseño
21.02.2025 - 21:28DROPS Design answered:
Hola Monique, sí, para alargar el tejido tienes que seguir trabajando con A.1 y los aumentos a cada lado de A.1 hasta alcanzar el largo deseado, antes de aumentar puntos repartidos y trabajar el elástico.
23.02.2025 - 23:35
![]() Eeva Aatsinki wrote:
Eeva Aatsinki wrote:
Hei. Puuttuuko etu-ja takakappaleen ohjeen lopusta tekstiä. Kun on neulottu niin, että työn pituus kainalosta on 18cm ja sitten lisäys. Ohjeen mukaan heti resori? Helma näyttää V-muotoiselta, miten se neulotaan?
11.12.2024 - 08:49DROPS Design answered:
Piirroksen A.1 mallineuleen kummallakin puolella lisätään silmukoita ja samalla sivuissa kavennetaan silmukoita. Tällä tavalla myös helmasta tulee V-muotoinen, vaikka joustinneuleen kohdalla ei enää lisätä/kavenneta silmukoita.
19.12.2024 - 18:19
![]() Aline wrote:
Aline wrote:
Bonjour, Je ne sais pas comment faire pour la pointe devant et derriere et les diminutions sur les cotes. Merci.
04.12.2024 - 09:53DROPS Design answered:
Bonjour Aline, avant les côtes en bas du pull, vous devez augmenter entre 48 et 68 mailles à intervalles réguliers, cette leçon vous explique comment procéder. Bon tricot!
04.12.2024 - 16:08
![]() Barbara wrote:
Barbara wrote:
Thank you for your answer. I assume you increase stitches on each side of the central cable while at the same time decreasing at the sides after you have done the 18cm. But how many do you increase on each side of the central cable and how many do you decrease at the side?
29.11.2024 - 21:04DROPS Design answered:
Dear Barbara, the number of increases/decreases is specified in the pattern. You increase on each side of A.1 (= the central cable) when increasing for the raglan, then you aditionally increase on each side 5 more times when working the yoke. Then, in the body, you increase on each side of A.1a total of17 times; meanwhile you start the decreases as specified in the text and decrease 5 times on each side. Happy knitting!
07.12.2024 - 20:40
|
|||||||||||||
Northern Exposure#northernexposuresweater |
|||||||||||||
 |
 |
||||||||||||
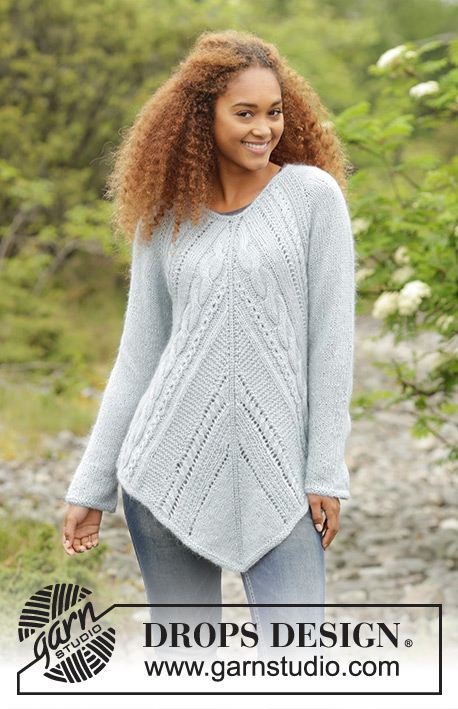
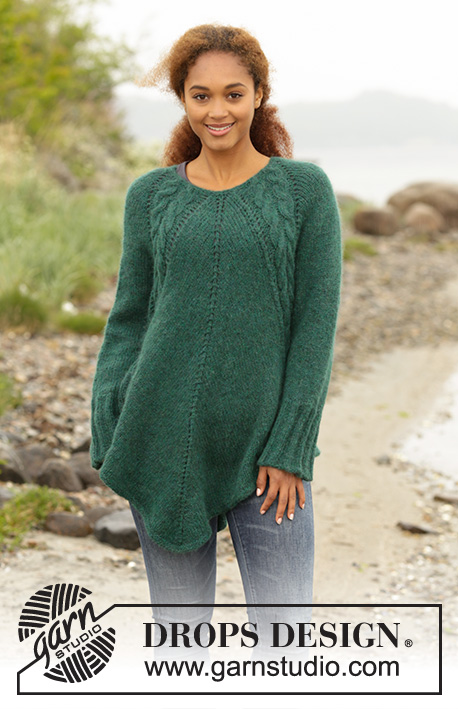
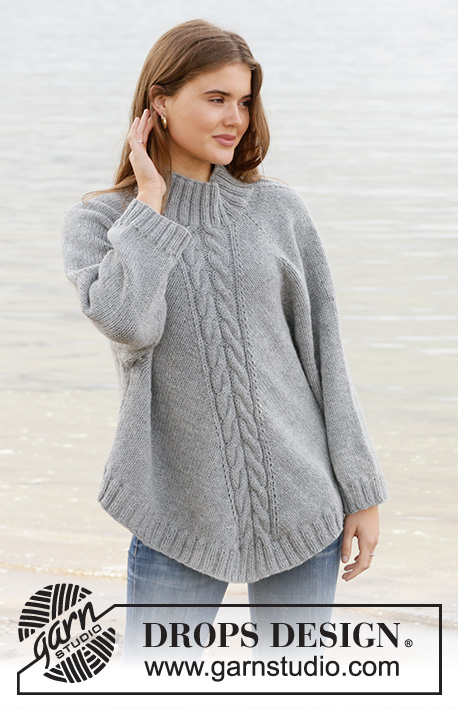
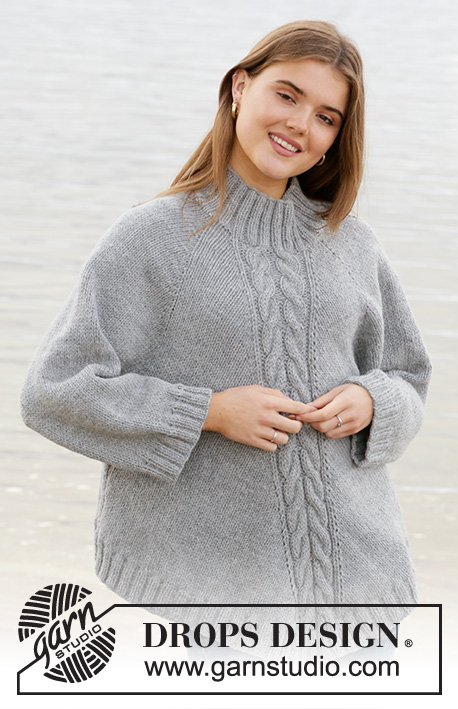
Knitted poncho-jumper with raglan in DROPS Nepal. The piece is worked top down with cables and high neck. Sizes S - XXXL.
DROPS 205-2 |
|||||||||||||
|
------------------------------------------------------- EXPLANATIONS FOR THE PATTERN: ------------------------------------------------------- PATTERN: See diagram A.1. DECREASE/INCREASE TIP (evenly spaced): To work out how to decrease/increase evenly, count the total number of stitches on needle (e.g. 88 stitches), and divide by number of decreases/increases to be made (e.g. 12) = 7.3. In this example, decrease by knitting together approx. each 6th and 7th stitch. When increasing, make 1 yarn over after approx. each 7th stitch. On the next round knit the yarn overs twisted to avoid holes. RAGLAN: A total of 8 stitches increased on the round. Increase as follows on the sleeves: Work as far as the first marker thread, make 1 yarn over after the thread, knit as far as the next marker thread and make 1 yarn over before the thread (= 1 stitches increased on each side of the sleeve). Repeat on the other sleeve (= 4 stitches increased on round). Increase as follows on front and back pieces: Increase 1 stitch on each side of A.1 by making 1 yarn over (= 4 stitches increased on round). Knit all yarn overs twisted on the next round to avoid holes, then work the new stitches in stocking stitch. DECREASE TIP: Decrease 1 stitch on each side of the marker thread as follows: Work until there are 3 stitches left before the marker thread, knit 2 together, knit 2 (marker thread sits between these 2 stitches) slip 1 stitch as if to knit, knit 1 and pass the slipped stitch over the knitted stitch. ------------------------------------------------------- START THE PIECE HERE: ------------------------------------------------------- PONCHO-JUMPER – SHORT OVERVIEW OF THE PIECE: The piece is worked in the round with circular needle, top down. The sleeves are worked in the round with short circular needle/double pointed needles. NECK: Cast on 88-92-96-96-100-108 stitches with short circular needle size 4.5 mm and Nepal. Knit 1 round then work rib (= knit 2/ purl 2) for 8 cm. Knit 1 round where you decrease 12-12-12-12-12-16 stitches evenly spaced – read DECREASE/INCREASE TIP = 76-80-84-84-88-92 stitches. YOKE: Change to short circular needle size 6 mm and work pattern as follows: Insert a marker thread at the beginning of the round (= transition between left sleeve and back piece), knit 3-4-5-5-6-7, make 1 yarn over, work A.1 over the next 20 stitches, 1 yarn over, knit 3-4-5-5-6-7 and insert 1 marker thread here (= transition between back piece and right sleeve), 1 yarn over, knit 12, 1 yarn over, insert a marker thread here (= transition between right sleeve and front piece), knit 3-4-5-5-6-7, 1 yarn over, work A.1 over the next 20 stitches, 1 yarn over, knit 3-4-5-5-6-7 , insert 1 marker thread here (= transition between front piece and left sleeve), 1 yarn over, knit 12, make 1 yarn over. REMEMBER THE KNITTING TENSION! A total of 8 stitches have been increased on the round to RAGLAN – read description above. Increase like this every 2nd round a total of 27-29-31-33-35-37 times = 292-312-332-348-368-388 stitches. Now continue with pattern as before at the same time as you continue to increase on each side of A.1 on the front and back pieces (= 4 stitches increased on round) 5 more times = 312-332-352-368-388-408 stitches. The piece measures approx. 34-36-38-40-42-44 cm. The next round is worked as follows: Work the first 90-96-102-106-112-118 stitches (= back piece), place the next 66-70-74-78-82-86 stitches on 1 thread for sleeve and cast on 8-8-10-10-12-12 new stitches on the needle (= in side under sleeve), work the next 90-96-102-106-112-118 stitches (= front piece), place the next 66-70-74-78-82-86 stitches on 1 thread for sleeve and cast on 8-8-10-10-12-12 new stitches on the needle (= in side under sleeve). Body and sleeves are finished separately. THE PIECE IS NOW MEASURED FROM HERE. BODY: = 196-208-224-232-248-260 stitches. Insert a marker thread in the middle of the 8-8-10-10-12-12 new stitches under each sleeve (= 4-4-5-5-6-6 new stitches on each side of each thread). Continue in the round with stocking stitch and pattern A.1 as before, AT THE SAME TIME continue to increase on each side of A.1 (= 4 stitches increased on the round) every 2nd round a total of 17 times and when the piece measures 4 cm start to decrease on each side – read DECREASE TIP. Decrease like this every 3 cm a total of 5 times = 244-256-272-280-296-308 stitches. Continue working until the piece measures 18 cm. Knit 1 round where you increase 48-52-56-60-64-68 stitches evenly spaced – remember DECREASE/INCREASE TIP = 292-308-328-340-360-376 stitches. Change to circular needle size 4.5 mm and work rib (= knit 2/ purl 2) for 5 cm. Cast off with knit over knit and purl over purl. The piece measures approx. 61-63-65-67-69-71 cm from the shoulder down. SLEEVE: Place the 66-70-74-78-82-86 stitches from the thread on the one side of the piece on short circular needle size 6 mm and knit up 1 stitch in each of the 8-8-10-10-12-12 stitches cast on under the sleeve = 74-78-84-88-94-98 stitches. Insert a marker thread in the middle of the 8-8-10-10-12-12 stitches under the sleeve (4-4-5-5-6-6 new stitches on each side of the thread). Work stocking stitch in the round. When the sleeve measures 2 cm start to decrease under the sleeve – read DECREASE TIP. Decrease like this every 2nd round a total of 6 times, then every 5-4½-2½-1½-1½-1 cm a total of 4-4-6-7-8-8 times = 54-58-60-62-66-70 stitches. When the piece measures 28-26-25-23-22-20 cm increase 10-14-12-14-14-14 stitches evenly spaced = 64-72-72-76-80-84 stitches. Change to circular needle size 4.5 mm and work rib (= knit 2/ purl 2) for 5 cm. Cast off with knit over knit and purl over purl. The sleeve measures approx. 33-31-30-28-27-25 cm. Work the other sleeve in the same way. |
|||||||||||||
Diagram explanations |
|||||||||||||
|
|||||||||||||
 |
|||||||||||||
 |
|||||||||||||
Have you finished this pattern?Tag your pictures with #dropspattern #northernexposuresweater or submit them to the #dropsfan gallery. Do you need help with this pattern?You'll find 25 tutorial videos, a Comments/Questions area and more by visiting the pattern on garnstudio.com. © 1982-2026 DROPS Design A/S. We reserve all rights. This document, including all its sub-sections, has copyrights. Read more about what you can do with our patterns at the bottom of each pattern on our site. |
|||||||||||||


With over 40 years in knitting and crochet design, DROPS Design offers one of the most extensive collections of free patterns on the internet - translated to 17 languages. As of today we count 324 catalogues and 12290 patterns translated into English (UK/cm). 12290
We work hard to bring you the best knitting and crochet have to offer, inspiration and advice as well as great quality yarns at incredible prices! Would you like to use our patterns for other than personal use? You can read what you are allowed to do in the Copyright text at the bottom of all our patterns. Happy crafting!
Post a comment to pattern DROPS 205-2
We would love to hear what you have to say about this pattern!
If you want to leave a question, please make sure you select the correct category in the form below, to speed up the answering process. Required fields are marked *.