
Popular categories
Looking for a yarn?


Comments / Questions (196)
![]() Katinka wrote:
Katinka wrote:
Hartelijk dank voor de reactie. Ik begrijp echter nog steeds niet hoe ik op de 22 opgezette steken (voorkant armsgat) 4 naalden lager moet insteken. Met de verkorte toeren heb ik me nog niet bezig gehouden. Eerst maar kijken of ik de cirkel (A3) voor elkaar krijg.
06.01.2019 - 13:54DROPS Design answered:
Dag Katinka,
Normaal steek je de rechter naald in de steek op de linker naald, maar nu steek je de rechter naald in de middelste van de 3 recht gebreide steken, die je 4 naalden eerder hebt gemaakt.
23.01.2019 - 11:46
![]() Rachelle Loyer wrote:
Rachelle Loyer wrote:
Bonjour, j'aimerais savoir quand vous dites au début du patron de répéter 8 fois A1 en largeur, je n'arrive pas à comprendre. Lorsque je le réalise, j'obtiens un tube et non un cercle plat. Besoin d'aide s'il vous plaît. Merci
05.01.2019 - 17:38DROPS Design answered:
Bonjour Mme Loyer, vous commencez par monter 8 mailles et répétez 8 fois A.1 (= A.1 = 1 maille) en rond (= en largeur). En fonction de la taille, vous augmentez dès le 1er (ou le 2ème) tour, puis tous les 2 tours, le nombre de mailles va augmenter, et le tricot sera ainsi plat et doit former un rond (après A.1 vous avez 6 m dans chaque A.1 x 8 A.1 = 48 mailles). Bon tricot!
07.01.2019 - 10:35
![]() Marie wrote:
Marie wrote:
Bonjour, je ne comprend pas la fin de la veste, la partie avec les rangs raccourcis. 1er tour je laisse 4 mailles avant la torsade, au 2ème tour je vais jusqu'au fil marqueur ou je fais 3 mailles en plus du rang précédent ? Pour le 3ème tour je vais jusqu'à la torsade ou je m'arrête 8 mailles avant la torsade ? Merci de votre réponse c'est mon premier ouvrage aussi complexe et ça n'est pas joli pour le moment
04.01.2019 - 11:50DROPS Design answered:
Bonjour Marie, pour la toute dernière partie de la veste (après les premiers rangs raccourcis des devants/bas de la veste), on tricote au rang 1 jusqu'à ce qu'il reste 4 m avant la torsade, et sur l'envers jusqu'à ce qu'il reste 3 m en plus avant le fil marqueur (début des tours) qu'au rang précédent, au rang 3, vous vous tricotez jusqu'à ce qu'il reste 8 m (= 4 m de plus), et au rang 4 jusqu'à ce qu'il reste 6 m (= 3 m en plus) et ainsi de suite. Bon tricot!
04.01.2019 - 12:52
![]() Katinka wrote:
Katinka wrote:
Ik heb nog een vraagje. Ik heb aan het einde van A2 2x 22 steken afgekant (maat L) en aan het begin van A3 weer 2x 22 steken opgezet. In de derde naald van A3 moet ik weer verlengde steken gaan breien. Moet dit ook op de 2 x 22 steken die ik net opgezet heb? En zo ja, hoe moet ik dan 4 naalden dieper insteken. Of brei ik daar gewoon drie steken recht (en de voorgeschreven omslagen)?
04.01.2019 - 00:32DROPS Design answered:
Dag Katinka
Je breit gewoon verder volgens beschrijving, dus ook over de 22 opgezette steken voor de armsgaten. De verkorte toeren komen pas nadat je A.3 hebt gebreid (en nadat je de eerstee 110 steken op een hulpdraad hebt gezet). Bij verkorte toeren brei je de eerste naald tot er 3 steken over zijn voor de volgende markeerdraad en dan keer je het werk; steekt niet 3 steken dieper in.
06.01.2019 - 13:38
![]() Niina wrote:
Niina wrote:
Hei! En ymmärrä kohtaa vasemman etukappaleen alaosa: 2.KERROS (nurja puoli): Neulo kunnes merkkilankaa (kerroksen vaihtumiskohtaa) edeltää 3 silmukkaa enemmän kuin edellisellä kerralla... onko käännös 3 silmukkaa aikaisemmin kuin mitä on tehty etukappaleet ja takakappaleen alaosan viimeinen käännös vai samassa kohtaa kun on käännös tehty ensimmäisen kerran etu- ja takakappaleiden aikana?
03.01.2019 - 10:44DROPS Design answered:
Hei, työ käännetään 3 silmukkaa aikaisemmin kuin edellisellä kerralla.
03.01.2019 - 14:18Rachael wrote:
An Alternative Short Row Technique that can be used is 'Wrap & turn'. Very effective to eliminate holes that can still appear when following the Drops Short Rows Tutorial.
05.12.2018 - 23:00
![]() Rachael wrote:
Rachael wrote:
An alternative increase option that renders the stitches almost invisible is the M1R/M1L (Make 1 right / Make 1 Left) Technique.
05.12.2018 - 22:56
![]() Katinka wrote:
Katinka wrote:
Bedankt voor het antwoord. Ik gaf echter in mijn vraag al aan dat ik een steek in de voorste en een steek in de achterste lus brei. Ik wil zo graag weten of er nog een (onzichtbare) methode bestaat om te meerderen. In het antwoord lijkt een tweede zin te beginnen, maar na het woordje ‘In’ wordt het bericht afgebroken. Ik hoop dat u mij nog verder kunt helprn.
28.11.2018 - 15:14DROPS Design answered:
Dag Katinka
Een andere manier van 'onzichtbaar' meerderen is door het lusje tussen 2 steken van de vorige toer op de linker naald te zetten en deze gedraaid te breien. In deze video kun je zien hoe je dat doet.
09.12.2018 - 17:17
![]() Katinka wrote:
Katinka wrote:
Enthousiast ben ik aan dit vest begonnen, maar ben niet zeker over de voortgang. Hoe moet je de eerste naald van A2 breien (m.n. de meerderingen)? Ik brei steeds 1 recht voorin en 1 recht achterin de steek. Het resultaat is steeds een horizontaal streepje, waardoor deze hele naald erg rommelig wordt. Bovendien worden de ‘stralen’ van de ster hierdoor onderbroken, waardoor het werk er nog slordiger uitziet. Is er een andere methode om 2 steken in 1 steek te breien? Alvast hartelijk dank.
25.11.2018 - 15:07DROPS Design answered:
Dag Katinka,
2 steken in 1 steek breien kun je het beste doen door in de voorste en de achterste lus van de steek te breien. In deze video zie je hoe je dat doet.
28.11.2018 - 12:47Vera wrote:
Do you ship to Canada or Germany? How much would this cost?
21.11.2018 - 23:32DROPS Design answered:
Dear Vera, yes we ship in both countries see DROPS stores shipping to USA and DROPS stores shipping to Germany. Happy knitting!
22.11.2018 - 09:05
|
|||||||||||||||||||||||||||||||
Empress#empressjacket |
|||||||||||||||||||||||||||||||
 |
 |
||||||||||||||||||||||||||||||
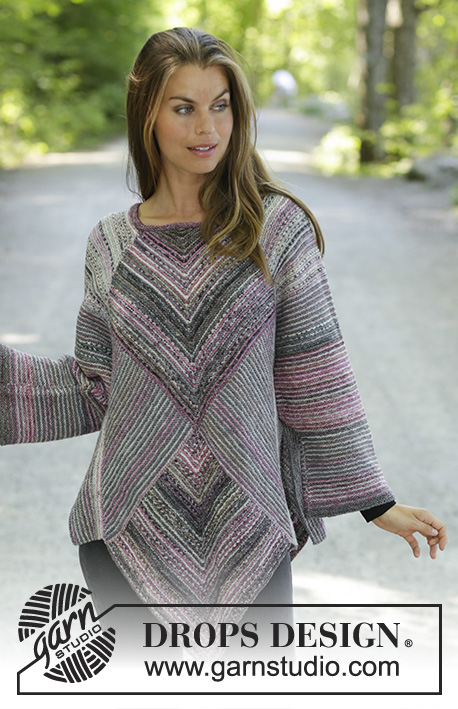
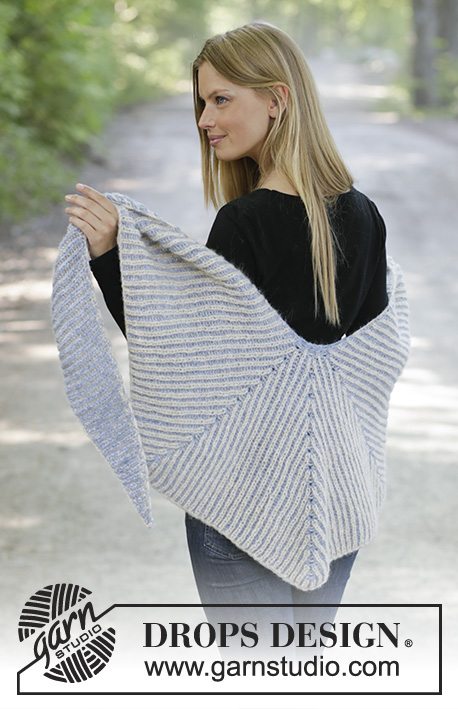
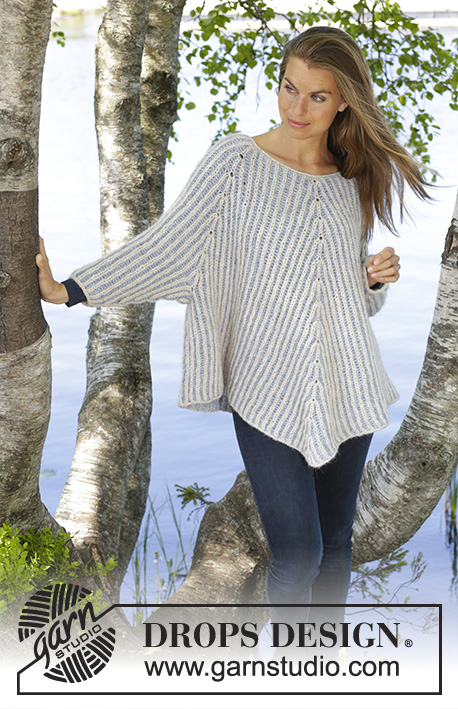
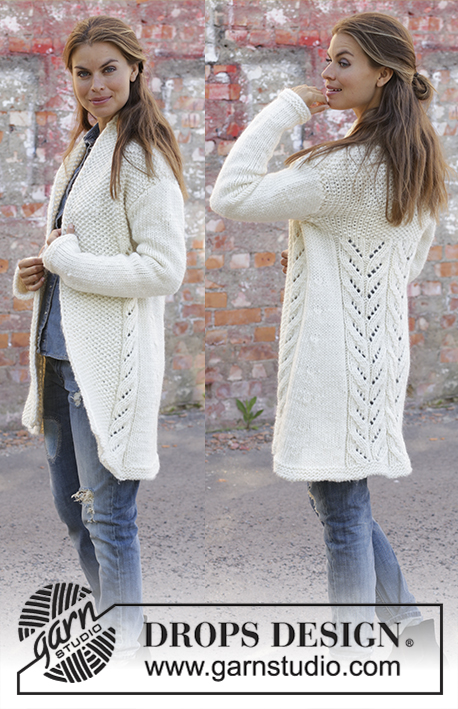
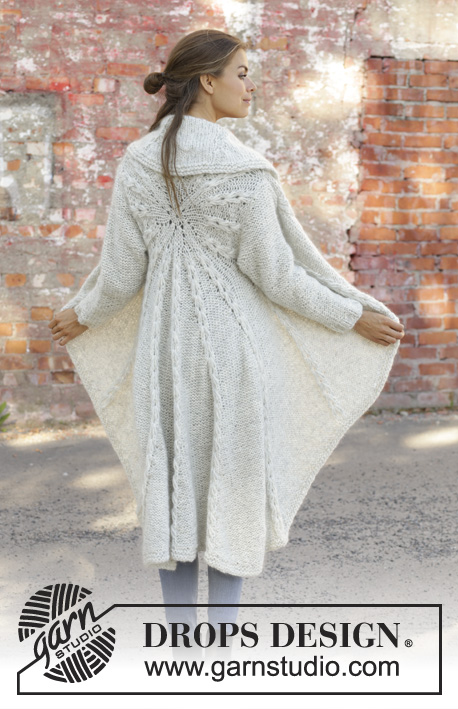
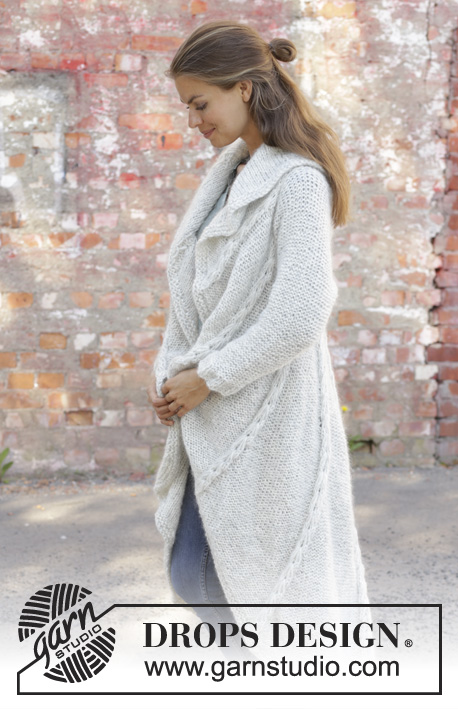
Knitted long circle jacket in 1 strand DROPS Air and 1 strand DROPS Brushed Alpaca Silk. The piece is worked in the round in a circle with texture. Sizes S - XXXL.
DROPS 194-17 |
|||||||||||||||||||||||||||||||
|
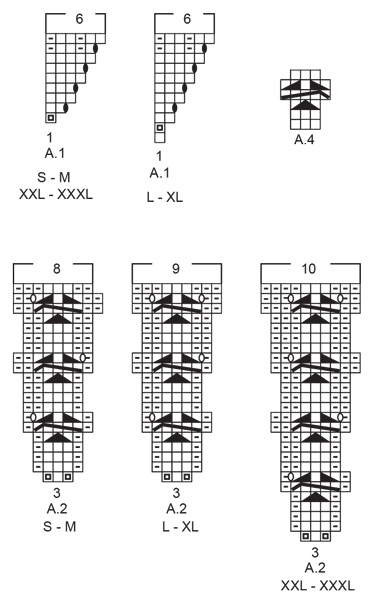
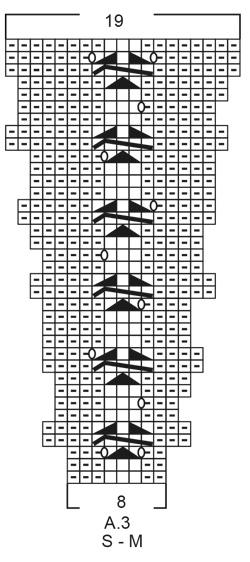
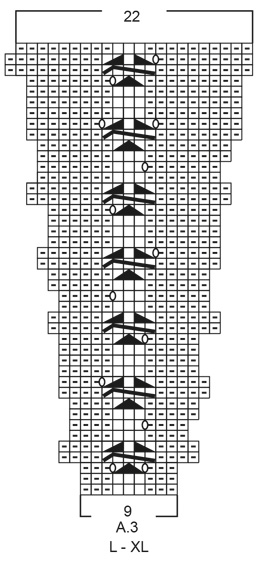
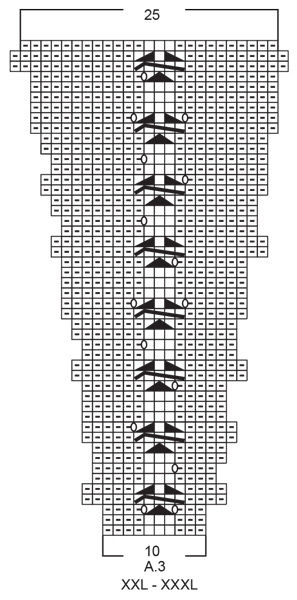
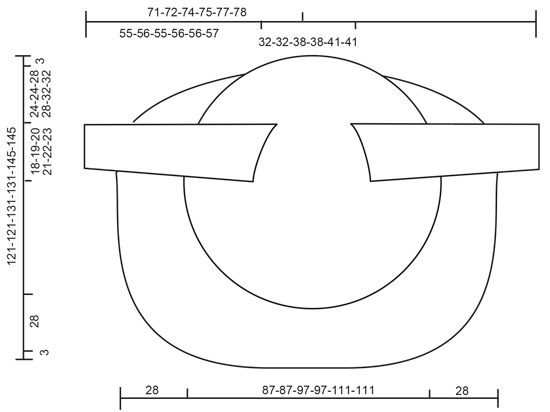
------------------------------------------------------- EXPLANATIONS FOR THE PATTERN: ------------------------------------------------------- RIDGE/GARTER STITCH (worked in the round): 1 ridge = 2 rounds. Knit 1 round and purl 1 round. RIDGE/GARTER STITCH (worked back and forth): 1 ridge = knit 2 rows. PATTERN: See diagrams A.1 to A.4. Choose diagram for your size. The diagrams show all the rows in the pattern seen from the right side! DECREASE TIP (for sleeves): All decreases are made from the side in purl! Decrease 1 stitch by purling 2 stitches together ------------------------------------------------------- START THE PIECE HERE: ------------------------------------------------------- CIRCLE JACKET - SHORT OVERVIEW OF THE PIECE: The piece is worked in the round in a circle from the middle of the back outwards. Change to circular needle(s) when necessary. Then work back and forth with short rows for the front pieces and down the back. The sleeves are worked top down in stocking stitch with the wrong side out. Because of the weight of the yarn, the garment will stretch somewhat after use. CIRCLE JACKET: CIRCLE: Cast on 8 stitches with double pointed needles size 8 mm and 1 strand Air and 1 strand Brushed Alpaca Silk (= 2 strands). Divide the stitches between 4 needles so that there are 2 stitches on each. Insert a marker thread at the beginning of the round. Allow the marker thread to follow your work onwards. Work pattern in the round according to A.1 – choose diagram for your size, a total of 8 times on the round. REMEMBER THE KNITTING TENSION! When A.1 is finished, there are 48 stitches on the round. Now work pattern as follows: Work A.2 – choose diagram for your size, a total of 16 times on the round. After the next-to-last round in A.2 there are 128-128-144-144-160-160 stitches on the round. The last round in A.2 is worked as follows: Work the first 39-39-45-45-49-49 stitches (there is now 1-1-0-0-1-1 stitch left in the last repeat of A.2 worked), insert a new marker thread here (follows your work onwards and is later used when you work short rows from the front pieces and down the body on the back piece), cast off the next 20-21-22-23-24-25 stitches (= armhole), work the next 49-47-55-53-63-61 stitches, cast off the last 20-21-22-23-24-25 stitches (= armhole). The piece measures approx. 39-39-41-41-47-47 cm in diameter. The next round is worked as follows: Work A.3 – choose diagram for your size (= 8-8-9-9-10-10 stitches on the first round in the diagram) a total of 16 times on the round and at the same time cast on 20-21-22-23-24-25 new stitches on the needle where the stitches were cast off for the armholes = 128-128-144-144-160-160 stitches. Continue in the round with A.3 until the whole diagram has been completed in height. There are now 304-304-352-352-400-400 stitches on the round. The piece measures approx. 87-87-97-97-111-111 cm in diameter. Cut the strand. Place the first 94-94-110-110-124-124 stitches on the round (= stitches between the 2 marker threads) on a thread. FRONT PIECES AND DOWN THE BODY: There are now 210-210-242-242-276-276 stitches for the front pieces and down the body on the back piece. Start from the right side after the second marker thread and work short rows back and forth for the front pieces and down the body on the back piece as follows: ROW 1 (right side): Purl over purl and work A.4 (= 3 stitches) over each cable until there are 3 stitches left before the next marker thread (i.e. start of round), turn. ROW 2 (wrong side): Work back until there are 3 stitches left before the marker thread, turn. ROW 3: Purl over purl and work A.4 over each of the cables until there are 6 stitches left before the marker thread, AT THE SAME TIME increase 1 purled stitch after each cable/A.4, turn. ROW 4: Work back until there are 6 stitches left before the marker thread, turn. Continue back and forth like this by working 3 fewer stitches than the previous row and increase 1 stitch after each cable/A.4 every 4th row until you have worked 7 repeats of A.4 in height (= 42 rows). The piece measures approx. 72-72-77-77-84-84 cm from the middle of the circle and down mid back. The last row is worked from the wrong side. Do not cut the strand. Insert a marker thread in the middle cable/A.4 mid back of jacket. Continue back and forth with pattern as before over the bottom of the left front piece as follows: ROW 1 (right side): Work until there are 4 stitches left before the cable/A.4 with the marker thread mid back, turn. ROW 2 (wrong side): Work until there are 3 more stitches left before the marker thread than the previous row (start of round), AT THE SAME TIME increase 1 purled stitch after each cable/A.4, turn. ROW 3 (right side): Work until there are 4 more stitches than last time left before the cable/A.4 with the marker thread mid back, turn. ROW 4 (wrong side): Work until there are 3 more stitches before the marker thread than the previous row, turn. Continue back and forth with pattern and increase after each cable/A.4 every 4th row until you have worked 3 repeats of A.4 in height (= 18 rows). Cut the strand. Start from the right side and after A.4/mid back and work short rows back and forth over the bottom of the right front piece in the same way, but reversed, i.e. each row from the wrong side is turned when there are 4 more stitches before the cable/A.4 with the marker thread mid back than the previous time and on each row from the right side is turned when there are 3 more stitches left than the previous time. EDGE: Place all stitches on the circle back on circular needle and work 2 RIDGES – read description above, around the whole circle. Cast off, but to avoid the cast-off edge being tight you can make 1 yarn over after approx. each 5th stitch - the yarn overs are cast off as normal stitches. SLEEVE: The sleeve is worked in stocking stitch with the wrong side out (reversed stocking stitch). Cast on 11-11-12-12-14-14 stitches with circular needle size 8 mm and 1 strand Air and 1 strand Brushed Alpaca Silk (= 2 strands). Work stocking stitch back and forth, AT THE SAME TIME cast on new stitches at the end of each row in each side as follows: Cast on 2 stitches 2 times, 1 stitch 3-4-5-6-6-7 times, 2 stitches 1 time and 4 stitches 1 time = 37-39-42-44-46-48 stitches. THE PIECE IS NOW MEASURED FROM HERE. Continue back and forth with stocking stitch and 1 edge stitch in GARTER STITCH – read description above, in each side. When the piece measures 4 cm decrease 1 stitch inside the 1 edge stitch in garter stitch in each side – read DECREASE TIP. Decrease like this every 7-6-6-5-5-4 cm a total of 6-7-7-8-8-9 times = 25-25-28-28-30-30 stitches. When the piece measures 42-42-40-40-39-39 cm increase 7-7-4-9-7-7 stitches evenly on row = 32-32-32-37-37-37 stitches. Change to circular needle size 7 mm. Work rib, starting from the side with purl (reversed stocking stitch/the wrong side out) as follows: 1 edge stitch in garter stitch (knit 2, purl 3) until there is 1 stitch left, 1 edge stitch in garter stitch. When the rib measures 5 cm cast off with knit over knit and purl over purl. The sleeve measures approx. 55-56-55-56-56-57 cm from the sleeve cap down. Work the other sleeve in the same way. ASSEMBLY: Sew sleeves to body inside the cast-off/cast-on edge. Sew sleeve seams. Make sure that the seam is not tight. |
|||||||||||||||||||||||||||||||
Diagram explanations |
|||||||||||||||||||||||||||||||
|
|||||||||||||||||||||||||||||||
 |
|||||||||||||||||||||||||||||||
 |
|||||||||||||||||||||||||||||||
 |
|||||||||||||||||||||||||||||||
 |
|||||||||||||||||||||||||||||||
 |
|||||||||||||||||||||||||||||||
Have you finished this pattern?Tag your pictures with #dropspattern #empressjacket or submit them to the #dropsfan gallery. Do you need help with this pattern?You'll find 31 tutorial videos, a Comments/Questions area and more by visiting the pattern on garnstudio.com. © 1982-2026 DROPS Design A/S. We reserve all rights. This document, including all its sub-sections, has copyrights. Read more about what you can do with our patterns at the bottom of each pattern on our site. |
|||||||||||||||||||||||||||||||


With over 40 years in knitting and crochet design, DROPS Design offers one of the most extensive collections of free patterns on the internet - translated to 17 languages. As of today we count 324 catalogues and 12245 patterns translated into English (UK/cm). 12245
We work hard to bring you the best knitting and crochet have to offer, inspiration and advice as well as great quality yarns at incredible prices! Would you like to use our patterns for other than personal use? You can read what you are allowed to do in the Copyright text at the bottom of all our patterns. Happy crafting!
Post a comment to pattern DROPS 194-17
We would love to hear what you have to say about this pattern!
If you want to leave a question, please make sure you select the correct category in the form below, to speed up the answering process. Required fields are marked *.