
Popular categories
Looking for a yarn?


Comments / Questions (23)
![]() Françoise LELARGE wrote:
Françoise LELARGE wrote:
Bonjour, Je voudrais tricoter se modèle avec un fil supplémentaire KID silk est-ce possible. (air + kid silk) combien de pelotes me faudrait-il de chaque. Cela me ferait un gilet plus volumineux et chaud. Merci de votre réponse.
22.10.2019 - 11:40DROPS Design answered:
Bonjour Mme Lelarge, en tricotant 1 fil Air + 1 fil Kid-Silk, vous obtiendrez un échantillon différent, correspondant au groupe D de nos fils (plus d'infos sur les alternatives ici). Il vous faudrait donc rechercher davantage parmi les modèles du groupe D. Bon tricot!
22.10.2019 - 13:00
![]() DUVAL MT wrote:
DUVAL MT wrote:
Comment puis-je transcrire le modèle pour la taille XL afin de le réaliser avec des aiguilles droites car je n'arrive pas à utiliser des aiguilles circulaires ?
14.09.2019 - 09:58DROPS Design answered:
Bonjour Mme Duval, seules les manches de ce modèle se tricotent en rond, vous trouverez ici comment adapter un modèle sur aiguilles droites. Bon tricot!
16.09.2019 - 08:56
![]() Karme wrote:
Karme wrote:
Hola, yo he llegado a los 14,5 cm y tego 243 puntos en las agujas. Ahora he de dejar de aumentar y seguir tejiendo como se presentan los puntos ? hasta los 22 cm? Gracias, por su pronta respuesta. un saludo. karme
02.09.2019 - 18:10DROPS Design answered:
Hola Karme. Si tu estás trabajando la talla S, tienes que aumentar para el raglán hasta que la labor mida 14 cm y después trabajar sin aumentos como se presentan los puntos hasta 20 cm, Si estás trabajando otra talla consulta el patrón para las medidas correspondientes.
05.09.2019 - 20:51
![]() Karme wrote:
Karme wrote:
Los graficos que se empiezan de izquierda a derecha por el derecho?
31.08.2019 - 17:52DROPS Design answered:
Hola Karme. Los graficos se leen de abajo arriba y de derecha a izquierda por el lado derecho y de izquierda a derecha por el lado revés.
31.08.2019 - 19:16Oksana wrote:
There is no short rows on back of the neck, but there is difference of 4 cm between neck of the back and front seen on diagramm. Could you please specify on which account it appeares. Thanks!
27.08.2018 - 10:51DROPS Design answered:
Hello! The difference from the back of the neck to the front of the neck is on the width (i.e, the back of the neack is wider than the front of the neck). The height (4 cm) is the same for both front and back of the neck. Happy Knitting!
30.08.2018 - 13:27
![]() Nanna wrote:
Nanna wrote:
En meget smuk trøje, som strikkes i L. Er dog i tvivl om udtagningers på bærestykket, da resultat er 241 og ikke 271? Er der flere udtagninger end i mønster. Synes ikke dette fremgår klart af opskriften.
14.08.2018 - 16:45DROPS Design answered:
Hej Nanna, ja er den ikke fin :) Du starter med 94 masker, tager 25 masker ud jævnt fordelt på første pind i str 5,5. Tager 8 masker ud 19 gange (152 m) = ialt 271 m - God fornøjelse!
15.08.2018 - 08:17
![]() Krista De Backer wrote:
Krista De Backer wrote:
Ik zou graag de telpatronen A3,A5 en A6 verder uittekenen. Kunt u mij zeggen met welk programma Drops de telpatronen uittekent? Groetjes
24.07.2018 - 15:34
![]() Krista De Backer wrote:
Krista De Backer wrote:
Hoe wordt de omslag in het telpatroon gebreid: gedraaid rechts of gedraaid averechts?
22.07.2018 - 13:45DROPS Design answered:
Dag Krista, In dit geval worden deze gedraaid averecht gebreid.
07.08.2018 - 09:40
![]() FURSTENBERGER Michèle wrote:
FURSTENBERGER Michèle wrote:
Bonjour, j'ai encore besoin de vos lumières, je n'arrive pas à faire le point fantaisie et choisir le diagramme à tricoter jusqu'à la séparation devant dos manches ainsi que le raglan, en fait tout le haut. Merci de m'indiquer en détail pour une taille XL, car le gilet me plais énormément.
19.04.2018 - 12:54DROPS Design answered:
Bonjour Mme Furstenberger, les cases blanches se tricotent toujours à l'endroit sur l'endroit et à l'envers sur l'envers. Celles avec une croix se tricotent à l'endroit sur l'envers = point mousse. A.4 = 16 m = Rang 1 (endroit): 16 m end. Rang 2 (envers): (1 m env, 2 m end) x 5, 1 m env. Répétez ces 2 rangs. A.1 se tricote en jersey endroit. Tricotez A.2, A.3 et A.5 comme pour A.4, mais tricotez les jetés torse (= pas de trou) au rang suivant soit à l'end (= si croix), soit à l'env (= si case blanche) au rang suivant. Suivez bien les diagrammes A.2, A.3 et A.6 indiqués pour la taille XL. Bon tricot!
19.04.2018 - 13:35
![]() FURSTENBERGER Michèle wrote:
FURSTENBERGER Michèle wrote:
Bonjour, Je vous ai adressé un autre message pour le modele 187-35 je n'ai pas eu de réponse, je vous demandais de bien vouloir m'expliquer l'empiècement de ce gilet en m'indiquant quels sont les diagrammes pour une taille xxl , à partir de quel rang je dois mettre les marqueurs et surtout les augmentations à faire. Je vous remercie beaucoup de reponse, je serais tellement contente de réussir ce gilet. A bientot de vous lire.
11.04.2018 - 09:59DROPS Design answered:
Bonjour Mme Furstenberger, nous n'avons aucune question de votre part sous le modèle du sac DROPS 187-35>/a>, pour votre question relative à ce modèle, vous trouverez la réponse ci-dessous. Bon tricot!
11.04.2018 - 13:48
|
||||||||||
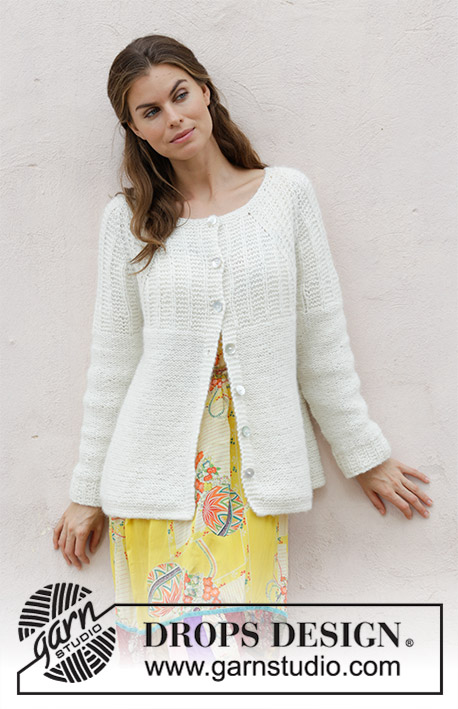
Sweet Pearl Jacket#sweetpearljacket |
||||||||||
 |
 |
|||||||||
Knitted jacket with garter stitch and raglan, worked top down. Sizes S - XXXL. The piece is worked in DROPS Air.
DROPS 187-38 |
||||||||||
|
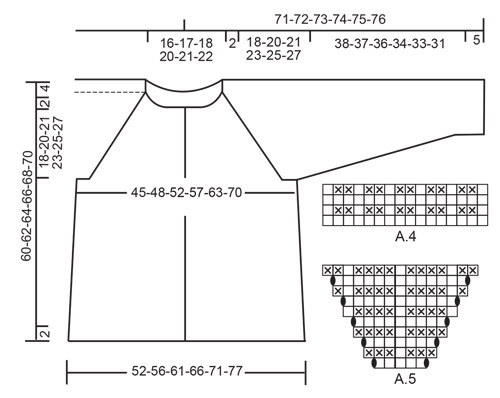
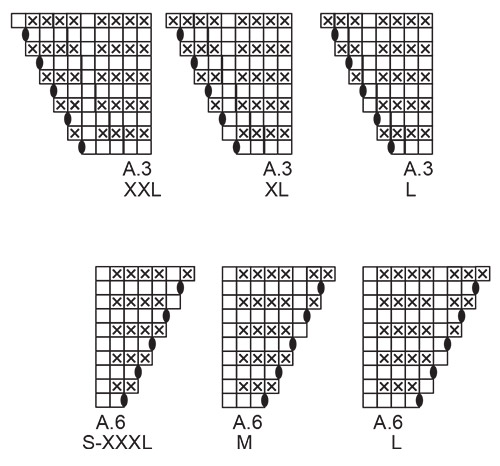
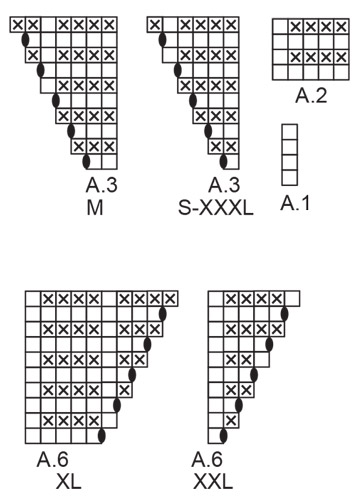
INFORMATION FOR THE PATTERN: RIDGE/GARTER STITCH (worked back and forth): 1 ridge = Knit 2 rows. RIDGE/GARTER STITCH (worked in the round – for the sleeves): 1 ridge = 2 rounds. Knit 1 round and purl 1 round. PATTERN: See diagrams A.1 to A.6. Choose diagram for your size in A.3 and A.6. The diagrams show all the rows in the pattern seen from the right side. INCREASE TIP (for body): Work until there are 2 stitches left before the marker thread, 1 yarn over, work 4 stitches (the marker thread sits in the middle of these 4 stitches), 1 yarn over (= 2 stitches increased). Repeat at both marker threads (= 4 stitches increased). DECREASE TIP (for sleeves): Decrease1 stitch on each side of the marker thread as follows: Work until there are 3 stitches left before the marker thread, slip 1 stitch as if to knit, knit 1, pass the slipped stitch over the knitted stitch, knit 2 stitches (the marker thread sits in the middle of these 2 stitches), knit the next 2 stitches together (= 2 stitches decreased). BUTTONHOLE: Work buttonholes on the right band (when the garment is worn). Work from the right side, when there are 3 stitches left on the row as follows: Make 1 yarn over, knit the next 2 stitches together and knit the last stitch. On the next row knit the yarn over to leave a hole. The first buttonhole is worked when the yoke measures approx. 1½-2 cm. Then work the other 6-6-7-7-7-7 buttonholes with 8-8-7½-7½-8-8 cm between each one. ---------------------------------------------------------- JACKET: The yoke and body are worked back and forth, top down. The sleeves are worked in the round with double pointed needles. YOKE: Cast on 86-90-94-98-102-106 stitches (including 5 band stitches on each side of the piece) with circular needle size 4.5 mm. Work 2 RIDGES – see description above. Change to circular needle size 5.5 mm. Knit 1 row and increase 25 stitches (by making yarn overs) evenly on row (do not increase over the first and the last 5 stitches = bands) = 111-115-119-123-127-131 stitches. Knit 1 row from the wrong side; the yarn overs are knitted twisted to avoid holes. Read BUTTONHOLE – see description above. Then work pattern from the right side as follows: Work as follows over the left front piece: Work 5 band stitches in garter stitch, A.1 (= 1 stitch), A.2 (= 5 stitches) over the next 5-5-5-5-5-10 stitches (= 1-1-1-1-1-2 times in width), A.3 (= 1-2-3-4-5-1 stitches). Work as follows over left sleeve: Work A.4 (= 16 stitches), A.5 (= 5 stitches), A.4 over 16 stitches. Work as follows over the back piece: Work A.6 (= 2-3-4-5-1-2 stitches), A.2 over 10-10-10-10-15-20 stitches, A.3 over 1-2-3-4-5-1 stitches. Work as follows over right sleeve: Work A.4 over 16 stitches, A.5 over 5 stitches, A.4 over 16 stitches. Work as follows over right front piece: Work A.6 over 2-3-4-5-1-2 stitches, A.2 over 5-5-5-5-10-10 stitches and finish with 5 band stitches in garter stitch. Continue the pattern and increase as shown in A.3, A.5 and A.6 (i.e. increase 1 stitch on each side of each A.4 = a total of 8 stitches increased on each row from the right side). The increased stitches are worked twisted into the pattern as you go, there should not be holes. The band stitches are worked in garter stitch to finished length. REMEMBER THE KNITTING TENSION! Diagram A.1, A.2 and A.4 are repeated in height. When A.3, A.5 and A.6 have been worked 1 time in height, continue to increase and the increased stitches are worked into the pattern as before. Increase on each side of each A.4 a total of 14-16-19-21-24-27 times (including the increases in A.3, A.5 and A.6) = 223-243-271-291-319-347 stitches. Then continue with garter stitch over garter stitch and stocking stitch over stocking stitch until the piece measures 20-22-23-25-27-29 cm from the neckline. Now divide sleeves and body from the right side as follows: Work 5 band stitches in garter stitch, purl 32-34-37-41-46-52 stitches (= left front piece), place the next 43-49-57-59-63-65 stitches on a thread (= sleeve), cast on 8-10-10-10-10-8 stitches under the sleeve, purl 63-67-73-81-91-103 stitches (= back piece), place the next 43-49-57-59-63-65 stitches on a thread (= sleeve), cast on 8-10-10-10-10-8 stitches under the sleeve, purl 32-34-37-41-46-52 stitches and finish with 5 band stitches in garter stitch. Body and sleeves are now finished separately. BODY: = 153-165-177-193-213-233 stitches. Continue working in stocking stitch, but with the wrong side out, i.e. knit from the wrong side and purl from the right side with 5 band stitches in garter stitch in each side of the piece. Insert 1 marker thread 41-44-47-51-56-61 stitches in from each side of the piece (= front pieces = 71-77-83-91-101-111 stitches on back piece). When the piece measures 4 cm from the division of the body and sleeves, increase 1 stitch on each side of the marker threads (= 4 stitches increased) – read INCREASE TIP! Increase like this every 4 cm a total of 6-6-7-7-6-6 times = 177-189-205-221-237-257 stitches. When the piece measures 34-34-35-35-35-35 cm from the division of body and sleeves, change to circular needle size 4.5 mm and work 3 ridges. Cast off. Make sure that the cast off edge is not tight; you can cast off with a 1 size larger needle if necessary. The piece measures a total of approx. 56-58-60-62-64-66 cm from the neck edge. SLEEVE: The piece is worked in the round with double pointed needles. Place the 43-49-57-59-63-65 stitches from the thread on the one side of the piece on double pointed needles size 5.5 mm and knit up 1 stitch in each of the 8-10-10-10-10-8 stitches cast on the body mid under sleeve = 51-59-67-69-73-73 stitches. Insert a marker thread in the middle of the new stitches. Continue with garter stitch over garter stitch and knit over knit; the 8-10-10-10-10-8 new stitches under the sleeve are worked in garter stitch. When the piece measures 3 cm from the division of sleeve and body, decrease 2 stitches mid under sleeve – read DECREASE TIP! Decrease every 5½-4-2½-2-2-2 cm a total of 6-8-12-12-14-12 times = 39-43-43-45-45-49 stitches. AT THE SAME TIME when the sleeve measures 5 cm from where the division of sleeve and body, continue with stocking stitch from the wrong side, i.e. turn the piece and knit in the round on the wrong side. When the piece measures 38-37-36-34-33-31 cm change to double pointed needles size 4.5 mm and work rib (purl 1, 2 stitches GARTER STITCH – see description above) in the round from the wrong side, AT THE SAME TIME as you decrease 0-1-1-0-0-1 stitch on the first row = 39-42-42-45-45-48 stitches. Cast off when the piece measures 43-42-41-39-38-36 cm from the division of sleeve and body. Make sure that the cast-off edge is not tight; you can cast off with a 1 size larger needle if necessary. The piece measures a total of 63-64-64-64-65-65 cm from the neck edge. Work the other sleeve in the same way. ASSEMBLY: Sew the buttons onto the left band. |
||||||||||
Diagram explanations |
||||||||||
|
||||||||||
 |
||||||||||
 |
||||||||||
 |
||||||||||
Have you finished this pattern?Tag your pictures with #dropspattern #sweetpearljacket or submit them to the #dropsfan gallery. Do you need help with this pattern?You'll find 28 tutorial videos, a Comments/Questions area and more by visiting the pattern on garnstudio.com. © 1982-2026 DROPS Design A/S. We reserve all rights. This document, including all its sub-sections, has copyrights. Read more about what you can do with our patterns at the bottom of each pattern on our site. |
||||||||||


With over 40 years in knitting and crochet design, DROPS Design offers one of the most extensive collections of free patterns on the internet - translated to 17 languages. As of today we count 324 catalogues and 12290 patterns translated into English (UK/cm). 12290
We work hard to bring you the best knitting and crochet have to offer, inspiration and advice as well as great quality yarns at incredible prices! Would you like to use our patterns for other than personal use? You can read what you are allowed to do in the Copyright text at the bottom of all our patterns. Happy crafting!
Post a comment to pattern DROPS 187-38
We would love to hear what you have to say about this pattern!
If you want to leave a question, please make sure you select the correct category in the form below, to speed up the answering process. Required fields are marked *.